用ThreadPoolExecutor的时候,又想知道被执行的任务的执行情况,这时就可以用FutureTask。
ThreadPoolTask
package com.paul.threadPool;
import java.io.Serializable;
import java.util.concurrent.Callable;
public class ThreadPoolTask implements Callable<String>, Serializable {
  private static final long serialVersionUID = 0;
  // 保存任务所需要的数据
  private Object threadPoolTaskData;
  private static int consumeTaskSleepTime = 2000;
  public ThreadPoolTask(Object tasks) {
    this.threadPoolTaskData = tasks;
  }
  public synchronized String call() throws Exception {
    // 处理一个任务,这里的处理方式太简单了,仅仅是一个打印语句
    System.out.println("开始执行任务:" + threadPoolTaskData);
    String result = "";
    // //便于观察,等待一段时间
    try {
//      long r = 5/0;
      for ( int i= 0 ; i< 100000000 ; i++){
      }
      result = "OK";
    } catch (Exception e) {
      e.printStackTrace();
      result = "ERROR";
    }
    threadPoolTaskData = null;
    return result;
  }
}
模拟客户端提交的线程
package com.paul.threadPool;
import java.util.concurrent.ExecutionException;
import java.util.concurrent.FutureTask;
import org.springframework.scheduling.concurrent.ThreadPoolTaskExecutor;
public class StartTaskThread implements Runnable{
 private ThreadPoolTaskExecutor threadPoolTaskExecutor;
 private int i;
 public StartTaskThread(ThreadPoolTaskExecutor threadPoolTaskExecutor,int i)
 {
 this.threadPoolTaskExecutor = threadPoolTaskExecutor;
 this.i = i;
 }
 @Override
 public synchronized void run() {
 String task = "task@ " + i;
 System.out.println("创建任务并提交到线程池中:" + task);
 FutureTask<String> futureTask = new FutureTask<String>(
 new ThreadPoolTask(task));
 threadPoolTaskExecutor.execute(futureTask);
 // 在这里可以做别的任何事情
 String result = null;
 try {
 // 取得结果,同时设置超时执行时间为0.1秒。同样可以用future.get(),不设置执行超时时间取得结果
 result = futureTask.get();
 } catch (InterruptedException e) {
 futureTask.cancel(true);
 } catch (ExecutionException e) {
 futureTask.cancel(true);
 } catch (Exception e) {
 futureTask.cancel(true);
 // 超时后,进行相应处理
 } finally {
 System.out.println("task@" + i + ":result=" + result);
 }
}
SPRING配置文件
<?xml version="1.0" encoding="UTF-8" ?> <beans xmlns="http://www.springframework.org/schema/beans" xmlns:xsi="http://www.w3.org/2001/XMLSchema-instance" xmlns:p="http://www.springframework.org/schema/p" xmlns:aop="http://www.springframework.org/schema/aop" xmlns:tx="http://www.springframework.org/schema/tx" xsi:schemaLocation=" http://www.springframework.org/schema/beans http://www.springframework.org/schema/beans/spring-beans-2.5.xsd http://www.springframework.org/schema/tx http://www.springframework.org/schema/tx/spring-tx-2.5.xsd http://www.springframework.org/schema/aop http://www.springframework.org/schema/aop/spring-aop-2.5.xsd"> <!-- 配置数据源 --> <bean id="dataSource" class="org.apache.commons.dbcp.BasicDataSource" destroy-method="close" p:driverClassName="com.mysql.jdbc.Driver" p:url="jdbc:mysql://localhost:3306/mb_main?useUnicode=true&characterEncoding=UTF-8&useServerPrepStmts=true" p:username="root" p:password="1234" /> <!-- 配置Jdbc模板 --> <bean id="jdbcTemplate" class="org.springframework.jdbc.core.JdbcTemplate" p:dataSource-ref="dataSource" /> <!-- 事务管理器 --> <bean id="transactionManager" class="org.springframework.jdbc.datasource.DataSourceTransactionManager" p:dataSource-ref="dataSource" /> <tx:advice id="jdbcTxAdvice" transaction-manager="transactionManager"> <tx:attributes> <tx:method name="*" /> </tx:attributes> </tx:advice> <!-- 使用aop/tx命名空间配置事务管理,这里对service包下的服务类方法提供事务 --> <aop:config> <aop:pointcut id="jdbcServiceMethod" expression="within(com.baobaotao.service..*)" /> <aop:advisor pointcut-ref="jdbcServiceMethod" advice-ref="jdbcTxAdvice" /> </aop:config> <!-- 配置dao <bean id="loginLogDao" class="com.baobaotao.dao.LoginLogDao" p:jdbcTemplate-ref="jdbcTemplate" /> <bean id="userDao" class="com.baobaotao.dao.UserDao" p:jdbcTemplate-ref="jdbcTemplate" /> <bean id="userService" class="com.baobaotao.service.UserService" p:userDao-ref="userDao" p:loginLogDao-ref="loginLogDao" /> --> <bean id="threadPoolTaskExecutor" class="org.springframework.scheduling.concurrent.ThreadPoolTaskExecutor"> <!-- 核心线程数,默认为1 --> <property name="corePoolSize" value="10" /> <!-- 最大线程数,默认为Integer.MAX_VALUE --> <property name="maxPoolSize" value="50" /> <!-- 队列最大长度,一般需要设置值>=notifyScheduledMainExecutor.maxNum;默认为Integer.MAX_VALUE <property name="queueCapacity" value="1000" /> --> <!-- 线程池维护线程所允许的空闲时间,默认为60s --> <property name="keepAliveSeconds" value="300" /> <!-- 线程池对拒绝任务(无线程可用)的处理策略,目前只支持AbortPolicy、CallerRunsPolicy;默认为后者 --> <property name="rejectedExecutionHandler"> <!-- AbortPolicy:直接抛出java.util.concurrent.RejectedExecutionException异常 --> <!-- CallerRunsPolicy:主线程直接执行该任务,执行完之后尝试添加下一个任务到线程池中,可以有效降低向线程池内添加任务的速度 --> <!-- DiscardOldestPolicy:抛弃旧的任务、暂不支持;会导致被丢弃的任务无法再次被执行 --> <!-- DiscardPolicy:抛弃当前任务、暂不支持;会导致被丢弃的任务无法再次被执行 --> <bean class="java.util.concurrent.ThreadPoolExecutor$CallerRunsPolicy" /> </property> </bean> </beans>
测试类
package com.paul.threadPool;
import java.util.concurrent.ArrayBlockingQueue;
import java.util.concurrent.ThreadPoolExecutor;
import java.util.concurrent.TimeUnit;
import org.junit.Test;
import org.springframework.beans.factory.annotation.Autowired;
import org.springframework.scheduling.concurrent.ThreadPoolTaskExecutor;
import org.springframework.test.context.ContextConfiguration;
import org.springframework.test.context.junit4.AbstractJUnit4SpringContextTests;
@ContextConfiguration
public class TestThreadPool extends AbstractJUnit4SpringContextTests{
 private static int produceTaskSleepTime = 10;
 private static int produceTaskMaxNumber = 1000;
 @Autowired
 private ThreadPoolTaskExecutor threadPoolTaskExecutor;
 public ThreadPoolTaskExecutor getThreadPoolTaskExecutor() {
 return threadPoolTaskExecutor;
 }
 public void setThreadPoolTaskExecutor(
 ThreadPoolTaskExecutor threadPoolTaskExecutor) {
 this.threadPoolTaskExecutor = threadPoolTaskExecutor;
 }
 @Test
 public void testThreadPoolExecutor()
 {
 // 构造一个线程池
 final ThreadPoolExecutor threadPool = new ThreadPoolExecutor(2, 4, 600,
 TimeUnit.SECONDS, new ArrayBlockingQueue<Runnable>(3),
 new ThreadPoolExecutor.CallerRunsPolicy());
 for (int i = 1; i <= produceTaskMaxNumber; i++) {
 try {
 Thread.sleep(produceTaskSleepTime);
 } catch (InterruptedException e1) {
 e1.printStackTrace();
 }
 new Thread(new StartTaskThread(threadPoolTaskExecutor,i)).start();
 }
 }
}
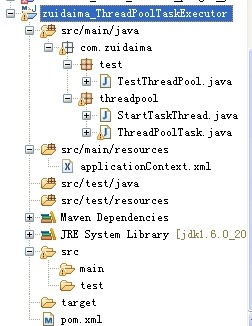
项目截图(基于maven构建)

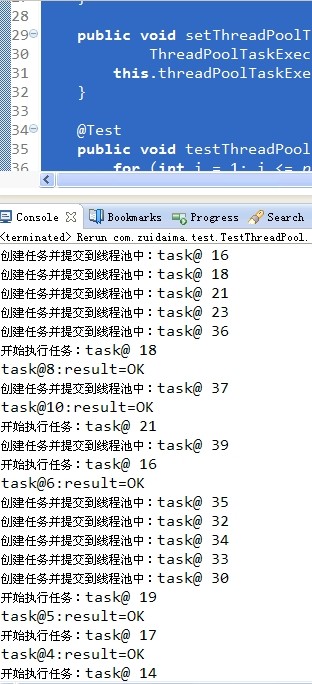
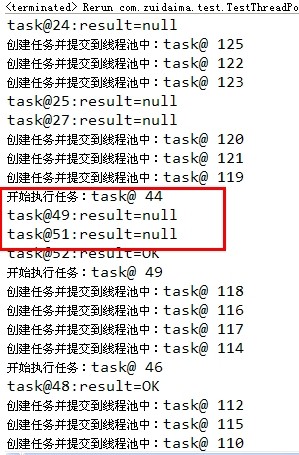
运行截图:

如果遇到cpu忙执行超过1秒的会返回null

总结
以上就是这篇文章的全部内容了,希望本文的内容对大家的学习或者工作具有一定的参考学习价值,谢谢大家对亿速云的支持。如果你想了解更多相关内容请查看下面相关链接
免责声明:本站发布的内容(图片、视频和文字)以原创、转载和分享为主,文章观点不代表本网站立场,如果涉及侵权请联系站长邮箱:is@yisu.com进行举报,并提供相关证据,一经查实,将立刻删除涉嫌侵权内容。