本文实例为大家分享了java实现通过绑定邮箱找回密码功能,供大家参考,具体内容如下
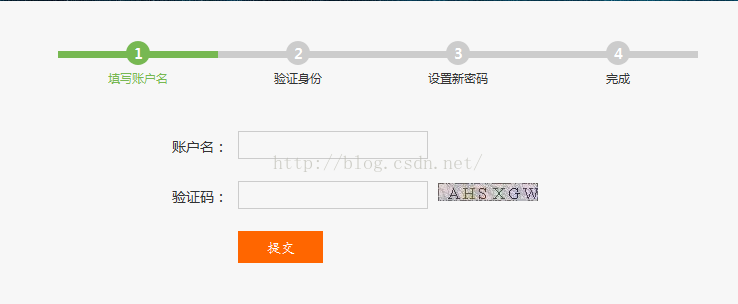
1.输入用户名及验证码,验证用户名是否存在

(1).生成验证码工具类
package com.utils;

import java.awt.Color;
import java.awt.Font;
import java.awt.Graphics;
import java.awt.image.BufferedImage;
import java.util.HashMap;
import java.util.Map;
import java.util.Random;

/**
 * @Title: GraphicsUtil.java
 * @copyright
 * @Package com.utils
 * @Description: TODO(这里用一句话描述这个类的作用)
 * @author Mr.chen
 * @date 2016-11-2 下午03:31:30
 */
public class GraphicsUtil {

 private Font mFont = new Font("Times New Roman", Font.PLAIN, 17);

 Color getRandColor(int fc,int bc){
 Random random = new Random();
 if(fc>255) fc=255;
 if(bc>255) bc=255;
 int r=fc+random.nextInt(bc-fc);
 int g=fc+random.nextInt(bc-fc);
 int b=fc+random.nextInt(bc-fc);
 return new Color(r,g,b);
 }

 public Map<String, Object> getGraphics(){

 int width=100,height=18;
 BufferedImage image=new BufferedImage(width, height, BufferedImage.TYPE_INT_BGR);
 Graphics g=image.getGraphics();
 Random random = new Random();
 g.setColor(getRandColor(200,250));
 g.fillRect(1, 1, width-1, height-1);
 g.setColor(new Color(102,102,102));
 g.drawRect(0, 0, width-1, height-1);
 g.setFont(mFont);
 g.setColor(getRandColor(160,200));
 //画随机线
 for (int i=0;i<155;i++){
 int x = random.nextInt(width - 1);
 int y = random.nextInt(height - 1);
 int xl = random.nextInt(6) + 1;
 int yl = random.nextInt(12) + 1;
 g.drawLine(x,y,x + xl,y + yl);
 }

 //从另一方向画随机线
 for (int i = 0;i < 70;i++){
 int x = random.nextInt(width - 1);
 int y = random.nextInt(height - 1);
 int xl = random.nextInt(12) + 1;
 int yl = random.nextInt(6) + 1;
 g.drawLine(x,y,x - xl,y - yl);
 }

 //生成随机数,并将随机数字转换为字母
 String sRand="";
 for (int i=0;i<6;i++){
 int itmp = random.nextInt(26) + 65;
 char ctmp = (char)itmp;
 sRand += String.valueOf(ctmp);
 g.setColor(new Color(20+random.nextInt(110),20+random.nextInt(110),20+random.nextInt(110)));
 g.drawString(String.valueOf(ctmp),15*i+10,16);
 }

 g.dispose();

 Map<String, Object> map=new HashMap<String, Object>();
 map.put("rand", sRand);
 map.put("image", image);
 return map;
 }

}
(2).生成验证码action
/**
 * @Description: 获取验证码
 * @author Mr.chen
 * @date 2016-11-2 下午03:45:28
 */
 public void getCode(){
 try {
 HttpServletResponse response = ServletActionContext.getResponse();

 HttpServletRequest request= ServletActionContext.getRequest();

 response.setHeader("Pragma","No-cache");
 response.setHeader("Cache-Control","no-cache");
 response.setDateHeader("Expires", 0);
 //表明生成的响应是图片
 response.setContentType("image/jpeg");

 Map<String, Object> map=new GraphicsUtil().getGraphics();
 System.out.println(map.get("rand"));
 request.getSession().setAttribute("rand", map.get("rand"));
 ImageIO.write((RenderedImage) map.get("image"), "JPEG", response.getOutputStream());
 } catch (IOException e) {
 e.printStackTrace();
 }
 }
(3).验证用户名是否存在
 /**
 * @Description: 检查用户名是否存在
 * @author Mr.chen
 * @date 2016-11-2 下午04:49:02
 */
 public void checkUsernumber(){
 try {
 HttpServletResponse response = ServletActionContext.getResponse();

 HttpServletRequest request= ServletActionContext.getRequest();
 String usernumber = request.getParameter("usernumber");
 Studentinfo stu= studentinfoService.getStudentinfoByUsernumber(usernumber);
 response.setContentType("text/plain; charset=utf-8");
 response.setCharacterEncoding("UTF-8");
 if(stu==null){
 response.getWriter().print("false");

 }else{
 if(!StringUtils.isBlank(stu.getEmail())){
 response.getWriter().print("true");
 }else{
 response.getWriter().print("notEmail");
 }

 }
 response.getWriter().flush();
 response.getWriter().close();
 } catch (IOException e) {
 e.printStackTrace();
 }
 }
2.用户名验证通过后往绑定邮箱发送邮件

/**
 * @Description: 发送邮件
 * @author Mr.chen
 * @date 2016-11-2 下午05:06:24
 */
 @SuppressWarnings("static-access")
 public String toFindPassword2(){
 HttpServletRequest request= ServletActionContext.getRequest();
 String usernumber = request.getParameter("usernumber");
 Studentinfo stu= studentinfoService.getStudentinfoByUsernumber(usernumber);
 try {
 Properties prop = new Properties();
 prop.setProperty("mail.transport.protocol", "smtp");
 prop.setProperty("mail.smtp.host", "smtp.qq.com");
 prop.setProperty("mail.smtp.auth", "true");
 prop.put("mail.smtp.port","587");
 prop.setProperty("mail.debug", "true");
 //验证写信者邮箱,此处使用第三方授权码登陆,使用密码不知道为什么登录不上
 Authenticator authenticator = new PopAuthenticator("123456789@qq.com", "**************");
 //创建会话
 Session session = Session.getInstance(prop,authenticator);
 //填写信封写信
 Message msg = new MimeMessage(session);
 //设置发邮件的原地址
 msg.setFrom(new InternetAddress("123456789@qq.com"));
 //设置接收人
 msg.setRecipient(RecipientType.TO, new InternetAddress(stu.getEmail()));
 msg.setSubject("找回密码!");
 msg.setText(this.createLink(stu));
 //验证用户名密码发送邮件
 Transport transport = session.getTransport();
 transport.send(msg);
 request.setAttribute("stu", stu);
 return SUCCESS;

 }catch(Exception e){
 e.printStackTrace();
 }
 return ERROR;
 }
/**
 * @Description: 生成邮箱链接地址
 * @author Mr.chen
 * @date 2016-11-3 下午01:50:14
 */
 public String createLink(Studentinfo stu){

 //生成密钥
 String secretKey=UUID.randomUUID().toString();
 //设置过期时间
 Date outDate = new Date(System.currentTimeMillis() + 30 * 60 * 1000);// 30分钟后过期
 System.out.println(System.currentTimeMillis());
 long date = outDate.getTime() / 1000 * 1000;// 忽略毫秒数 mySql 取出时间是忽略毫秒数的

 //此处应该更新Studentinfo表中的过期时间、密钥信息
 stu.setOutDate(date);
 stu.setValidataCode(secretKey);
 studentinfoService.updateStudentinfo(stu);
 //将用户名、过期时间、密钥生成链接密钥
 String key =stu.getUsernumber() + "$" + date + "$" + secretKey;

 String digitalSignature = MD5Util.getMd5(key);// 数字签名

 HttpServletRequest request= ServletActionContext.getRequest();

 String path=request.getContextPath();

 String basePath=request.getScheme()+"://"+request.getServerName()+":"+request.getServerPort()+path;

 String resetPassHref = basePath + "/toFindPassword3.action?sid="+ digitalSignature +"&id="+stu.getId();

 String emailContent = "请勿回复本邮件.点击下面的链接,重设密码,本邮件超过30分钟,链接将会失效,需要重新申请找回密码." + resetPassHref;

 return emailContent;
 }
3.邮件发送成功后进入邮箱,通过该链接进入修改密码请求,链接验证通过后进入修改密码页面

/**
 * @Description: 该方法用于处理从邮箱链接过来的修改密码请求
 * @author Mr.chen
 * @date 2016-11-3 下午02:24:17
 */
 public String toFindPassword3(){
 String message="";
 HttpServletRequest request= ServletActionContext.getRequest();
 //获取链接中的加密字符串
 String sid=request.getParameter("sid");
 //获取链接中的用户名
 String id=request.getParameter("id");
 if(StringUtils.isBlank(sid)||StringUtils.isBlank(id)){
 System.out.println("请求的链接不正确,请重新操作.");
 message="请求的链接不正确,请重新操作.";
 }
 Studentinfo stu=studentinfoService.getStudentinfoById(Long.parseLong(id));

 if(stu!=null){
 //获取当前用户申请找回密码的过期时间
 //找回密码链接已经过期
 if(stu.getOutDate()<=System.currentTimeMillis()){
 System.out.println("链接已经过期");
 message="链接已经过期";
 }
 //获取当前登陆人的加密码
 String key = stu.getUsernumber()+"$"+stu.getOutDate()/1000*1000+"$"+stu.getValidataCode();//数字签名

 String digitalSignature = MD5Util.getMd5(key);// 数字签名

 if(!digitalSignature.equals(sid)){
 System.out.println("链接加密密码不正确");
 message="链接加密密码不正确";
 }else{
 //验证成功,跳入到修改密码界面
 request.setAttribute("stu", stu);
 }

 }else{
 System.out.println("用户信息不存在");
 message="用户信息不存在";
 request.setAttribute("message", message);
 }
 return SUCCESS;
 }

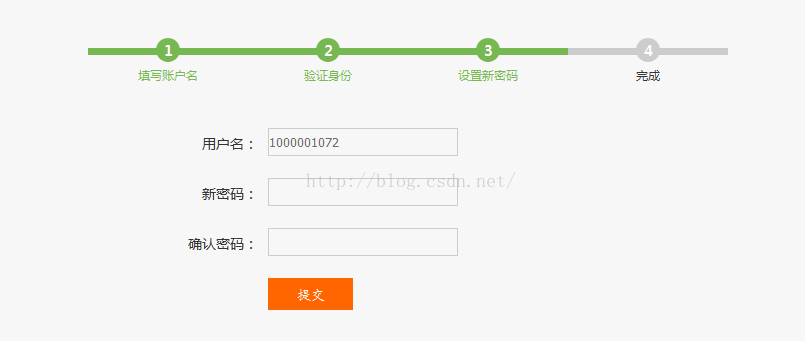
4.输入新密码,验证成功后即修改成功

以上就是本文的全部内容,希望对大家的学习有所帮助,也希望大家多多支持亿速云。
免责声明:本站发布的内容(图片、视频和文字)以原创、转载和分享为主,文章观点不代表本网站立场,如果涉及侵权请联系站长邮箱:is@yisu.com进行举报,并提供相关证据,一经查实,将立刻删除涉嫌侵权内容。