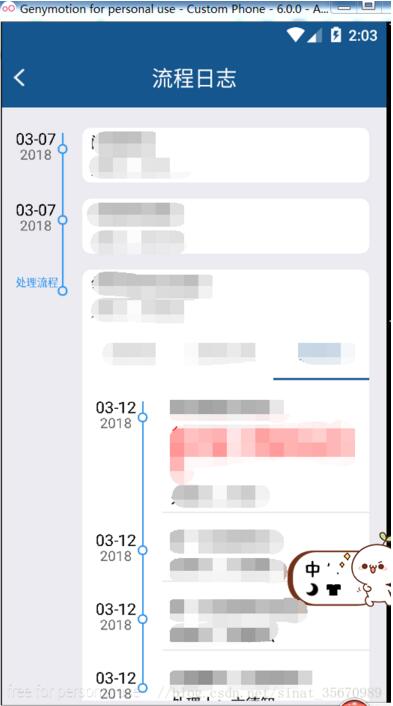
本文实例为大家分享了Android列表时间轴展示的具体代码,供大家参考,具体内容如下
实现的效果图如下:

实现的方式是利用recycleview的ItemDecoration这个抽象类,就是我们经常用来画分割线的的这个类,
具体如下
public class DividerItemDecoration extends RecyclerView.ItemDecoration{
 // 写右边字的画笔(具体信息)
 private Paint mPaint;

 // 写左边日期字的画笔( 时间 + 日期)
 private Paint mPaint1;
 private Paint mPaint2;
 private Paint mPaint3;


 // 左 上偏移长度
 private int itemView_leftinterval;
 private int itemView_topinterval;

 // 轴点半径
 private int circle_radius;

 // 图标
 private Bitmap mIcon;
 //月份合集(使用时需要设置)
 private List<String> monthList= new ArrayList<>();
 //年份合集(使用时需要设置)
 private List<String> yearList= new ArrayList<>();

 public void setMonthList(List<String> monthList) {
  this.monthList = monthList;
 }

 public void setYearList(List<String> yearList) {
  this.yearList = yearList;
 }

 // 在构造函数里进行绘制的初始化,如画笔属性设置等
 public DividerItemDecoration(Context context) {

  // 轴点画笔(红色)
  mPaint = new Paint();
  mPaint.setColor(Color.rgb(58, 154, 239));
  mPaint.setStyle(Paint.Style.STROKE);
  mPaint.setStrokeWidth(3);
  // 左边时间文本画笔(蓝色)
  // 此处设置了两只分别设置 时分 & 年月
  mPaint1 = new Paint();
  mPaint1.setColor(Color.BLACK);
  mPaint1.setTextSize(30);


  mPaint2 = new Paint();
  mPaint2.setColor(context.getResources().getColor(R.color.divider));
  mPaint2.setTextSize(26);

  mPaint3 = new Paint();
  mPaint3.setColor(Color.rgb(58, 154, 239));
  mPaint3.setTextSize(20);

  // 赋值ItemView的左偏移长
  itemView_leftinterval = 150;

  // 赋值ItemView的上偏移长度
  itemView_topinterval = 30;

  // 赋值轴点圆的半径为10
  circle_radius = 8;


 }

 // 重写getItemOffsets()方法
 // 作用:设置ItemView 左 & 上偏移长度
 @Override
 public void getItemOffsets(Rect outRect, View view, RecyclerView parent, RecyclerView.State state) {
  super.getItemOffsets(outRect, view, parent, state);

  // 设置ItemView的左 & 上偏移长度分别为150 px & 30px,即此为onDraw()可绘制的区域
  outRect.set(itemView_leftinterval, itemView_topinterval, 0, 0);

 }

 // 重写onDraw()
 // 作用:在间隔区域里绘制时光轴线 & 时间文本
 @Override
 public void onDraw(Canvas c, RecyclerView parent, RecyclerView.State state) {
  super.onDraw(c, parent, state);
  // 获取RecyclerView的Child view的个数
  int childCount = parent.getChildCount();

  // 遍历每个Item,分别获取它们的位置信息,然后再绘制对应的分割线
  for (int i = 0; i < childCount; i++) {

   // 获取每个Item对象
   View child = parent.getChildAt(i);
   View lastChild = null;
   if (i > 0) {

    lastChild = parent.getChildAt(i - 1);
   }

   /**
    * 绘制轴点
    */
   // 轴点 = 圆 = 圆心(x,y) 位置可以根据需求来调节
   float centerx = child.getLeft() - itemView_leftinterval / 4;
   float centery = child.getTop() + itemView_topinterval +10;
   // 绘制轴点圆
   c.drawCircle(centerx, centery, circle_radius, mPaint);


   /**
    * 绘制上半轴线(x轴是保持不变的)
    */
   // 上端点坐标(x,y)
   float upLine_up_x = centerx;
   float upLine_up_y = 0;
   if (i>0){
     upLine_up_y = lastChild.getBottom();
   }else {
     upLine_up_y = centery - itemView_topinterval;
   }


   // 下端点坐标(x,y)
   float upLine_bottom_x = centerx;
   float upLine_bottom_y = centery - circle_radius;

   //绘制上半部轴线
   c.drawLine(upLine_up_x, upLine_up_y, upLine_bottom_x, upLine_bottom_y, mPaint);

   /**
    * 绘制下半轴线,最后一个不画下半轴
    */
   if (i <childCount-1){
    // 上端点坐标(x,y)
    float bottomLine_up_x = centerx;
    float bottom_up_y = centery + circle_radius;

    // 下端点坐标(x,y)
    float bottomLine_bottom_x = centerx;
    float bottomLine_bottom_y = child.getBottom();

    //绘制下半部轴线
    c.drawLine(bottomLine_up_x, bottom_up_y, bottomLine_bottom_x, bottomLine_bottom_y, mPaint);
   }


   /**
    * 绘制左边时间文本
    */
   // 获取每个Item的位置
   int index = parent.getChildAdapterPosition(child);
   // 设置文本起始坐标
   float Text_x = child.getLeft() - itemView_leftinterval * 5 / 6;
   float Text_y = upLine_bottom_y;

   // 根据Item位置设置时间文本
   switch (index) {
    case (0):
     // 设置日期绘制位置

     c.drawText(monthList.get(0), Text_x, Text_y, mPaint1);
     c.drawText(yearList.get(0), Text_x + 8, Text_y + 28, mPaint2);
     break;
    case (1):
     // 设置日期绘制位置
     c.drawText(monthList.get(1), Text_x, Text_y, mPaint1);
     c.drawText(yearList.get(1), Text_x + 8, Text_y + 28, mPaint2);
     break;
    case (2):
     // 设置日期绘制位置
     if (TextUtils.isEmpty(yearList.get(2))){
      c.drawText(monthList.get(2), Text_x, Text_y, mPaint3);
     }else {
      c.drawText(monthList.get(2), Text_x, Text_y, mPaint1);
      c.drawText(yearList.get(2), Text_x + 8, Text_y + 28, mPaint2);
     }
     break;
    case (3):
     // 设置日期绘制位置
     c.drawText(monthList.get(3), Text_x, Text_y, mPaint1);
     c.drawText(yearList.get(3), Text_x + 8, Text_y + 28, mPaint2);
     break;
    case (4):
     // 设置日期绘制位置
     c.drawText(monthList.get(4), Text_x, Text_y, mPaint1);
     c.drawText(yearList.get(4), Text_x + 8, Text_y + 28, mPaint2);
     break;
    default:c.drawText("结束", Text_x, Text_y, mPaint1);
   }
  }
 }

}
使用比较简单:
DividerItemDecoration dividerItemDecoration = new DividerItemDecoration(this);
  dividerItemDecoration.setMonthList(monthList);
  dividerItemDecoration.setYearList(yearList);
  mRecyclerView.addItemDecoration(dividerItemDecoration);
以上就是本文的全部内容,希望对大家的学习有所帮助,也希望大家多多支持亿速云。
免责声明:本站发布的内容(图片、视频和文字)以原创、转载和分享为主,文章观点不代表本网站立场,如果涉及侵权请联系站长邮箱:is@yisu.com进行举报,并提供相关证据,一经查实,将立刻删除涉嫌侵权内容。