这篇文章给大家分享的是有关Android如何自定义ViewGroup实现堆叠头像的点赞Layout的内容。小编觉得挺实用的,因此分享给大家做个参考,一起跟随小编过来看看吧。
实现
自定义属性
| 属性名 | 说明 | 默认值 |
|---|---|---|
| vertivalSpace | 行距 | 4dp |
| pileWidth | 重叠宽度 | 10dp |
onMeasure方法,每行的宽度不再是child的宽度和了,而是要减掉重叠部分的宽度和
@Override
  protected void onMeasure(int widthMeasureSpec, int heightMeasureSpec) {
    super.onMeasure(widthMeasureSpec, heightMeasureSpec);
    int widthSpecMode = MeasureSpec.getMode(widthMeasureSpec);
    int widthSpecSize = MeasureSpec.getSize(widthMeasureSpec);
    int heightSpecMode = MeasureSpec.getMode(heightMeasureSpec);
    int heightSpecSize = MeasureSpec.getSize(heightMeasureSpec);

    //AT_MOST
    int width = 0;
    int height = 0;
    int rawWidth = 0;//当前行总宽度
    int rawHeight = 0;// 当前行高

    int rowIndex = 0;//当前行位置
    int count = getChildCount();
    for (int i = 0; i < count; i++) {
      View child = getChildAt(i);
      if(child.getVisibility() == GONE){
        if(i == count - 1){
          //最后一个child
          height += rawHeight;
          width = Math.max(width, rawWidth);
        }
        continue;
      }

      //这里调用measureChildWithMargins 而不是measureChild
      measureChildWithMargins(child, widthMeasureSpec, 0, heightMeasureSpec, 0);
      MarginLayoutParams lp = (MarginLayoutParams) child.getLayoutParams();

      int childWidth = child.getMeasuredWidth() + lp.leftMargin + lp.rightMargin;
      int childHeight = child.getMeasuredHeight() + lp.topMargin + lp.bottomMargin;
      if(rawWidth + childWidth - (rowIndex > 0 ? pileWidth : 0)> widthSpecSize - getPaddingLeft() - getPaddingRight()){
        //换行
        width = Math.max(width, rawWidth);
        rawWidth = childWidth;
        height += rawHeight + vertivalSpace;
        rawHeight = childHeight;
        rowIndex = 0;
      } else {
        rawWidth += childWidth;
        if(rowIndex > 0){
          rawWidth -= pileWidth;
        }
        rawHeight = Math.max(rawHeight, childHeight);
      }

      if(i == count - 1){
        width = Math.max(rawWidth, width);
        height += rawHeight;
      }

      rowIndex++;
    }

    setMeasuredDimension(
        widthSpecMode == MeasureSpec.EXACTLY ? widthSpecSize : width + getPaddingLeft() + getPaddingRight(),
        heightSpecMode == MeasureSpec.EXACTLY ? heightSpecSize : height + getPaddingTop() + getPaddingBottom()
    );
}onLayout 每一行,第一个正常放,之后的重叠放
@Override
  protected void onLayout(boolean changed, int l, int t, int r, int b) {
    int viewWidth = r - l;
    int leftOffset = getPaddingLeft();
    int topOffset = getPaddingTop();
    int rowMaxHeight = 0;
    int rowIndex = 0;//当前行位置
    View childView;
    for( int w = 0, count = getChildCount(); w < count; w++ ){
      childView = getChildAt(w);
      if(childView.getVisibility() == GONE) continue;

      MarginLayoutParams lp = (MarginLayoutParams) childView.getLayoutParams();
      // 如果加上当前子View的宽度后超过了ViewGroup的宽度,就换行
      int occupyWidth = lp.leftMargin + childView.getMeasuredWidth() + lp.rightMargin;
      if(leftOffset + occupyWidth + getPaddingRight() > viewWidth){
        leftOffset = getPaddingLeft(); // 回到最左边
        topOffset += rowMaxHeight + vertivalSpace; // 换行
        rowMaxHeight = 0;

        rowIndex = 0;
      }

      int left = leftOffset + lp.leftMargin;
      int top = topOffset + lp.topMargin;
      int right = leftOffset+ lp.leftMargin + childView.getMeasuredWidth();
      int bottom = topOffset + lp.topMargin + childView.getMeasuredHeight();
      childView.layout(left, top, right, bottom);

      // 横向偏移
      leftOffset += occupyWidth;
      // 试图更新本行最高View的高度
      int occupyHeight = lp.topMargin + childView.getMeasuredHeight() + lp.bottomMargin;
      if(rowIndex != count - 1){
        leftOffset -= pileWidth;//这里控制重叠位置
      }
      rowMaxHeight = Math.max(rowMaxHeight, occupyHeight);
      rowIndex++;
    }
}效果图
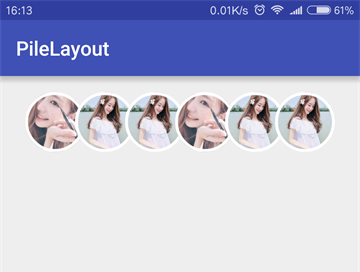
因为这个一般只会显示一行,所以暂时没有通过setAdapter方式去设置数据源。
感谢各位的阅读!关于“Android如何自定义ViewGroup实现堆叠头像的点赞Layout”这篇文章就分享到这里了,希望以上内容可以对大家有一定的帮助,让大家可以学到更多知识,如果觉得文章不错,可以把它分享出去让更多的人看到吧!
亿速云「云服务器」,即开即用、新一代英特尔至强铂金CPU、三副本存储NVMe SSD云盘,价格低至29元/月。点击查看>>
免责声明:本站发布的内容(图片、视频和文字)以原创、转载和分享为主,文章观点不代表本网站立场,如果涉及侵权请联系站长邮箱:is@yisu.com进行举报,并提供相关证据,一经查实,将立刻删除涉嫌侵权内容。


 计算
计算 安全
安全 数据库
数据库 网络和加速
网络和加速 企业服务
企业服务


