1.问题
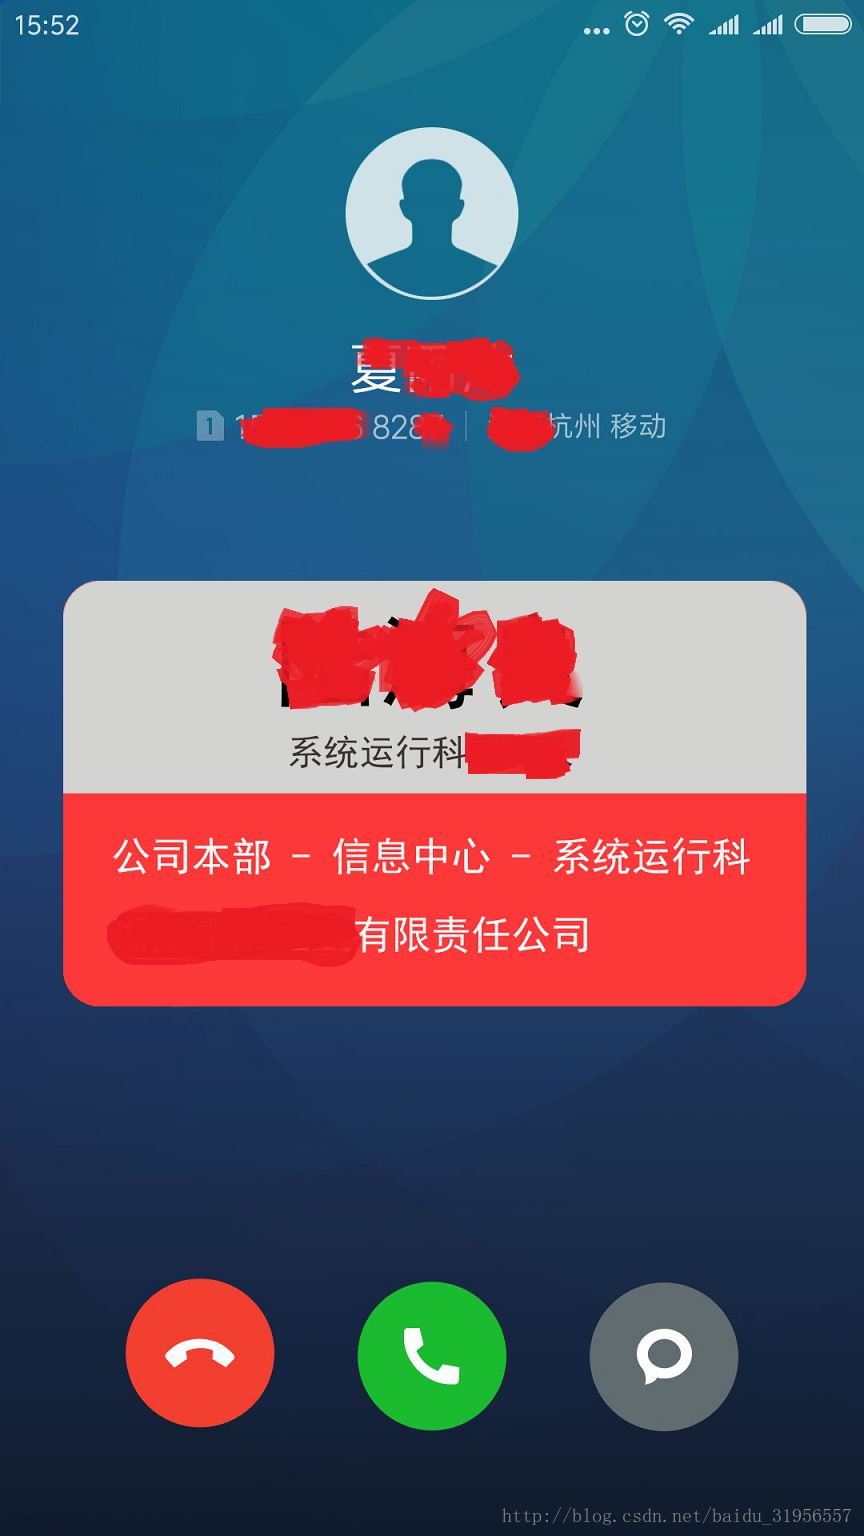
项目中有自己企业的通讯录,但是在应用中拨打公司通讯录的联系人,由于手机通讯录中没有相应的信息,只显示一串电话号
2 .目的
监听系统来电,获取到电话号码,通过调用接口,查询出来相应电话号码的详细信息,并弹出系统悬浮框,给用户提示。
3.实现
首先 注册广播监听系统来电。监听系统来电需要、注册相应的权限
代码地址:https://github.com/sdsjk/phone_alert.git
<uses-permission android:name="android.permission.SYSTEM_ALERT_WINDOW" />
<uses-permission android:name="android.permission.READ_PHONE_STATE" />自定义广播去监听系统来电
 public class PhoneReceiver extends BroadcastReceiver {

  private Context mcontext;


  @Override
  public void onReceive(Context context, Intent intent){
    mcontext=context;
    System.out.println("action"+intent.getAction());
    if(intent.getAction().equals(Intent.ACTION_NEW_OUTGOING_CALL)){
      //如果是去电(拨出)
      Log.e("TAG","拨出");
    }else{

      Log.e("TAG","来电");
      TelephonyManager tm = (TelephonyManager)context.getSystemService(Service.TELEPHONY_SERVICE);
      tm.listen(listener, PhoneStateListener.LISTEN_CALL_STATE);
      //设置一个监听器
    }
  }


  private PhoneStateListener listener=new PhoneStateListener(){

    @Override
    public void onCallStateChanged(int state, final String incomingNumber) {
      // TODO Auto-generated method stub
      //state 当前状态 incomingNumber,貌似没有去电的API
      super.onCallStateChanged(state, incomingNumber);
      switch(state){
        case TelephonyManager.CALL_STATE_IDLE:
          Log.e("TAG","挂断");

          break;
        case TelephonyManager.CALL_STATE_OFFHOOK:
          Log.e("TAG","接听");

          break;
        case TelephonyManager.CALL_STATE_RINGING:

          //输出来电号码
          Log.e("TAG","响铃:来电号码"+incomingNumber);
          Log.e("TAG","响铃:======"+Thread.currentThread().getName());

          break;
      }
    }
  };
  };
需要静态注册广播
 <receiver android:name="com.cloud.adapter.myview.PhoneReceiver">
      <intent-filter>
        <action android:name="android.intent.action.PHONE_STATE"/>
        <action android:name="android.provider.Telephony.SMS_RECEIVED"/>
        <action android:name="android.intent.action.NEW_OUTGOING_CALL" />
      </intent-filter>
</receiver>其次在注册完,广播之后我们需要在监听到系统的来电之后,后获取到电话号之后去请求接口,获取数据。并弹出系统悬浮框。
注意:在弹出系统悬浮框的时候需要注册权限,并且检查应用的允许弹出悬浮框权限是否开启。
<uses-permission android:name="android.permission.PROCESS_OUTGOING_CALLS" />在监听中的 TelephonyManager.CALL_STATE_RINGING中操作
    inflate= LayoutInflater.from(mcontext);
              wm = (WindowManager)mcontext.getApplicationContext().getSystemService(Context.WINDOW_SERVICE);
              WindowManager.LayoutParams params = new WindowManager.LayoutParams();
              params.type = WindowManager.LayoutParams.TYPE_PHONE;
              params.flags = WindowManager.LayoutParams.FLAG_NOT_TOUCH_MODAL | WindowManager.LayoutParams.FLAG_NOT_FOCUSABLE;
              params.gravity= Gravity.CENTER;
              params.width = WindowManager.LayoutParams.MATCH_PARENT;
              params.height = 600;
              params.format = PixelFormat.RGBA_8888;
              phoneView=inflate.inflate(R.layout.phone_alert,null);
wm.addView(phoneView, params);自定义一个布局文件,作为要添加的View,布局文件如下
 <?xml version="1.0" encoding="utf-8"?>
  <com.cloud.adapter.myview.MyLinearLayout xmlns:android="http://schemas.android.com/apk/res/android"
  android:layout_width="300dp"
  android:layout_height="200dp"
  android:orientation="vertical"
  android:layout_gravity="center"
  android:id="@+id/rootview"

  >
  <LinearLayout
  android:background="@drawable/top_background"
  android:layout_width="300dp"
  android:layout_height="100dp"
  android:orientation="vertical"
  android:layout_gravity="center"
  android:gravity="center"

  >
  <TextView
    android:layout_width="wrap_content"
    android:layout_height="wrap_content"
    android:text="陆XX"
    android:textSize="26sp"
    />
  <TextView
    android:layout_marginTop="5dp"
    android:layout_width="wrap_content"
    android:layout_height="wrap_content"
    android:textSize="16sp"
    android:text="系统运行科科长"
    />
  </LinearLayout>
  <LinearLayout
    android:background="@drawable/bottom_background"
    android:layout_width="300dp"
    android:layout_height="100dp"
    android:orientation="vertical"
    android:layout_gravity="center"
    android:gravity="center"
    >
    <TextView
      android:textColor="#fff"
      android:layout_width="wrap_content"
      android:layout_height="wrap_content"
      android:text="公司本部-信息中心-系统运营科"
      android:textSize="20sp"
      />
    <TextView
      android:layout_marginTop="10dp"
      android:layout_width="wrap_content"
      android:layout_height="wrap_content"
      android:textSize="20sp"
      android:textColor="#fff"
      android:text="XXX有限公司"
      android:layout_marginBottom="10dp"
      />
  </LinearLayout>

  </com.cloud.adapter.myview.MyLinearLayout>
使用到两个背景shape
 <?xml version="1.0" encoding="utf-8"?>
  <shape xmlns:android="http://schemas.android.com/apk/res/android"
  android:shape="rectangle">
  <corners android:topLeftRadius="20dp"
    android:topRightRadius="20dp"
    />
  <solid android:color="@color/colorPrimary"/>
  </shape>

  <?xml version="1.0" encoding="utf-8"?>
  <shape xmlns:android="http://schemas.android.com/apk/res/android"
  android:shape="rectangle">
  <corners android:bottomLeftRadius="20dp"
    android:bottomRightRadius="20dp"
    />
  <solid android:color="#f44"/>
  </shape>
广播中完整代码
 package com.cloud.adapter.myview;

  import android.app.Activity;
  import android.app.Service;
  import android.content.BroadcastReceiver;
  import android.content.Context;
  import android.content.Intent;
  import android.graphics.PixelFormat;
  import android.os.Handler;
  import android.os.Looper;
  import android.telephony.PhoneStateListener;
  import android.telephony.TelephonyManager;
  import android.util.Log;
  import android.view.Gravity;
  import android.view.LayoutInflater;
  import android.view.View;
  import android.view.WindowManager;
  import android.widget.TextView;

  /**
   * Created by zhang on 2017/10/10.
   */

  public class PhoneReceiver extends BroadcastReceiver {

  private Context mcontext;
  private WindowManager wm;

  @Override
  public void onReceive(Context context, Intent intent){
    mcontext=context;
    System.out.println("action"+intent.getAction());
    if(intent.getAction().equals(Intent.ACTION_NEW_OUTGOING_CALL)){
      //如果是去电(拨出)
      Log.e("TAG","拨出");
    }else{
      //查了下android文档,貌似没有专门用于接收来电的action,所以,非去电即来电
      Log.e("TAG","来电");
      TelephonyManager tm = (TelephonyManager)context.getSystemService(Service.TELEPHONY_SERVICE);
      tm.listen(listener, PhoneStateListener.LISTEN_CALL_STATE);
      //设置一个监听器
    }
  }

  private TextView tv;
  private LayoutInflater inflate;
  private View phoneView;
  private PhoneStateListener listener=new PhoneStateListener(){

    @Override
    public void onCallStateChanged(int state, final String incomingNumber) {
      // TODO Auto-generated method stub
      //state 当前状态 incomingNumber,貌似没有去电的API
      super.onCallStateChanged(state, incomingNumber);
      switch(state){
        case TelephonyManager.CALL_STATE_IDLE:
          Log.e("TAG","挂断");
          wm.removeView(tv);
          break;
        case TelephonyManager.CALL_STATE_OFFHOOK:
          Log.e("TAG","接听");
          wm.removeView(tv);
          break;
        case TelephonyManager.CALL_STATE_RINGING:

          inflate= LayoutInflater.from(mcontext);
          wm = (WindowManager)mcontext.getApplicationContext().getSystemService(Context.WINDOW_SERVICE);
          WindowManager.LayoutParams params = new WindowManager.LayoutParams();
          params.type = WindowManager.LayoutParams.TYPE_PHONE;
          params.flags = WindowManager.LayoutParams.FLAG_NOT_TOUCH_MODAL | WindowManager.LayoutParams.FLAG_NOT_FOCUSABLE;
          params.gravity= Gravity.CENTER;
          params.width = WindowManager.LayoutParams.MATCH_PARENT;
          params.height = 600;
          params.format = PixelFormat.RGBA_8888;
          phoneView=inflate.inflate(R.layout.phone_alert,null);
          wm.addView(phoneView, params);
          Log.e("TAG","响铃:来电号码"+incomingNumber);
          Log.e("TAG","响铃:======"+Thread.currentThread().getName());
          //输出来电号码
          break;
      }
    }
  };
  };
效果图

以上就是本文的全部内容,希望对大家的学习有所帮助,也希望大家多多支持亿速云。
亿速云「云服务器」,即开即用、新一代英特尔至强铂金CPU、三副本存储NVMe SSD云盘,价格低至29元/月。点击查看>>
免责声明:本站发布的内容(图片、视频和文字)以原创、转载和分享为主,文章观点不代表本网站立场,如果涉及侵权请联系站长邮箱:is@yisu.com进行举报,并提供相关证据,一经查实,将立刻删除涉嫌侵权内容。