这期内容当中小编将会给大家带来有关如何在Android应用中实现一个Gallery画廊效果,文章内容丰富且以专业的角度为大家分析和叙述,阅读完这篇文章希望大家可以有所收获。
画廊 使用Gallery表示,按水平方向显示内容,并且可以用手指直接拖动图片移动,一般用来浏览图片,被选中的选项位于中间,可以响应事件显示信息。
xml布局文件基本语法
<Gallery
属性列表
/>
Gallery支持4中xml属性
属性名称 | 描述 | |||||||||||||||||||||||||||||||||||||||
android:animationDuration | 设置布局变化时动画的转换所需的时间(毫秒级)。仅在动画开始时计时。该值必须是整数,比如:100。 | |||||||||||||||||||||||||||||||||||||||
android:gravity | 指定在对象的X和Y轴上如何放置内容。指定一下常量中的一个或多个(使用 “|”分割)
| |||||||||||||||||||||||||||||||||||||||
android:spacing | (译者注:设置图片之间的间距) | |||||||||||||||||||||||||||||||||||||||
android:unselectedAlpha | 设置未选中的条目的透明度(Alpha)。该值必须是float类型,比如:“1.2” |
效果的具体实现过程
layout:
<?xml version="1.0" encoding="utf-8"?>
<LinearLayout xmlns:android="http://schemas.android.com/apk/res/android"
android:layout_width="match_parent"
android:layout_height="match_parent"
android:orientation="vertical" >
<Gallery
android:id="@+id/gallery"
android:spacing="5px" //设置列表项之间的间距为5像素
android:unselectedAlpha="0.5" //设置未被选中的列表项的透明度
android:layout_width="match_parent"
android:layout_height="wrap_content" />
</LinearLayout>Activity:
package xqx;
import com.example.xqx_lianxi.R;
import android.app.Activity;
import android.content.res.TypedArray;
import android.os.Bundle;
import android.view.View;
import android.view.ViewGroup;
import android.widget.AdapterView;
import android.widget.AdapterView.OnItemClickListener;
import android.widget.BaseAdapter;
import android.widget.Gallery;
import android.widget.ImageView;
import android.widget.Toast;
public class MainGallery extends Activity{
//设置画廊图片
private int[] imageId = new int[] { R.drawable.ic_launcher,R.drawable.ic_launcher,R.drawable.ic_launcher,R.drawable.ic_launcher,R.drawable.ic_launcher,R.drawable.ic_launcher};
@Override
protected void onCreate(Bundle savedInstanceState) {
// TODO Auto-generated method stub
super.onCreate(savedInstanceState);
setContentView(R.layout.main_gallery);
//获取Gallery组件
Gallery gallery = (Gallery) findViewById(R.id.gallery);
BaseAdapter adapter = new BaseAdapter() {
//获取当前选项ID
@Override
public long getItemId(int position) {
return position;
}
//获取当前选项值
@Override
public Object getItem(int position) {
return position;
}
//获取数量
@Override
public int getCount() {
return imageId.length;
}
@Override
public View getView(int position, View convertView, ViewGroup parent) {
ImageView imageview; //声明ImageView的对象
if (convertView == null) {
imageview = new ImageView(MainGallery.this); //创建ImageView的对象
imageview.setScaleType(ImageView.ScaleType.FIT_XY); //设置缩放方式
imageview.setLayoutParams(new Gallery.LayoutParams(500, 400));
TypedArray typedArray = obtainStyledAttributes(R.styleable.Gallery);
imageview.setBackgroundResource(typedArray.getResourceId(
R.styleable.Gallery_android_galleryItemBackground,
0));
imageview.setPadding(5, 0, 5, 0); //设置imageview的内边距
}
else
{
imageview = (ImageView) convertView;
}
imageview.setImageResource(imageId[position]);
return imageview;
}
};
//将适配器与Gallery关联
gallery.setAdapter(adapter);
gallery.setSelection(imageId.length / 2); //默认显示的图片的id
//画廊图片的点击事件
gallery.setOnItemClickListener(new OnItemClickListener() {
@Override
public void onItemClick(AdapterView<?> parent, View view,
int position, long id) {
Toast.makeText(MainGallery.this,
"第" + String.valueOf(position+1) + "张图片被选中",
Toast.LENGTH_SHORT).show();
}
});
}
}最后在res/values/string.xml中添加一段代码 ,这里对应activity中的51行
<declare-styleable name="Gallery">
    <attr name="android:galleryItemBackground" />
</declare-styleable>
这样便完成了一个画廊的效果
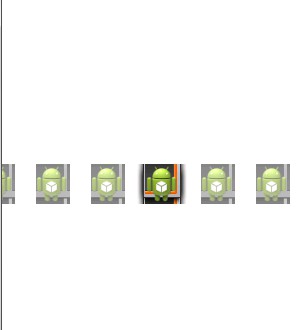
效果图:

可以看到 一共有6张图片 默认显示第4张
gallery.setSelection(imageId.length / 2); //默认显示的图片的id
上述就是小编为大家分享的如何在Android应用中实现一个Gallery画廊效果了,如果刚好有类似的疑惑,不妨参照上述分析进行理解。如果想知道更多相关知识,欢迎关注亿速云行业资讯频道。
免责声明:本站发布的内容(图片、视频和文字)以原创、转载和分享为主,文章观点不代表本网站立场,如果涉及侵权请联系站长邮箱:is@yisu.com进行举报,并提供相关证据,一经查实,将立刻删除涉嫌侵权内容。