本章简单介绍redis的配置及使用方法,本文示例代码在前面代码的基础上进行修改添加,实现了使用redis进行缓存验证码,以及校验验证码的过程。
1、添加依赖库(添加redis库,以及第三方的验证码库)
       <dependency>
  <groupId>org.springframework.boot</groupId>
  <artifactId>spring-boot-starter-redis</artifactId>
</dependency>
<dependency>
  <groupId>cn.apiclub.tool</groupId>
  <artifactId>simplecaptcha</artifactId>
  <version>1.2.2</version>
</dependency> 2、在application.properties中添加redis的配置信息
spring.redis.database=4
spring.redis.host=hostname
spring.redis.password=password
spring.redis.port=6379
spring.redis.timeout=2000
spring.redis.pool.max-idle=8
spring.redis.pool.min-idle=0
spring.redis.pool.max-active=8
spring.redis.pool.max-wait=-1 3、添加redis数据模版
新增RedisConfig.Java
package com.xiaofangtech.sun.config;
import org.springframework.context.annotation.Bean;
import org.springframework.data.redis.connection.RedisConnectionFactory;
import org.springframework.data.redis.connection.jedis.JedisConnectionFactory;
import org.springframework.data.redis.core.RedisTemplate;
import org.springframework.data.redis.serializer.StringRedisSerializer;
public class RedisConfig {
  @Bean
  JedisConnectionFactory jedisConnectionFactory() {
    return new JedisConnectionFactory();
  }
  @Bean RedisTemplate<String, String>redisTemplate(RedisConnectionFactory factory)
  {
    RedisTemplate<String, String> template = new RedisTemplate<String, String>();
    template.setConnectionFactory(jedisConnectionFactory());
    template.setKeySerializer(new StringRedisSerializer());
    template.setValueSerializer(new StringRedisSerializer());
    return template;
  }
} 4、redis的基本使用(缓存生成的验证码信息)
新建CaptchaModule.java,涉及redis插入操作关键代码
@Autowired
  private RedisTemplate<String, String> redisTemplate;
//将验证码以<key,value>形式缓存到redis
redisTemplate.opsForValue().set(uuid, captcha.getAnswer(), captchaExpires, TimeUnit.SECONDS); 完整代码
package com.xiaofangtech.sunt.utils;
import java.io.ByteArrayOutputStream;
import java.io.IOException;
import java.util.UUID;
import java.util.concurrent.TimeUnit;
import javax.imageio.ImageIO;
import javax.servlet.http.Cookie;
import javax.servlet.http.HttpServletResponse;
import org.springframework.beans.factory.annotation.Autowired;
import org.springframework.data.redis.core.RedisTemplate;
import org.springframework.http.MediaType;
import org.springframework.web.bind.annotation.RequestMapping;
import org.springframework.web.bind.annotation.RequestMethod;
import org.springframework.web.bind.annotation.ResponseBody;
import org.springframework.web.bind.annotation.RestController;
import cn.apiclub.captcha.Captcha;
import cn.apiclub.captcha.backgrounds.GradiatedBackgroundProducer;
import cn.apiclub.captcha.gimpy.FishEyeGimpyRenderer;
@RestController
@RequestMapping("captcha")
public class CaptchaModule {
  @Autowired
  private RedisTemplate<String, String> redisTemplate;
  private static int captchaExpires = 3*60; //超时时间3min
  private static int captchaW = 200;
  private static int captchaH = 60;
  @RequestMapping(value = "getcaptcha", method = RequestMethod.GET, produces = MediaType.IMAGE_PNG_VALUE)
  public @ResponseBody byte[] getCaptcha(HttpServletResponse response)
  {
    //生成验证码
    String uuid = UUID.randomUUID().toString();
    Captcha captcha = new Captcha.Builder(captchaW, captchaH)
        .addText().addBackground(new GradiatedBackgroundProducer())
        .gimp(new FishEyeGimpyRenderer())
        .build();
    //将验证码以<key,value>形式缓存到redis
    redisTemplate.opsForValue().set(uuid, captcha.getAnswer(), captchaExpires, TimeUnit.SECONDS);
    //将验证码key,及验证码的图片返回
    Cookie cookie = new Cookie("CaptchaCode",uuid);
    response.addCookie(cookie);
    ByteArrayOutputStream bao = new ByteArrayOutputStream();
    try {
      ImageIO.write(captcha.getImage(), "png", bao);
      return bao.toByteArray();
    } catch (IOException e) {
      return null;
    }
  }
} 5、redis内容的获取(根据key获取验证码)
完善前面获取token的流程,在获取token的接口中添加校验验证码的流程(根据登录参数中的验证码id获取验证码内容,并与登录参数中的验证码内容进行比对)
修改JsonWebToken.java
@Autowired
  private RedisTemplate<String, String> redisTemplate;
//验证码校验在后面章节添加
String captchaCode = loginPara.getCaptchaCode();
try {
  if (captchaCode == null)
  {
    throw new Exception();
  }
  String captchaValue = redisTemplate.opsForValue().get(captchaCode);
  if (captchaValue == null)
  {
    throw new Exception();
  }
  redisTemplate.delete(captchaCode);
  if (captchaValue.compareTo(loginPara.getCaptchaValue()) != 0)
  {
    throw new Exception();
  }
} catch (Exception e) {
  resultMsg = new ResultMsg(ResultStatusCode.INVALID_CAPTCHA.getErrcode(),
      ResultStatusCode.INVALID_CAPTCHA.getErrmsg(), null);
  return resultMsg;
} 6、测试
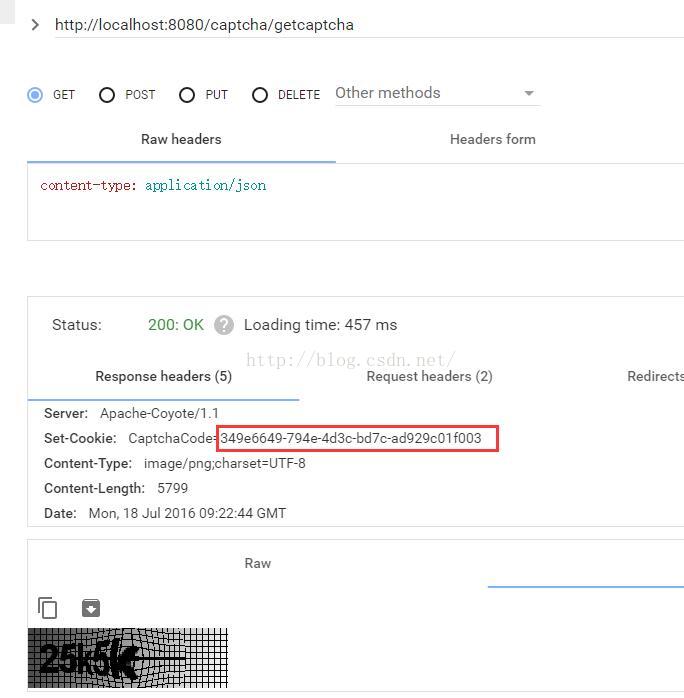
1)请求获取验证码,可以获取到验证码图片,以及在cookie中返回缓存入redis的key值

2)查看redis,可以查看到之前缓存的key value

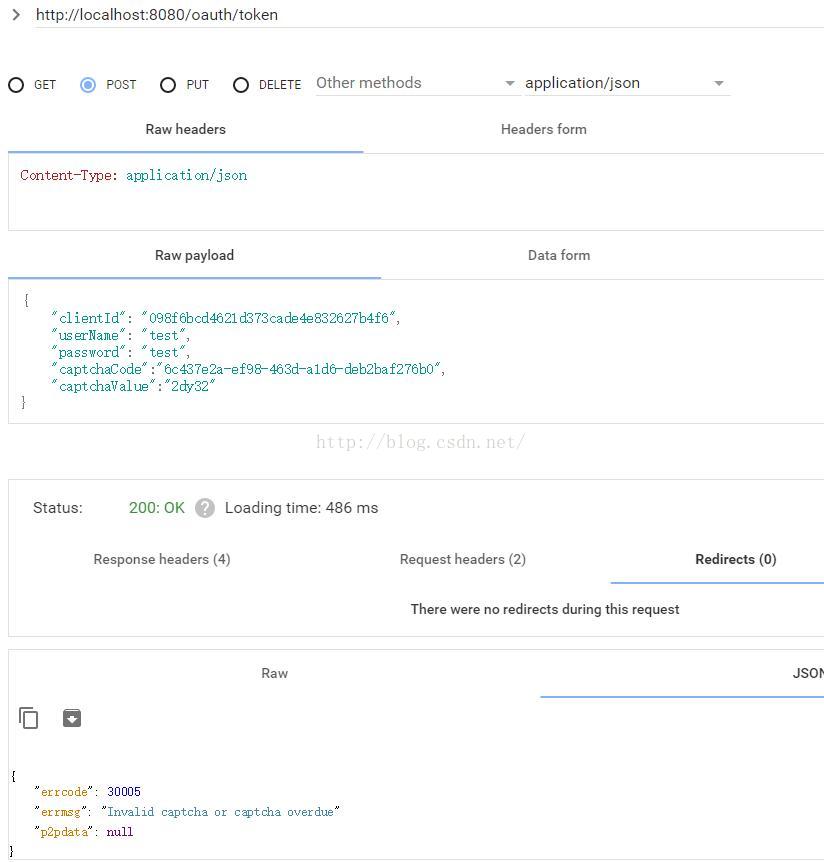
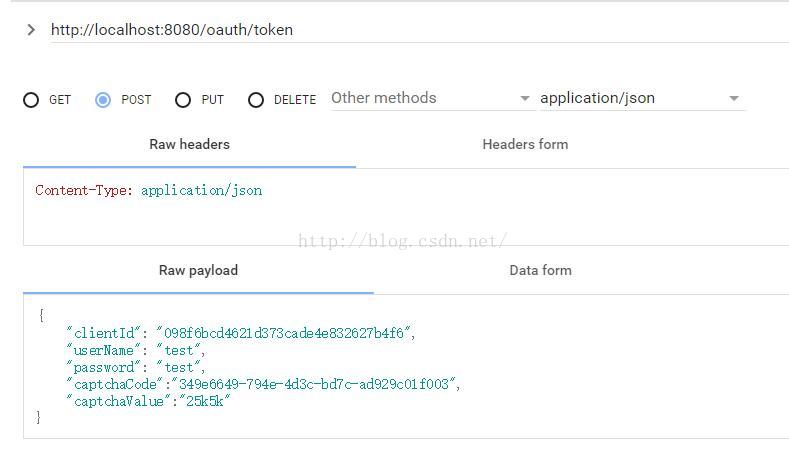
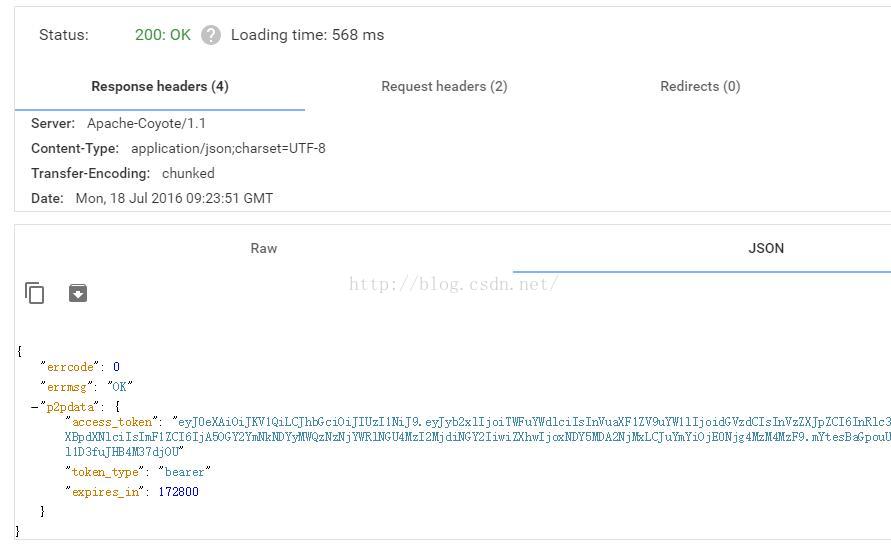
3)登录获取token时,添加验证码参数
如果验证码错误,返回验证码错误

验证码正确,且用户名密码正确,返回token


总结
以上所述是小编给大家介绍的实例详解Spring Boot实战之Redis缓存登录验证码,希望对大家有所帮助,如果大家有任何疑问请给我留言,小编会及时回复大家的。在此也非常感谢大家对亿速云网站的支持!
亿速云「云服务器」,即开即用、新一代英特尔至强铂金CPU、三副本存储NVMe SSD云盘,价格低至29元/月。点击查看>>
免责声明:本站发布的内容(图片、视频和文字)以原创、转载和分享为主,文章观点不代表本网站立场,如果涉及侵权请联系站长邮箱:is@yisu.com进行举报,并提供相关证据,一经查实,将立刻删除涉嫌侵权内容。