1. CORS 简介
同源策略(same origin policy)是浏览器安全的基石。在同源策略的限制下,非同源的网站之间不能发送 ajax 请求的。
为了解决这个问题,w3c 提出了跨源资源共享,即 CORS(Cross-Origin Resource Sharing)。
CORS 做到了两点:
基于这两点,CORS 将请求分为两类:简单请求和非简单请求。
1.1 简单请求
可以先看下 CORS 出现前的情况:跨源时能够通过 script 或者 image 标签触发 GET 请求或通过表单发送一条 POST 请求,但这两种请求 HTTP 头信息中都不能包含任何自定义字段。
简单请求对应该规则,因此对简单请求的定义为:
请求方法是 HEAD、GET 或 POST 且 HTTP 头信息不超过以下几个字段:Accept、Accept-Language、Content-Language、Last-Event-ID、Content-Type(只限于 application/x-www-form-urlencoded、multipart/form-data、text/plain)。
比如有一个简单请求:
GET /test HTTP/1.1
Accept: */*
Accept-Encoding: gzip, deflate, sdch, br
Origin: http://www.examples.com
Host: www.examples.com
对于这样的简单请求,CORS 的策略是请求时,**在头信息中添加一个 Origin 字段**,服务器收到请求后,根据该字段判断是否允许该请求。
浏览器先于用户得到返回结果,根据有无 Access-Control-Allow-Origin 字段来决定是否拦截该返回结果。
对于 CORS 出现前的一些服务,CORS 对他们的影响分两种情况:
可以看出,CORS 的出现,没有对”旧的“服务造成任何影响。
另外,除了提到的 Access-Control-Allow-Origin 还有几个字段用于描述 CORS 返回结果:
1.2 非简单请求
除了简单请求之外的请求,就是非简单请求。
对于非简单请求的跨源请求,**浏览器会在真实请求发出前**,增加一次 OPTION 请求,称为预检请求(preflight request)。预检请求将真实请求的信息,包括请求方法、自定义头字段、源信息添加到 HTTP 头信息字段中,询问服务器是否允许这样的操作。
比如对于 DELETE 请求:
OPTIONS /test HTTP/1.1
Origin: http://www.examples.com
Access-Control-Request-Method: DELETE
Access-Control-Request-Headers: X-Custom-Header
Host: www.examples.com
与 CORS 相关的字段有:
服务器收到请求时,需要分别对 Origin、Access-Control-Request-Method、Access-Control-Request-Headers 进行验证,验证通过后,会在返回 Http 头信息中添加
Access-Control-Allow-Origin: http://www.examples.com
Access-Control-Allow-Methods: GET, POST, PUT, DELETE
Access-Control-Allow-Headers: X-Custom-Header
Access-Control-Allow-Credentials: true
Access-Control-Max-Age: 1728000
他们的含义分别是:
当预检请求通过后,浏览器会发送真实请求到服务器。这就实现了跨源请求。
了解完 CORS,接下来我们来搭建简单的 Spring MVC 服务,并进一步了解 Spring MVC 如何配置 CORS。
2. Spring MVC 环境搭建
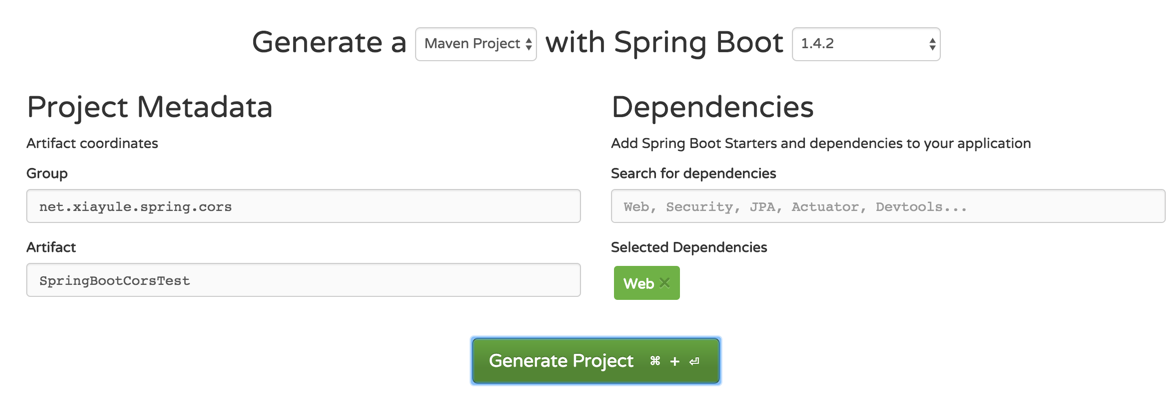
打开 http://start.spring.io/,添加 Web Dependency,然后选择 Generate Project,下载 zip 文件,就得到了一个 spring boot demo。

解压 zip 文件,双击 pom.xml 打开或用 IDEA、Eclipse 将项目按照 maven 导入。
根据 Group、Artifact、Dependencies 填写的不同,项目目录结构可能有些许差别,我的项目结构如下:
├── src
│  ├── main/java
│  |    └── net/xiayule/spring/cors
│  |      └── SpringBootCorsTestApplication.java
|  └── resources
|    ├── static
|    ├── templates
|    └── application.properties
|
└── pom.xml
我们需要关心的只有 SpringBootCorsTestApplication.java。在 SpringBootCorsTestApplication.java 添加以下代码:
@RestController
@SpringBootApplication
public class SpringBootCorsTestApplication {

  @RequestMapping(value = "/test")
  public String greetings() {
    return "{\"project\":\"just a test\"}";
  }

  public static void main(String[] args) {
    SpringApplication.run(SpringBootCorsTestApplication.class, args);
  }
}
@RequestMapping(value = "/test") 的含义是该方法接受来自 /test 的请求,并且提供了对 HTTP 的 GET、POST、DELETE 等方法的支持。
运行项目的方法为,在项目根目录执行 mvn spring-boot:run 启动应用,打开浏览器访问 http://localhost:8080 即可看到效果:

后端服务搭建好了,接着实现前端。为了简单,直接创建一个 test.html 文件,添加以下内容:
<!DOCTYPE html>
<html>
<head>
  <title>Hello CORS</title>
  <script src="https://ajax.googleapis.com/ajax/libs/jquery/1.10.2/jquery.min.js"></script>

  <script>
    $(document).ready(function() {
      $.ajax({
        url: "http://localhost:8080/test",
        method: "POST",
        contentType: "application/json; charset=utf-8"
      }).then(function(data, status, jqxhr) {
        alert(data)
      });
    });
  </script>
</head>
<body>
</body>
</html>
使用浏览器打开该文件,就会触发一条向 http://localhost:8080 的请求。可以通过修改上面代码的 method,来触发不同类型的请求。
由于是直接使用浏览器打开,**网页的源为 null**, 当向源 http://localhost:8080 请求时,就变成了跨源请求,因此如果后端不加 CORS 的配置,返回的 HTTP 头信息中不会包含 Access-Control-Allow-Origin,因此浏览器会报出如下错误:

3. 配置 CORS
一个应用可能会有多个 CORS 配置,并且可以设置每个 CORS 配置针对一个接口或一系列接口或者对所有接口生效。
举例来说,我们需要:
对第一种情况,如果想要对某一接口配置 CORS,可以在方法上添加 CrossOrigin 注解:
@CrossOrigin(origins = {"http://localhost:9000", "null"})
@RequestMapping(value = "/test", method = RequestMethod.GET)
public String greetings() {
  return "{\"project\":\"just a test\"}";
}
第二种情况,如果想对一系列接口添加 CORS 配置,可以在类上添加注解,对该类声明所有接口都有效:
CrossOrigin(origins = {"http://localhost:9000", "null"})
@RestController
@SpringBootApplication
public class SpringBootCorsTestApplication {
  // xxx
}
第三种情况,添加全局配置,则需要添加一个配置类:
@Configuration
public class WebConfig extends WebMvcConfigurerAdapter {

  @Override
  public void addCorsMappings(CorsRegistry registry) {
    registry.addMapping("/**")
        .allowedOrigins("http://localhost:9000", "null")
        .allowedMethods("POST", "GET", "PUT", "OPTIONS", "DELETE")
        .maxAge(3600)
        .allowCredentials(true);
  }
}
另外,还可以通过添加 Filter 的方式,配置 CORS 规则,并手动指定对哪些接口有效。
@Bean
public FilterRegistrationBean corsFilter() {
  UrlBasedCorsConfigurationSource source = new UrlBasedCorsConfigurationSource();
  CorsConfiguration config = new CorsConfiguration();
  config.setAllowCredentials(true); config.addAllowedOrigin("http://localhost:9000");
  config.addAllowedOrigin("null");
  config.addAllowedHeader("*");
  config.addAllowedMethod("*");
  source.registerCorsConfiguration("/**", config); // CORS 配置对所有接口都有效
  FilterRegistrationBean bean = newFilterRegistrationBean(new CorsFilter(source));
  bean.setOrder(0);
  return bean;
}
4. 实现剖析
无论是通过哪种方式配置 CORS,其实都是在构造 CorsConfiguration。
一个 CORS 配置用一个 CorsConfiguration 类来表示,它的定义如下:
public class CorsConfiguration {
  private List<String> allowedOrigins;
  private List<String> allowedMethods;
  private List<String> allowedHeaders;
  private List<String> exposedHeaders;
  private Boolean allowCredentials;
  private Long maxAge;
}
Spring MVC 中对 CORS 规则的校验,都是通过委托给 DefaultCorsProcessor 实现的。
DefaultCorsProcessor 处理过程如下:
校验就是根据 CorsConfiguration 这个类的配置进行判断:
5. 总结
本文介绍了 CORS 的知识以及如何在 Spring MVC 中配置 CORS。希望对大家的学习有所帮助,也希望大家多多支持亿速云。
免责声明:本站发布的内容(图片、视频和文字)以原创、转载和分享为主,文章观点不代表本网站立场,如果涉及侵权请联系站长邮箱:is@yisu.com进行举报,并提供相关证据,一经查实,将立刻删除涉嫌侵权内容。