本篇文章给大家分享的是有关如何搭建Tomcat7 session同步集群,小编觉得挺实用的,因此分享给大家学习,希望大家阅读完这篇文章后可以有所收获,话不多说,跟着小编一起来看看吧。
Tomcat session同步集群搭建
一、如何保持session会话
为了使web能适应大规模的访问,需要实现应用的集群部署。集群最有效的方案就是负载均衡,而实现负载均衡用户每一个请求都有可能被分配到不固定的服务器上,这样我们首先要解决session的统一来保证无论用户的请求被转发到哪个服务器上都能保证用户的正常使用,即需要实现session的共享机制。
因为我这边提供web服务的是两台Tomcat服务器,也会有session共享的议题存在,经过与开发人员的交谈中了解到,他们应用的session是由JVM产生的,所以为了让一台tomcat服务器出现故障时,另外一台可以继续承接服务,并保持原先会话,即在故障服务器上处于登入状态的用户,不需要再次登入。
二、在集群系统下实现session统一的有如下三种方案:
1、请求精确定位产生session的web服务器:sticky session,即当前用户的请求都集中定位到一台服务器中,这台服务器保存了用户的session登录信息,如果宕机,
则等同于单点部署,会丢失,会话也不会复制。
#注:上述情况适用于在web端做好session共享,负载均衡层做好sticky session,则就可以实现精准定位又实现解除故障的情况。
2、session复制共享:session replication,如tomcat自带session共享,主要是指集群环境下,多台应用服务器之间同步session,使session保持一致,对外透明。
如果其中一台服务器发生故障,根据负载均衡的原理,调度器会遍历寻找可用节点,分发请求,由于session已同步,故能保证用户的session信息不会丢失,实现会话复制。
但必须在同一种中间件之间完成(如:tomcat-tomcat之间).
session复制带来的性能损失会快速增加.特别是当session中保存了较大的对象,而且对象变化较快时, 性能下降更加显著,会消耗系统性能。这种特性使得web应用的水平扩展受到了限制。
Session内容通过广播同步给成员,会造成网络流量瓶颈,即便是内网瓶颈,在大并发下表现也并不好。
#注:上述2适用于并发量小的集群需求
3.基于 memcache/redis缓存的 session 共享
即使用cacheDB存取session信息,应用服务器接受新请求将session信息保存在cache DB中,当应用服务器发生故障时,调度器会遍历寻找可用节点,分发请求,当应用服务器发现session不在本机内存时,则去cache DB中查找,如果找到则复制到本机,这样实现session共享和高可用。
二、本文主要讲第二种集群方式,配置基于tomcat7环境,通过tomcat集群自带的session复制,session信息将会被自动复制到各个节点。
涉及环境:
主机 操作系统 IP地址 主要软件
Nginx centos7.2 172.16.22.2 nginx-1.10.1
tomcat01 centos7.2 172.16.22.3 jdk-8u102-linux-x64.tar.gz、apache-tomcat-7.0.72.tar.gz
tomcat02 centos7.2 172.16.22.4 jdk-8u102-linux-x64.tar.gz、apache-tomcat-7.0.72.tar.gz
三、安装软件工作
1.安装Nginx
a.首先安裝nginx前需要安裝一些依賴庫 openssl-devel 、zlib-devel 、pcre-devel
[root@~]# yum install -y openssl-devel 、zlib-devel 、pcre-devel
因为程序默认是使用 nobody 身份运行的,我们为了便于查看可以创建nginx 用户来运行,首先添加nginx组和用户,可不创建家目录,并且不允许登陆系统
[root@~]# groupadd nginx
[root@~]# useradd -M -s /sbin/nologin -g nginx nginx
b.解压nginx-1.10.1.tar.gz,并编译
[root@~]# tar xf nginx-1.10.1.tar.gz
[root@~]# cd nginx-1.10.1
# ./configure \
--prefix=/data0/nginx \
--pid-path=/data0/nginx/logs/nginx.pid \
--lock-path=/var/lock/nginx.lock \
--user=nginx \
--group=nginx \
--with-http_ssl_module \
--with-http_flv_module \
--with-http_stub_status_module \
--with-http_gzip_static_module \
--http-client-body-temp-path=/var/tmp/nginx/client/ \
--http-proxy-temp-path=/var/tmp/nginx/proxy/ \
--http-fastcgi-temp-path=/var/tmp/nginx/fcgi/ \
--http-uwsgi-temp-path=/var/tmp/nginx/uwsgi \
--http-scgi-temp-path=/var/tmp/nginx/scgi \
--with-pcre
结果如下:
Configuration summary
+ using system PCRE library
+ using system OpenSSL library
+ md5: using OpenSSL library
+ sha1: using OpenSSL library
+ using system zlib library
nginx path prefix: "/data0/nginx"
nginx binary file: "/data0/nginx/sbin/nginx"
nginx modules path: "/data0/nginx/modules"
nginx configuration prefix: "/data0/nginx/conf"
nginx configuration file: "/data0/nginx/conf/nginx.conf"
nginx pid file: "/data0/nginx/nginx.pid"
nginx error log file: "/data0/nginx/logs/error.log"
nginx http access log file: "/data0/nginx/logs/access.log"
nginx http client request body temporary files: "/var/tmp/nginx/client/"
nginx http proxy temporary files: "/var/tmp/nginx/proxy/"
nginx http fastcgi temporary files: "/var/tmp/nginx/fcgi/"
nginx http uwsgi temporary files: "/var/tmp/nginx/uwsgi"
nginx http scgi temporary files: "/var/tmp/nginx/scgi"
c.上述配置完,就進行編譯安裝
[root@~]# make && make install
[root@~]# mkdir /var/tmp/nginx/client/ -pv
等编译安装完成后在 /data0 下就会出现 nginx 这个目录了,进入这个目录后发现目录非常简单。
它的配置文件存放在 conf 目录中,网页文件存放在 html 中,日志文件存放在 logs 中,
sbin 目录下只有一个可执行程序 "nginx"
d.进入/data0/nginx/conf,配置nginx.conf
配置nginx.conf文件
[root@conf ] vim nginx.conf
user nginx;
#user root;
worker_processes auto;
error_log /data0/nginx/logs/error.log crit;
pid /data0/nginx/logs/nginx.pid;
worker_rlimit_nofile 100000;
events {
worker_connections 2048;
multi_accept on;
use epoll;
}
http {
include /data0/nginx/conf/mime.types;
default_type application/octet-stream;
server_tokens off;
sendfile on;
tcp_nopush on;
tcp_nodelay on;
keepalive_timeout 10;
client_header_timeout 10;
client_body_timeout 10;
reset_timedout_connection on;
send_timeout 10;
limit_conn_zone $binary_remote_addr zone=addr:5m;
limit_conn addr 100;
gzip_disable "msie6";
gzip_proxied any;
gzip_min_length 1000;
gzip_comp_level 6;
gzip_types text/plain text/css application/json application/x-javascript text/xml application/xml application/xml+rss text/javascript;
open_file_cache max=100000 inactive=20s;
open_file_cache_valid 30s;
open_file_cache_min_uses 2;
open_file_cache_errors on;
#load balance
upstream tomcat {
server 172.16.22.3:8080;
server 172.16.22.4:8080;
}
#load balance
server {
listen 80;
server_name localhost;
charset utf-8;
location ~ /uploads/.*\.(gif|jpg|jpeg|png|pdf|doc|xls|docx|xlsx|apk|htm|html|mp4|flv)$ {
expires 24h;
root /data0/nginx/res/home/;
access_log off;
proxy_store on;
proxy_store_access user:rw group:rw all:rw;
proxy_temp_path /data0/nginx/res/home/;
proxy_redirect off;
proxy_set_header Host $host;
proxy_set_header X-Real-IP $remote_addr;
proxy_set_header X-Forwarded-For $proxy_add_x_forwarded_for;
client_max_body_size 20m;
client_body_buffer_size 1280k;
proxy_connect_timeout 900;
proxy_send_timeout 900;
proxy_read_timeout 900;
proxy_buffer_size 40k;
proxy_buffers 40 320k;
proxy_busy_buffers_size 640k;
proxy_temp_file_write_size 640k;
if ( !-e $request_filename)
{
proxy_pass http://127.0.0.1:80;
}
}
location / {
client_max_body_size 20m;
proxy_pass http://localhost:8080/;
proxy_set_header Host $host;
proxy_set_header X-Real-IP $remote_addr;
proxy_set_header X-Forwarded-For $proxy_add_x_forwarded_for;
# allow 113.28.26.107
# deny all;
}
error_page 500 502 503 504 /50x.html;
location = /50x.html {
root html;
}
e.检测配置文档是否准确无误
[root@~] # /data0/nginx/sbin/nginx -t
nginx: the configuration file /data0/work/nginx/conf/nginx.conf syntax is ok
nginx: configuration file /data0/work/nginx/conf/nginx.conf test is successful
#注:如果有问题,通过提示内容进行解决即可
f.启动nginx服务
[root@~] # /data0/nginx/sbin/nginx
g.但是記得關閉防火牆或将端口加入防火墙规则
因为在CentOS 7 以後不再用iptables作為防火牆,直接使用firewall
[root@~]# systemctl stop firewalld.service && systemctl disable firewalld.service
或者
[root@~]# firewall-cmd --permanet --add-port=80/tcp
[root@~]# firewall-cmd --reload
h.打开浏览器访问http://172.16.22.2或者在本机使用[root@~] curl http://localhost:80访问,如果能打开nginx默认网页出现Welcome to nginx字样,则nginx安装成功
2.安裝配置java 與tomcat
a.在安裝tomcat前需要安裝Java
解壓並且進入安裝包
[root@~]# tar -zxvf jdk-8u101-linux-x64.tar.gz
[root@~]# mkdir /usr/local/java
[root@~]mv jdk1.8.0_101/ /usr/local/java/
b.配置環境變量
[root@~]# vim /etc/profile
在最后一行添加上下列信息
# java
export JAVA_HOME=/usr/local/java/jdk1.8.0_101
export JRE_HOME=/usr/local/java/jdk1.8.0_101/jre
export CLASSPATH=.:$JRE_HOME/lib/dt.jar:$JRE_HOME/lib/tools.jar
export PATH=$JRE_HOME/bin:$JRE_HOME/bin:$PATH
c.讓配置生效查看版本
[root@~]# source /etc/profile
[root@~]# java -version
java version "1.8.0_101"
Java(TM) SE Runtime Environment (build 1.8.0_101-b13)
Java HotSpot(TM) 64-Bit Server VM (build 25.101-b13, mixed mode)
d.首先tomcat是一個免安裝軟件直接進行解壓即可,查看tomcat版本及JVM配置環境信息
[root@~]# tar -xf apache-tomcat-7.0.72.tar.gz
[root@~]# sh /data0/tomcat01/bin/version.sh
Using CATALINA_BASE: /data0/tomcat01
Using CATALINA_HOME: /data0/tomcat01
Using CATALINA_TMPDIR: /data0/tomcat01/temp
Using JRE_HOME: /usr/local/java/jdk1.8.0_101/jre
Using CLASSPATH: /data0/tomcat01/bin/bootstrap.jar:/data0/tomcat01/bin/tomcat-juli.jar
Server version: Apache Tomcat/7.0.72
Server built: Sep 14 2016 12:12:26 UTC
Server number: 7.0.72.0
OS Name: Linux
OS Version: 3.10.0-327.el7.x86_64
Architecture: amd64
JVM Version: 1.8.0_101-b13
JVM Vendor: Oracle Corporation
e.启动tomcat服務
[root@~]# sh /data0/tomcat01/bin/startup.sh
f.查看是否開放了tomcat端口 8080 8009 8005,服务是否正常
[root@~]# netstat -nltp
Active Internet connections (only servers)
Proto Recv-Q Send-Q Local Address Foreign Address State PID/Program name
tcp 0 0 0.0.0.0:8009 0.0.0.0:* LISTEN 9844/java
tcp 0 0 0.0.0.0:8080 0.0.0.0:* LISTEN 9844/java
tcp 0 0 0.0.0.0:80 0.0.0.0:* LISTEN 32434/nginx: master
tcp 0 0 127.0.0.1:8005 0.0.0.0:* LISTEN 9844/java
3.呈现访问测试session页面的准备工作
在上述步骤完毕后,便修改tomcat配置文件
a.注:设置默认主机,并增加jvmRoute
[root@~]# vim /data0/tomcat01/conf/server.xml
找到第102行
102 <!-- You should set jvmRoute to support load-balancing via AJP ie :
103 <Engine name="Catalina" defaultHost="localhost" jvmRoute="jvm1">
104 -->
在下面添加下列内容,该jvmRoute改为Tomcat01
如: <Engine name="Catalina" defaultHost="localhost" jvmRoute="Tomcat01">
目的是为了在使用负载均衡层访问页面时,了解承接服务的是哪一台tomcat服务器
#注:tomcat02也是这么做,只是jvmRoute不同,只要把Tomcat01更换成Tomcat02即可
b.在发布文档目录内添加测试文件
[root@~]# vim /data0/tomcat01/webapps/ROOT/jsp/index.jsp
<%@page language="java" import="java.util.*" pageEncoding="UTF-8"%>
<html>
<head>
<title>tomcat01</title>
</head>
<body>
<h2><font color="red">Session serviced by tomcat </font></h2>
<table aligh="center" border="1">
<tr>
<td>Session ID </td>
<td><%=session.getId() %></td>
<% session.setAttribute("abc","adc");%>
</tr>
<tr>
<td>Created on</td>
<td><%=session.getCreationTime() %></td>
</tr>
</table>
</body>
<html>
#注:另外Tomcat02节点与tomcat01节点配置基本类似,另外为了区分由哪个节点提供访问,测试页标题也不同。其他的配置都相同
c.重启tomcat服务,分别进行测试访问index.jsp
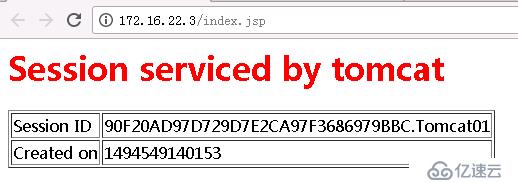
访问Tomcat01测试页面

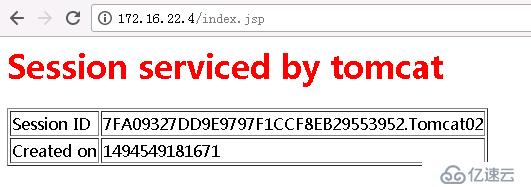
访问Tomcat02测试页面

可以看到访问结果中页面呈现的session ID 不同,到这,可以说准备工作就基本完成,下面我们来配置tomcat的负载均衡,通过session复制实现会话保持。
4.配置tomcat集群环境:
配置会话共享集群,分别在tomcat01和tomcat02完成下面的操作
a.配置server.xml文件
[root@~]# vim /data0/tomcat01/conf/server.xml
找到110行左右
110 <!--
111 <Cluster className="org.apache.catalina.ha.tcp.SimpleTcpCluster"/>
112 -->
在下面添加下列内容:
<Cluster className="org.apache.catalina.ha.tcp.SimpleTcpCluster"
channelSendOptions="8" >
<Manager className="org.apache.catalina.ha.session.DeltaManager"
expireSessionsOnShutdown="false"
notifyListenersOnReplication="true"/>
<Channel className="org.apache.catalina.tribes.group.GroupChannel">
<Membership className="org.apache.catalina.tribes.membership.McastService"
address="228.0.0.4"
port="45564"
frequency="500"
dropTime="3000"/>
<Receiver className="org.apache.catalina.tribes.transport.nio.NioReceiver"
address="auto"
port="4000"
autoBind="100"
selectorTimeout="5000"
maxThreads="6"/>
<Sender className="org.apache.catalina.tribes.transport.ReplicationTransmitter">
<Transport className="org.apache.catalina.tribes.transport.nio.PooledParallelSender"/>
</Sender>
<Interceptor className="org.apache.catalina.tribes.group.interceptors.TcpFailureDetector"/>
<Interceptor className="org.apache.catalina.tribes.group.interceptors.MessageDispatch25Interceptor"/>
</Channel>
<Valve className="org.apache.catalina.ha.tcp.ReplicationValve"
filter=".*\.gif|.*\.js|.*\.jpeg|.*\.jpg|.*\.png|.*\.htm|.*\.html|.*\.css|.*\.txt"/>
<Valve className="org.apache.catalina.ha.session.JvmRouteBinderValve"/>
<Deployer className="org.apache.catalina.ha.deploy.FarmWarDeployer"
tempDir="/tmp/war-temp/"
deployDir="/tmp/war-deploy/"
watchDir="/tmp/war-listen/"
watchEnabled="false"/>
<ClusterListener className="org.apache.catalina.ha.session.JvmRouteSessionIDBinderListener"/>
<ClusterListener className="org.apache.catalina.ha.session.ClusterSessionListener"/>
</Cluster>
#上述添加集群的内容来自于官网配置文档,请参考:http://tomcat.apache.org/tomcat-7.0-doc/cluster-howto.html
b.配置应用代码目录下的web.xml文件
修改应用的web.xml文件,加入标签<distributable/>,这是tomcat集群实现session复制的的关键,如果没有添加,Tomcat集群可以说就无法实现。设置很简单如下所示:
[root@~]# vim /data0/tomcat01/webapps/ROOT/WEB-INF/web.xml
<welcome-file>index.shtml</welcome-file>
<welcome-file>index.jspx</welcome-file>
</welcome-file-list>
<distributable/> --添加的
</web-app>
#注:直接加在</web-app>之前就可以了。
c.两台Tomcat均按上述步骤修改了配置文档后,我们重启下两台Tomcat服务器,并通过浏览器访问jsp测试页面
我们重启下两台Tomcat服务器Tomcat服务
tomcat02重启Tomcat服务
[root@~]#sh /data0/tomcat02/bin/shutdown.sh
[root@~]#sh /data0/tomcat02/bin/startup.sh
再对tomcat01重启Tomcat服务
[root@~]#sh /data0/tomcat01/bin/shutdown.sh
[root@~]#sh /data0/tomcat01/bin/startup.sh
查看先启动那台机器上的catalina.out日志
[root@tomcat02 ~]# tail -f /data0/work/tomcat02/logs/catalina.out
May 11, 2017 11:46:29 AM org.apache.catalina.ha.tcp.SimpleTcpCluster memberAdded
INFO: Replication member added:org.apache.catalina.tribes.membership.MemberImpl[tcp://{172, 16, 22, 3}:4000,{172, 16, 22, 3},4000, alive=1011, securePort=-1, UDP Port=-1, id={-66 109 3 57 13 98 70 60 -86 23 -103 16 91 -52 -91 -49 }, payload={}, command={}, domain={}, ]
从上面的SimpleTcpCluster memberAdded来看tomcat01和tomcat02成了集群成员了。
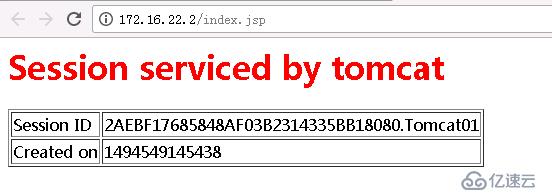
然后访问负载均衡层的测试页面

刷新,再看测试页面

大家可以从图中看到,不管你怎么刷新SessionID都不会变,只有承载的服务器在变化而已,从而说明我们的Tomcat的DeltaManager集群配置完成,实现了会话共享。
以上就是如何搭建Tomcat7 session同步集群,小编相信有部分知识点可能是我们日常工作会见到或用到的。希望你能通过这篇文章学到更多知识。更多详情敬请关注亿速云行业资讯频道。
亿速云「云服务器」,即开即用、新一代英特尔至强铂金CPU、三副本存储NVMe SSD云盘,价格低至29元/月。点击查看>>
免责声明:本站发布的内容(图片、视频和文字)以原创、转载和分享为主,文章观点不代表本网站立场,如果涉及侵权请联系站长邮箱:is@yisu.com进行举报,并提供相关证据,一经查实,将立刻删除涉嫌侵权内容。