这篇文章给大家分享的是有关DedeCms 5.7代码高亮的实现方法的内容。小编觉得挺实用的,因此分享给大家做个参考。一起跟随小编过来看看吧。
DedeCms 5.7代码高亮怎么实现?
无论建博客网站还是CMS类型网站,很多都需要代码高亮,织梦CMS是国内比较优秀的CMS建站系统之一,不像Wordpress一样有大把大把的插件可用,我用的是最新的dedeCMS 5.7,在网上搜了很长时间资料,大都写的是CKEditor和SyntaxHighlighter整合的文章,但是dedecms将ckeditor做了集成,和一般的只针对于ckeditor对config.js修改不同。
所以只能自己琢磨修改了,现将方法写出供站长朋友们参考:
一、首先去SyntaxHighlighter官方网站下载,网址:http://alexgorbatchev.com/SyntaxHighlighter/download/,建议下载2.1版本,3.0版本的貌似不支持自动换行,这里使用的是2.1.382版本。将下载的文件解压在syntaxHighlight文件夹里,去除里面无用的文件,只留下scripts和styles文件夹。
二、新建dialogs文件夹,在里面新建一个名为syntaxhighlight.js的文件,因代码量过大,不宜贴出,请直接下载syntaxhighlight.js
如果想修改代码区域的样式请在以下代码处修改<table>标签里的样式。
代码如下:
onOk : function() {
var i = this.getParentEditor();
var h = i.getSelection();
var g = h.getStartElement();
var l = g && g.getAscendant("pre", true);
var j = f();
this.commitContent(j);
var k = e(j);
var m = CKEDITOR.dom.element
.createFromHtml('<table style="border:1px solid #EAED9C;width:660px;"><tr><td><pre class="' + k + '">'
+ c(j.code) +"</pre></td></tr><table>");
if (l) {
m.insertBefore(l);
l.remove()
} else {
i.insertElement(m)
}
},
三、然后新建images文件夹,存放一个syntaxhighlight.gif图片文件,该图片文件在编辑器工具栏上显示,可以使用16*16像素的图片
四、新建lang文件夹,是语言包,里面有两个文件,一个是中文cn.js一个是英文en.js,代码内容如下:
en.js代码如下:
代码如下:
CKEDITOR.plugins.setLang('syntaxhighlight', 'en',
{
syntaxhighlight:
{
title: 'Add or update a code snippet',
sourceTab: 'Source code',
langLbl: 'Select language',
advancedTab: 'Advanced',
hideGutter: 'Hide gutter',
hideGutterLbl: 'Hide gutter & line numbers.',
hideControls: 'Hide controls',
hideControlsLbl: 'Hide code controls at the top of the code block.',
collapse: 'Collapse',
collapseLbl: 'Collapse the code block by default. (controls need to be turned on)',
showColumns: 'Show columns',
showColumnsLbl: 'Show row columns in the first line.',
lineWrap: 'Disable line wrapping',
lineWrapLbl: 'Switch off line wrapping.',
lineCount: 'Default line count',
highlight: 'Highlight lines',
highlightLbl: 'Enter a comma seperated lines of lines you want to highlight, eg <em>3,10,15</em>.'
}
});
cn.js代码如下:
代码如下:
CKEDITOR.plugins.setLang('syntaxhighlight', 'cn',
{
syntaxhighlight:
{
title: '添加或更新代码',
sourceTab: '代码',
langLbl: '选择语言',
advancedTab: '高级',
hideGutter: '隐藏分割线',
hideGutterLbl: '隐藏分割线和行号',
hideControls: '隐藏工具栏',
hideControlsLbl: '隐藏浮动工具栏',
collapse: '代码折叠',
collapseLbl: '默认折叠代码块 (需要启用工具栏)',
lineWrap: '自动换行',
lineWrapLbl: '关闭自动换行',
autoLinks: '自动链接',
autoLinksLbl: '不自动转换超链接',
lineCount: '起始行号',
highlight: '高亮行号',
highlightLbl: '输入以逗号分隔的行号, 如 <em>3,10,15</em>.'
}
});
五、新建plugin.js文件,该文件是ckeditor插件必须得文件,里面是对该插件的一些配置,代码如下:
代码如下:
CKEDITOR.plugins.add("syntaxhighlight", {
requires : [ "dialog" ],
lang : [ "cn" ],
init : function(a) {
var b = "syntaxhighlight";
var c = a.addCommand(b, new CKEDITOR.dialogCommand(b));
c.modes = {
wysiwyg : 1,
source : 1
};
c.canUndo = false;
a.ui.addButton("Code", {
label : a.lang.syntaxhighlight.title,
command : b,
icon : this.path + "images/syntaxhighlight.gif"
});
CKEDITOR.dialog.add(b, this.path + "dialogs/syntaxhighlight.js")
}
});
六、由于dedecms 5.7自己集成了一个dedepage插件,用来添加ckeditor自定义插件,在/include/ckeditor/dedepage文件夹下,打开plugin.js文件在最后面添加:
requires : ['syntaxhighlight'],其中syntaxhighlight为代码高亮插件的文件夹名,添加完之后的代码如下:
[code]
// Register a plugin named "dedepage".
(function()
{
CKEDITOR.plugins.add( 'dedepage',
{
init : function( editor )
{
// Register the command.
editor.addCommand( 'dedepage',{
exec : function( editor )
{
// Create the element that represents a print break.
// alert('dedepageCmd!');
editor.insertHtml("
");
}
});
// alert('dedepage!');
// Register the toolbar button.
editor.ui.addButton( 'MyPage',
{
label : '插入分页符',
command : 'dedepage',
icon: 'images/dedepage.gif'
});
// alert(editor.name);
},
requires : [ 'fakeobjects' ],
requires : ['syntaxhighlight']
});
})();
[/code]
七、修改/include/ckeditor/ckeditor.inc.php文件,在$toolbar['Basic']数组的最后一行添加元素Code,修改后代码如下:
代码如下:
$toolbar['Basic'] = array(
array( 'Source','-','Templates'),
array( 'Cut','Copy','Paste','PasteText','PasteFromWord','-','Print'),
array( 'Undo','Redo','-','Find','Replace','-','SelectAll','RemoveFormat'),
array( 'ShowBlocks'),array('Image','Flash'),array('Maximize'),'/',
array( 'Bold','Italic','Underline','Strike','-'),
array( 'NumberedList','BulletedList','-','Outdent','Indent','Blockquote'),
array( 'JustifyLeft','JustifyCenter','JustifyRight','JustifyBlock'),
array( 'Table','HorizontalRule','Smiley','SpecialChar'),
array( 'Link','Unlink','Anchor'),'/',
array( 'Styles','Format','Font','FontSize'),
array( 'TextColor', 'BGColor', 'MyPage','Code')
);
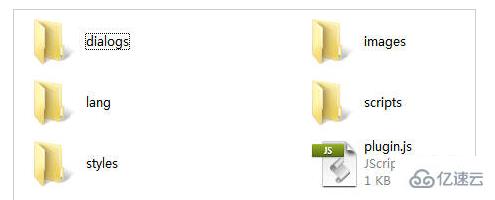
至此,编辑器的修改已经完成,修改后的syntaxhighlight文件夹文件目录结构图如下图:

将syntaxhighlight文件夹上传到/include/ckeditor/plugins/文件夹下,打开后台,添加文章试一下,看看编辑器的上最后一行是否出现了如图所示的按钮:

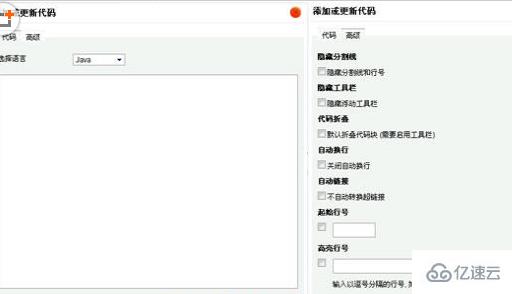
点击按钮弹出如下图所示的对话框输入代码,并且可以切换到高级选项对代码高亮显示做一些配置:

八、但是光这些还不够,还要在文章模板文件/templets/default/article_article.htm文件里引入高亮显示的笔刷JS文件和CSS文件,由于是需要引入很多JS,所以建议将引入的代码放在</body>标签之前,等待前面的网页加载完后加载,进行显示。
代码如下:
<script type="text/javascript" src="/include/ckeditor/plugins/syntaxhighlight/scripts/shCore.js"> </script>
<script type="text/javascript" src="/include/ckeditor/plugins/syntaxhighlight/scripts/shBrushJava.js"></script>
<script type="text/javascript" src="/include/ckeditor/plugins/syntaxhighlight/scripts/shBrushJScript.js"></script>
<script type="text/javascript" src="/include/ckeditor/plugins/syntaxhighlight/scripts/shBrushPhp.js"></script>
<script type="text/javascript" src="/include/ckeditor/plugins/syntaxhighlight/scripts/shBrushScala.js"></script>
<script type="text/javascript" src="/include/ckeditor/plugins/syntaxhighlight/scripts/shBrushSql.js"></script>
<script type="text/javascript" src="/include/ckeditor/plugins/syntaxhighlight/scripts/shBrushVb.js"></script>
<script type="text/javascript" src="/include/ckeditor/plugins/syntaxhighlight/scripts/shBrushXml.js"></script>
<script type="text/javascript" src="/include/ckeditor/plugins/syntaxhighlight/scripts/shBrushBash.js"></script>
<script type="text/javascript" src="/include/ckeditor/plugins/syntaxhighlight/scripts/shBrushCpp.js"></script>
<script type="text/javascript" src="/include/ckeditor/plugins/syntaxhighlight/scripts/shBrushCSharp.js"></script>
<script type="text/javascript" src="/include/ckeditor/plugins/syntaxhighlight/cripts/shBrushCss.js"></script>
<script type="text/javascript" src="/include/ckeditor/plugins/syntaxhighlight/scripts/shBrushDelphi.js"></script>
<script type="text/javascript" src="/include/ckeditor/plugins/syntaxhighlight/scripts/shBrushDiff.js"></script>
<script type="text/javascript" src="/include/ckeditor/plugins/syntaxhighlight/scripts/shBrushGroovy.js"></script>
<script type="text/javascript" src="/include/ckeditor/plugins/syntaxhighlight/scripts/shBrushPlain.js"></script>
<script type="text/javascript" src="/include/ckeditor/plugins/syntaxhighlight/scripts/shBrushPython.js"></script>
<script type="text/javascript" src="/include/ckeditor/plugins/syntaxhighlight/scripts/shBrushRuby.js"></script>
<link type="text/css" rel="stylesheet" href="/include/ckeditor/plugins/syntaxhighlight/styles/shCore.css"/>
<link type="text/css" rel="stylesheet" href="/include/ckeditor/plugins/syntaxhighlight/styles/shThemeDefault.css"/>
<script type="text/javascript">
SyntaxHighlighter.config.clipboardSwf = '/include/ckeditor/plugins/syntaxhighlight/scripts/clipboard.swf';
SyntaxHighlighter.all();
</script>
最后发表并生成的文章页面效果图如下:

当然,该整合也有点缺点,就是在html页面页面中可能会引入大量的JS文件,加载起来可能会比较慢,另外可拓展性不强,我也会不定期优化该插件,也希望各位网友能提出意见。
感谢各位的阅读!关于DedeCms 5.7代码高亮的实现方法就分享到这里了,希望以上内容可以对大家有一定的帮助,让大家可以学到更多知识。如果觉得文章不错,可以把它分享出去让更多的人看到吧!
免责声明:本站发布的内容(图片、视频和文字)以原创、转载和分享为主,文章观点不代表本网站立场,如果涉及侵权请联系站长邮箱:is@yisu.com进行举报,并提供相关证据,一经查实,将立刻删除涉嫌侵权内容。