本篇内容主要讲解“docker镜像管理基础以及镜像的制作方法”,感兴趣的朋友不妨来看看。本文介绍的方法操作简单快捷,实用性强。下面就让小编来带大家学习“docker镜像管理基础以及镜像的制作方法”吧!
首发:arppinging
在之前的文章我们提到过,容器是基于镜像启动的,镜像的存储驱动是overlay2
overlayFS将单个Linux主机上的两个目录合成一个目录,这些目录称为层,统一过程被称为联合挂载。
下图是一个docker镜像和docke容器的分层图,docker镜像是lowdir,docker容器是upperdir。而统一的视图层是merged层。
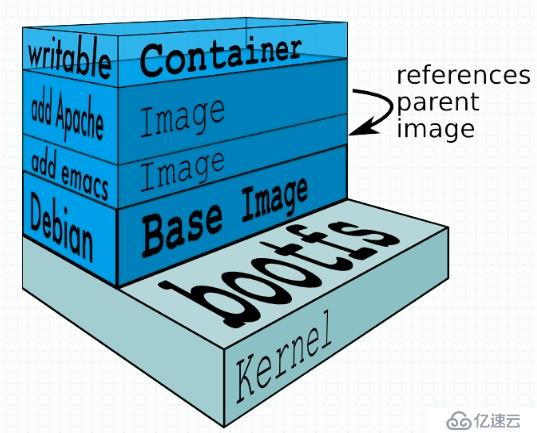
如果一个镜像有多层的话,那么它的启动过程需要进行联合挂载,如下图,centos被称为基础镜像(base image),在基础镜像上安装了nginx,形成新的层。如果基于镜像进行启动,启动的顺序应该为centos-->nginx,因为nginx的文件依赖于centos,如果基础镜像没有启动,那么上面的层就没有可以使用的文件系统,所以,必须要centos启动并挂载了文件系统之后,nginx才能启动和使用文件系统。

镜像的分层构建和联合挂载都依赖于专用的文件系统支撑。
docker可使用的文件系统有:aufs、overlayFS、btrfs、devicemapper(dm)。
不同系统默认支持的文件系统也不一样,比如ubuntu默认使用的是aufs,centos 7上,使用的是devicemapper,在内核版本为3.18之后,使用的是overlayfs。其中devicemapper(dm)也是linux中lvm使用的文件系统。
镜像的本身时候只读的
位于下层的镜像称为父镜像(parent image),最底层的称为基础镜像(base image),当基于镜像运行容器的时候,最上层的为可写层,其下的均为只读层。所有的写操作只能在最上面的wirtable写入,一旦删除容器,可写层 wirtable的数据也会一并被删除。
docker镜像包含有启动容器所需要的文件系统及其内容,因此,其用于创建并启动docker容器。
docker采用分层的构建机制,最底层为bootfs(引导文件系统),其之为rootfs。
bootfs:用于系统引导的文件系统,包括bootloader和kernel,容器启动后会自动卸载(并非删除)以节省资源。所以bootfs仅仅用于引导文件系统。
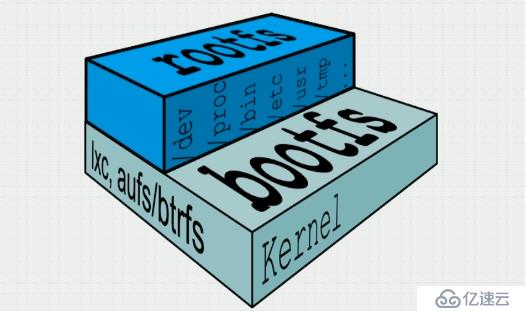
rootfs:位于bootfs之上,表现为docker容器的根文件系统(/目录及其子目录)
在传统模式中(完整的操作系统),系统启动时,内核挂载rootfs时会首先挂载为只读模式,完整性自检完成后将其重新挂载为读写模式。而在docker中,rootfs由内核挂载为只读模式,而后通过联合挂载技术额外挂载一个可写层。
镜像制作的有automated build、docker file和基于容器制作等方式。
默认情况下,docker会在dockerhub.com获取镜像,如果我们要在别的网站获取镜像的话,需要指定。
格式:docker pull <registry>[:port]/[namespace]:<name>:<tag>
在quay.io获取一个镜像
[root@node1 /]# docker pull quay.io/coreos/flannel:v0.10.0-amd64
v0.10.0-amd64: Pulling from coreos/flannel
ff3a5c916c92: Pull complete
8a8433d1d437: Pull complete
306dc0ee491a: Pull complete
856cbd0b7b9c: Pull complete
af6d1e4decc6: Pull complete
Digest: sha256:88f2b4d96fae34bfff3d46293f7f18d1f9f3ca026b4a4d288f28347fcb6580ac
Status: Downloaded newer image for quay.io/coreos/flannel:v0.10.0-amd64
[root@node1 /]#
在容器上做符合需求的修改,然后构建成新的镜像。
命令格式:docker commit [options] container [repository[:tag]]
常用option:-p:在制作镜像的过程中停止运行容器,以防在镜像制作的过程中容器有新的文件写入,导致文件不完整。-c:修改基础镜像的参数-a:作者
如果没有填写repository和tag,默认为Null
基于busybox镜像运行容器b1,并在b1上创建新的文件。
[root@node1 /]# docker run --name b1 -it busybox
/ # ls
bin   dev   etc   home  proc  root  sys   tmp   usr   var
/ # mkdir /data/html/
/ # mkdir -p /data/html/
/ # vi /data/html/index.html
/ #
命令格式:docker commit [options] container [repository[:tag]]
打开另一个窗口,基于b1容器进行镜像制作
[root@node1 ~]# docker commit -a arppinging -p b1 web1:v1
sha256:d63a2e64d5d84196356d8bbd9cf46c1e87b904cce3deef6fac2cae61f503b4a6
[root@node1 ~]# docker image ls
REPOSITORY               TAG                 IMAGE ID            CREATED             SIZE
web1                     v1                  d63a2e64d5d8        5 seconds ago       1.15MB
nginx                    1.14-alpine         77bae8d00654        5 weeks ago         17.7MB
redis                    4-alpine            05097a3a0549        2 months ago        30MB
busybox                  latest              59788edf1f3e        2 months ago        1.15MB
quay.io/coreos/flannel   v0.10.0-amd64       f0fad859c909        10 months ago       44.6MB
[root@node1 ~]#
基于新的镜像运行容器,查看增加的文件是否存在。
[root@node1 ~]# docker run --name b2 -it web1:v1
/ # cat /data/html/index.html
<h2>welcome to arppinging.com<h2>
/ #
镜像默认的执行命令类似于自启动程序一样,只要我们基于镜像启动容器,那么容器就会运行该命令。
需要注意的是:如果我们想要一个容器始终处于运行状态,那么它必须有程序是在前台运行的。
查看web1:v1 镜像默认执行的命令
[root@node1 ~]# docker inspect web1:v1 | more
[
    {
        "Id": "sha256:d63a2e64d5d84196356d8bbd9cf46c1e87b904cce3deef6fac2cae61f503b4a6",
        "RepoTags": [
            "web1:v1"
        ],
        "RepoDigests": [],
        "Parent": "sha256:59788edf1f3e78cd0ebe6ce1446e9d10788225db3dedcfd1a59f764bad2b2690",
        "Comment": "",
        "Created": "2018-12-16T03:43:22.600775608Z",
        "Container": "2e45357a5285dc8465c6273f9969f0168e55b03455e16c23a4793aef8cb811e7",
        "ContainerConfig": {
            "Hostname": "2e45357a5285",
            "Domainname": "",
            "User": "",
            "AttachStdin": true,
            "AttachStdout": true,
            "AttachStderr": true,
            "Tty": true,
            "OpenStdin": true,
            "StdinOnce": true,
            "Env": [
                "PATH=/usr/local/sbin:/usr/local/bin:/usr/sbin:/usr/bin:/sbin:/bin"
            ],
            "Cmd": [
                "sh"
            ],
            "ArgsEscaped": true,
            "Image": "busybox",
            "Volumes": null,
            "WorkingDir": "",
            "Entrypoint": null,
            "OnBuild": null,
            "Labels": {}
        },
        "DockerVersion": "18.09.0",
        "Author": "arppinging",
        "Config": {
            "Hostname": "2e45357a5285",
            "Domainname": "",
            "User": "",
            "AttachStdin": true,
            "AttachStdout": true,
            "AttachStderr": true,
            "Tty": true,
            "OpenStdin": true,
            "StdinOnce": true,
            "Env": [
                "PATH=/usr/local/sbin:/usr/local/bin:/usr/sbin:/usr/bin:/sbin:/bin"
            ],
            "Cmd": [
                "sh"
            ],
            "ArgsEscaped": true,
            "Image": "busybox",
            "Volumes": null,
            "WorkingDir": "",
            "Entrypoint": null,
            "OnBuild": null,
            "Labels": {}
        },
        "Architecture": "amd64",
        "Os": "linux",
        "Size": 1154454,
        "VirtualSize": 1154454,
        "GraphDriver": {
            "Data": {
                "LowerDir": "/var/lib/docker/overlay2/294014f41c7dd6e411b4dcf7cebfc8762cdf32b74d49ce58413ca311d21bf7b1
/diff",
                "MergedDir": "/var/lib/docker/overlay2/8afb453743527c6b9472a9d585d1725212d64fa582bcc58558e793dc01cb211
9/merged",
                "UpperDir": "/var/lib/docker/overlay2/8afb453743527c6b9472a9d585d1725212d64fa582bcc58558e793dc01cb2119
/diff",
                "WorkDir": "/var/lib/docker/overlay2/8afb453743527c6b9472a9d585d1725212d64fa582bcc58558e793dc01cb2119/
work"
            },
            "Name": "overlay2"
        },
        "RootFS": {
            "Type": "layers",
            "Layers": [
                "sha256:8a788232037eaf17794408ff3df6b922a1aedf9ef8de36afdae3ed0b0381907b",
                "sha256:3b385ace78f4f55bf74f7c9964870173820b06bd1c0d5fbe55da9314d141c5cc"
            ]
        },
        "Metadata": {
            "LastTagTime": "2018-12-16T11:43:22.602292651+08:00"
        }
    }
]
[root@node1 ~]# docker inspect web1:v1
[
    {
        "Id": "sha256:d63a2e64d5d84196356d8bbd9cf46c1e87b904cce3deef6fac2cae61f503b4a6",
        "RepoTags": [
            "web1:v1"
        ],
        "RepoDigests": [],
        "Parent": "sha256:59788edf1f3e78cd0ebe6ce1446e9d10788225db3dedcfd1a59f764bad2b2690",
        "Comment": "",
        "Created": "2018-12-16T03:43:22.600775608Z",
        "Container": "2e45357a5285dc8465c6273f9969f0168e55b03455e16c23a4793aef8cb811e7",
        "ContainerConfig": {
            "Hostname": "2e45357a5285",
            "Domainname": "",
            "User": "",
            "AttachStdin": true,
            "AttachStdout": true,
            "AttachStderr": true,
            "Tty": true,
            "OpenStdin": true,
            "StdinOnce": true,
            "Env": [
                "PATH=/usr/local/sbin:/usr/local/bin:/usr/sbin:/usr/bin:/sbin:/bin"
            ],
            "Cmd": [
                "sh"
            ],
            "ArgsEscaped": true,
            "Image": "busybox",
            "Volumes": null,
            "WorkingDir": "",
            "Entrypoint": null,
            "OnBuild": null,
            "Labels": {}
        },
        "DockerVersion": "18.09.0",
        "Author": "arppinging",
        "Config": {
            "Hostname": "2e45357a5285",
            "Domainname": "",
            "User": "",
            "AttachStdin": true,
            "AttachStdout": true,
            "AttachStderr": true,
            "Tty": true,
            "OpenStdin": true,
            "StdinOnce": true,
            "Env": [
                "PATH=/usr/local/sbin:/usr/local/bin:/usr/sbin:/usr/bin:/sbin:/bin"
            ],
            "Cmd": [
                "sh"
            ],
            "ArgsEscaped": true,
            "Image": "busybox",
            "Volumes": null,
            "WorkingDir": "",
            "Entrypoint": null,
            "OnBuild": null,
            "Labels": {}
        },
        "Architecture": "amd64",
        "Os": "linux",
        "Size": 1154454,
        "VirtualSize": 1154454,
        "GraphDriver": {
            "Data": {
                "LowerDir": "/var/lib/docker/overlay2/294014f41c7dd6e411b4dcf7cebfc8762cdf32b74d49ce58413ca311d21bf7b1/diff",
                "MergedDir": "/var/lib/docker/overlay2/8afb453743527c6b9472a9d585d1725212d64fa582bcc58558e793dc01cb2119/merged",
                "UpperDir": "/var/lib/docker/overlay2/8afb453743527c6b9472a9d585d1725212d64fa582bcc58558e793dc01cb2119/diff",
                "WorkDir": "/var/lib/docker/overlay2/8afb453743527c6b9472a9d585d1725212d64fa582bcc58558e793dc01cb2119/work"
            },
            "Name": "overlay2"
        },
        "RootFS": {
            "Type": "layers",
            "Layers": [
                "sha256:8a788232037eaf17794408ff3df6b922a1aedf9ef8de36afdae3ed0b0381907b",
                "sha256:3b385ace78f4f55bf74f7c9964870173820b06bd1c0d5fbe55da9314d141c5cc"
            ]
        },
        "Metadata": {
            "LastTagTime": "2018-12-16T11:43:22.602292651+08:00"
        }
    }
]
可以看到其“Cmd”为sh,那如果我们想要将镜像默认的命令改为在前台运行httpd服务的话,需要怎么做呢?
修改镜像的默认命令(需要重新构建一个镜像)
[root@node1 ~]#
[root@node1 ~]# docker commit  -a "arppinging <admin@arppinging.com>" -c 'CMD ["/bin/httpd","-f","-h","/data/html/"]' -p b1 web1:v2
sha256:1918f7fd1895f3535ab3b6a2a3c6411bdae4173cc85a962f09e07d7e13f9ea7d
[root@node1 ~]#
httpd参数:
-f:在前端运行
-h:指定http的目录
查看镜像的默认命令是否被修改
[root@node1 ~]# docker inspect web1:v2 | less
[
    {
        "Id": "sha256:1918f7fd1895f3535ab3b6a2a3c6411bdae4173cc85a962f09e07d7e13f9ea7d",
        "RepoTags": [
            "web1:v2"
        ],
        "RepoDigests": [],
        "Parent": "sha256:59788edf1f3e78cd0ebe6ce1446e9d10788225db3dedcfd1a59f764bad2b2690",
        "Comment": "",
        "Created": "2018-12-16T03:58:21.298236626Z",
        "Container": "2e45357a5285dc8465c6273f9969f0168e55b03455e16c23a4793aef8cb811e7",
        "ContainerConfig": {
            "Hostname": "2e45357a5285",
            "Domainname": "",
            "User": "",
            "AttachStdin": true,
            "AttachStdout": true,
            "AttachStderr": true,
            "Tty": true,
            "OpenStdin": true,
            "StdinOnce": true,
            "Env": [
                "PATH=/usr/local/sbin:/usr/local/bin:/usr/sbin:/usr/bin:/sbin:/bin"
            ],
            "Cmd": [
                "sh"
            ],
            "ArgsEscaped": true,
            "Image": "busybox",
            "Volumes": null,
            "WorkingDir": "",
            "Entrypoint": null,
            "OnBuild": null,
            "Labels": {}
        },
        "DockerVersion": "18.09.0",
        "Author": "arppinging <admin@arppinging.com>",
        "Config": {
            "Hostname": "2e45357a5285",
            "Domainname": "",
            "User": "",
            "AttachStdin": true,
            "AttachStdout": true,
            "AttachStderr": true,
            "Tty": true,
            "OpenStdin": true,
            "StdinOnce": true,
            "Env": [
                "PATH=/usr/local/sbin:/usr/local/bin:/usr/sbin:/usr/bin:/sbin:/bin"
            ],
            "Cmd": [
                "/bin/httpd",
                "-f",
                "-h",
                "/data/html/"
            ],
            "ArgsEscaped": true,
            "Image": "busybox",
            "Volumes": null,
"WorkingDir": "",可以看到cmd已经被修改为/bin/httpd -f -g /data/html
基于新的镜像运行容器,并验证httpd服务是否自动开启。
[root@node1 ~]# docker run --name http_1 web1:v2
由于服务在前端运行,所以启动了之后会发现命令行无反应。可以打开另一个窗口使用docker inspet http_1查看IP,并使用curl验证是否能获取网页信息。
[root@node1 ~]# curl 172.17.0.3
<h2>welcome to arppinging.com<h2>
[root@node1 ~]#
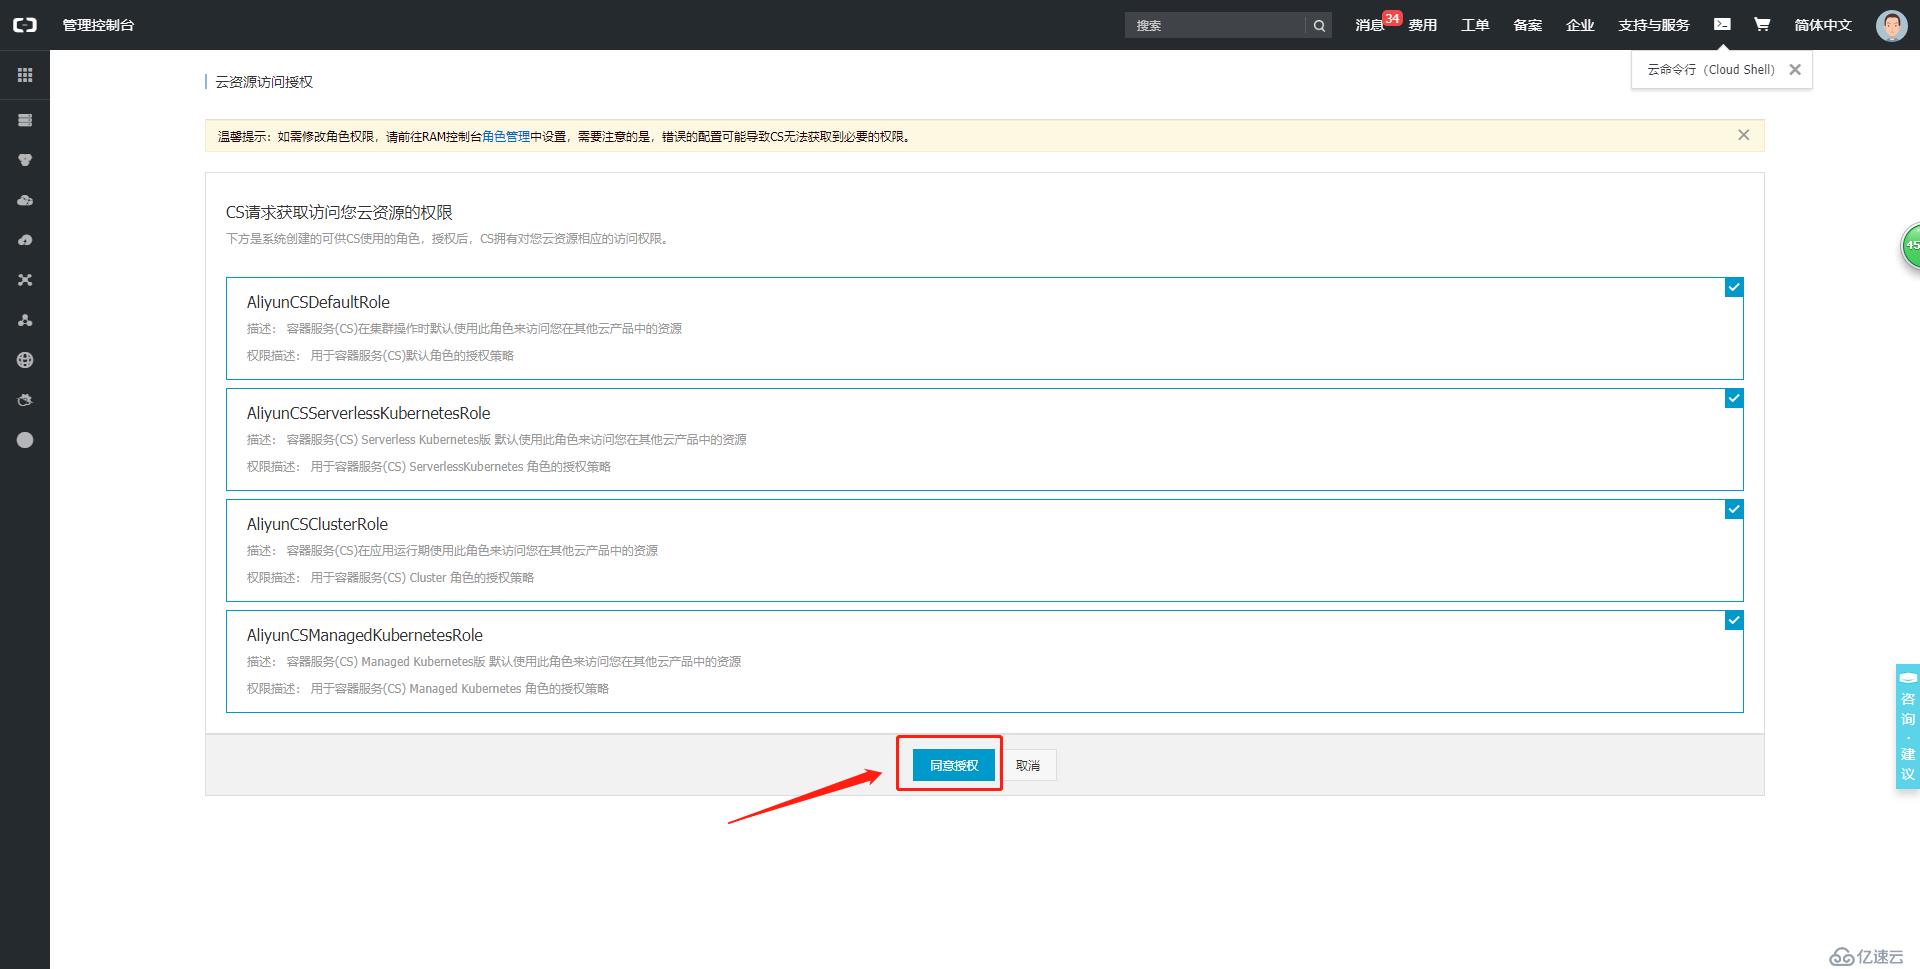
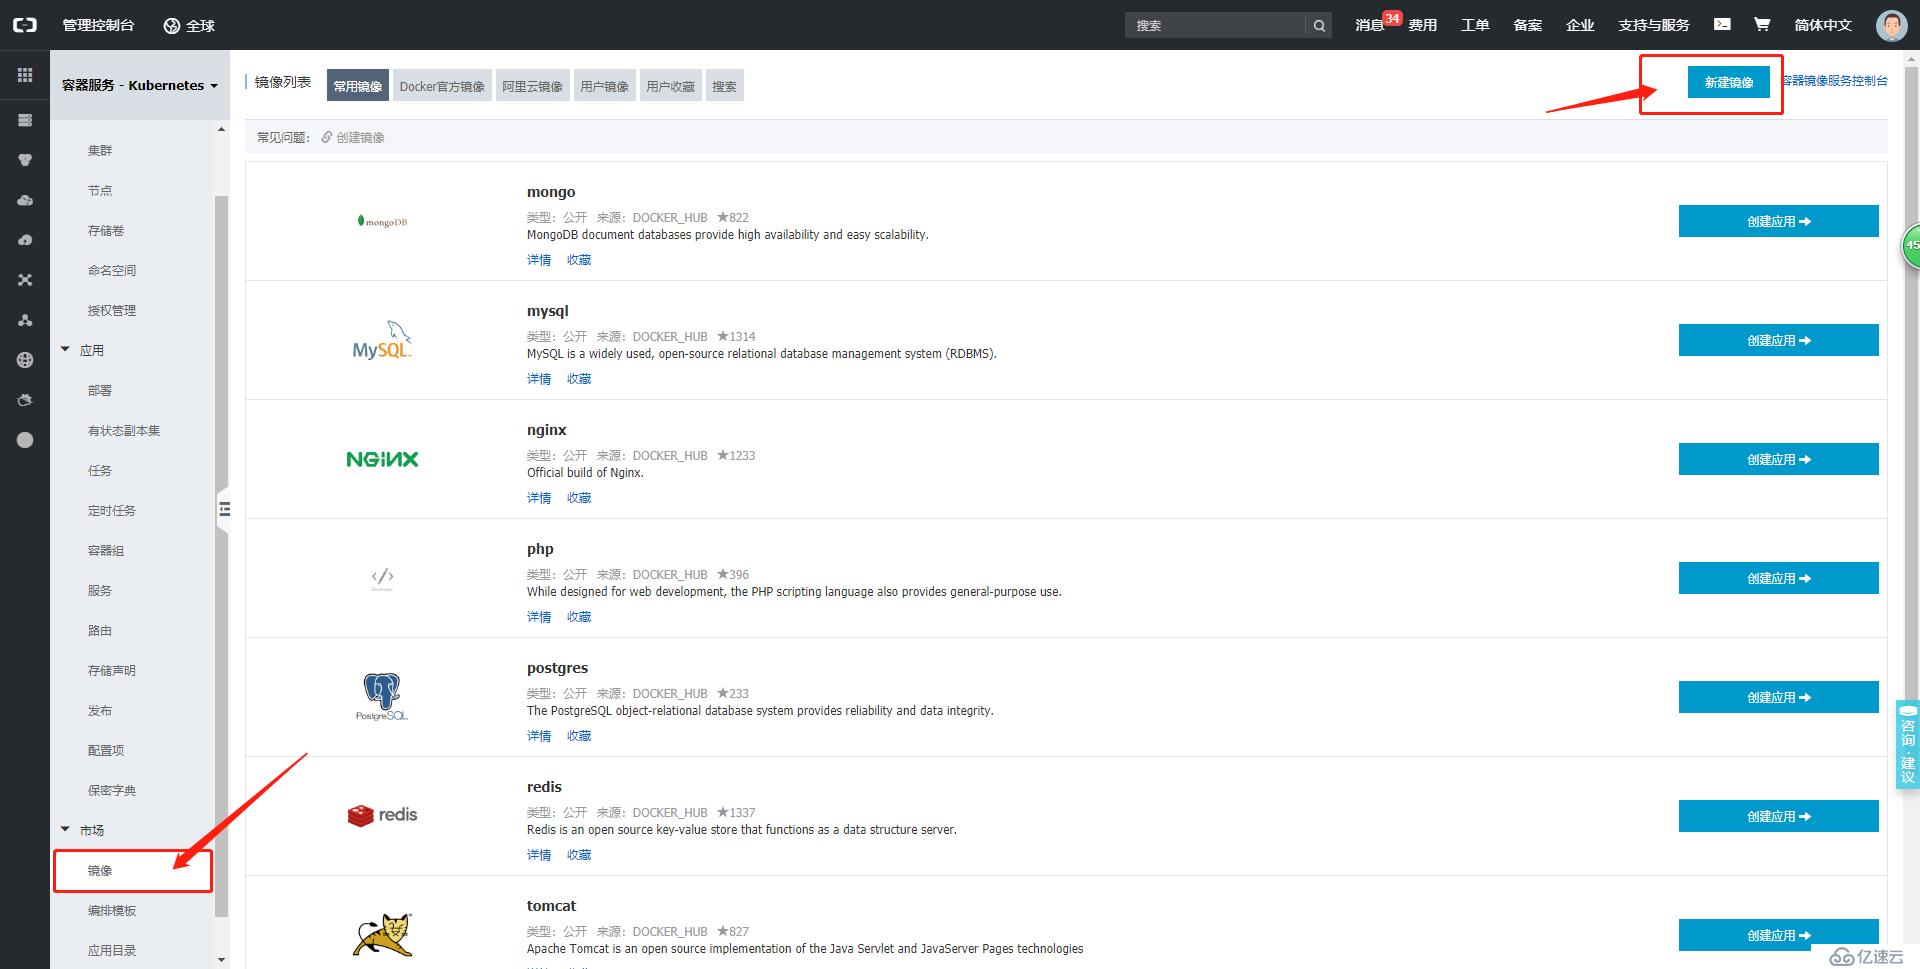
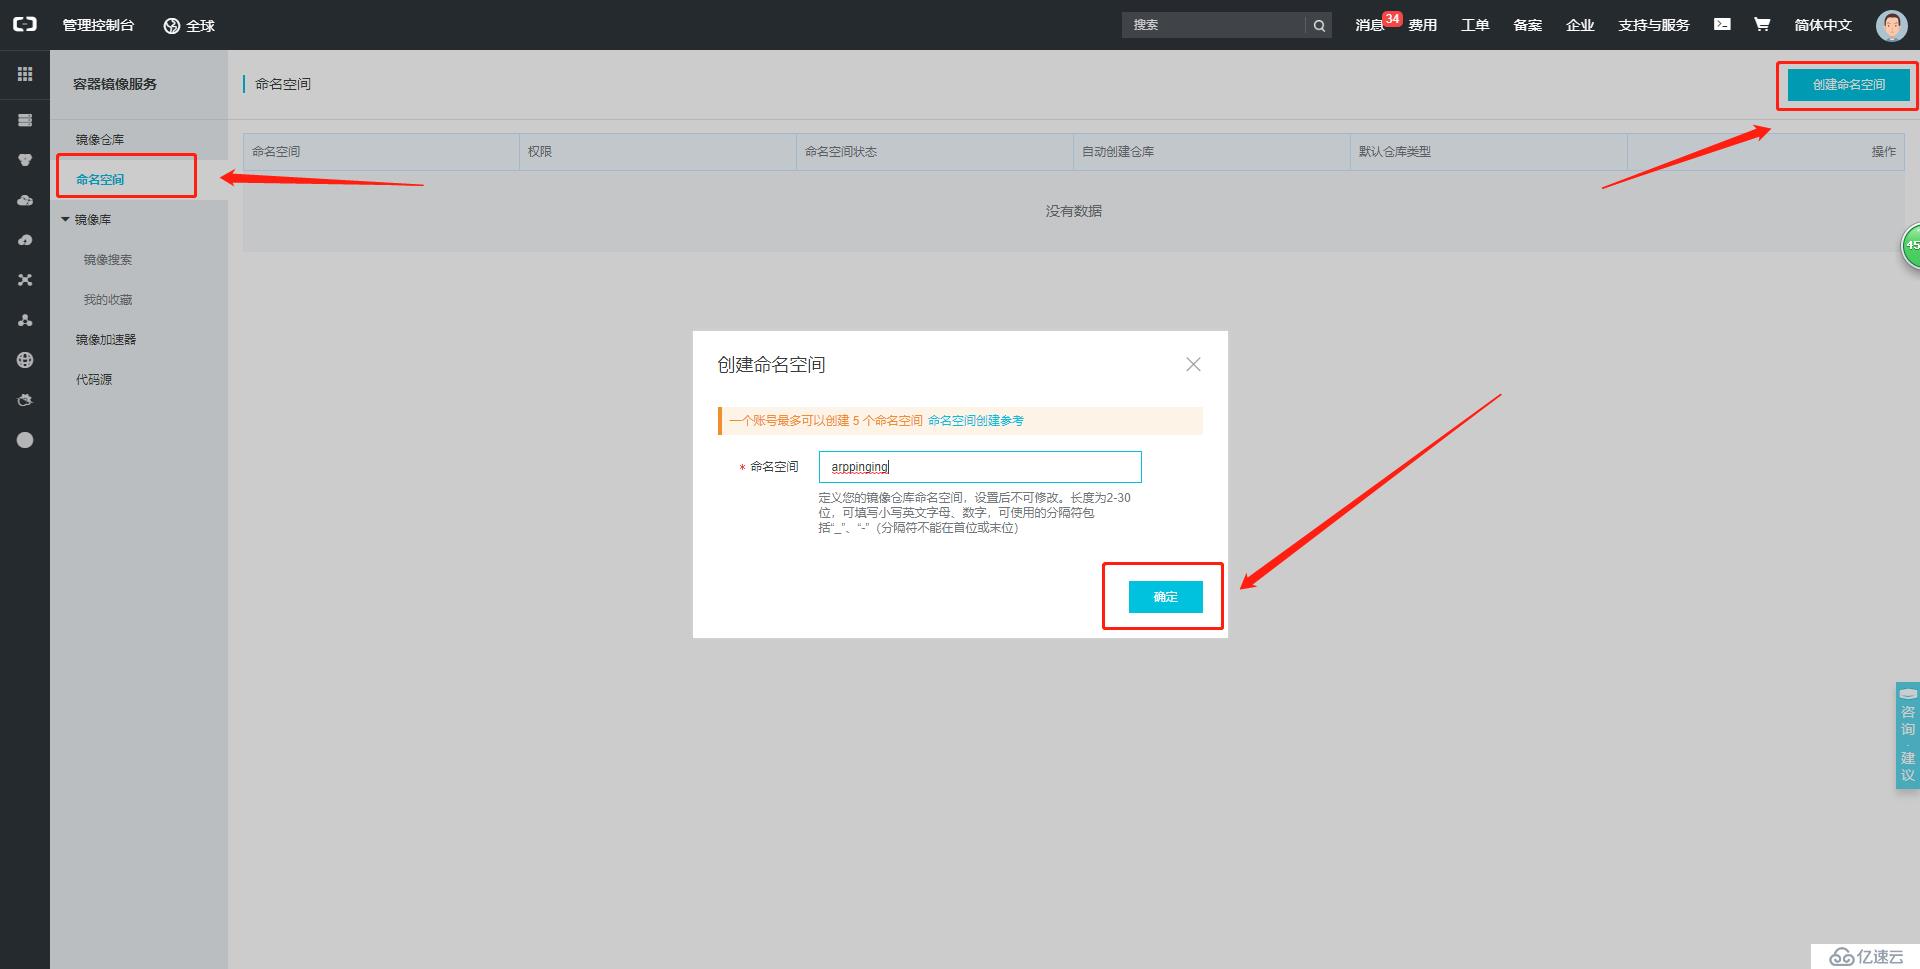
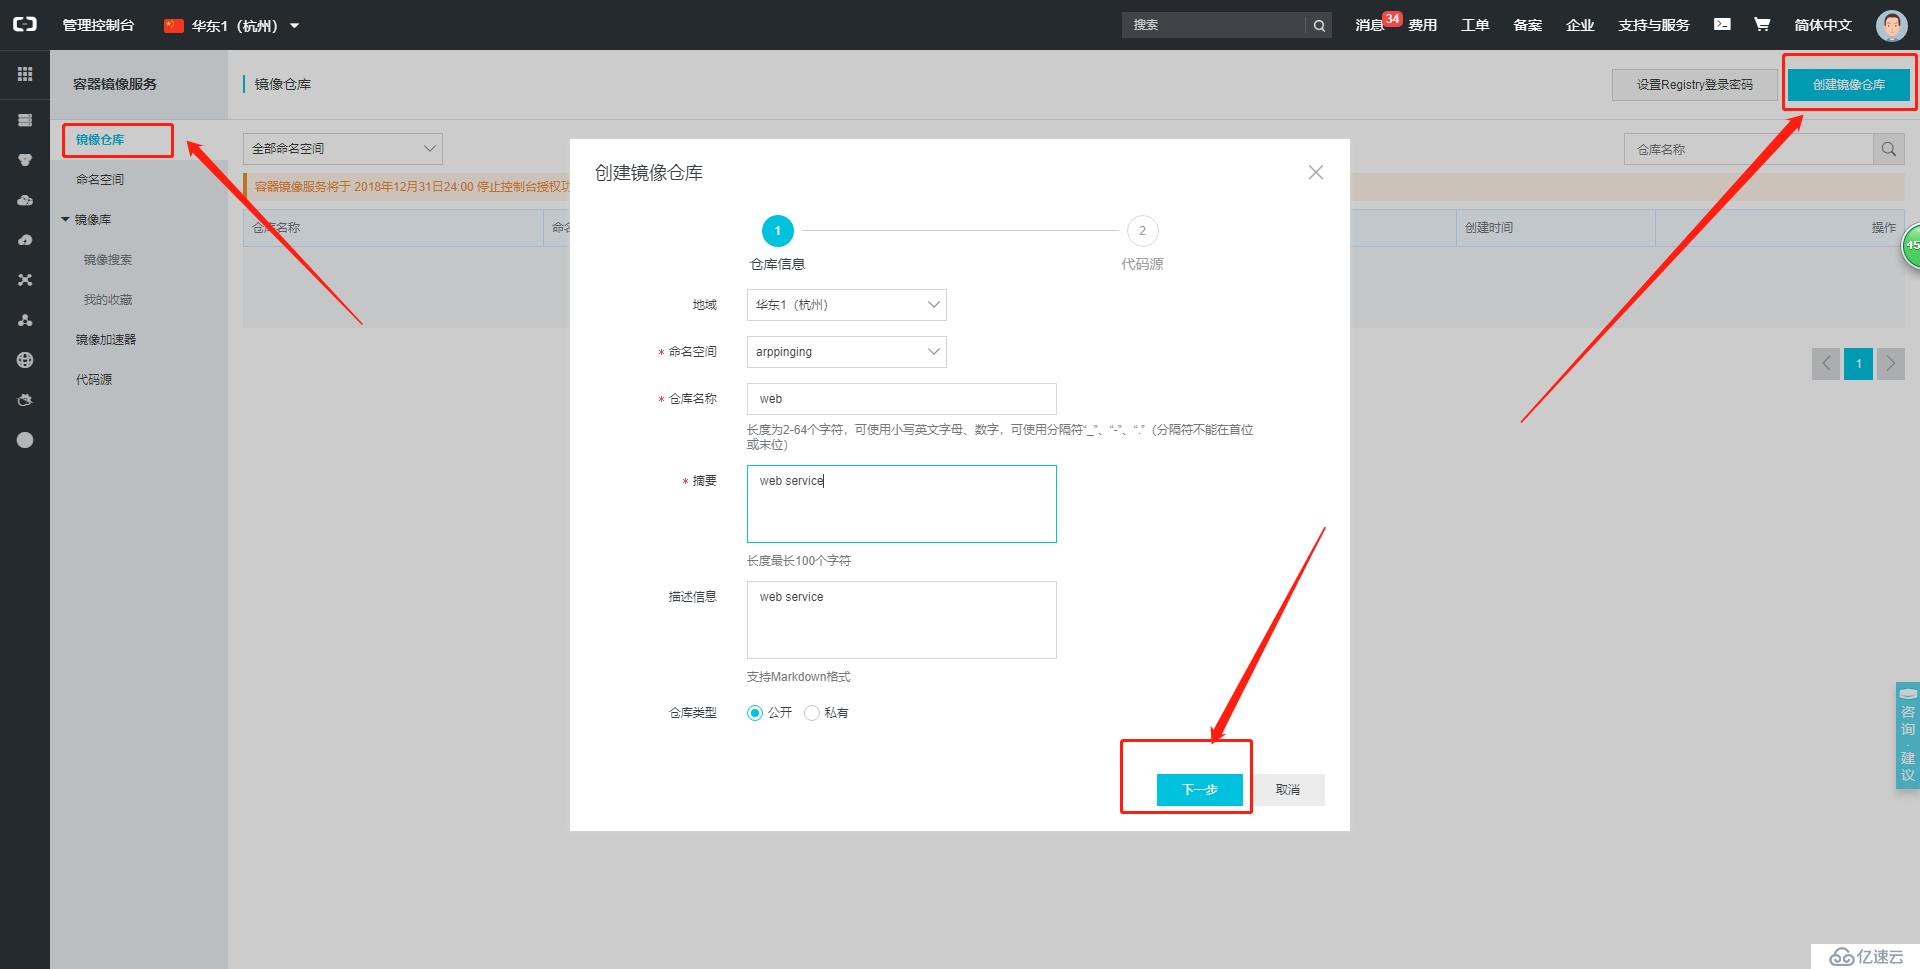
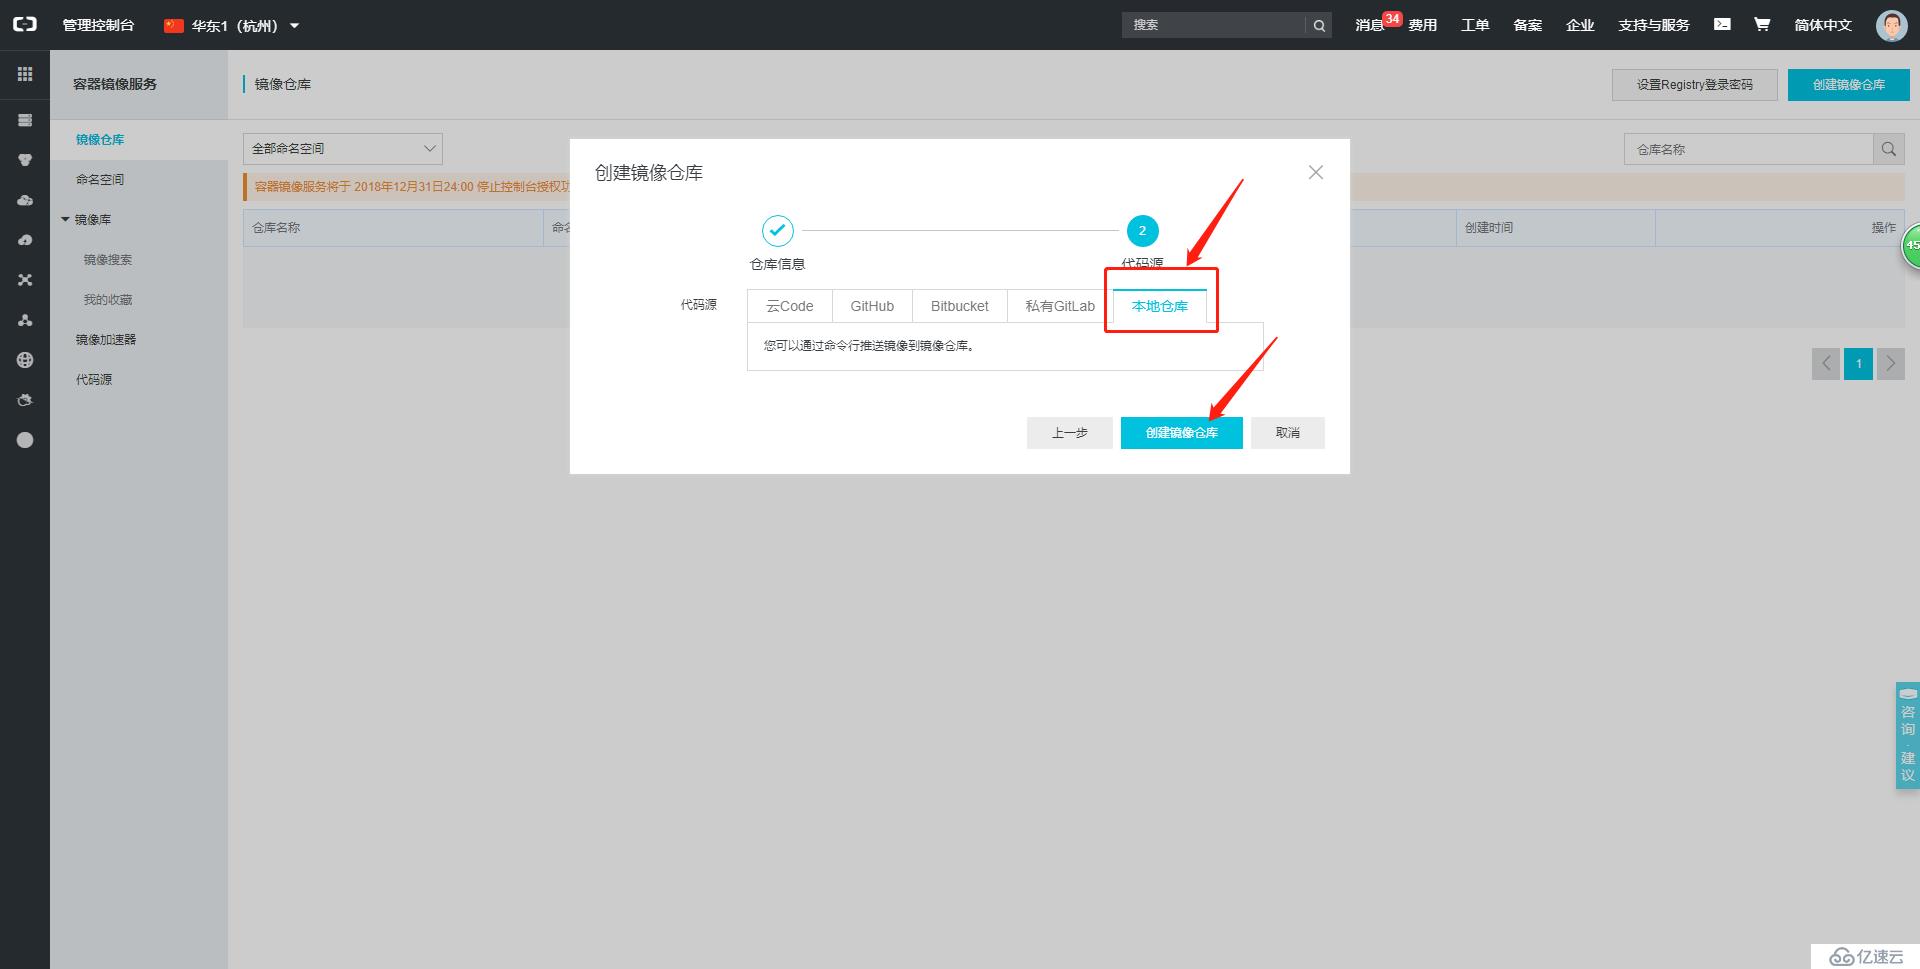
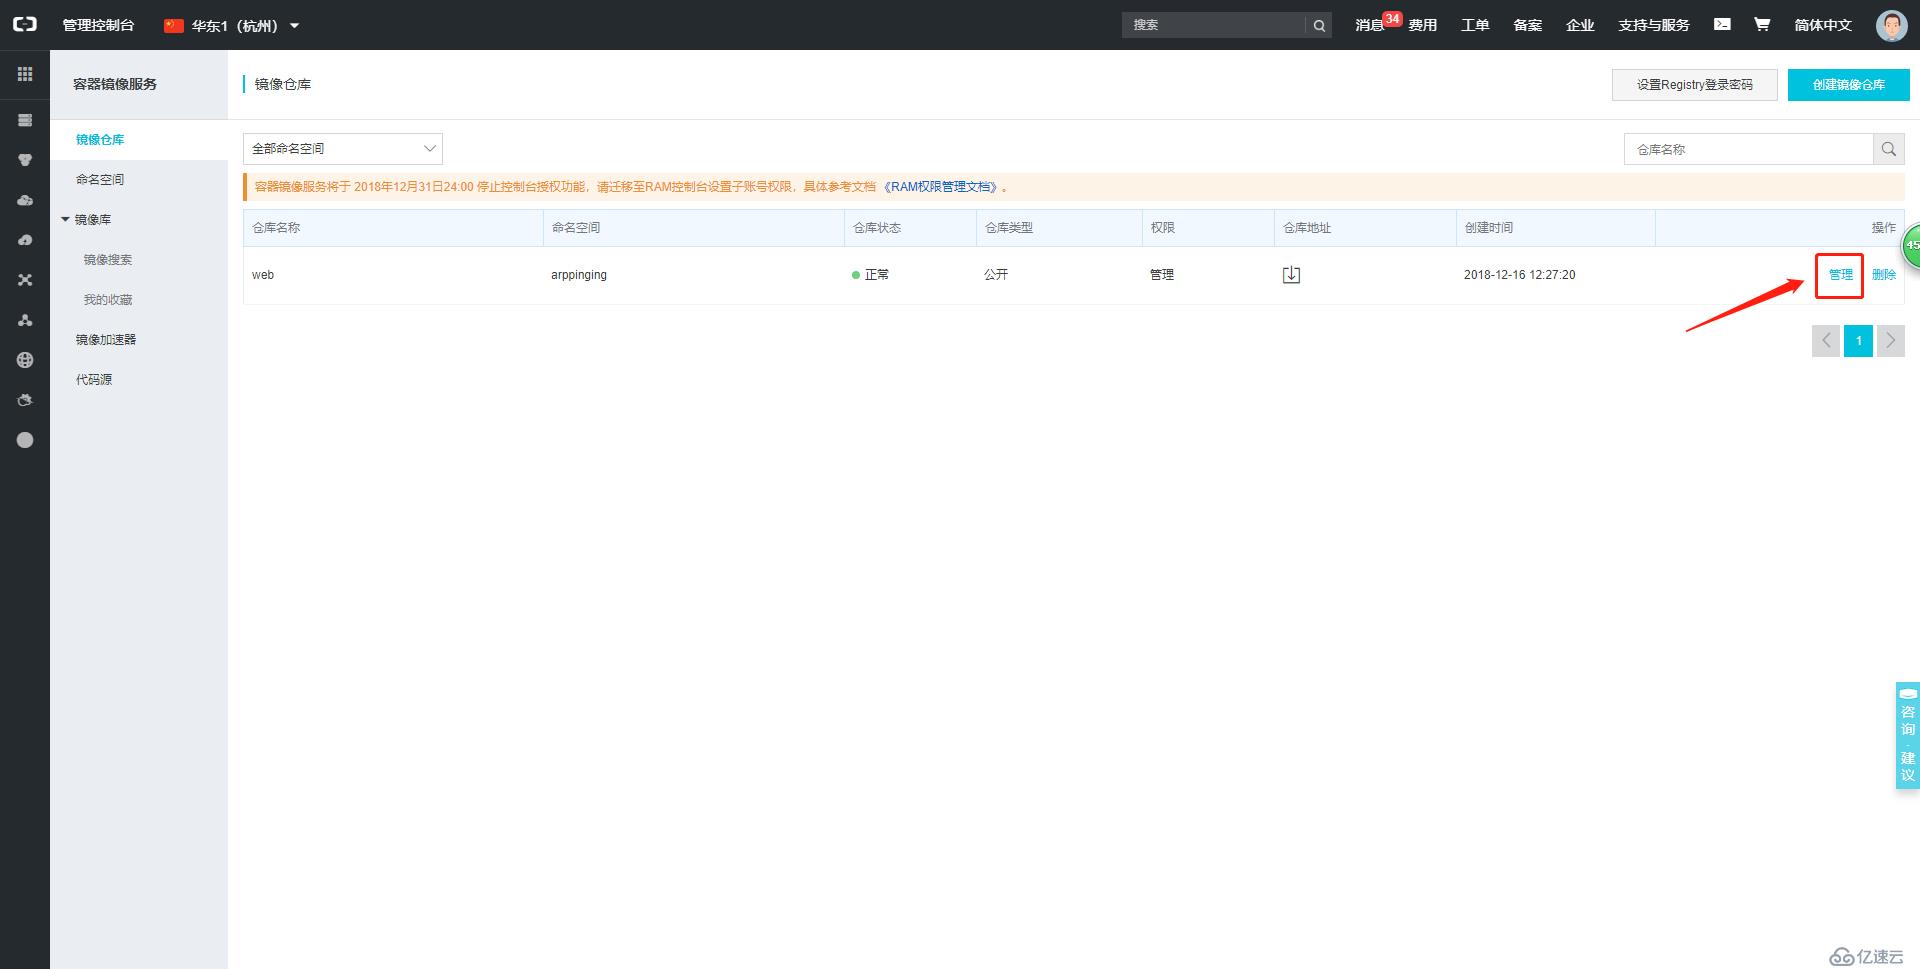
镜像制作完成之后,可以将镜像推送到镜像仓库。
http://dev.aliyun.com/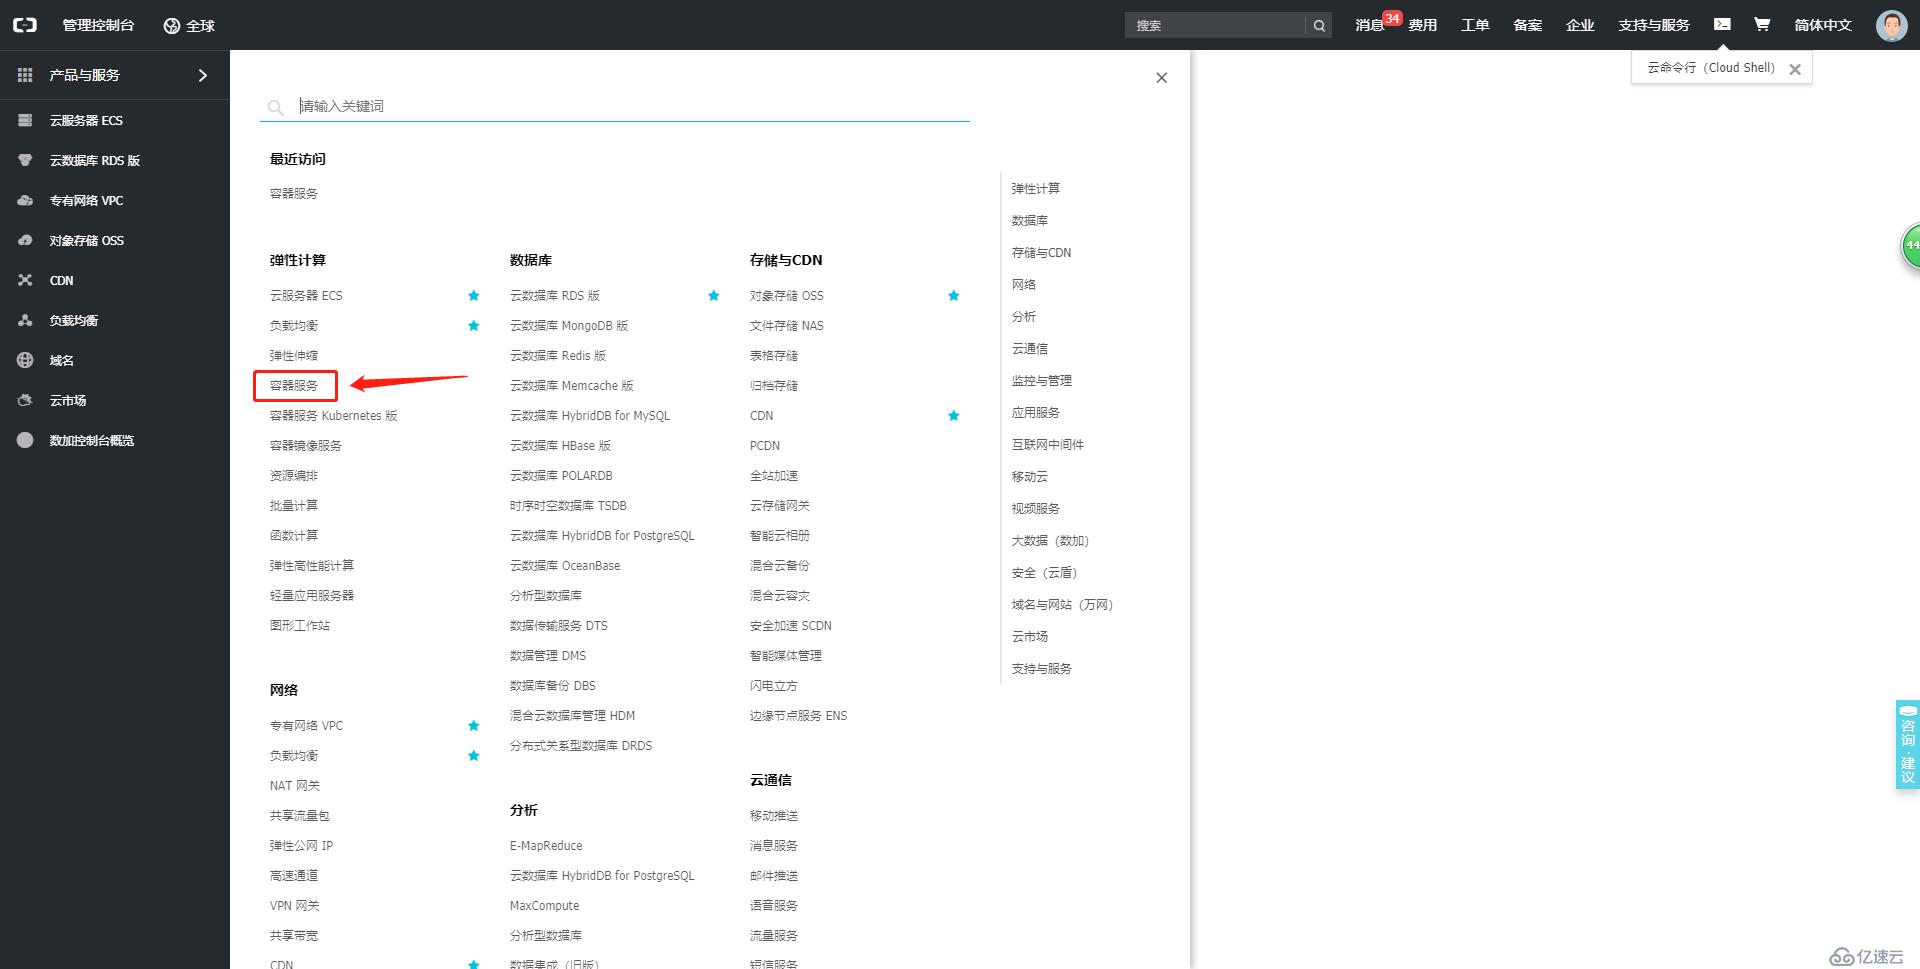
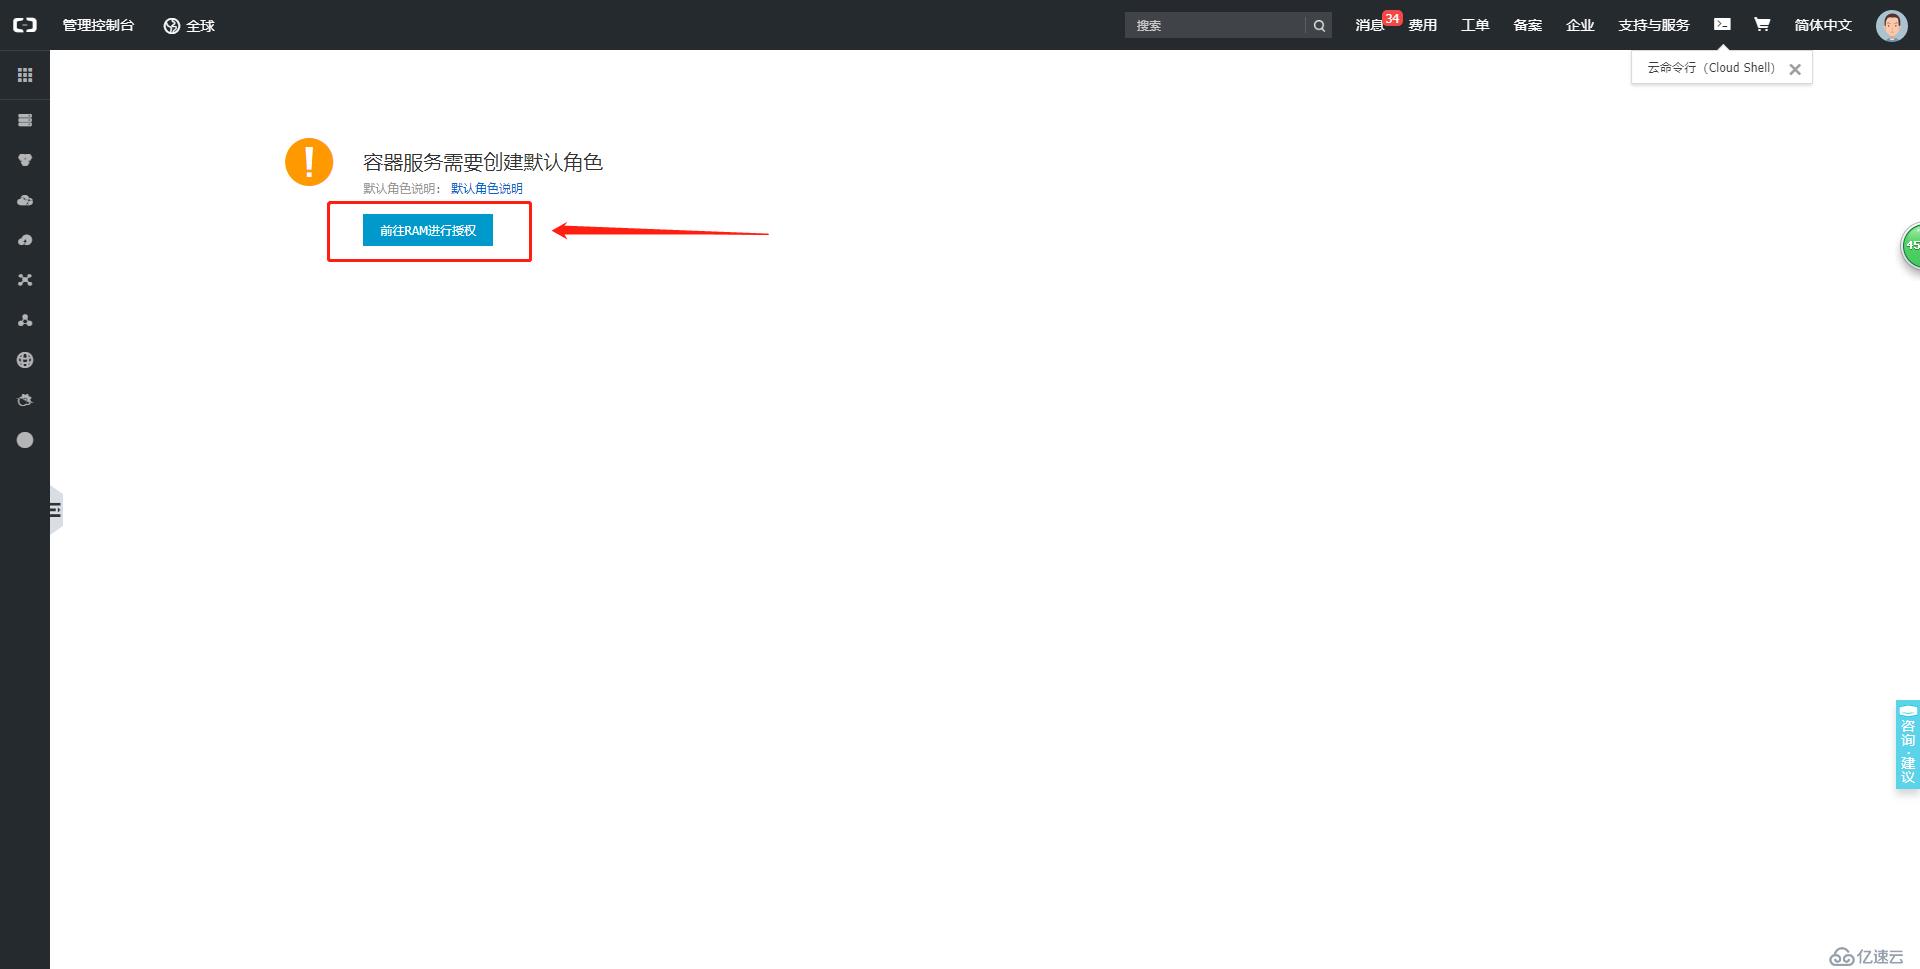
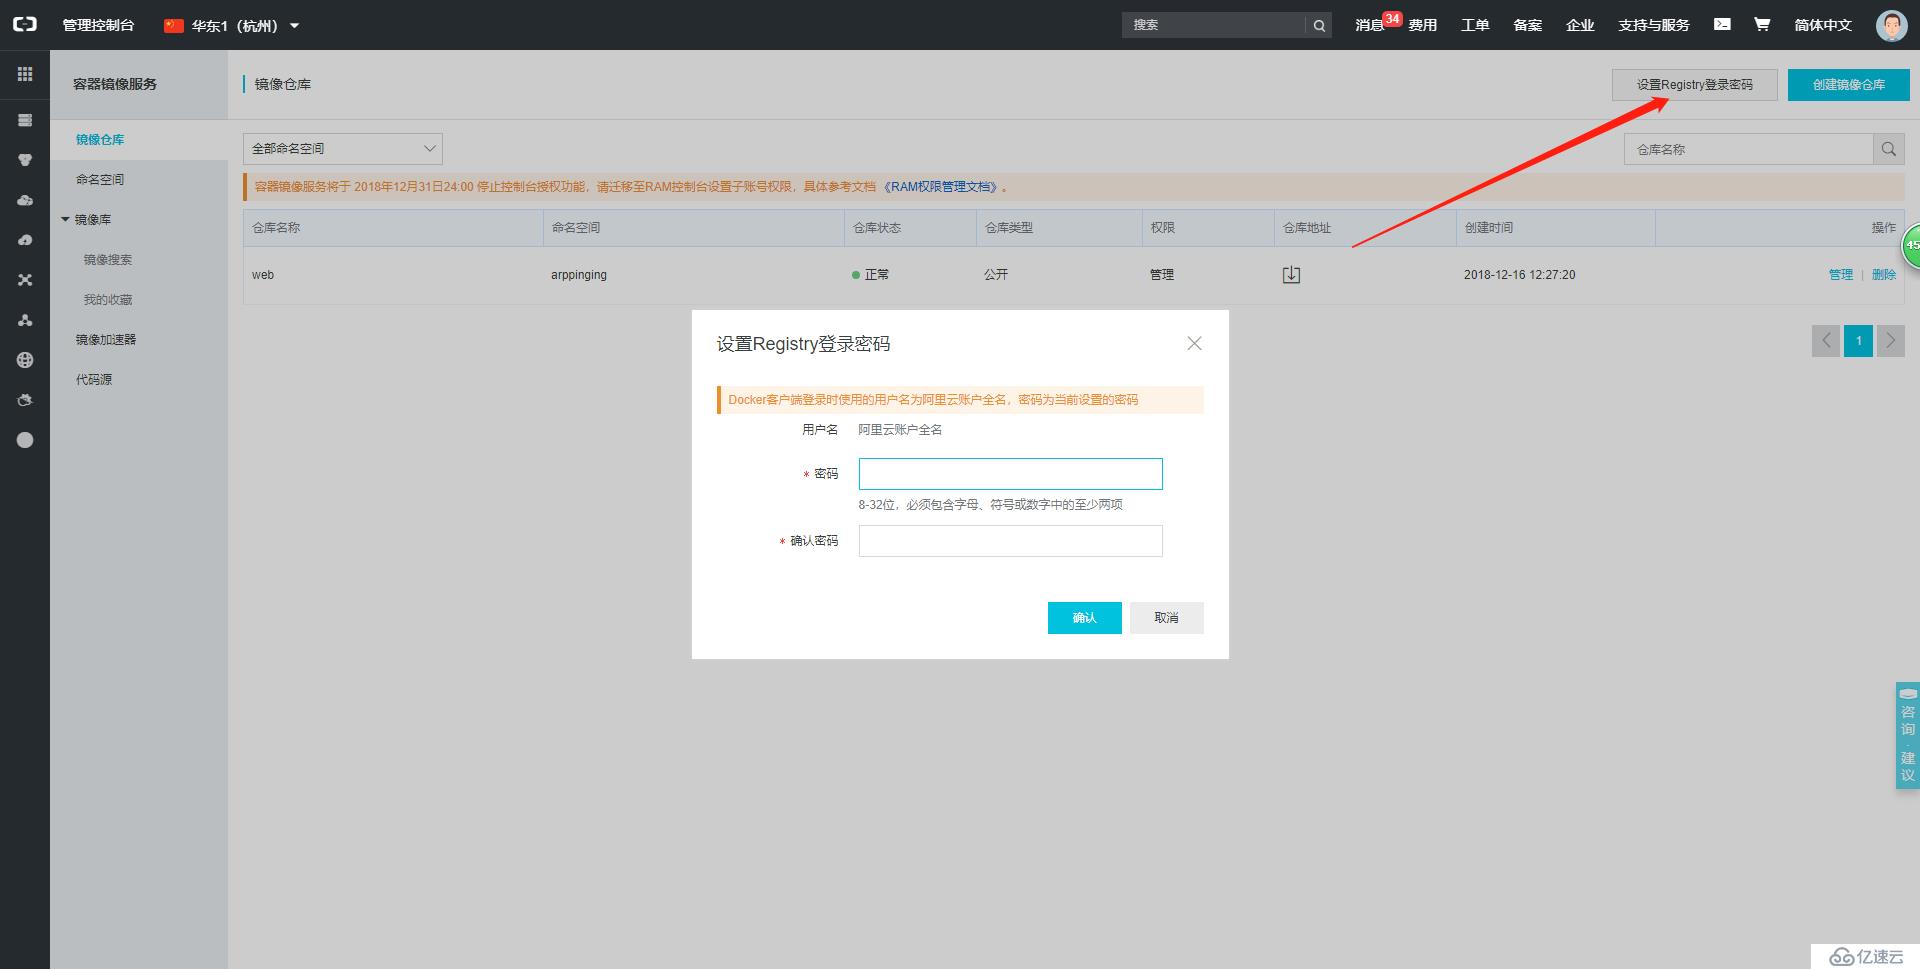

[root@node1 ~]# docker login --username=tb7595138 registry.cn-hangzhou.aliyuncs.com
Password:
WARNING! Your password will be stored unencrypted in /root/.docker/config.json.
Configure a credential helper to remove this warning. See
https://docs.docker.com/engine/reference/commandline/login/#credentials-store

Login Succeeded
[root@node1 ~]#
[root@node1 ~]# docker image ls
REPOSITORY               TAG                 IMAGE ID            CREATED             SIZE
web1                     v2                  1918f7fd1895        37 minutes ago      1.15MB
web1                     v1                  d63a2e64d5d8        About an hour ago   1.15MB
nginx                    1.14-alpine         77bae8d00654        5 weeks ago         17.7MB
redis                    4-alpine            05097a3a0549        2 months ago        30MB
busybox                  latest              59788edf1f3e        2 months ago        1.15MB
quay.io/coreos/flannel   v0.10.0-amd64       f0fad859c909        10 months ago       44.6MB
[root@node1 ~]# docker tag 1918f7fd1895 registry.cn-hangzhou.aliyuncs.com/arppinging/web:v1
[root@node1 ~]# docker image ls
REPOSITORY                                         TAG                 IMAGE ID            CREATED             SIZE
web1                                               v2                  1918f7fd1895        38 minutes ago      1.15MB
registry.cn-hangzhou.aliyuncs.com/arppinging/web   v1                  1918f7fd1895        38 minutes ago      1.15MB
web1                                               v1                  d63a2e64d5d8        About an hour ago   1.15MB
nginx                                              1.14-alpine         77bae8d00654        5 weeks ago         17.7MB
redis                                              4-alpine            05097a3a0549        2 months ago        30MB
busybox                                            latest              59788edf1f3e        2 months ago        1.15MB
quay.io/coreos/flannel                             v0.10.0-amd64       f0fad859c909        10 months ago       44.6MB
[root@node1 ~]#
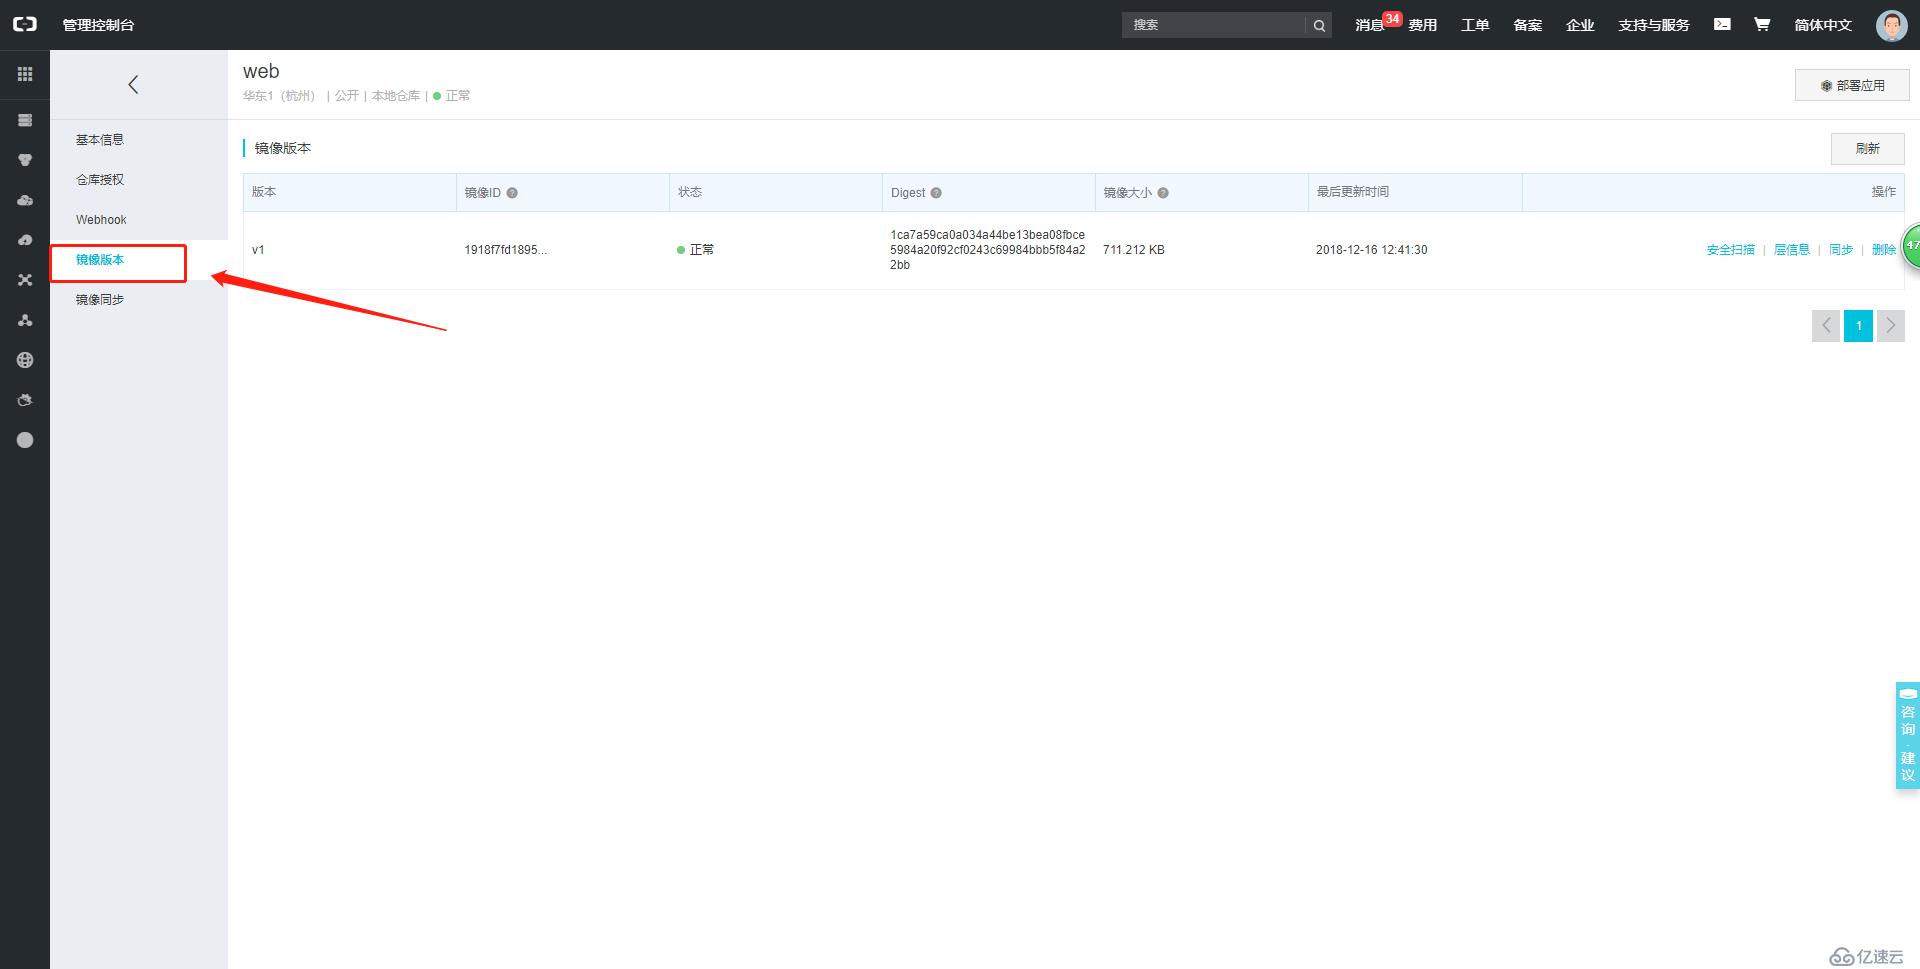
[root@node1 ~]# docker push registry.cn-hangzhou.aliyuncs.com/arppinging/web:v1
The push refers to repository [registry.cn-hangzhou.aliyuncs.com/arppinging/web]
3b385ace78f4: Pushed
8a788232037e: Pushed
v1: digest: sha256:1ca7a59ca0a034a44be13bea08fbce5984a20f92cf0243c69984bbb5f84a22bb size: 734
[root@node1 ~]#
除了将镜像推送到仓库,还可以将镜像导出,拷贝到另一台主机后再进行导出。
导出格式:docker save [option] image [image]-o:打包为
[root@node1 ~]# docker save -o test.tar b1:v1.1 b1:v2
[root@node1 ~]# ls
anaconda-ks.cfg  initial-setup-ks.cfg  test.tar  公共  模板  视频  图片  文档  下载  音乐  桌面
[root@node1 ~]#
导入格式:docker load-i:input
到此,相信大家对“docker镜像管理基础以及镜像的制作方法”有了更深的了解,不妨来实际操作一番吧!这里是亿速云网站,更多相关内容可以进入相关频道进行查询,关注我们,继续学习!
免责声明:本站发布的内容(图片、视频和文字)以原创、转载和分享为主,文章观点不代表本网站立场,如果涉及侵权请联系站长邮箱:is@yisu.com进行举报,并提供相关证据,一经查实,将立刻删除涉嫌侵权内容。