在完成了上述配置后,其实已经可以生产文档内容,但是这样的文档主要针对请求本身,而描述主要来源于函数等命名产生,对用户并不友好,我们通常需要自己增加一些说明来丰富文档内容。如下所示,我们通过@ApiOperation注解来给API增加说明、通过@ApiImplicitParams、@ApiImplicitParam注解来给参数增加说明。
@RestController
@RequestMapping(value="/users")     // 通过这里配置使下面的映射都在/users下,可去除
public class UserController {

    static Map<Long, User> users = Collections.synchronizedMap(new HashMap<Long, User>());

    @ApiOperation(value="获取用户列表", notes="")
    @RequestMapping(value={""}, method=RequestMethod.GET)
    public List<User> getUserList() {
        List<User> r = new ArrayList<User>(users.values());
        return r;
    }

    @ApiOperation(value="创建用户", notes="根据User对象创建用户")
    @ApiImplicitParam(name = "user", value = "用户详细实体user", required = true, dataType = "User")
    @RequestMapping(value="", method=RequestMethod.POST)
    public String postUser(@RequestBody User user) {
        users.put(user.getId(), user);
        return "success";
    }

    @ApiOperation(value="获取用户详细信息", notes="根据url的id来获取用户详细信息")
    @ApiImplicitParam(name = "id", value = "用户ID", required = true, dataType = "Long")
    @RequestMapping(value="/{id}", method=RequestMethod.GET)
    public User getUser(@PathVariable Long id) {
        return users.get(id);
    }

    @ApiOperation(value="更新用户详细信息", notes="根据url的id来指定更新对象,并根据传过来的user信息来更新用户详细信息")
    @ApiImplicitParams({
            @ApiImplicitParam(name = "id", value = "用户ID", required = true, dataType = "Long"),
            @ApiImplicitParam(name = "user", value = "用户详细实体user", required = true, dataType = "User")
    })
    @RequestMapping(value="/{id}", method=RequestMethod.PUT)
    public String putUser(@PathVariable Long id, @RequestBody User user) {
        User u = users.get(id);
        u.setName(user.getName());
        u.setAge(user.getAge());
        users.put(id, u);
        return "success";
    }

    @ApiOperation(value="删除用户", notes="根据url的id来指定删除对象")
    @ApiImplicitParam(name = "id", value = "用户ID", required = true, dataType = "Long")
    @RequestMapping(value="/{id}", method=RequestMethod.DELETE)
    public String deleteUser(@PathVariable Long id) {
        users.remove(id);
        return "success";
    }

}
完成上述代码添加上,启动Spring Boot程序,访问:http://localhost:8080/swagger-ui.html
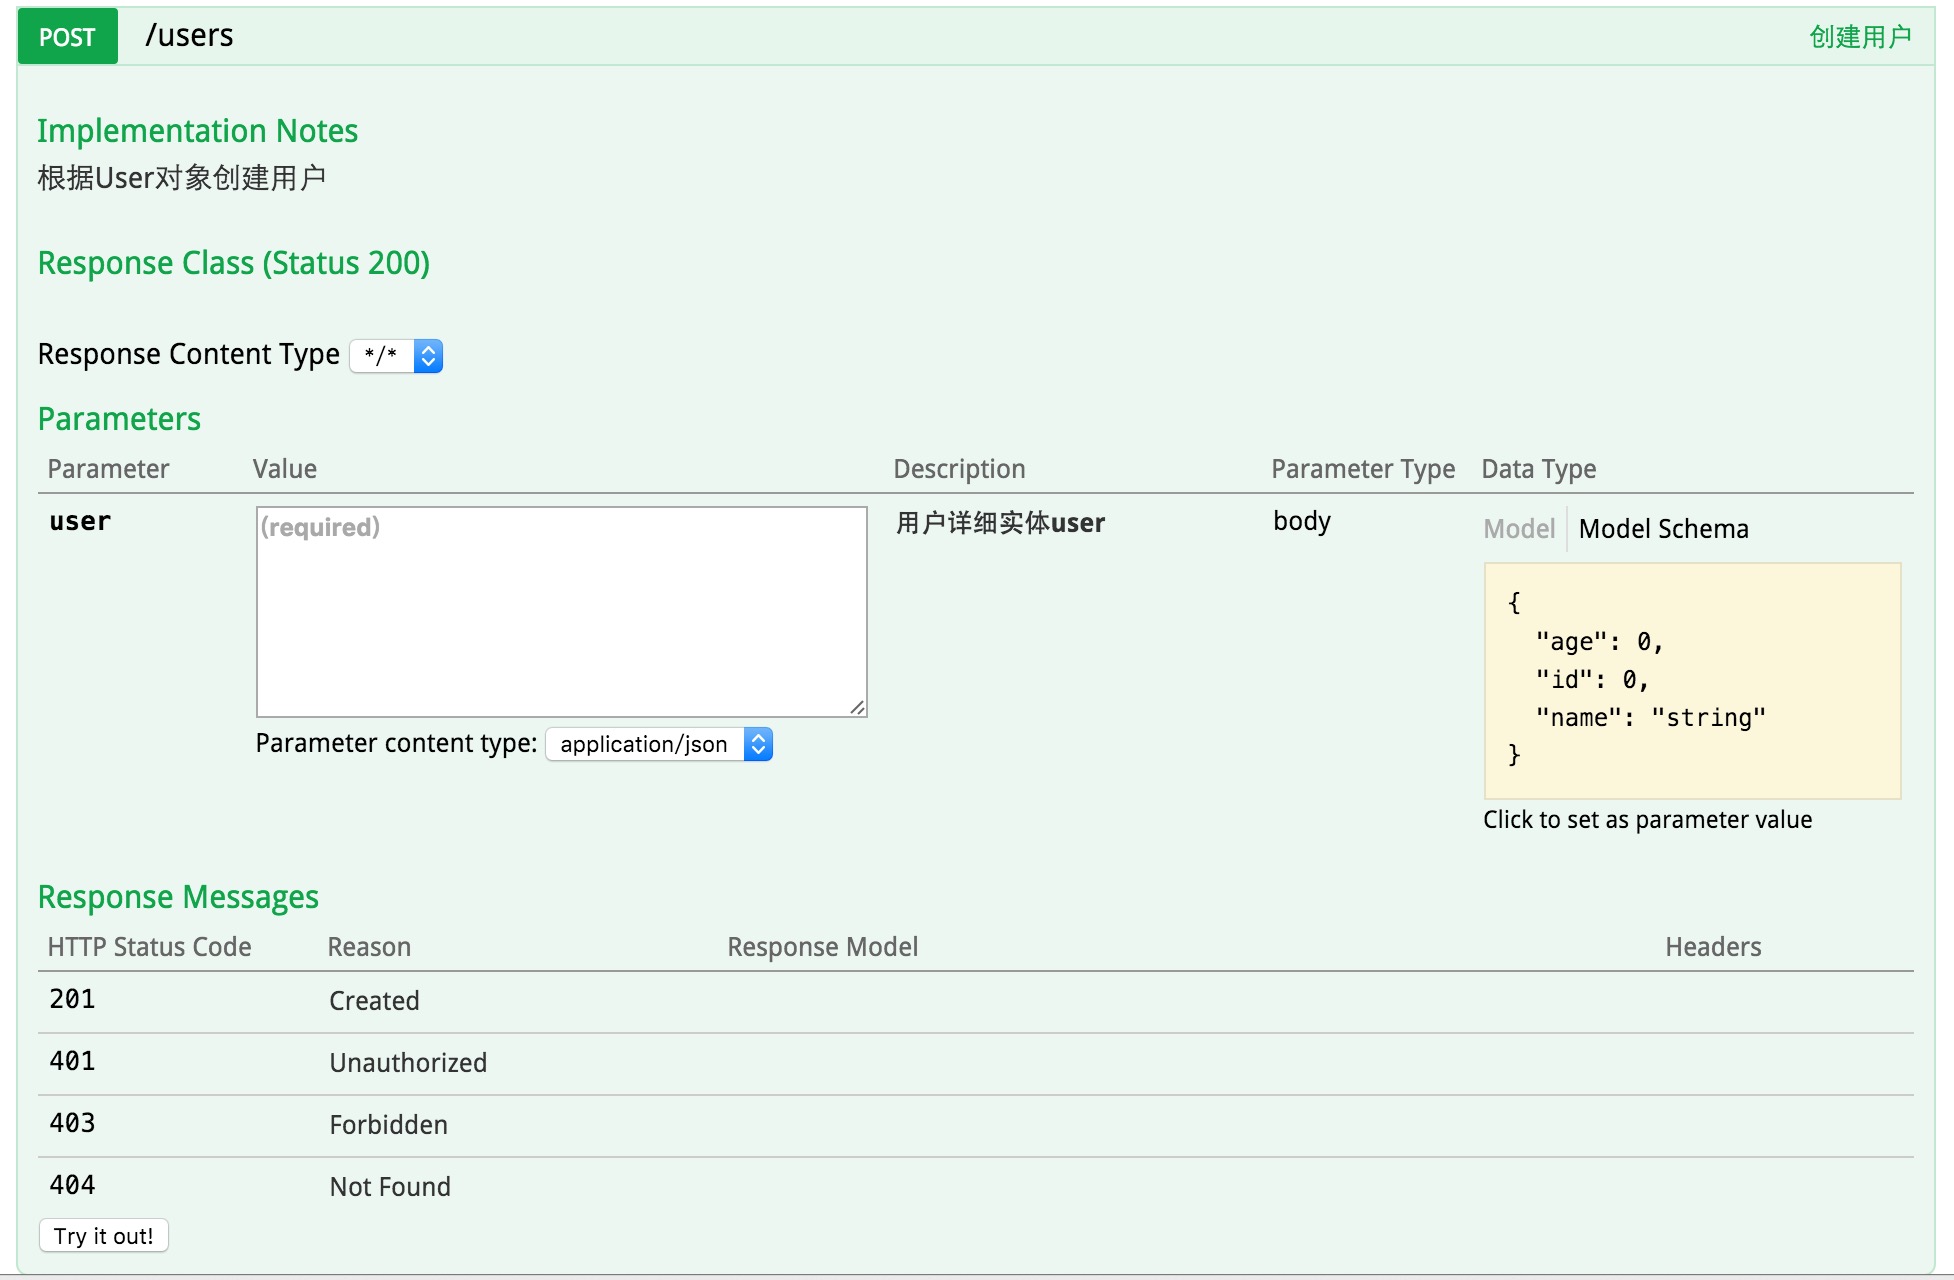
。就能看到前文所展示的RESTful API的页面。我们可以再点开具体的API请求,以POST类型的/users请求为例,可找到上述代码中我们配置的Notes信息以及参数user的描述信息,如下图所示。

API文档访问与调试
在上图请求的页面中,我们看到user的Value是个输入框?是的,Swagger除了查看接口功能外,还提供了调试测试功能,我们可以点击上图中右侧的Model Schema(黄色区域:它指明了User的数据结构),此时Value中就有了user对象的模板,我们只需要稍适修改,点击下方“Try it out!”按钮,即可完成了一次请求调用!
此时,你也可以通过几个GET请求来验证之前的POST请求是否正确。
相比为这些接口编写文档的工作,我们增加的配置内容是非常少而且精简的,对于原有代码的侵入也在忍受范围之内。因此,在构建RESTful API的同时,加入swagger来对API文档进行管理,是个不错的选择。

公司最近升级了电子商务系统,将所有电子商务功能全部转为分布式微服务模式
了解springcloud架构可以加求求:三五三六二四七二五九

源码来源
免责声明:本站发布的内容(图片、视频和文字)以原创、转载和分享为主,文章观点不代表本网站立场,如果涉及侵权请联系站长邮箱:is@yisu.com进行举报,并提供相关证据,一经查实,将立刻删除涉嫌侵权内容。