жӮЁеҘҪпјҢзҷ»еҪ•еҗҺжүҚиғҪдёӢи®ўеҚ•е“ҰпјҒ
жӮЁеҘҪпјҢзҷ»еҪ•еҗҺжүҚиғҪдёӢи®ўеҚ•е“ҰпјҒ
иҝҷзҜҮж–Үз« е°ҶдёәеӨ§е®¶иҜҰз»Ҷи®Іи§Јжңүе…іжҗӯе»әspringboot-2.3.xжңҖж–°зүҲзҡ„ж–№жі•пјҢе°Ҹзј–и§үеҫ—жҢәе®һз”Ёзҡ„пјҢеӣ жӯӨеҲҶдә«з»ҷеӨ§е®¶еҒҡдёӘеҸӮиҖғпјҢеёҢжңӣеӨ§е®¶йҳ…иҜ»е®ҢиҝҷзҜҮж–Үз« еҗҺеҸҜд»ҘжңүжүҖ收иҺ·гҖӮ
дёҖгҖҒеүҚиЁҖ
и·ҹеҫҲеӨҡе°ҸдјҷдјҙиҒҠеӨ©пјҢеҸ‘зҺ°дёҖдёӘдёҘйҮҚзҡ„й—®йўҳпјҢеҫҲеӨҡе°ҸдјҷдјҙжЁӘеҗ‘еҸ‘еұ•зҡ„иІҢдјјеҫҲдёҚй”ҷпјҢеҫҲеӨҡжҠҖжңҜйғҪиғҪиҜҙеҮәдёҖдәҢпјҢдҪҶжҳҜеҰӮжһңеңЁжҹҗдёӘжҠҖжңҜдёҠж·ұжҢ–дёҖдёӢе°ұдёҚиЎҢдәҶпјҢй—®е•Ҙе•ҘдёҚдјҡгҖӮе°ұжӢҝspringbootжқҘиҜҙпјҢеҫҲеӨҡеҗҢеӯҰжӯўжӯҘдәҺspringbootзҡ„еә”з”ЁпјҢеҶҚеҫҖж·ұеӨ„е°ұдёҖй—®дёүдёҚзҹҘдәҶпјҢйӮЈд№ҲеҰӮдҪ•з ҙеұҖе‘ўпјҹsmartе“Ҙи®ӨдёәжңҖеҘҪзҡ„еҠһжі•е°ұжҳҜзӣҙжҚЈй»„йҫҷпјҢиҰҒжҠҠдёҖдёӘжҠҖжңҜзҗҶи§ЈйҖҸдәҶпјҢеҗ¬еҲ«дәәи®ІдёҖдёҮйҒҚеҺҹзҗҶпјҢдёҚеҰӮиҮӘе·ұж’•дёҖйҒҚжәҗз ҒгҖӮ
иҰҒйҳ…иҜ»жәҗз ҒйӮЈе°ұйҰ–е…Ҳеҫ—е…Ҳжҗӯе»әжәҗз Ғйҳ…иҜ»зҺҜеўғпјҢйӮЈд№Ҳжң¬зҜҮж–Үз« е°ұжқҘд»Ӣз»ҚдёӢSpring Bootзҡ„жәҗз ҒзҺҜеўғжҗӯе»әгҖӮ йүҙдәҺspringеӣўйҳҹе·Із»Ҹе…ЁйқўжҠӣејғmavenжһ„е»әе·Ҙе…·иҖҢйҖүз”ЁgradleжқҘжһ„е»әпјҢиҖҢдё”зҪ‘дёҠзӣ®еүҚзңӢжқҘиҝҳжІЎжңүж–Үз« д»Ӣз»ҚspringbootжңҖж–°зүҲ2.3.xзҡ„gradleжһ„е»әпјҲз»қеӨ§еӨҡж•°йғҪжҳҜmavenжһ„е»әпјүпјҢйӮЈд№Ҳжң¬зҜҮж–Үз« е°ұжҳҜеҹәдәҺgradleжқҘжһ„е»әжңҖж–°зүҲspringboot2.3.2зҡ„жәҗз Ғйҳ…иҜ»зҺҜеўғгҖӮ
дәҢгҖҒзҺҜеўғеҮҶеӨҮ
1гҖҒgit
жӢүеҸ–жәҗз ҒдҪҝз”Ё
2гҖҒjdk8еҸҠд»ҘдёҠ
дёҖиҲ¬е°ҸдјҷдјҙжңәеҷЁдёҠйғҪе·Із»ҸиЈ…еҘҪдәҶ

3гҖҒgradle6.5.1
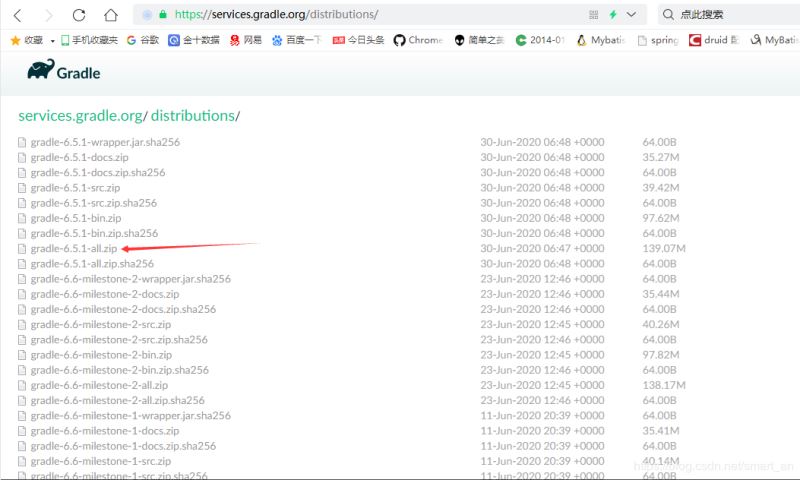
жү“ејҖ https://services.gradle.org/distributions/ йҖүжӢ©жңҖж–°зүҲжң¬пјҡgradle-6.5.1-all.zip(allзүҲжң¬жҳҜеёҰжәҗз Ғзҡ„)
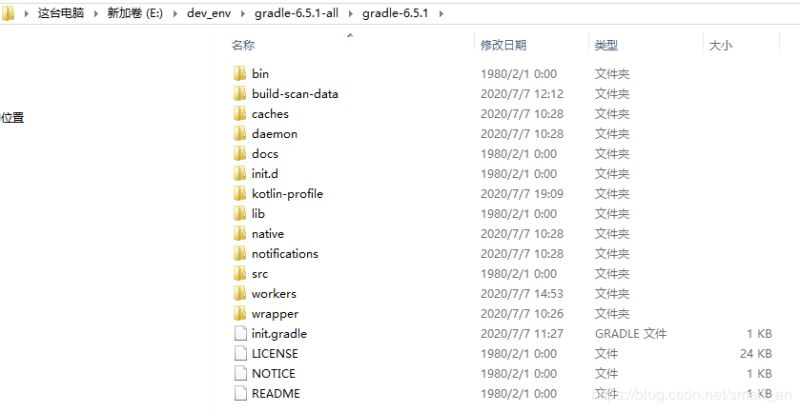
дёӢиҪҪи§ЈеҺӢеҗҺзӣ®еҪ•з»“жһ„еҰӮдёӢпјҡ
и®ҫзҪ®зҺҜеўғеҸҳйҮҸпјҡ
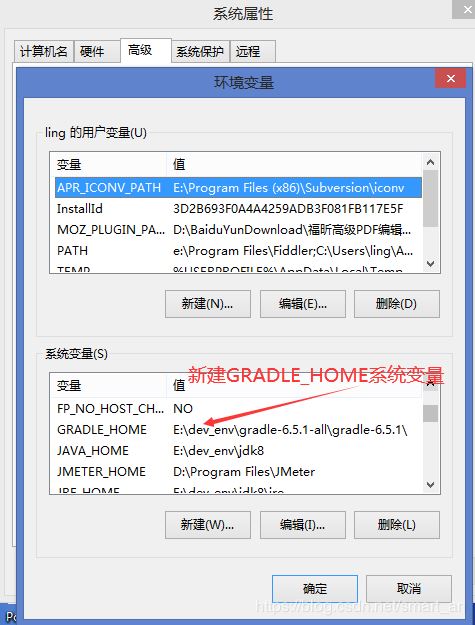
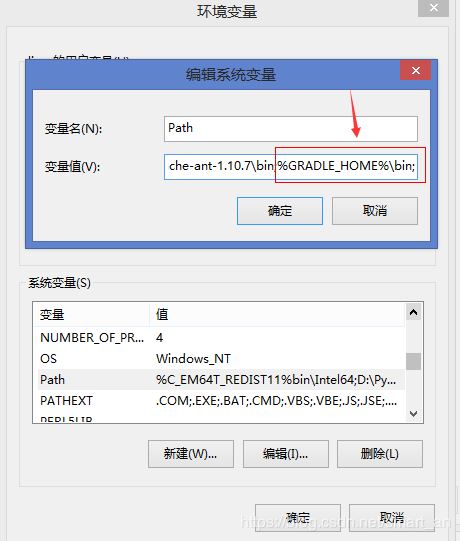
е®ҢжҲҗеҗҺжү“ејҖcmdпјҢжү§иЎҢ
gradle -v
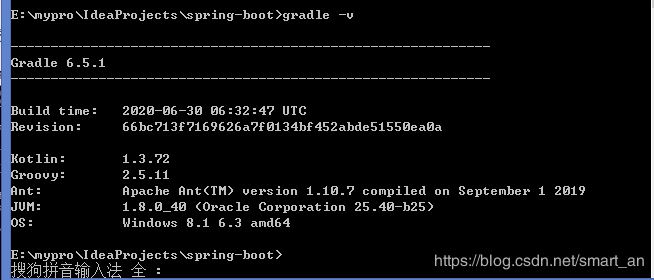
иЎЁзӨәе·Із»Ҹе®үиЈ…жҲҗеҠҹпјҢзүҲжң¬дёә6.5.1
4гҖҒidea2020.1.2
пјҲзҪ‘дёҠеҫҲеӨҡжңӢеҸӢиЎЁзӨәidea2020д№ӢеүҚзҡ„зүҲжң¬еҜје…Ҙж—¶е§Ӣз»Ҳжңүй—®йўҳпјҢе»әи®®еҚҮзә§еҲ°2020.1зүҲжң¬пјҢsmartе“ҘеҪ“еүҚдҪҝз”Ёзҡ„е°ұжҳҜ2020.1.2зүҲжң¬пјү
дёҚеҫ—дёҚиҜҙ2020.1.2зүҲжң¬зңҹйҰҷпјҢд№ӢеүҚзҡ„зүҲжң¬еҫҲеӨҡbugйғҪеңЁ2020.1дёӯеҫ—еҲ°дҝ®еӨҚгҖӮйӮЈдәӣдёӘbugзңҹзҡ„дјҡи®©дәәеҘ”жәғгҖӮ
жіЁж„Ҹпјҡspringbootжәҗз Ғжһ„е»әгҖҒзј–иҜ‘еҸҠеҶ’зғҹжөӢиҜ•дјҡйқһеёёзҡ„иҖ—еҶ…еӯҳпјҢе»әи®®еҶ…еӯҳдёҚи¶і16gзҡ„е°ҸдјҷдјҙеҚҮзә§дёӢжңәеҷЁеҶ…еӯҳпјҢжңҖе°‘16gгҖӮ
дёүгҖҒдёӢиҪҪжәҗз Ғ
д»Һе®ҳж–№д»“еә“ https://github.com/spring-projects/spring-boot Fork еҮәеұһдәҺиҮӘе·ұзҡ„д»“еә“гҖӮ
Fork пјҹ既然ејҖе§Ӣйҳ…иҜ»гҖҒи°ғиҜ•жәҗз ҒпјҢжҲ‘们еҸҜиғҪдјҡеҶҷдёҖдәӣжіЁйҮҠпјҢжңүдәҶиҮӘе·ұзҡ„д»“еә“пјҢеҸҜд»ҘиҝӣиЎҢиҮӘз”ұзҡ„жҸҗдәӨгҖӮ2.3.xзҡ„еҲҶж”Ҝд»Јз Ғ пјҲ2.3.2.BUILD-SNAPSHOTпјүгҖӮFork еҮәжқҘзҡ„д»“еә“жӢүеҸ–д»Јз ҒпјҢжіЁж„ҸиҝҷйҮҢдёәд»Җд№ҲдёҚжӢүеҸ–masterеҲҶж”Ҝе‘ўпјҹеӣ дёәsmartе“ҘеҲҡејҖе§Ӣе°ұжҳҜжӢүеҸ–зҡ„masterеҲҶж”ҜпјҢдҪҶжҳҜmasterеҲҶж”Ҝдҫқиө–зҡ„springзүҲжң¬дёәspring-5.3.0-M1зүҲжң¬пјҢиҜҘзүҲжң¬йқһзЁіе®ҡзүҲжң¬пјҢиҖҢдё”зј–иҜ‘еҲ°жңҖеҗҺдјҡеҮәзҺ°й—®йўҳпјҢжҠҘдёҖдәӣspringжЁЎеқ—зҡ„5.3.0-M1.jarеҢ…дёҚеӯҳеңЁжҲ–ж— жі•дёӢиҪҪзӯүдёҖдәӣиҺ«еҗҚе…¶еҰҷзҡ„й”ҷиҜҜпјҢ жүҖд»ҘжҲ‘иҝҷиҫ№жӢүеҸ–зҡ„жҳҜ2.3.xеҲҶж”ҜпјҢиҝҷдёӘеҲҶж”Ҝдҫқиө–зҡ„springзүҲжң¬дёә5.2.7.RELEASEзүҲжң¬гҖӮжүҖд»ҘжҲ‘е°ұgit clone 2.3.xеҲҶж”ҜеҲ°жң¬ең°пјҢ然еҗҺеҶҚеҜје…ҘideaдёӯгҖӮ
е…·дҪ“иҝҮзЁӢеҰӮдёӢпјҡ
1гҖҒжү“ејҖ https://github.com/spring-projects/spring-bootпјҢзӮ№еҮ»еҸідёҠи§’ForkеҚіеҸҜпјҢиҝҷж ·е°ұжҠҠspringд»“еә“forkеҲ°иҮӘе·ұзҡ„д»“еә“дёӯдәҶгҖӮ
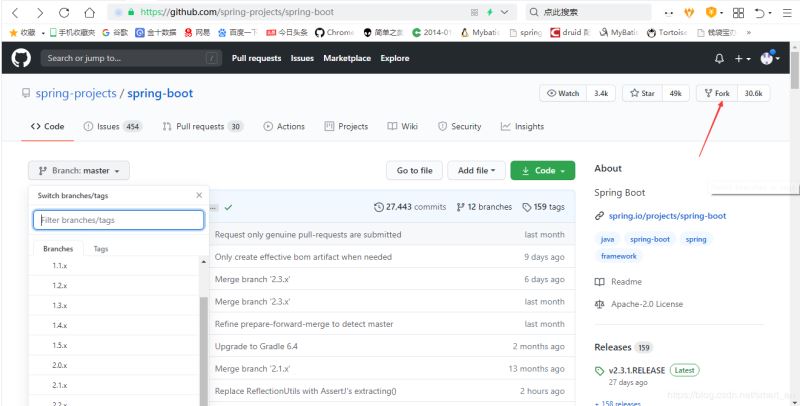
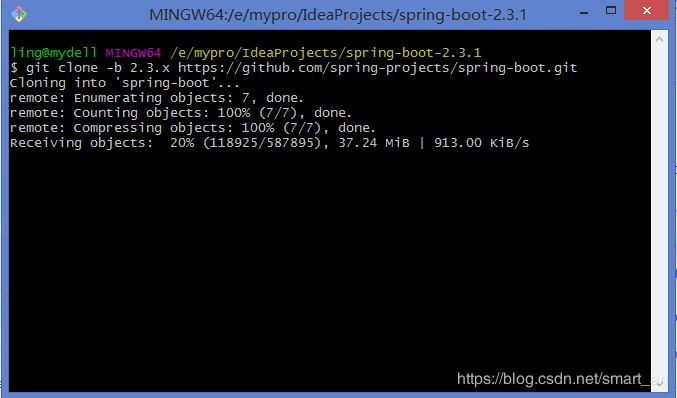
2гҖҒйҖүжӢ©дёҖдёӘзӣ®еҪ•пјҢжҲ‘зҡ„жҳҜE:\mypro\IdeaProjects\spring-boot-2.3.1пјҢз©әзҷҪеӨ„еҸіеҮ»Git Bash Here
жү§иЎҢпјҡ
git clone -b 2.3.x https://github.com/spring-projects/spring-boot.gi
дёӢиҪҪеҲ°жң¬ең°
еӣӣгҖҒејҖе§Ӣжһ„е»ә
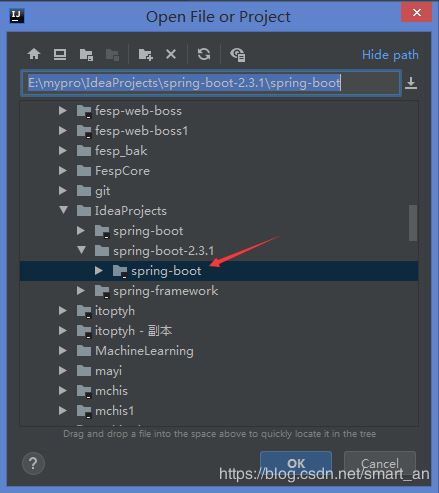
1гҖҒжү“ејҖideaеҗҺпјҢгҖҗFileгҖ‘->гҖҗOpenвҖҰгҖ‘,жү“ејҖеҲҡжӢүеҸ–зҡ„spring-bootжәҗз ҒпјҢзӮ№еҮ»okеҚіеҸҜжү“ејҖпјҢеҰӮдёӢеӣҫпјҡ
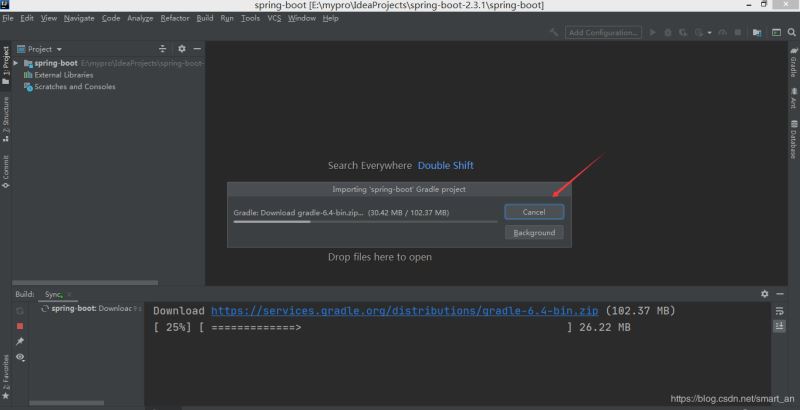
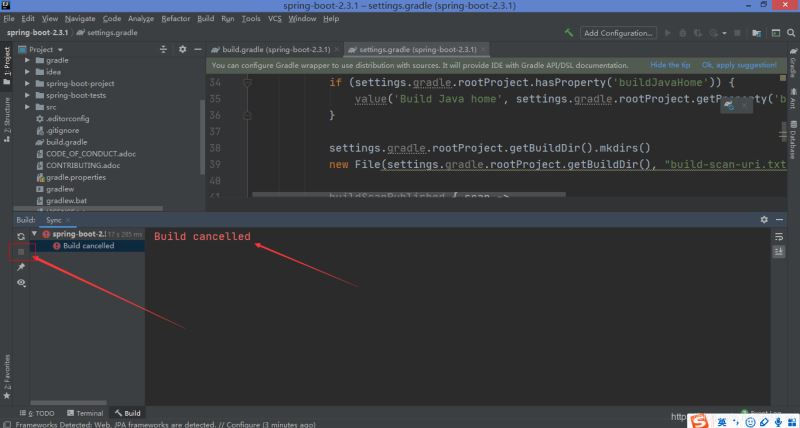
жү“ејҖд№ӢеҗҺпјҢgradleдјҡиҮӘеҠЁжһ„е»әпјҢејҖе§ӢдёӢиҪҪgradle-6.4-bin.zipе·Ҙе…·еҢ…пјҢideaдёӯиҝҳжңүдёҖдәӣең°ж–№йңҖиҰҒи®ҫзҪ®пјҢжүҖд»Ҙе…ҲдёҚжһ„е»әпјҢзӮ№еҮ»еҸ–ж¶ҲпјҢеҰӮдёӢеӣҫпјҡ
еҸ–ж¶ҲеҗҺеҰӮдёӢеӣҫпјҡ
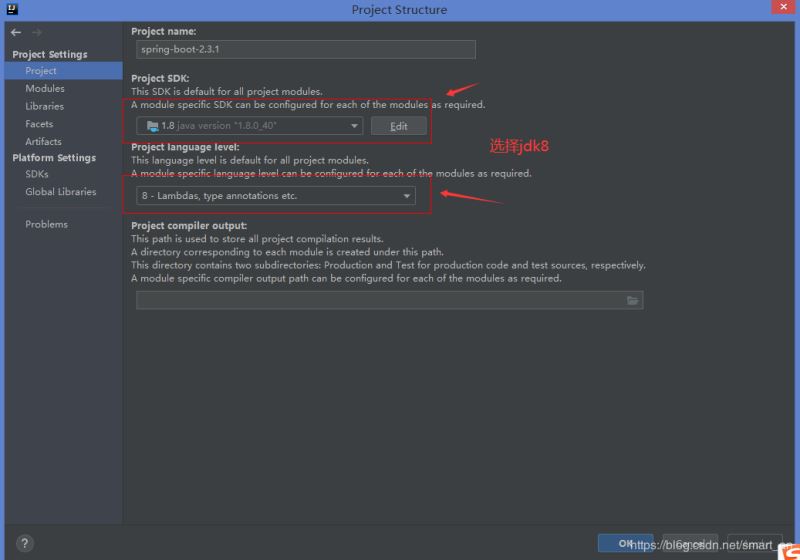
2гҖҒйҖүжӢ©гҖҗFileгҖ‘->гҖҗproject StructureвҖҰгҖ‘,жү“ејҖеҗҺзӮ№еҮ»е·Ұдҫ§ProjectпјҢ然еҗҺProject SDKйҖүжӢ©java version 1.8пјҢProject language levelйҖүжӢ©8пјҢеҰӮдёӢеӣҫпјҡ
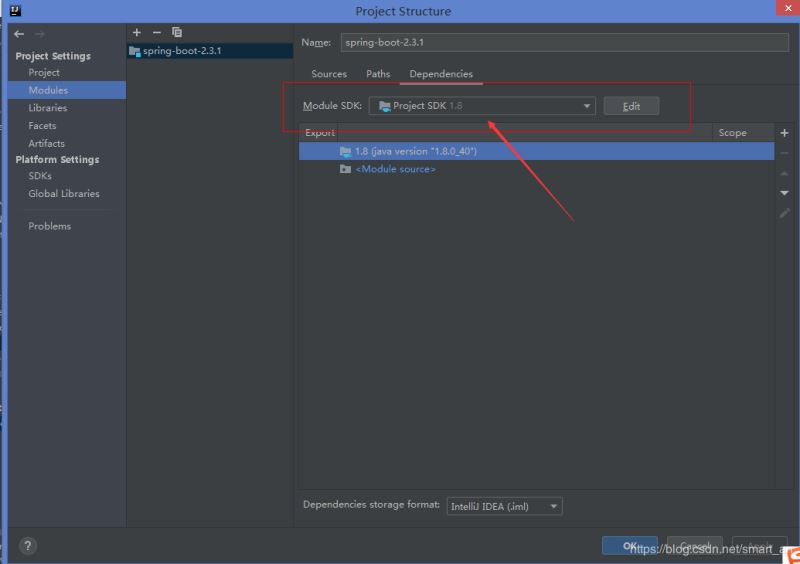
жҺҘдёӢжқҘпјҢModulesйҖүжӢ©Project SDK 1.8пјҢзӮ№еҮ»okеҚіеҸҜ
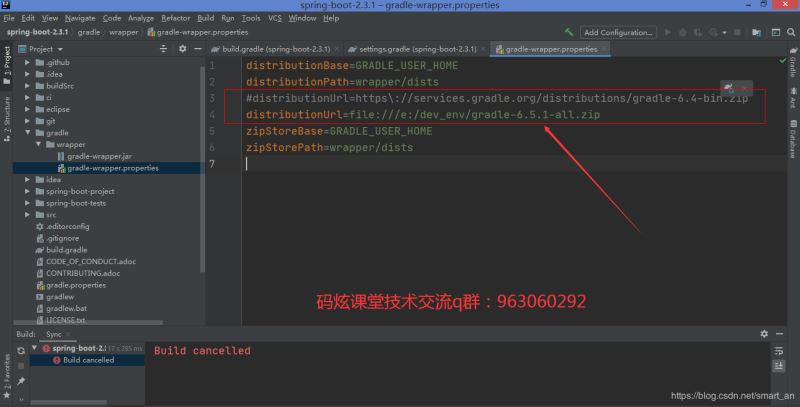
3гҖҒи®ҫзҪ®е®ҢжҜ•д№ӢеҗҺпјҢжү“ејҖе·ҘзЁӢдёӢзҡ„gradle->wrapperдёӢзҡ„gradle-wrapper.propertiesж–Ү件пјҢжіЁйҮҠжҺүпјҡ
#distributionUrl=https\://services.gradle.org/distributions/gradle-6.4-bin.zip
жҚўжҲҗжң¬ең°зҡ„gradle-6.5.1-all.zipпјҢиҝҷдёӘзүҲжң¬жҳҜеҪ“еүҚжңҖж–°зүҲпјҢиҖҢдё”жҳҜеёҰжәҗз Ғзҡ„гҖӮ
distributionUrl=file:///e:/dev_env/gradle-6.5.1-all.zip
еҰӮеӣҫжүҖзӨәпјҡ
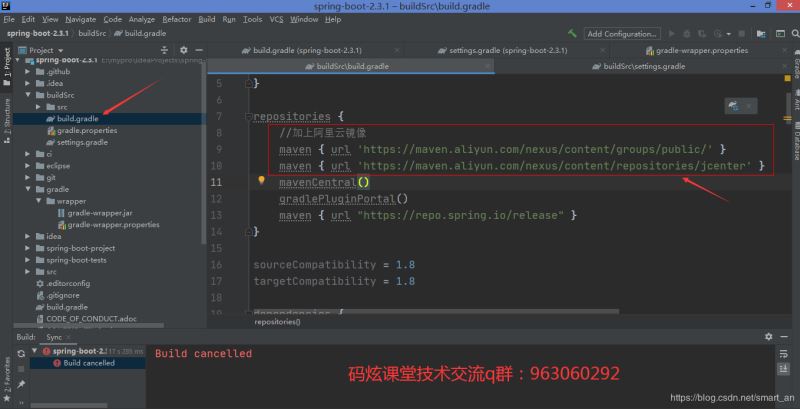
4гҖҒдҝ®ж”№е·ҘзЁӢдёӢзҡ„buildSrcдёӢзҡ„build.gradleж–Ү件пјҢжүҫеҲ°еҰӮдёӢд»Јз Ғж®өпјҢж·»еҠ йҳҝйҮҢдә‘й•ңеғҸпјҲдёҚж·»еҠ зҡ„иҜқеҮ дёӘе°Ҹж—¶д№ҹжһ„е»әдёҚе®Ңпјү
repositories {
//еҠ дёҠйҳҝйҮҢдә‘й•ңеғҸ
maven { url 'https://maven.aliyun.com/nexus/content/groups/public/' }
maven { url 'https://maven.aliyun.com/nexus/content/repositories/jcenter' }
maven { url "https://repo.spring.io/plugins-release" }
mavenCentral()
gradlePluginPortal()
maven { url "https://repo.spring.io/release" }
}еҰӮеӣҫпјҡ
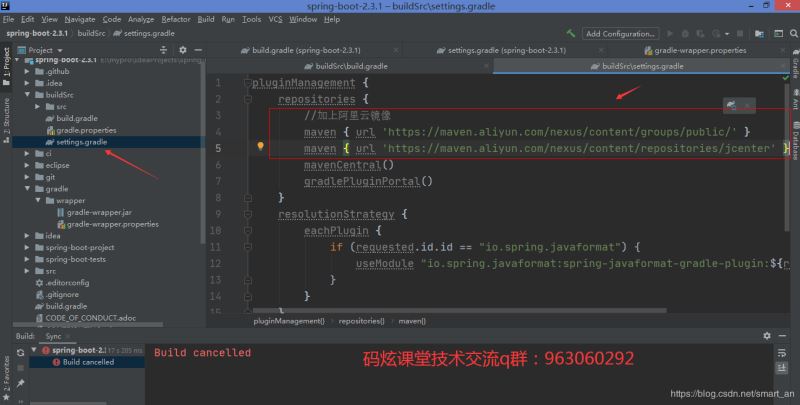
5гҖҒ继з»ӯдҝ®ж”№еҗҢзӣ®еҪ•дёӢзҡ„settings.gradleж–Ү件пјҢиҝҷжҳҜе…ЁеұҖй…ҚзҪ®ж–Ү件пјҢд№ҹиҰҒеҠ дёҠйҳҝйҮҢдә‘й•ңеғҸпјҢжүҫеҲ°еҰӮдёӢд»Јз Ғеқ—пјҢдҝ®ж”№еҰӮдёӢпјҡ
pluginManagement {
repositories {
//еҠ дёҠйҳҝйҮҢдә‘й•ңеғҸ
maven { url 'https://maven.aliyun.com/nexus/content/groups/public/' }
maven { url 'https://maven.aliyun.com/nexus/content/repositories/jcenter' }
maven { url "https://repo.spring.io/plugins-release" }
mavenCentral()
gradlePluginPortal()
}
......
}еҰӮдёӢеӣҫжүҖзӨәпјҡ
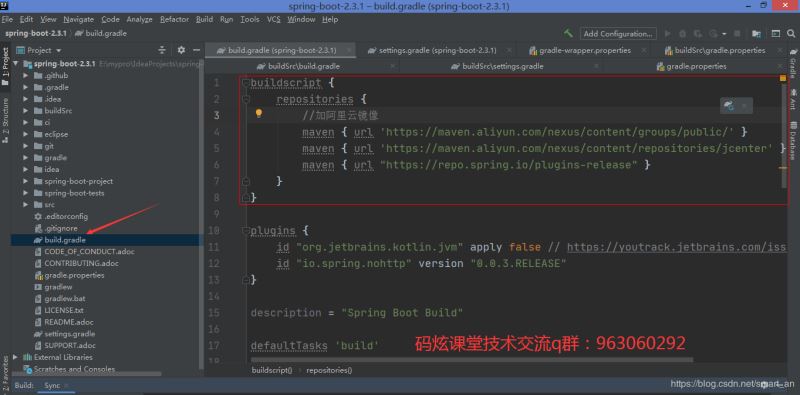
6гҖҒдҝ®ж”№е·ҘзЁӢж №зӣ®еҪ•дёӢзҡ„build.gradleж–Ү件пјҲеүҚйқўдҝ®ж”№зҡ„жҳҜbuildSrcдёӢзҡ„пјҢжіЁж„ҸеҢәеҲ«пјүпјҢеҗҢж ·жҳҜеҠ дёҠйҳҝйҮҢдә‘й•ңеғҸпјҢзәўжЎҶдёӯзҡ„д»Јз ҒйңҖиҰҒе…ЁйғЁеҠ дёҠпјҢдё”еҸӘиғҪеҠ еңЁиҜҘж–Ү件еӨҙйғЁгҖӮ
buildscript {
 repositories {
  maven { url 'https://maven.aliyun.com/nexus/content/groups/public/' }
  maven { url 'https://maven.aliyun.com/nexus/content/repositories/jcenter' }
  maven { url "https://repo.spring.io/plugins-release" }
 }
}
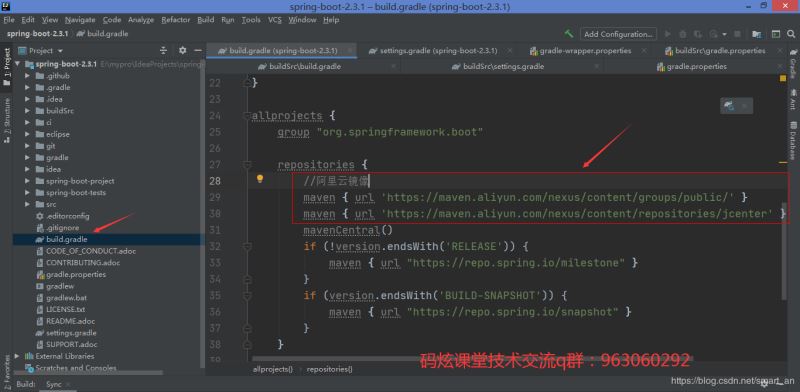
иҝҳжҳҜиҝҷдёӘж–Ү件пјҢ继з»ӯдҝ®ж”№пјҢеҫҖдёӢжүҫеҲ°еҰӮдёӢеӣҫзҡ„д»Јз Ғеқ—пјҢеҠ дёҠйҳҝйҮҢдә‘й•ңеғҸ
allprojects {
group "org.springframework.boot"
repositories {
//йҳҝйҮҢдә‘й•ңеғҸ
maven { url 'https://maven.aliyun.com/nexus/content/groups/public/' }
maven { url 'https://maven.aliyun.com/nexus/content/repositories/jcenter' }
mavenCentral()
......
}
......
}
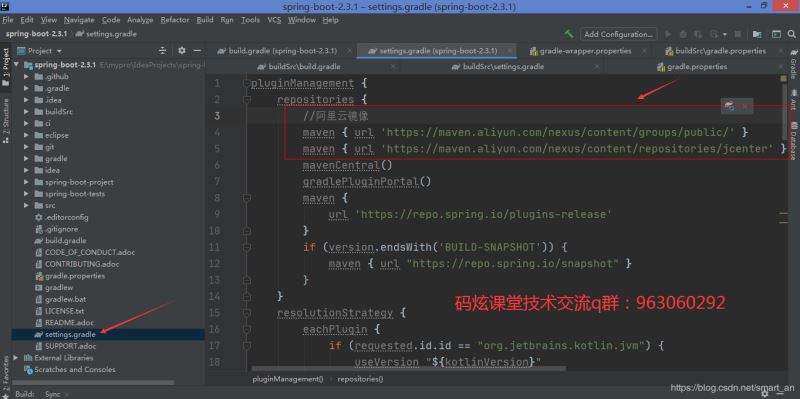
7гҖҒ继з»ӯдҝ®ж”№ж №зӣ®еҪ•дёӢзҡ„е…ЁеұҖй…ҚзҪ®ж–Ү件settings.gradleпјҢеҗҢж ·жҳҜеҠ дёҠйҳҝйҮҢдә‘й•ңеғҸ
pluginManagement {
repositories {
//йҳҝйҮҢдә‘й•ңеғҸ
maven { url 'https://maven.aliyun.com/nexus/content/groups/public/' }
maven { url 'https://maven.aliyun.com/nexus/content/repositories/jcenter' }
mavenCentral()
......
}
......
} еҰӮдёӢеӣҫжүҖзӨәпјҡ
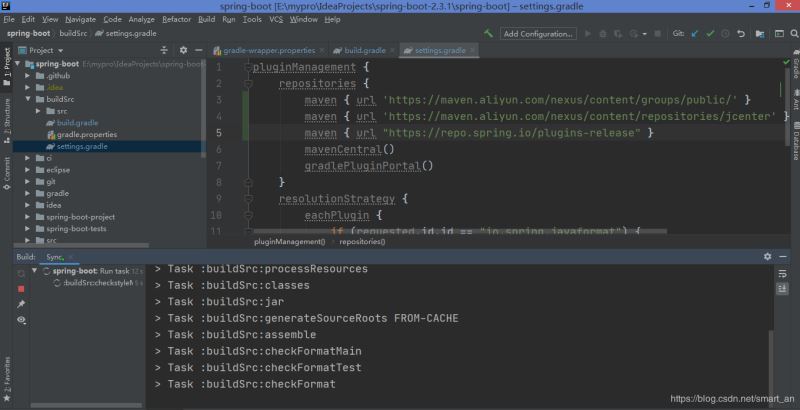
8гҖҒokпјҢеҲ°жӯӨжүҚеҸҜд»ҘејҖе§Ӣж„үеҝ«зҡ„жһ„е»әпјҢеҰӮдёӢеӣҫпјҢжһ„е»әдёӯгҖӮгҖӮгҖӮ
з»ҸиҝҮдёҖж®өж—¶й—ҙд№ӢеҗҺпјҢжһ„е»әеҝ«з»“жқҹзҡ„ж—¶еҖҷпјҢжү§иЎҢtestиҝҷдёҖжӯҘзҡ„ж—¶еҖҷпјҢеҮәзҺ°й—®йўҳпјҲеҪ“然иҝҷдёҖжӯҘеҸҜд»ҘзңҒз•ҘпјҢдҪҶжҳҜsmartе“Ҙе…ҲеӨ©зҡ„ејәиҝ«з—ҮдёҚе…Ғи®ёпјүпјҢдәҺжҳҜејҖе§Ӣз ҙи§Јд№Ӣжі•гҖӮ
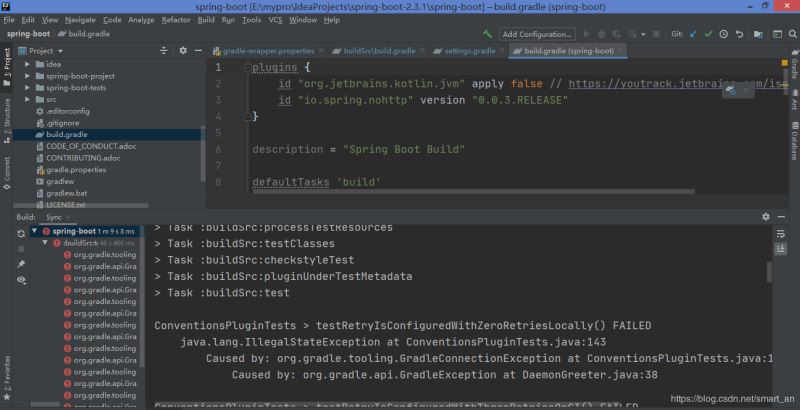
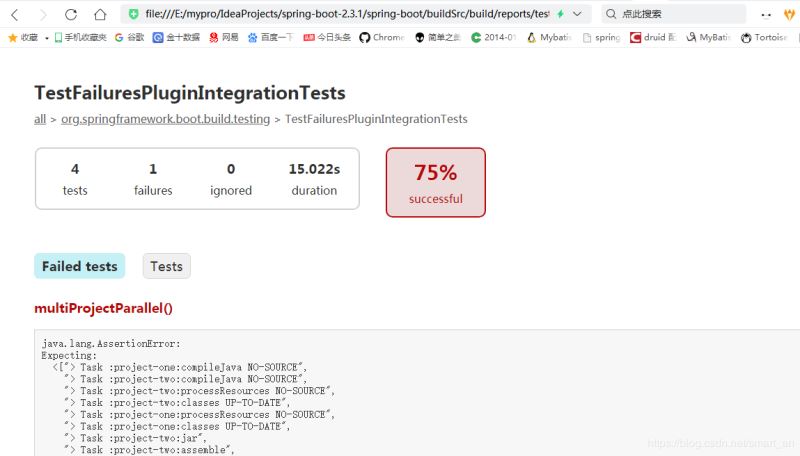
иҝҷдёӘй—®йўҳд№ҚдёҖзңӢжҳҜж— д»Һе…ҘжүӢзҡ„пјҢ然еҗҺеҫҖдёҠжүҫеҲ°й”ҷиҜҜжҸҗзӨәпјҡ
file:///E:/mypro/IdeaProjects/spring-boot-2.3.1/spring-boot/buildSrc/build/reports/tests/test/classes/org.springframework.boot.build.testing.TestFailuresPluginIntegrationTests.html#multiProjectParallel()
дәҺжҳҜжӢ·иҙқиҝҷдёҖж®өең°еқҖеңЁжөҸи§ҲеҷЁжү“ејҖпјҢеҰӮдёӢеӣҫжүҖзӨәпјҡ
жҳҜдёҖж®өжөӢиҜ•жҠҘе‘Ҡ
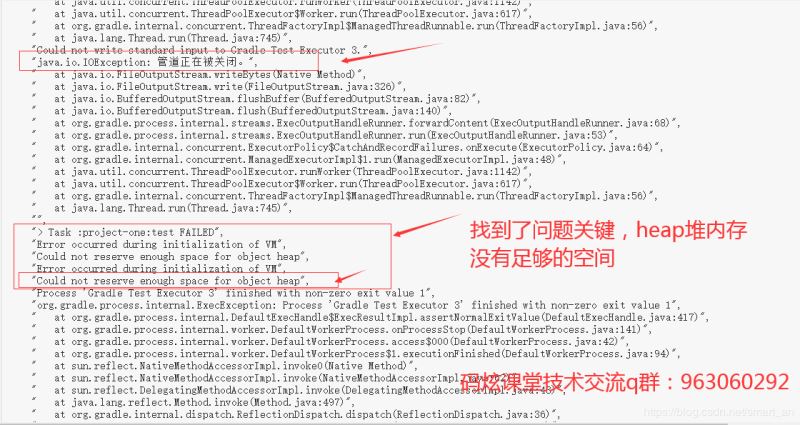
继з»ӯеҫҖдёӢжҹҘжүҫпјҢжүҫеҲ°й—®йўҳе…ій”®жүҖеңЁпјҢheapе ҶеҶ…еӯҳжІЎжңүи¶іеӨҹзҡ„з©әй—ҙпјҢй”ҷиҜҜеҰӮдёӢпјҡ
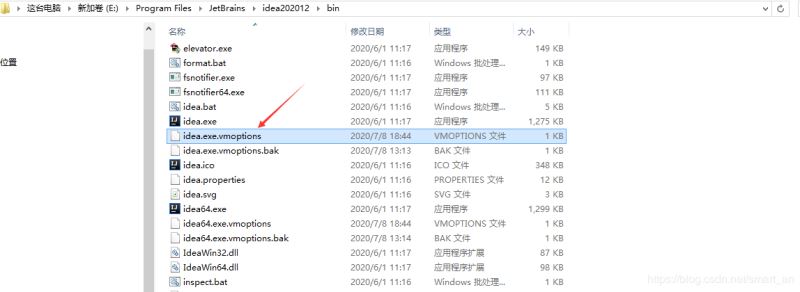
9гҖҒжҲ‘жң¬жңәжҳҜ16gеҶ…еӯҳпјҢдәҺжҳҜдҝ®ж”№ideaзҡ„binзӣ®еҪ•дёӢзҡ„idea.exe.vmoptionsж–Ү件пјҢдҝ®ж”№ideaзҡ„еҲқе§ӢеҢ–еҶ…еӯҳе’ҢжңҖеӨ§еҶ…еӯҳеҸӮж•°пјҡ
-Xms1024mпјҢ-Xmx4096m
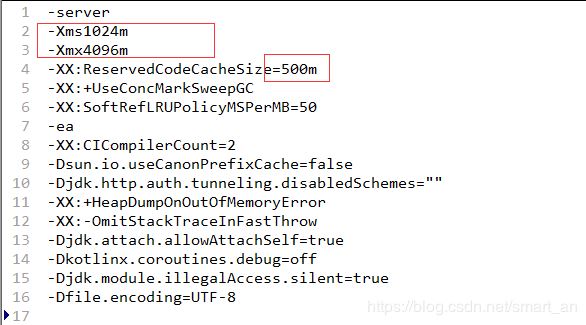
дҝ®ж”№еҗҺзҡ„ж–Ү件еҶ…е®№еҰӮдёӢпјҡ
-server
-Xms1024m
-Xmx4096m
-XX:ReservedCodeCacheSize=500m
-XX:+UseConcMarkSweepGC
-XX:SoftRefLRUPolicyMSPerMB=50
-ea
-XX:CICompilerCount=2
-Dsun.io.useCanonPrefixCache=false
-Djdk.http.auth.tunneling.disabledSchemes=""
-XX:+HeapDumpOnOutOfMemoryError
-XX:-OmitStackTraceInFastThrow
-Djdk.attach.allowAttachSelf=true
-Dkotlinx.coroutines.debug=off
-Djdk.module.illegalAccess.silent=true
-Dfile.encoding=UTF-8
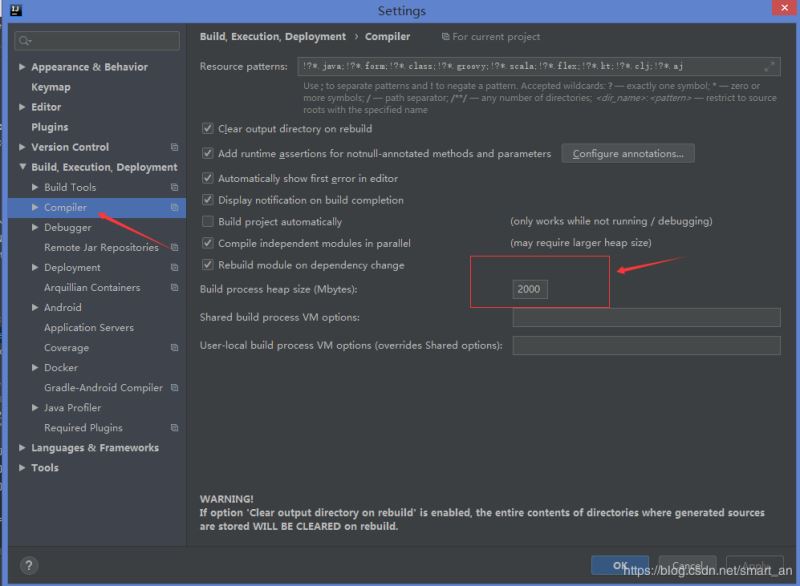
10гҖҒйҮҚж–°зј–иҜ‘иҝҳжҳҜжҠҘй”ҷпјҢдәҺжҳҜжү“ејҖгҖҗFileгҖ‘->гҖҗSettingsгҖ‘пјҢгҖҗBuildпјҢExecutionпјҢDeploymentгҖ‘->гҖҗCompilerгҖ‘пјҢBuild process heap sizeпјҲMbytesпјүж”№жҲҗ2000
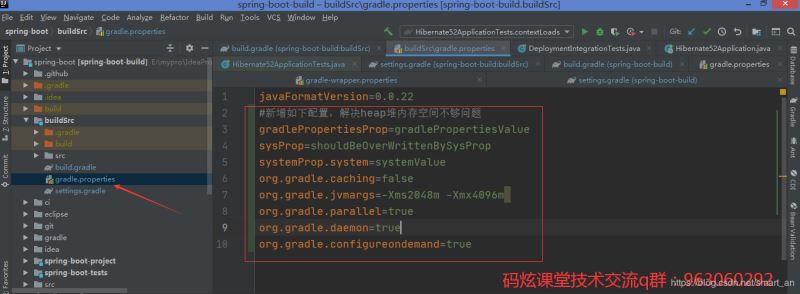
11гҖҒйҮҚж–°зј–иҜ‘иҝҳжҳҜжҠҘй”ҷпјҢ继з»ӯдҝ®ж”№buildSrcзӣ®еҪ•дёӢзҡ„gradle.propertiesж–Ү件пјҢж–°еўһеҰӮдёӢй…ҚзҪ®пјҡ
#ж–°еўһеҰӮдёӢй…ҚзҪ®пјҢи§ЈеҶіheapе ҶеҶ…еӯҳз©әй—ҙдёҚеӨҹй—®йўҳ gradlePropertiesProp=gradlePropertiesValue sysProp=shouldBeOverWrittenBySysProp systemProp.system=systemValue org.gradle.caching=false org.gradle.jvmargs=-Xms2048m -Xmx4096m org.gradle.parallel=true org.gradle.daemon=true org.gradle.configureondemand=true
йҮҚзӮ№жҳҜпјҡorg.gradle.jvmargs=-Xms2048m -Xmx4096m
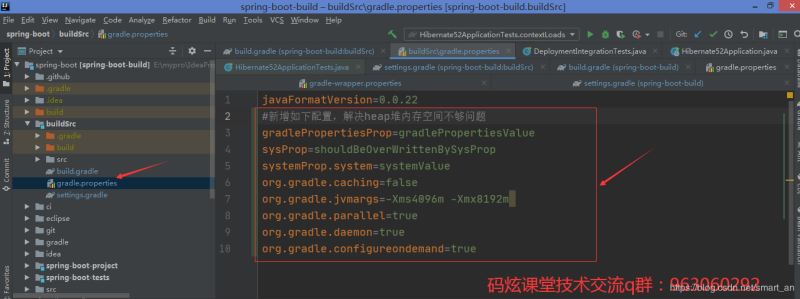
й…ҚзҪ®е®ҢйҮҚж–°жһ„е»әпјҢзј–иҜ‘пјҢжңҖеҗҺиҝҳжҳҜжҠҘз©әй—ҙдёҚи¶іпјҢдәҺжҳҜе°Ҷorg.gradle.jvmargsеҶ…еӯҳжү©еӨ§дёҖеҖҚпјҢеҰӮдёӢпјҡеҲқе§Ӣ4gпјҢжңҖеӨ§8g
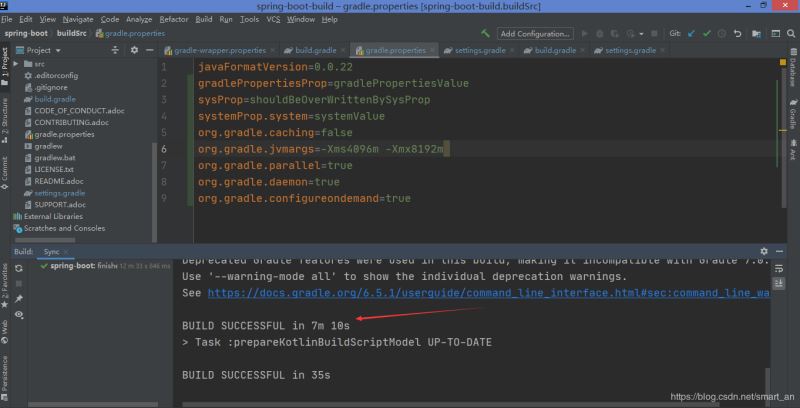
дҝ®ж”№е®ҢеҶҚж¬ЎйҮҚж–°жһ„е»әпјҢзј–иҜ‘пјҢз»ҲдәҺжҲҗеҠҹпјҒпјҒж’’иҠұпјҒпјҒ7еҲҶ10з§’пјҢж—¶й—ҙиҝҳжҳҜеҫҲеҝ«зҡ„гҖӮ
дә”гҖҒжәҗз ҒжөӢиҜ•
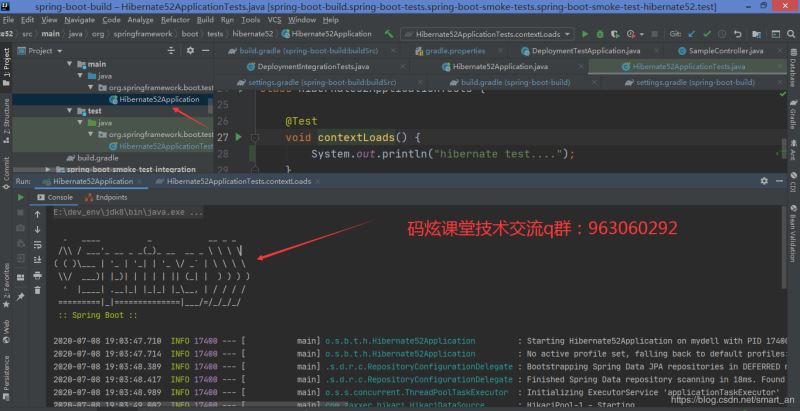
1гҖҒеңЁspringboot-boot-testsжЁЎеқ—дёӢйҡҸдҫҝжүҫдёҖдёӘspring-boot-smoke-test-hibernate52е·ҘзЁӢжқҘиҝӣиЎҢеҶ’зғҹжөӢиҜ•пјҢжү“ејҖHibernate52Application.javaж–Ү件пјҢзӣҙжҺҘжү§иЎҢmainж–№жі•еҗҜеҠЁspringbootпјҢжҲҗеҠҹ!
consoleдёӯеҮәзҺ°жҲ‘们зҶҹжӮүзҡ„еӣҫж ҮгҖӮ
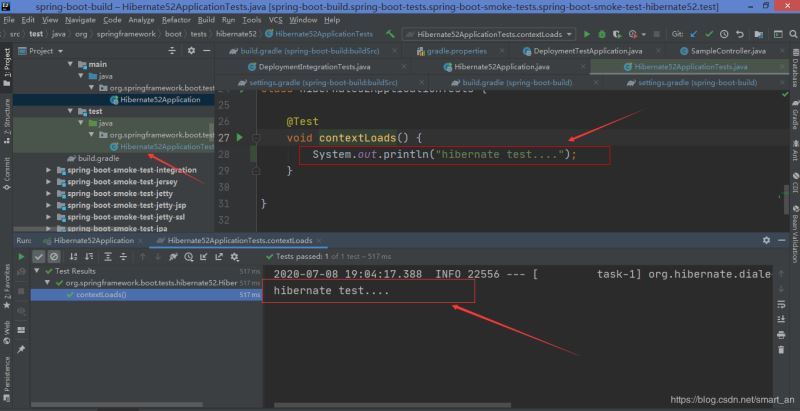
2гҖҒдёӢйқўиҝӣиЎҢеҚ•е…ғжөӢиҜ•пјҢиҝҳжҳҜеңЁspring-boot-smoke-test-hibernate52дёӢзҡ„testзӣ®еҪ•дёӯпјҢжү“ејҖHibernate52ApplicationTests.javaж–Ү件,еңЁcontextLoads()ж–№жі•дёӯеҠ дёҖж®өжү“еҚ°дҝЎжҒҜпјҡ
@Test
void contextLoads() {
 System.out.println("hibernate test....");
}жү§иЎҢRun Test,OK,жөӢиҜ•д№ҹжҳҜжІЎжңүй—®йўҳзҡ„,жөӢиҜ•з»“жһңеҰӮдёӢеӣҫ:
иҮіжӯӨпјҢspring-bootзҡ„жәҗз Ғйҳ…иҜ»зҺҜеўғе…ЁйғЁжҗӯе»ә并жөӢиҜ•е®ҢжҜ•
е…ӯгҖҒй—®йўҳеҸҠи§ЈеҶіж–№жЎҲ
1гҖҒTestFailuresPluginIntegrationTests > multiProjectParallel() FAILED
java.lang.AssertionError at TestFailuresPluginIntegrationTests.java:88
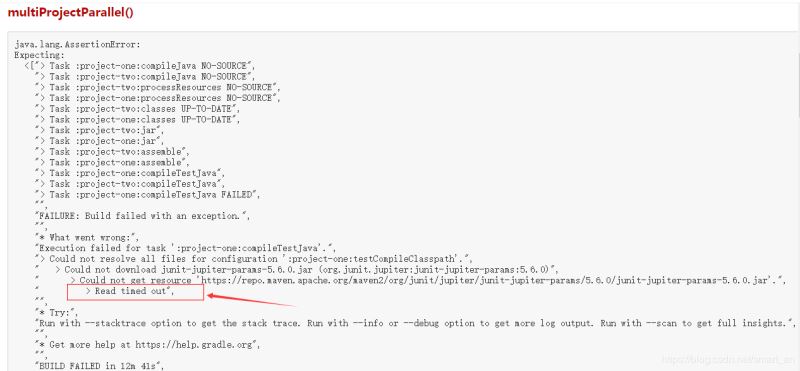
иҜҘй—®йўҳжҳҜjunitеҢ…дёӢиҪҪи¶…ж—¶пјҢеҸҜиғҪжҳҜжҲ‘жңәеҷЁзҪ‘з»ңжҠҪйЈҺдәҶпјҢеҲ·ж–°йҮҚж–°жһ„е»әеҚіеҸҜпјҒ
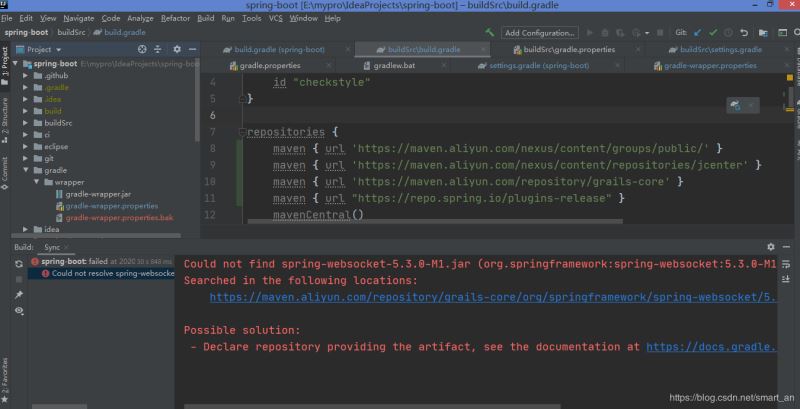
2гҖҒspring-websocket-5.3.0-M1.jarеҢ…жүҫдёҚеҲ°
еҰӮжһңе°Ҹдјҷдјҙ们жӢүеҸ–зҡ„жҳҜmasterеҲҶж”ҜпјҢе°ұеғҸжҲ‘еңЁжң¬ж–ҮејҖеӨҙи®Ізҡ„йӮЈж ·пјҢжӯӨж—¶жҠҘspring-websocket-5.3.0-M1.jarеҢ…жүҫдёҚеҲ°пјҢжҸҗзӨәеңЁдёӢйқўзҡ„ең°еқҖдёӯжҹҘжүҫгҖӮ
дҪҶжҳҜ https://maven.aliyun.com/repository/grails-core/org/springframework/spring-websocket/5.3.0-M1/spring-websocket-5.3.0-M1.jar
иҝҷдёӘй“ҫжҺҘжҳҺжҳҺжҳҜеҸҜд»ҘдёӢиҪҪзҡ„пјҢжүҖд»Ҙsmartе“ҘдёҖеӨҙйӣҫж°ҙпјҢжҮөеңҲдәҶеҫҲд№…гҖӮ

з»ҸиҝҮsmartе“ҘеӨҡж¬ЎеҲ·ж–°йҮҚж–°дёӢиҝҳжҳҜж— жі•дёӢиҪҪпјҢдәҺжҳҜжҠӣејғmasterеҲҶж”ҜпјҢиҪ¬иҖҢжӢүеҸ–2.3.xеҲҶж”ҜгҖӮ
е…ідәҺжҗӯе»әspringboot-2.3.xжңҖж–°зүҲзҡ„ж–№жі•е°ұеҲҶдә«еҲ°иҝҷйҮҢдәҶпјҢеёҢжңӣд»ҘдёҠеҶ…е®№еҸҜд»ҘеҜ№еӨ§е®¶жңүдёҖе®ҡзҡ„её®еҠ©пјҢеҸҜд»ҘеӯҰеҲ°жӣҙеӨҡзҹҘиҜҶгҖӮеҰӮжһңи§үеҫ—ж–Үз« дёҚй”ҷпјҢеҸҜд»ҘжҠҠе®ғеҲҶдә«еҮәеҺ»и®©жӣҙеӨҡзҡ„дәәзңӢеҲ°гҖӮ
е…ҚиҙЈеЈ°жҳҺпјҡжң¬з«ҷеҸ‘еёғзҡ„еҶ…е®№пјҲеӣҫзүҮгҖҒи§Ҷйў‘е’Ңж–Үеӯ—пјүд»ҘеҺҹеҲӣгҖҒиҪ¬иҪҪе’ҢеҲҶдә«дёәдё»пјҢж–Үз« и§ӮзӮ№дёҚд»ЈиЎЁжң¬зҪ‘з«ҷз«ӢеңәпјҢеҰӮжһңж¶үеҸҠдҫөжқғиҜ·иҒ”зі»з«ҷй•ҝйӮ®з®ұпјҡis@yisu.comиҝӣиЎҢдёҫжҠҘпјҢ并жҸҗдҫӣзӣёе…іиҜҒжҚ®пјҢдёҖз»ҸжҹҘе®һпјҢе°Ҷз«ӢеҲ»еҲ йҷӨж¶үе«ҢдҫөжқғеҶ…е®№гҖӮ