这期内容当中小编将会给大家带来有关PhpStorm2020 + phpstudyV8 +XDebug的使用教程,文章内容丰富且以专业的角度为大家分析和叙述,阅读完这篇文章希望大家可以有所收获。
1、安装phpStudy
1.1、下载phpStudy
解压后运行exe进行安装,我的安装目录是:D:\phpstudy_pro
1.2、配置环境:
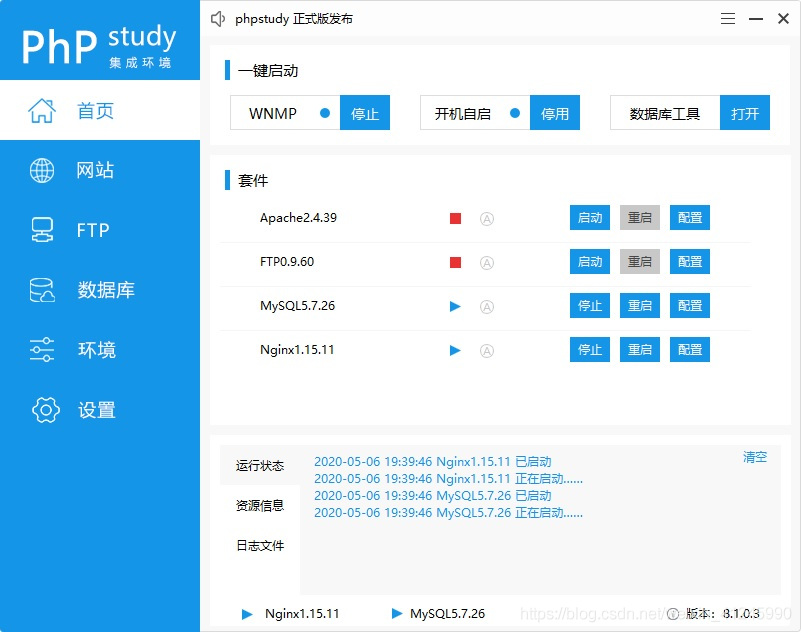
在桌面启动小皮进行配置,我的配置如下:
首页面板:启动"WNMP"
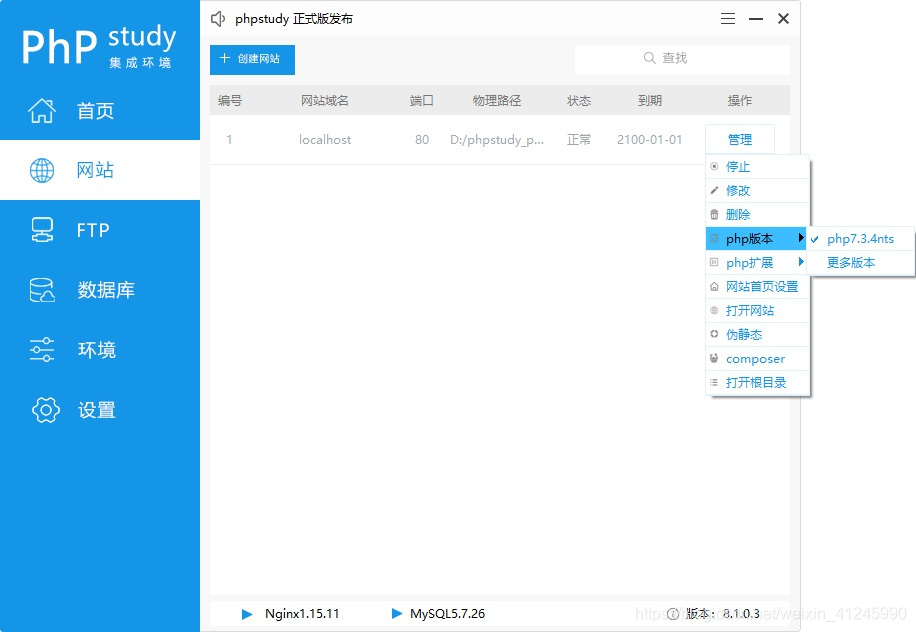
网站面板:PHP版本
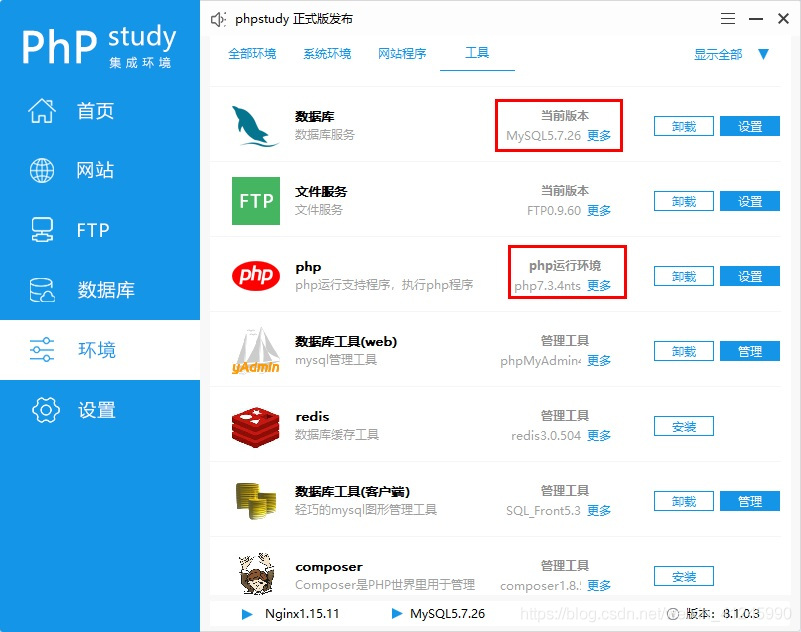
环境面板:数据库、PHP运行环境
2、安装PhpStorm2020
2.1、下载phpStudy
下载地址:https://blog.jetbrains.com/phpstorm/2020/03/phpstorm-2020-1-beta/
我使用的是缺省目录进行安装,如何激活在这就不详细说了。
2.1、配置PHP版本信息
我们点击“File->Settings”菜单进行PHP版本配置,使用和phpstudy对应的版本PHP7.3.4。
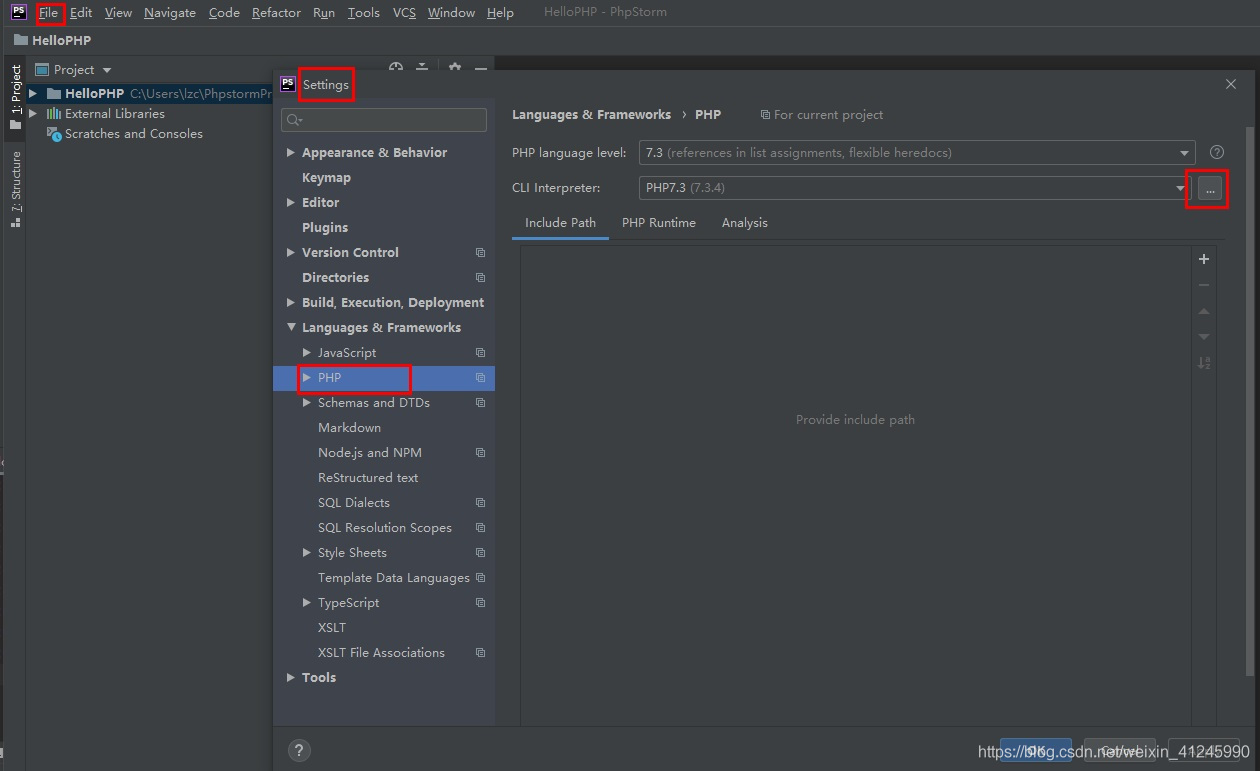
注意:Interpreter默认是没有的,我们需要点击右边的按钮进行配置。

3、新建测试工程
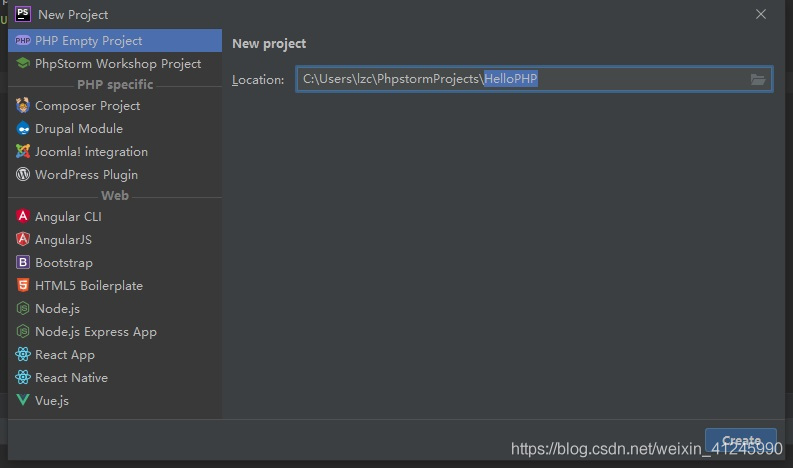
3.1、使用PhpStorm新建工程"HelloPHP"
第一步:打开PhpStorm软件,点击创建新项目,在输入框填写带项目存放地址的项目名称,完成后点击创建。
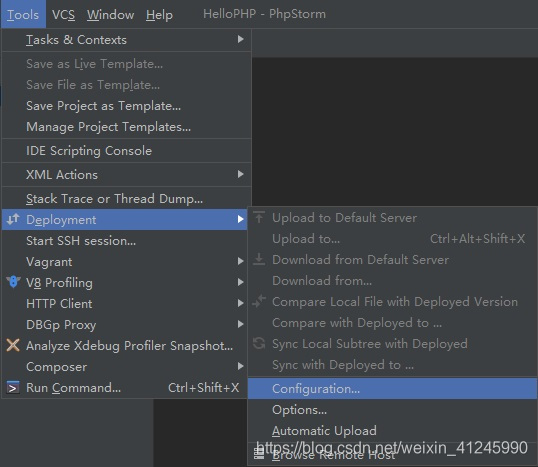
3.2、配置工程的本地服务
我们点击“工具/部署/配置”菜单进行本地服务配置
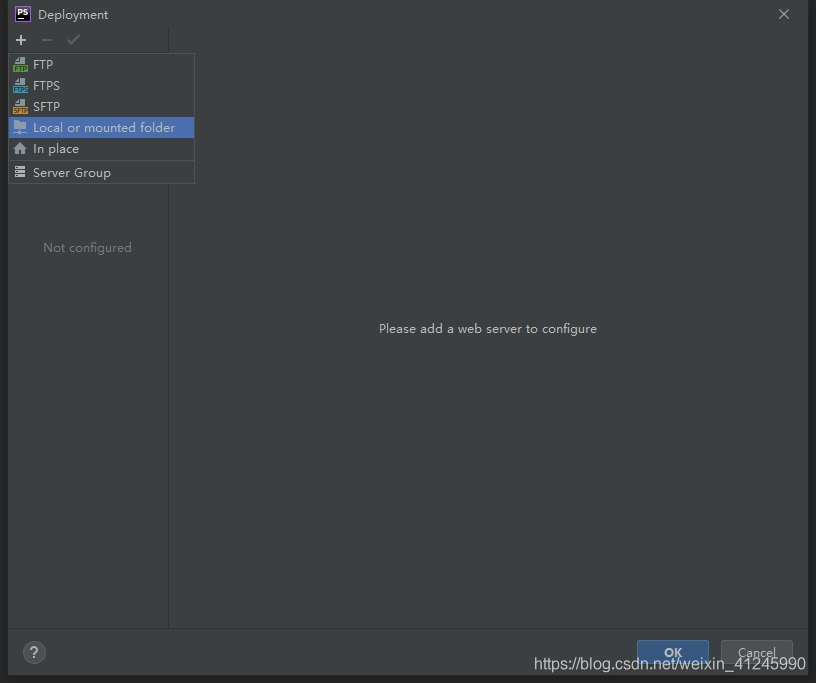
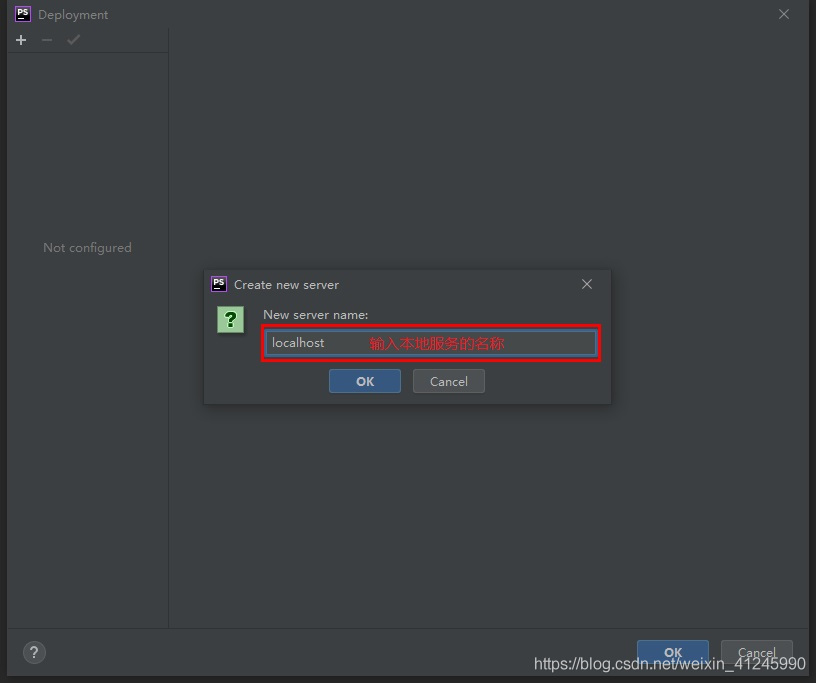
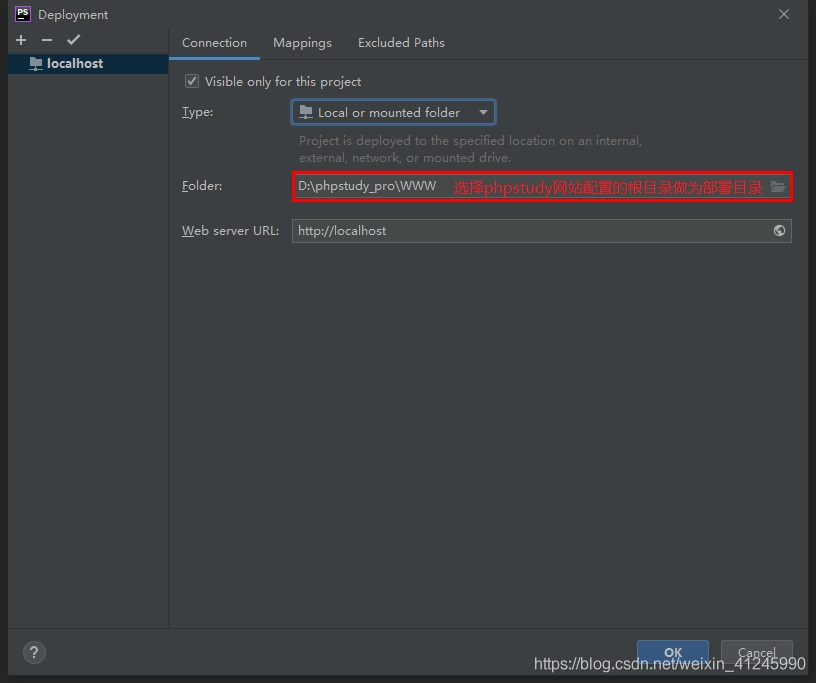
点击确定后进行具体配置:
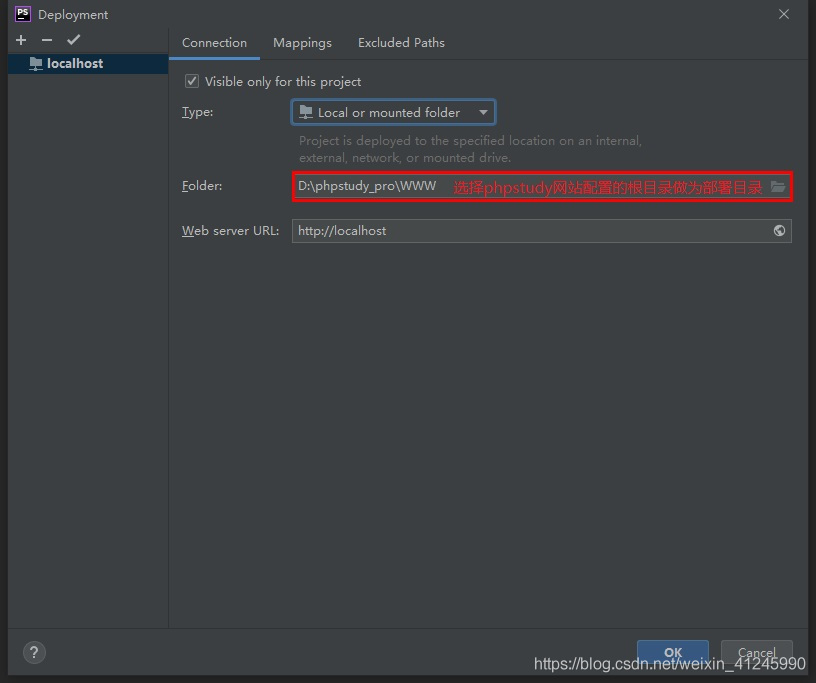
Connection面板:配置部署目录
Mappings面板:配置相对目录和访问地址
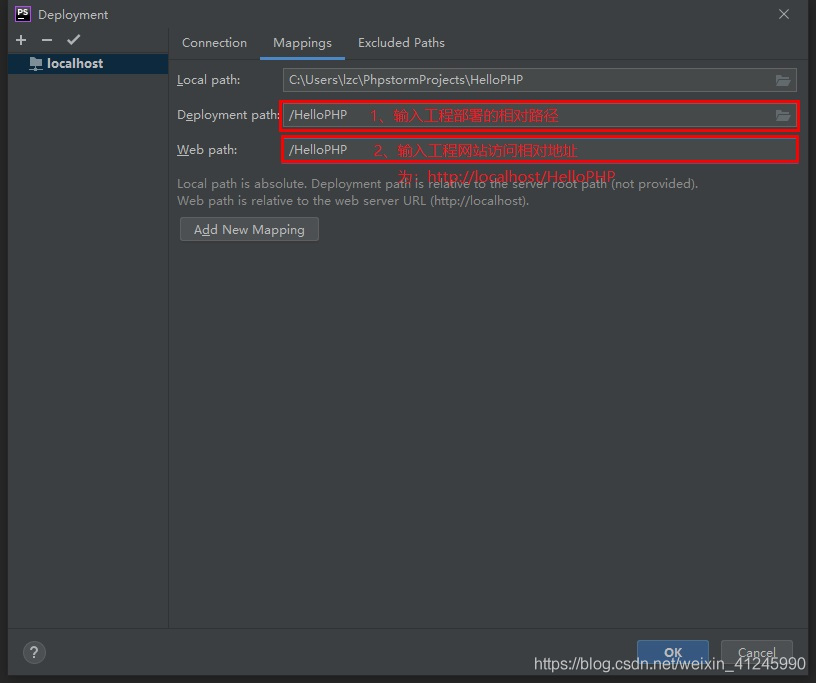
配置完之后点击“确定”。
3.3、配置运行环境
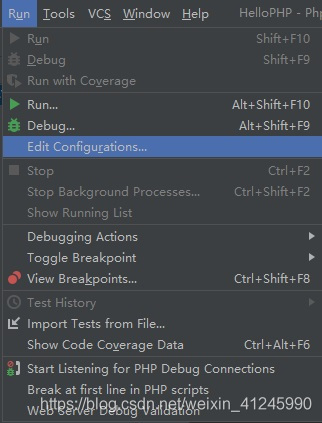
我们点击“运行/编辑配置”菜单进行运行环境配置
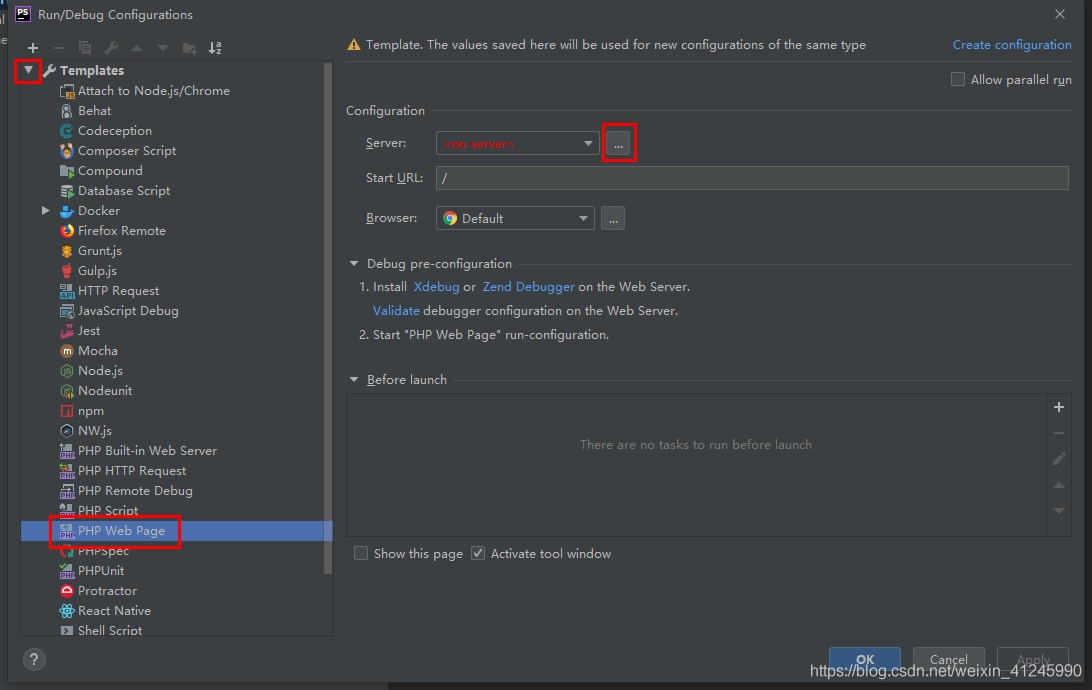
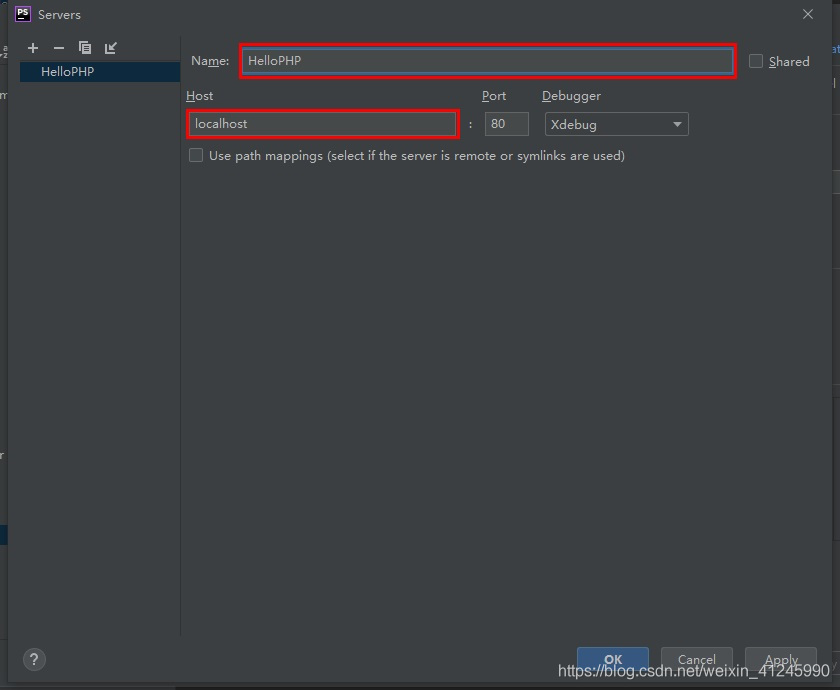
3.4、创建PHP文件
选择工程,单击右键->New->PHP File
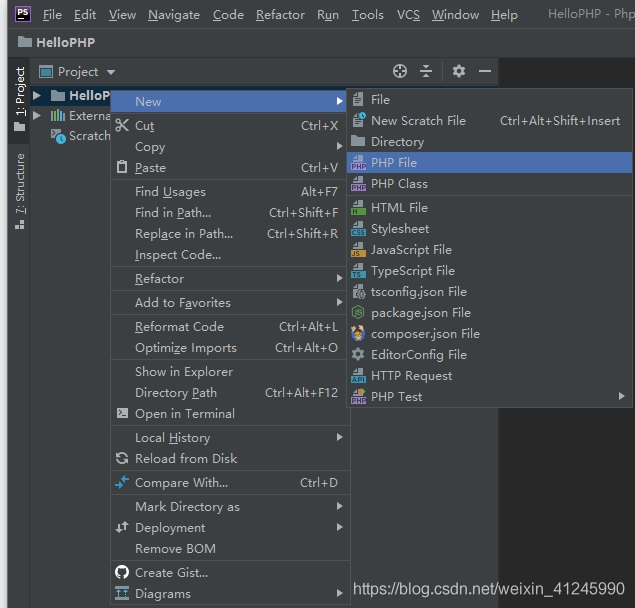
输入文件的名称,点击确定增加PHP文件

在新建的文件里输入代码:
<?php echo "Hello PHP!"; // 在页面上输出“Hello PHP!” phpinfo(); // 调用PHP内置的函数显示PHP的基本信息
3.5、部署工程
在菜单中选择Tools->Deployment->Upload to localhost上传工程。
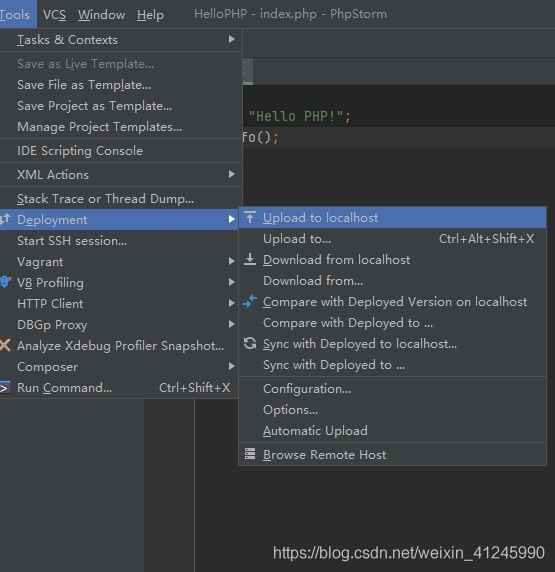
上传成功后,下方控制台显示上传的具体信息:

我们在phpstudy的www/HelloPHP目录下可以找到刚才上传的Index.php文件

3.6、运行Hello PHP
点击页面中悬浮的浏览器运行页面

我们来看看效果:

到这,我们完成了PHPStudy+PHPStorm配置和HelloPHP的运行,但是到目前为止PHPStorm只是承担了编辑器和部署的功能,没法直接调试,下面我们就来完成在PHPStorm进行单步调试。
4、调试Hello PHP
4.1、浏览器和插件
1)浏览器我们使用chrome,下载地址:https://www.google.com/chrome/;
2)配合chrome的插件我们使用xdebug,安装完成在浏览器地址栏的右侧能够看到一只小爬虫,点击后如下图所示:
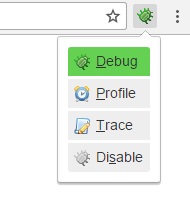
我们选择Debug,就会通知我们的开发环境进行调试,选择disable,就会直接运行。
我们可以在xdebug helper中配置它,选择phpstorm并且在右边的框中填入phpstorm-xdebug。
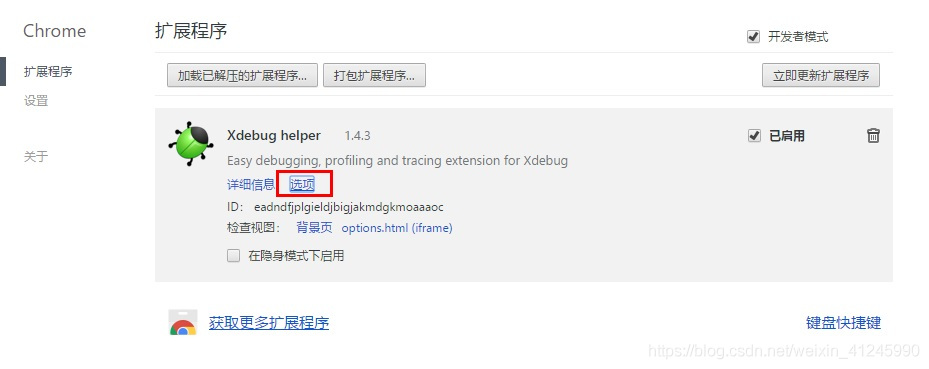
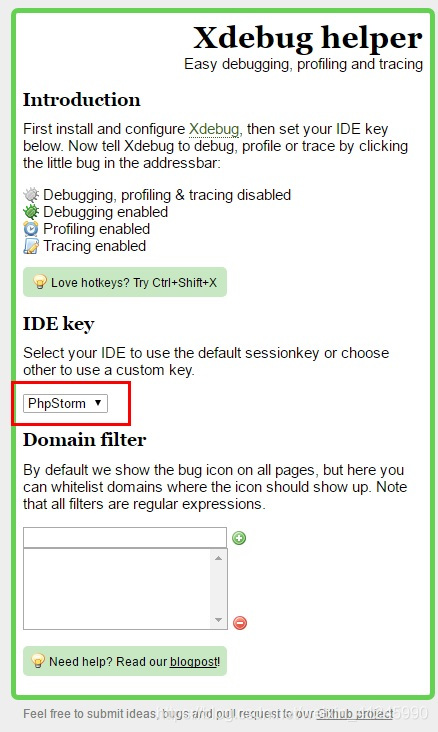
到这里,我们可以phpstorm中设置断点,然后使用浏览器的xdebug helper开启页面调试。
4.2、在php.ini文件的末尾添加如下配置:
[Xdebug]
zend_extension=D:/phpstudy_pro/Extensions/php/php7.3.4nts/ext/php_xdebug.dll
xdebug.collect_params=1
xdebug.collect_return=1
xdebug.auto_trace=On
xdebug.trace_output_dir=D:/phpstudy_pro/Extensions/php_log/php7.3.4nts.xdebug.trace	;设置的函数调用监测信息的输出路径
;xdebug.profiler_enable=On	;效能监测的设置开关
xdebug.profiler_enable = 1
xdebug.profiler_enable_trigger = 0
xdebug.profiler_output_dir="D:\phpstudy_pro\Extensions\tmp\xdebug"	;profiler_enable设置为1的时候,效能监测信息写入文件所在的目录
xdebug.remote_host = "localhost"
xdebug.remote_port=9090
xdebug.remote_handler="dbgp"
xdebug.profiler_append = 0
xdebug.remote_enable=On
xdebug.idekey=phpstorm-xdebug
xdebug.profiler_output_name ="cache.out.%t-%s"	;生成的效能监测文件的名字
4.3、在PhpStorm配置Debug:
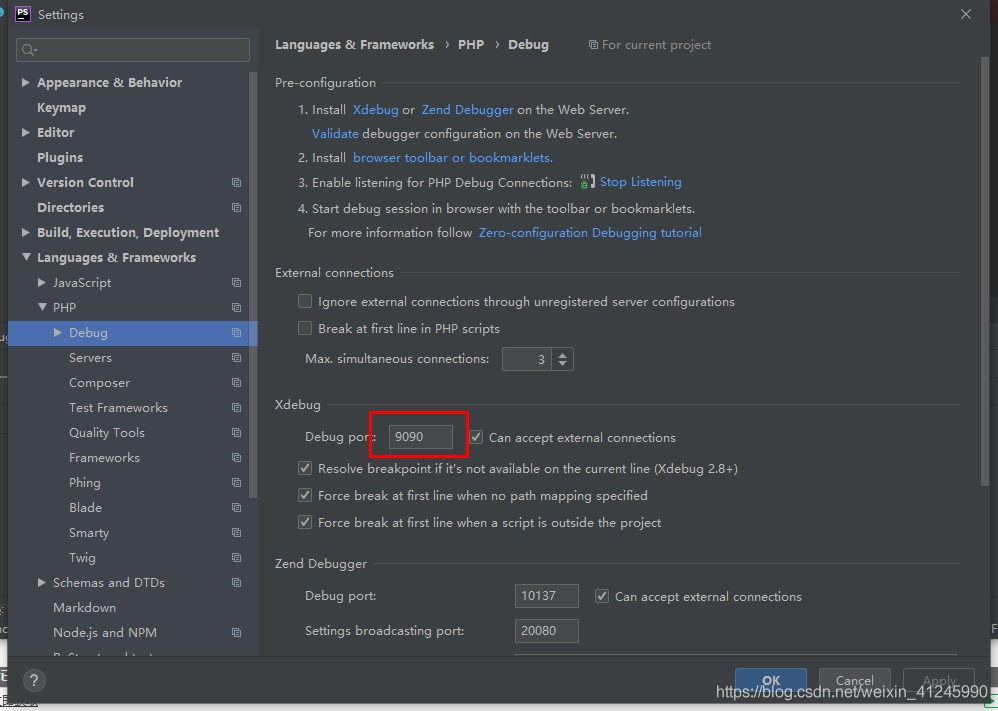
1)选择File->Settings->Languages&Frameworks->PHP>Debug,找到XDebug选项卡,Debug port 输入的是刚刚php.ini配置文件当中xdebug.remote_port的值,具体配置如下图:
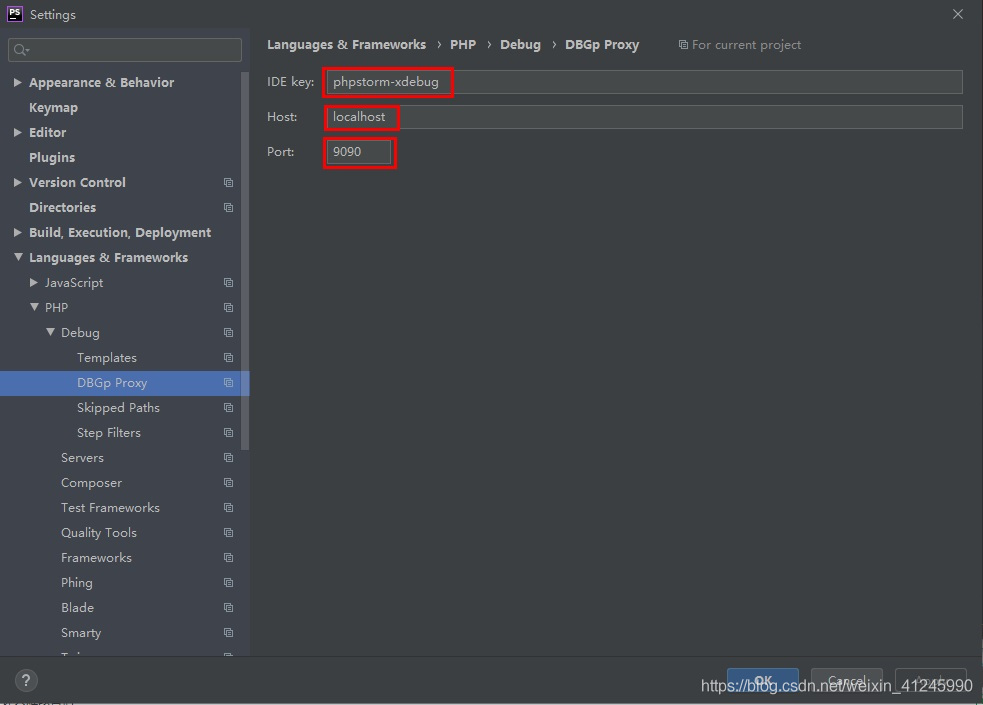
2)选择File->Settings->Languages&Frameworks->PHP->Debug->DBGp Proxy,
IED key输入刚刚php.ini文件中xdebug.idekey的值,Host、Port是File->Settings->Languages&Frameworks->PHP->Servers中设定的Host、Port值,具体配置如下图:
4.4、开启XDebug调试
在phpStorm里打开监听,就是一个电话一样的按钮,点击变为绿色,在程序代码点前点击,设置程序段点,点击绿色的debug爬虫按钮,chrome浏览器打开xdebug页,phpStorm出现debug窗口,并获取到variables值

5、错误处理
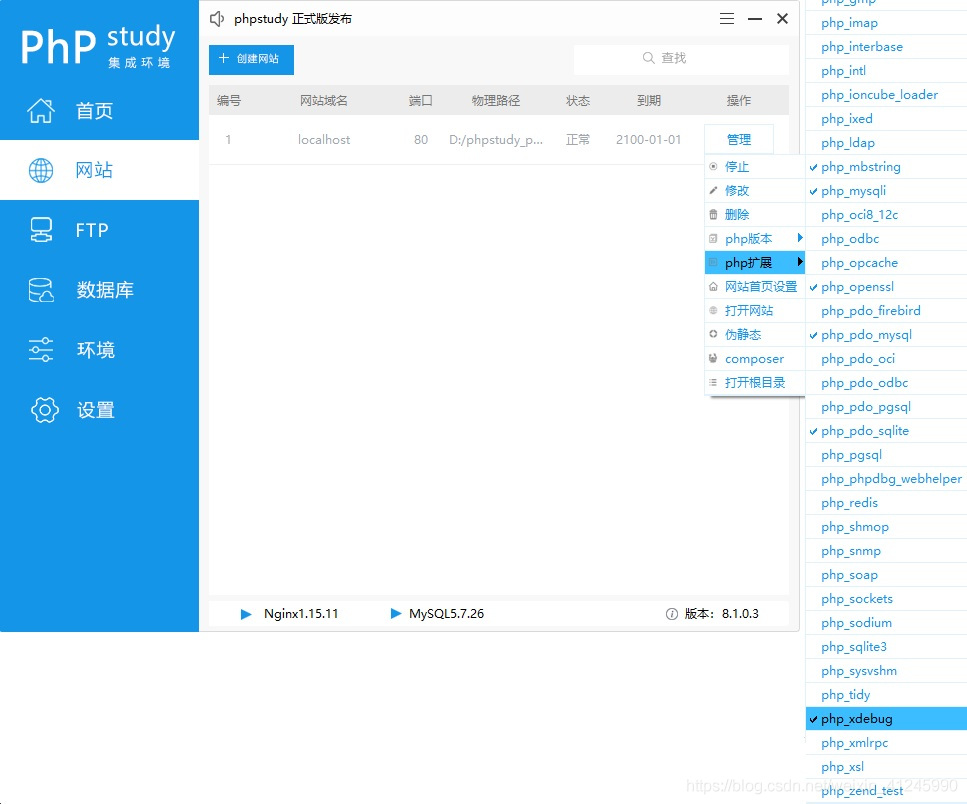
5.1 PHP Warning: Xdebug MUST be loaded as a Zend extension in Unknown on line 0
原因1:
remote_port我们使用的是9090,默认使用的是9000。由于9000端口会被nginx占用做代理,如果被占用,就会导致php无法调试。
原因2:
phpStudy集成XDebug扩展,我们在PHP扩展中选择php_xdebug时会出现上述错误,个人分析:可能是因为php.ini中配置的zend_extension和选项有冲突。
上述就是小编为大家分享的PhpStorm2020 + phpstudyV8 +XDebug的使用教程了,如果刚好有类似的疑惑,不妨参照上述分析进行理解。如果想知道更多相关知识,欢迎关注亿速云行业资讯频道。
免责声明:本站发布的内容(图片、视频和文字)以原创、转载和分享为主,文章观点不代表本网站立场,如果涉及侵权请联系站长邮箱:is@yisu.com进行举报,并提供相关证据,一经查实,将立刻删除涉嫌侵权内容。