小编给大家分享一下ThinkPHP5邮件发送服务封装的示例分析,希望大家阅读完这篇文章之后都有所收获,下面让我们一起去探讨吧!
具体内容如下
1.Composer安装phpmailer
composer require phpmailer/phpmailer
2.ThinkPHP中封装邮件服务类
我把它封装在扩展目录 extend/Mail.php 文件里,内容如下:
<?php
/**
* 邮件服务类
*/
class Mail extends \PHPMailer
{
  function __construct()
  {
    date_default_timezone_set('PRC');             // 默认时区设置

    $this->CharSet = config('mail.charset');          // 邮件编码设置
    $this->isSMTP();                      // 启用SMTP服务
    $this->SMTPDebug = config('mail.smtp_debug');       // Debug模式级别
    $this->Debugoutput = config('mail.debug_output');     // Debug输出类型
    $this->Host = config('mail.host');             // SMTP服务器地址
    $this->Port = config('mail.port');             // 端口号
    $this->SMTPAuth = config('mail.smtp_auth');        // SMTP登录认证
    $this->SMTPSecure = config('mail.smtp_secure');      // SMTP安全协议
    $this->Username = config('mail.username');         // SMTP登录邮箱
    $this->Password = config('mail.password');         // SMTP登录密码
    $this->setFrom(config('mail.from'), config('mail.from_name'));      // 发件人邮箱和名称
    $this->addReplyTo(config('mail.reply_to'), config('mail.reply_to_name')); // 回复邮箱和名称
  }

  /**
   * 发送邮件
   * @param [type] $toMail   收件人地址
   * @param [type] $toName   收件人名称
   * @param [type] $subject   邮件主题
   * @param [type] $content   邮件内容,支持html
   * @param [type] $attachment 附件列表。文件路径或路径数组
   * @return [type]       成功返回true,失败返回错误消息
   */
  function sendMail($toMail, $toName, $subject, $content, $attachment = null)
  {
    $this->addAddress($toMail, $toName);
    $this->Subject = $subject;
    $this->msgHTML($content);

    if($attachment) { // 添加附件
      if(is_string($attachment)){
        is_file($attachment) && $this->AddAttachment($attachment);
      }
      else if(is_array($attachment)){
        foreach ($attachment as $file) {
          is_file($file) && $this->AddAttachment($file);
        }
      }
    }

    if(!$this->send()){ // 发送
      return $this->ErrorInfo;
    }
    else{
      return true;
    }
  }
}注意:如果发送附件,建议使用英文路径。中文路径可能会导致附件发送失败,收到的邮件没有附件。
上面需要的一些配置参数,我把它们放在扩展配置目录 application/extra/mail.php 文件里 ,内容如下:
<?php
/**
 * 邮件服务相关配置
 */
return [
  'charset' => 'utf-8',         // 邮件编码
  'smtp_debug' => 0,           // Debug模式。0: 关闭,1: 客户端消息,2: 客户端和服务器消息,3: 2和连接状态,4: 更详细
  'debug_output' => 'html',       // Debug输出类型。`echo`(默认),`html`,或`error_log`
  'host' => 'smtp.126.com',       // SMTP服务器地址
  'port' => 465,             // 端口号。默认25
  'smtp_auth' => true,          // 启用SMTP认证
  'smtp_secure' => 'ssl',        // 启用安全协议。''(默认),'ssl'或'tls',留空不启用
  'username' => 'yourname@example.com', // SMTP登录邮箱
  'password' => 'yourpassword',     // SMTP登录密码。126邮箱使用客户端授权码,QQ邮箱用独立密码
  'from' => 'from@example.com',     // 发件人邮箱
  'from_name' => 'name',         // 发件人名称
  'reply_to' => '',           // 回复邮箱的地址。留空取发件人邮箱
  'reply_to_name' => '',         // 回复邮箱人名称。留空取发件人名称
]; 注意:一般默认端口 25。如果使用了安全协议 ssl,那么端口号一般是 465 或 587。譬如 126 邮箱。建议使用安全协议,因为像阿里云服务器就禁止了非安全协议的 25 端口。
更多配置参数,可以看看源码:https://github.com/PHPMailer/PHPMailer/blob/master/class.phpmailer.php
3.测试
在控制器里方法里,添加测试代码:
public function mail()
{
  $mail = new \Mail;
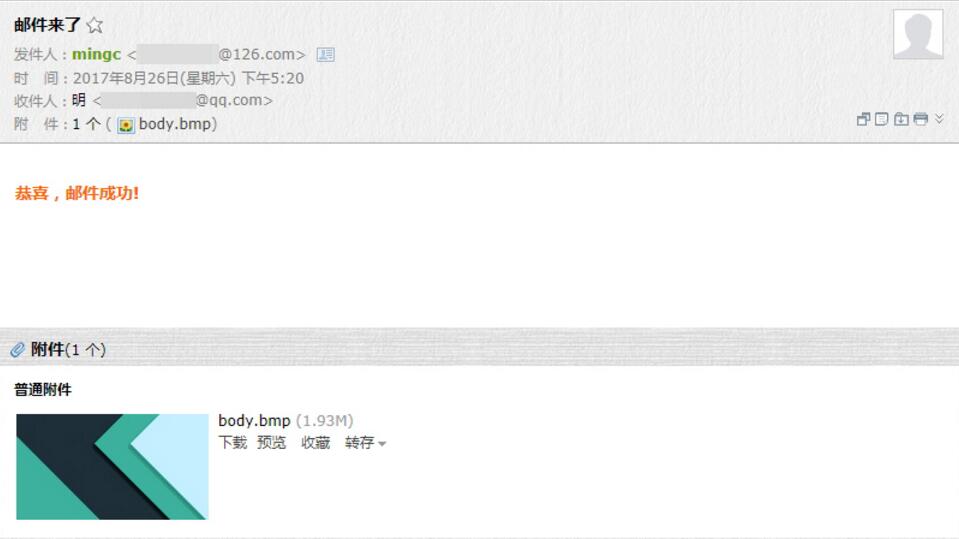
  $ok = $mail->sendMail('xxxxxxxxx@qq.com', 'mingc', '邮件来了', '<p >恭喜,邮件成功!</p>', 'C:/Users/Administrator/Desktop/body.bmp');
  var_dump($ok);
}
这里我使用 126 邮箱,安全协议 ssl,端口号 465,发送 html 内容,测试成功:

看完了这篇文章,相信你对“ThinkPHP5邮件发送服务封装的示例分析”有了一定的了解,如果想了解更多相关知识,欢迎关注亿速云行业资讯频道,感谢各位的阅读!
免责声明:本站发布的内容(图片、视频和文字)以原创、转载和分享为主,文章观点不代表本网站立场,如果涉及侵权请联系站长邮箱:is@yisu.com进行举报,并提供相关证据,一经查实,将立刻删除涉嫌侵权内容。