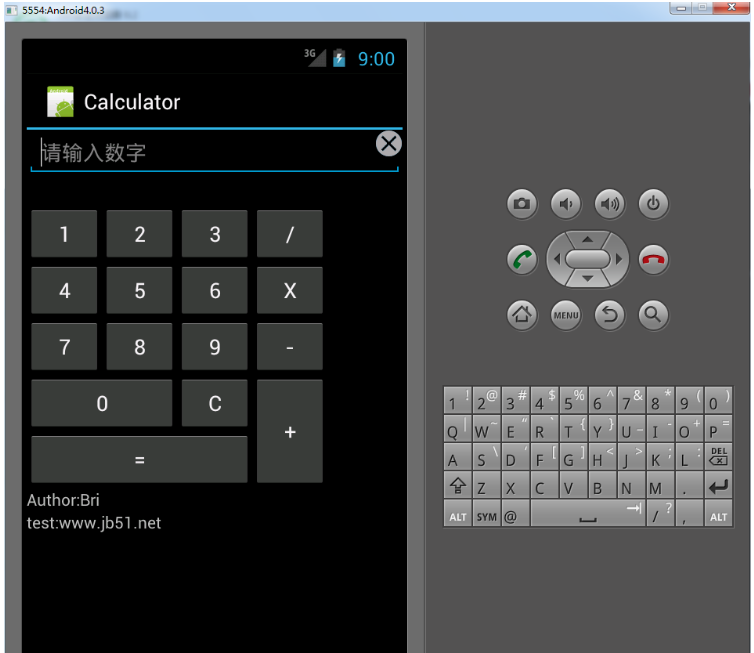
今天小编给大家分享一下Android开发怎么实现计算器功能的相关知识点,内容详细,逻辑清晰,相信大部分人都还太了解这方面的知识,所以分享这篇文章给大家参考一下,希望大家阅读完这篇文章后有所收获,下面我们一起来了解一下吧。
先上图看效果

比较简单,所以我就没怎么写注释,应该一看就能明白的
有不明白的可以发信问我
先贴MainActivity.java代码
package com.example.calculator;
import android.app.Activity;
import android.os.Bundle;
import android.view.Menu;
import android.view.MenuItem;
import android.view.View;
import android.view.View.OnClickListener;
import android.widget.Button;
import android.widget.EditText;
import android.widget.ImageView;
import android.widget.TextView;
import android.widget.Toast;
public class MainActivity extends Activity implements OnClickListener {
  Button b1, b2, b3, b4, b5, b6, b7, b8, b9, b0, bp, bs, bm, bd, bc, be;
  ImageView delete;
  TextView tv;
  EditText show;
  String showString = "", option = "";
  int showfirst = 0;
  String exception = "";
  @Override
  protected void onCreate(Bundle savedInstanceState) {
    super.onCreate(savedInstanceState);
    setContentView(R.layout.activity_main);
    b0 = (Button) findViewById(R.id.bt_0);
    b1 = (Button) findViewById(R.id.bt_1);
    b2 = (Button) findViewById(R.id.bt_2);
    b3 = (Button) findViewById(R.id.bt_3);
    b4 = (Button) findViewById(R.id.bt_4);
    b5 = (Button) findViewById(R.id.bt_5);
    b6 = (Button) findViewById(R.id.bt_6);
    b7 = (Button) findViewById(R.id.bt_7);
    b8 = (Button) findViewById(R.id.bt_8);
    b9 = (Button) findViewById(R.id.bt_9);
    bp = (Button) findViewById(R.id.bt_plus);
    bs = (Button) findViewById(R.id.bt_sub);
    bm = (Button) findViewById(R.id.bt_mutilate);
    bd = (Button) findViewById(R.id.bt_div);
    bc = (Button) findViewById(R.id.bt_c);
    be = (Button) findViewById(R.id.bt_equ);
    b1.setOnClickListener(this);
    b2.setOnClickListener(this);
    b3.setOnClickListener(this);
    b4.setOnClickListener(this);
    b5.setOnClickListener(this);
    b6.setOnClickListener(this);
    b7.setOnClickListener(this);
    b8.setOnClickListener(this);
    b9.setOnClickListener(this);
    b0.setOnClickListener(this);
    bp.setOnClickListener(this);
    bs.setOnClickListener(this);
    bm.setOnClickListener(this);
    bd.setOnClickListener(this);
    bc.setOnClickListener(this);
    be.setOnClickListener(this);
    show = (EditText) findViewById(R.id.et_show);
    delete = (ImageView) findViewById(R.id.iv_delete);
    delete.setOnClickListener(this);
    tv=(TextView) findViewById(R.id.author);
    tv.setOnClickListener(this);
  }
  @Override
  public boolean onCreateOptionsMenu(Menu menu) {
    // Inflate the menu; this adds items to the action bar if it is present.
    getMenuInflater().inflate(R.menu.main, menu);
    return true;
  }
  @Override
  public boolean onOptionsItemSelected(MenuItem item) {
    // Handle action bar item clicks here. The action bar will
    // automatically handle clicks on the Home/Up button, so long
    // as you specify a parent activity in AndroidManifest.xml.
    int id = item.getItemId();
    if (id == R.id.action_settings) {
      return true;
    }
    return super.onOptionsItemSelected(item);
  }
  @Override
  public void onClick(View v) {
    switch (v.getId()) {
    case R.id.bt_0:
      showString += "0";
      break;
    case R.id.bt_1:
      showString += "1";
      break;
    case R.id.bt_2:
      showString += "2";
      break;
    case R.id.bt_3:
      showString += "3";
      break;
    case R.id.bt_4:
      showString += "4";
      break;
    case R.id.bt_5:
      showString += "5";
      break;
    case R.id.bt_6:
      showString += "6";
      break;
    case R.id.bt_7:
      showString += "7";
      break;
    case R.id.bt_8:
      showString += "8";
      break;
    case R.id.bt_9:
      showString += "9";
      break;
    case R.id.bt_plus:
      if (showString.equals(""))
        exception = "先输入数值哦";
      else {
        showfirst = Integer.parseInt(showString);
        showString = "";
        option = "+";
      }
      break;
    case R.id.bt_sub:
      if (showString.equals(""))
        exception = "先输入数值哦";
      else {
        showfirst = Integer.parseInt(showString);
        showString = "";
        option = "-";
      }
      break;
    case R.id.bt_mutilate:
      if (showString.equals(""))
        exception = "先输入数值哦";
      else {
        showfirst = Integer.parseInt(showString);
        showString = "";
        option = "*";
      }
      break;
    case R.id.bt_div:
      if (showString.equals(""))
        exception = "先输入数值哦";
      else {
        showfirst = Integer.parseInt(showString);
        showString = "";
        option = "/";
      }
      break;
    case R.id.bt_equ:
      if (option.equals("+"))
        showString = showfirst + Integer.parseInt(showString) + "";
      else if (option.equals("-")) {
        showString = showfirst - Integer.parseInt(showString) + "";
      } else if (option.equals("*")) {
        showString = showfirst * Integer.parseInt(showString) + "";
      } else if (option.equals("/")) {
        if (showString.equals("0")) {
          exception = "除数不能为0!";
        } else
          showString = showfirst / Integer.parseInt(showString) + "";
      }
      break;
    case R.id.bt_c:
      showString = "";
      break;
    case R.id.iv_delete:
      Toast.makeText(MainActivity.this, showString + "已被清空",
          Toast.LENGTH_SHORT).show();
      showString = "";
      break;
    case R.id.author:
      Toast.makeText(MainActivity.this, "郑明亮\n软件工程\nQQ:1072307340",
          Toast.LENGTH_SHORT).show();
      break;
    default:
      break;
    }
    if (exception.equals(""))
      show.setText(showString);
    else {
      show.setText(exception);
      exception = "";
    }
    // 设置文本框颜色;
    if (!show.getText().toString().equals("")) {
      delete.setBackgroundColor(R.drawable.delete_gray);
    }
    else {
      delete.setBackgroundResource(R.drawable.delete);
    }
  }
}再贴布局activity_main.xml:
<LinearLayout xmlns:android="http://schemas.android.com/apk/res/android"
  xmlns:tools="http://schemas.android.com/tools"
  android:layout_width="match_parent"
  android:layout_height="match_parent"
  android:orientation="vertical"
  tools:context="com.example.calculator.MainActivity" >
  <RelativeLayout
    android:layout_width="match_parent"
    android:layout_height="wrap_content" >
    <EditText
      android:id="@+id/et_show"
      android:layout_width="fill_parent"
      android:layout_height="wrap_content"
      android:hint="请输入数字" />
    <ImageView
      android:id="@+id/iv_delete"
      android:layout_width="wrap_content"
      android:layout_height="wrap_content"
      android:layout_alignRight="@id/et_show"
      android:src="@drawable/delete_and_deletegray" >
    </ImageView>
  </RelativeLayout>
  <GridLayout
    android:layout_width="fill_parent"
    android:layout_height="wrap_content"
    android:layout_below="@+id/et_show"
    android:focusable="false"
    android:gravity="center"
    android:layout_marginTop="25dp"
    android:columnCount="4"
    android:horizontalSpacing="0dp"
    android:orientation="horizontal"
    android:stretchMode="none" >
    <Button
      android:id="@+id/bt_1"
      android:layout_height="wrap_content"
      android:text="1" />
    <Button
      android:id="@+id/bt_2"
      android:text="2" />
    <Button
      android:id="@+id/bt_3"
      android:text="3" />
    <Button
      android:id="@+id/bt_div"
      android:text="/" />
    <Button
      android:id="@+id/bt_4"
      android:text="4" />
    <Button
      android:id="@+id/bt_5"
      android:text="5" />
    <Button
      android:id="@+id/bt_6"
      android:text="6" />
    <Button
      android:id="@+id/bt_mutilate"
      android:text="X" />
    <Button
      android:id="@+id/bt_7"
      android:text="7" />
    <Button
      android:id="@+id/bt_8"
      android:text="8" />
    <Button
      android:id="@+id/bt_9"
      android:text="9" />
    <Button
      android:id="@+id/bt_sub"
      android:text="-" />
    <Button
      android:id="@+id/bt_0"
      android:layout_columnSpan="2"
      android:layout_gravity="fill_horizontal"
      android:text="0"
      android:width="2dp" />
    <Button
      android:id="@+id/bt_c"
      android:layout_width="wrap_content"
      android:layout_height="wrap_content"
      android:text="C" />
    <Button
      android:id="@+id/bt_plus"
      android:layout_gravity="fill_vertical"
      android:layout_rowSpan="2"
      android:text="+" />
    <Button
      android:id="@+id/bt_equ"
      android:layout_columnSpan="3"
      android:layout_gravity="fill_horizontal"
      android:text="=" />
  </GridLayout>
  <TextView
    android:id="@+id/author"
    android:layout_width="wrap_content"
    android:layout_height="wrap_content"
    android:text="Author:Bri"
    />
  <TextView
    android:id="@+id/test"
    android:layout_width="wrap_content"
    android:layout_height="wrap_content"
    android:text="test:www.jb51.net"
    />
</LinearLayout>我还写了一个drawable的xml,自己看吧
delete_and_deletegray.xml:
<?xml version="1.0" encoding="utf-8"?>
<selector xmlns:android="http://schemas.android.com/apk/res/android">
  <item android:drawable="@drawable/delete_gray" android:state_focused="false" android:state_pressed="false"></item>
  <item android:drawable="@drawable/delete" android:state_focused="false" android:state_pressed="false" android:state_selected="true"/>
  <item android:drawable="@drawable/delete" android:state_pressed="true" android:state_selected="false"/>
  <item android:drawable="@drawable/delete" android:state_focused="true" android:state_pressed="true"/>
</selector>以上就是“Android开发怎么实现计算器功能”这篇文章的所有内容,感谢各位的阅读!相信大家阅读完这篇文章都有很大的收获,小编每天都会为大家更新不同的知识,如果还想学习更多的知识,请关注亿速云行业资讯频道。
亿速云「云服务器」,即开即用、新一代英特尔至强铂金CPU、三副本存储NVMe SSD云盘,价格低至29元/月。点击查看>>
免责声明:本站发布的内容(图片、视频和文字)以原创、转载和分享为主,文章观点不代表本网站立场,如果涉及侵权请联系站长邮箱:is@yisu.com进行举报,并提供相关证据,一经查实,将立刻删除涉嫌侵权内容。
原文链接:https://www.xuebuyuan.com/3287250.html