怎么快速搭建一个SpringCloud2020版环境?很多新手对此不是很清楚,为了帮助大家解决这个难题,下面小编将为大家详细讲解,有这方面需求的人可以来学习下,希望你能有所收获。
项目使用maven工程搭建,下面是工程的结构图。SpringCloud2020是父工程,仅负责依赖的管理,eureka是注册中心的服务端,testclient是测试的客户端。

1.1 父工程pom
<?xml version="1.0" encoding="UTF-8"?>
<project xmlns="http://maven.apache.org/POM/4.0.0"
   xmlns:xsi="http://www.w3.org/2001/XMLSchema-instance"
   xsi:schemaLocation="http://maven.apache.org/POM/4.0.0 http://maven.apache.org/xsd/maven-4.0.0.xsd">
 <modelVersion>4.0.0</modelVersion>

 <groupId>org.example</groupId>
 <artifactId>SpringCloud2020</artifactId>
 <packaging>pom</packaging>
 <version>1.0-SNAPSHOT</version>
 <modules>
  <module>eureka</module>
  <module>testclient</module>
 </modules>
 <parent>
  <groupId>org.springframework.boot</groupId>
  <artifactId>spring-boot-starter-parent</artifactId>
  <version>2.4.1</version>
  <relativePath/> <!-- lookup parent from repository -->
 </parent>
 <properties>
  <project.build.sourceEncoding>UTF-8</project.build.sourceEncoding>
  <project.reporting.outputEncoding>UTF-8</project.reporting.outputEncoding>
  <java.version>1.8</java.version>
 </properties>

 <dependencyManagement>
  <dependencies>
   <dependency>
    <groupId>org.springframework.cloud</groupId>
    <artifactId>spring-cloud-dependencies</artifactId>
    <!-- Provide the latest stable Spring Cloud release train version (e.g. 2020.0.0) -->
    <version>2020.0.0</version>
    <type>pom</type>
    <scope>import</scope>
   </dependency>
  </dependencies>
 </dependencyManagement>
 <build>
  <plugins>
   <plugin>
    <groupId>org.springframework.boot</groupId>
    <artifactId>spring-boot-maven-plugin</artifactId>
   </plugin>
  </plugins>
 </build>
</project>1.2 eureka子工程pom
<?xml version="1.0" encoding="UTF-8"?>
<project xmlns="http://maven.apache.org/POM/4.0.0"
   xmlns:xsi="http://www.w3.org/2001/XMLSchema-instance"
   xsi:schemaLocation="http://maven.apache.org/POM/4.0.0 http://maven.apache.org/xsd/maven-4.0.0.xsd">
 <parent>
  <artifactId>SpringCloud2020</artifactId>
  <groupId>org.example</groupId>
  <version>1.0-SNAPSHOT</version>
 </parent>
 <modelVersion>4.0.0</modelVersion>

 <artifactId>eureka</artifactId>

 <dependencies>
  <dependency>
   <groupId>org.springframework.cloud</groupId>
   <artifactId>spring-cloud-starter-netflix-eureka-server</artifactId>
  </dependency>
 </dependencies>
</project>1.3 testclient子工程pom
<?xml version="1.0" encoding="UTF-8"?>
<project xmlns="http://maven.apache.org/POM/4.0.0"
   xmlns:xsi="http://www.w3.org/2001/XMLSchema-instance"
   xsi:schemaLocation="http://maven.apache.org/POM/4.0.0 http://maven.apache.org/xsd/maven-4.0.0.xsd">
 <parent>
  <artifactId>SpringCloud2020</artifactId>
  <groupId>org.example</groupId>
  <version>1.0-SNAPSHOT</version>
 </parent>
 <modelVersion>4.0.0</modelVersion>

 <artifactId>testclient</artifactId>
 <dependencies>
 	<dependency>
   <groupId>org.springframework.cloud</groupId>
   <artifactId>spring-cloud-starter-netflix-eureka-client</artifactId>
  </dependency>
  <!--引入WebStart-->
  <dependency>
   <groupId>org.springframework.boot</groupId>
   <artifactId>spring-boot-starter-web</artifactId>
  </dependency>
 </dependencies>
</project>2.1 eureka 配置
server:
 port: 20001 #eureka运行的端口号
 address: 127.0.0.1 #注册中心运行地址
 servlet:
 context-path: /server #eureka注册中心管理界面地址
eureka:
 client:
 register-with-eureka: false #是否加入eureka注册表
 fetch-registry: false #还是向eureka请求注册信息表
 service-url:
defaultZone: http://${server.address}:${server.port}/eureka #注册中心地址,其它服务需要注册到该地址2.1 testclient 配置
server:
 port: 20002
# Spring
spring:
 application:
 name: test_service
# Eureka
eureka:
 client:
 service-url:
  defaultZone: http://127.0.0.1:20001/eureka #这里的port与eureka的端口对应
 instance:
 lease-renewal-interval-in-seconds: 5 # 每隔5秒发送一次心跳
 lease-expiration-duration-in-seconds: 10 # 10秒不发送就过期
 prefer-ip-address: true
instance-id: ${spring.application.name}:${server.port}3.1 Eureka启动类EurekaApplication
package org.example.demo;

import org.springframework.boot.SpringApplication;
import org.springframework.boot.autoconfigure.SpringBootApplication;
import org.springframework.cloud.netflix.eureka.server.EnableEurekaServer;

@SpringBootApplication
@EnableEurekaServer
public class DemoApplication {

	public static void main(String[] args) {
		SpringApplication.run(DemoApplication.class, args);
	}

}3.2 TestClient启动类TestClientApplication
package org.example.demo;

import org.springframework.boot.SpringApplication;
import org.springframework.boot.autoconfigure.SpringBootApplication;
import org.springframework.cloud.netflix.eureka.EnableEurekaClient;

@SpringBootApplication
@EnableEurekaClient
public class TestClientApplication {

	public static void main(String[] args) {
		SpringApplication.run(TestClientApplication.class, args);
	}
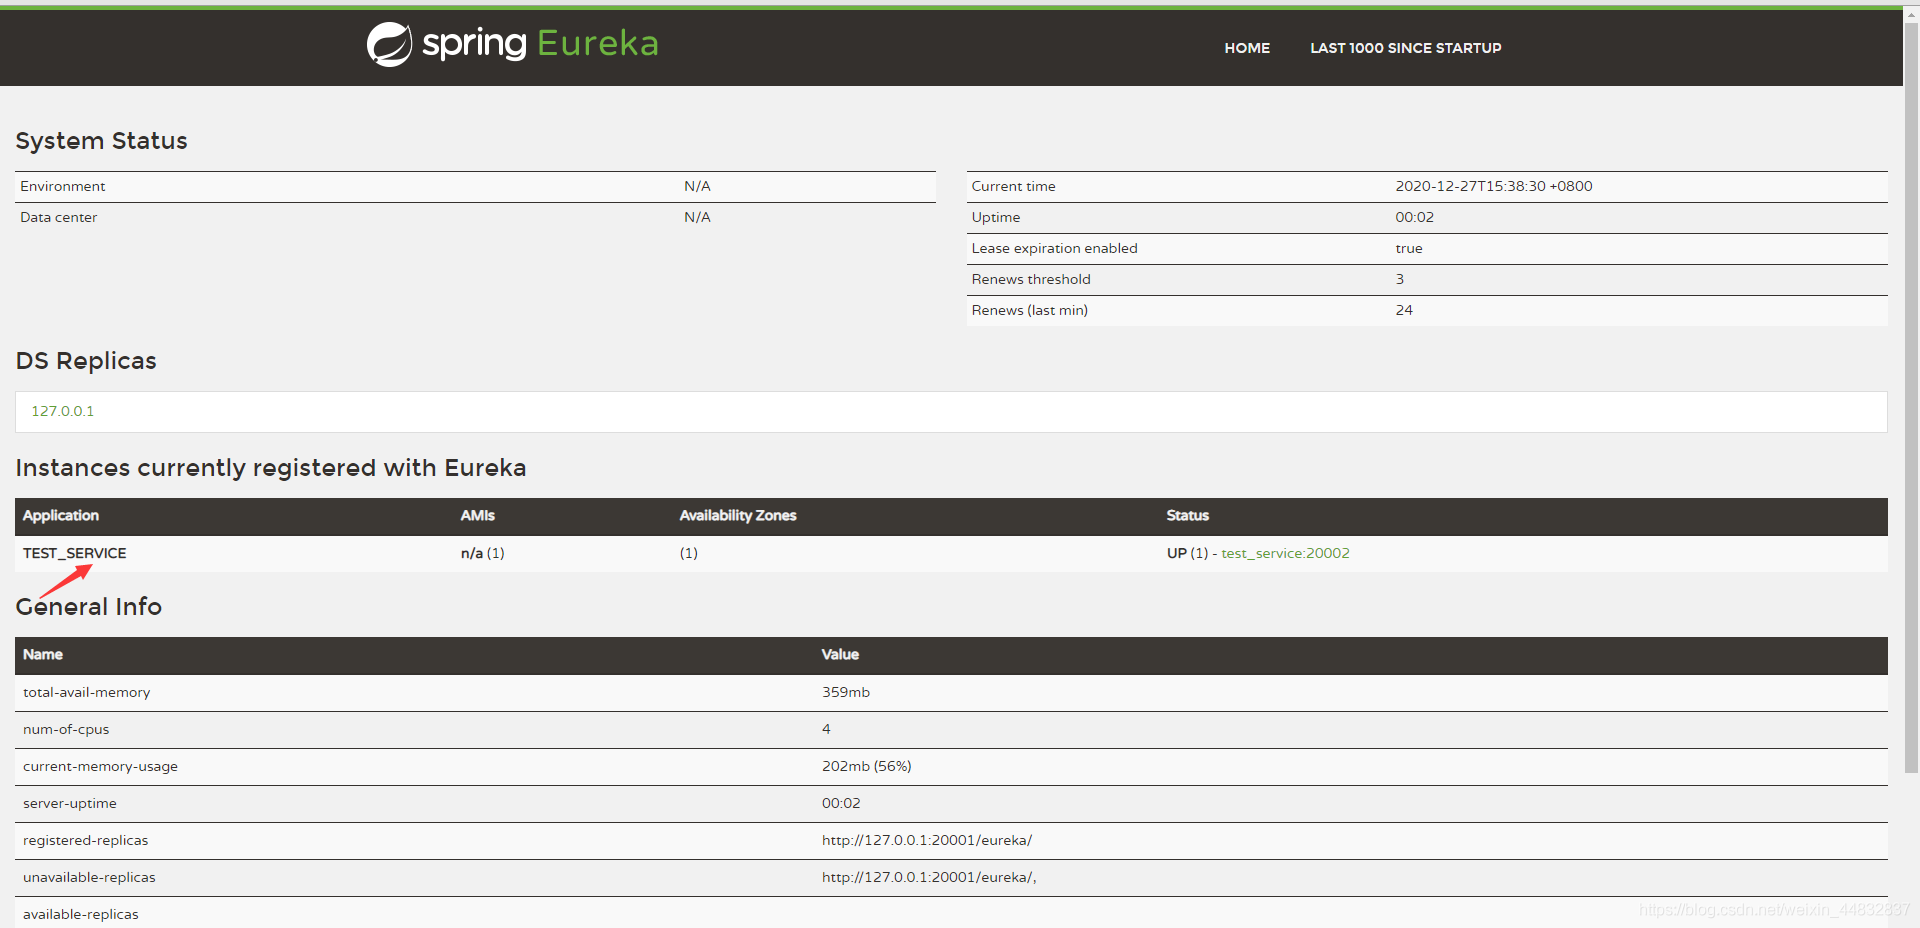
}如果没有意外,那么你将看到
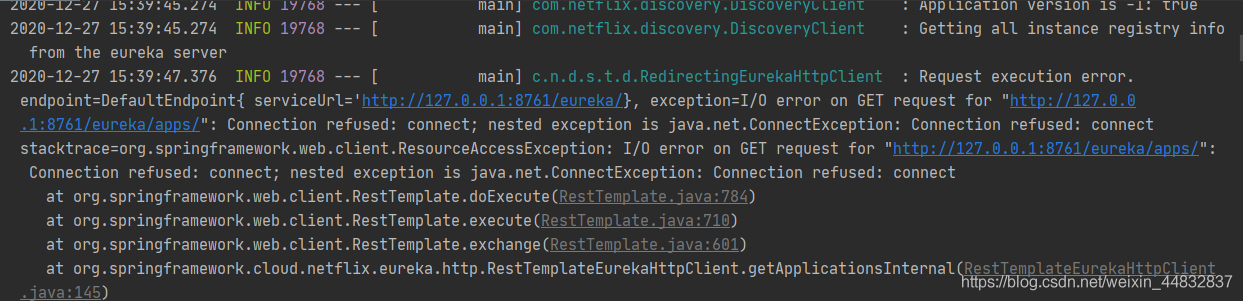
如果启动testclient时报错

请检查testclient工程的依赖中是否存在下面的依赖项,如果没有,请添加。原因可能是eureka-client依赖spring-boot-starter-web
 <dependency>
   <groupId>org.springframework.boot</groupId>
   <artifactId>spring-boot-starter-web</artifactId>
</dependency>如果没有出现TEST_SERVICE,并且testclient出现以下报错
请检查testclient配置的defaultZone是否与eureka配置对应,并清空已经构建的内容,再重新启动eureka,testclient。
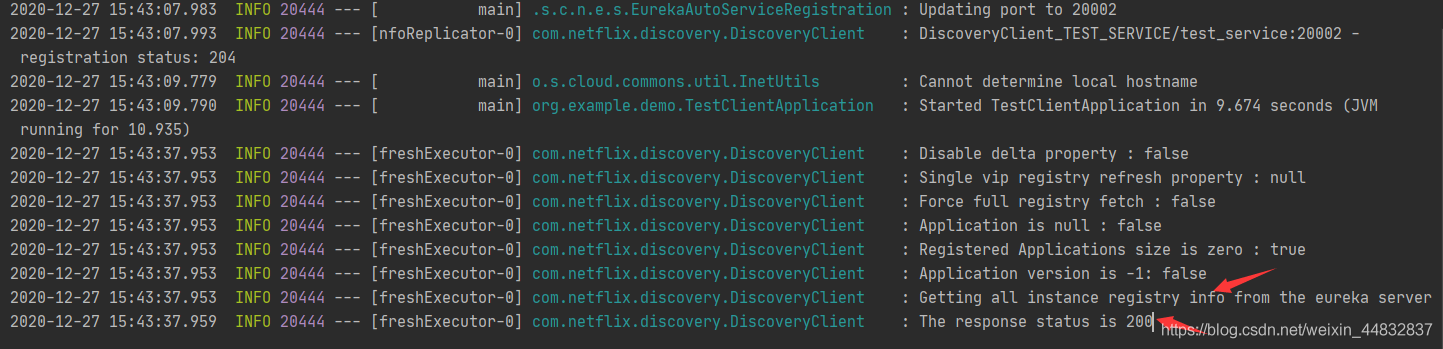
在testclient控制台看到以下日志信息,说明注册成功。
访问管理界面默认使用127.0.0.1:port,如果要改变它,请按照下面的提示配置
server:
 port: 20001 #eureka运行的端口号
 address: 127.0.0.1 #管理界面的地址
 servlet:
 context-path: /eureka-ui#管理界面的context-path
eureka:
 client:
 register-with-eureka: false #是否加入eureka注册表
 fetch-registry: false #是否向eureka请求注册信息表
 service-url:
defaultZone: http://127.0.0.1:${server.port}/eureka # 配置注册中心的地址,其它服务注册的时候使用。看完上述内容是否对您有帮助呢?如果还想对相关知识有进一步的了解或阅读更多相关文章,请关注亿速云行业资讯频道,感谢您对亿速云的支持。
亿速云「云服务器」,即开即用、新一代英特尔至强铂金CPU、三副本存储NVMe SSD云盘,价格低至29元/月。点击查看>>
免责声明:本站发布的内容(图片、视频和文字)以原创、转载和分享为主,文章观点不代表本网站立场,如果涉及侵权请联系站长邮箱:is@yisu.com进行举报,并提供相关证据,一经查实,将立刻删除涉嫌侵权内容。


 计算
计算 安全
安全 数据库
数据库 网络和加速
网络和加速 企业服务
企业服务


