这期内容当中小编将会给大家带来有关如何正确的使用canvas裁剪函数clip(),文章内容丰富且以专业的角度为大家分析和叙述,阅读完这篇文章希望大家可以有所收获。
未使用裁剪绘制一个圆
<!DOCTYPE html>
<html lang="en">
<head>
    <meta charset="UTF-8">
    <title></title>
    <style>
        *{margin:0; padding:0;}
        html, body{width:100%; height:100%; overflow:hidden; background-color:#AFAFAF;}
    </style>
</head>
<body>
    <canvas id="canvas"></canvas>
    <script>
        var canvas = document.getElementById('canvas'),
            context = canvas.getContext('2d');
        canvas.width = document.body.clientWidth;
        canvas.height = document.body.clientHeight;
        context.lineWidth = 3;
        context.strokeStyle = 'red';
        context.beginPath();
        context.arc(200, 200, 100, (Math.PI / 180) * 0, (Math.PI / 180) * 360, false);
        context.stroke();
        context.closePath();
    </script>
</body>
</html>效果

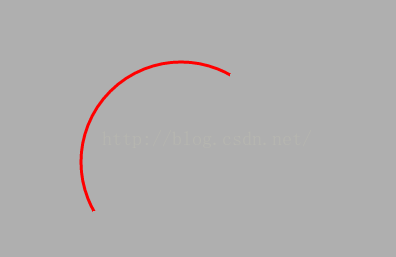
使用clip()裁剪区域
<!DOCTYPE html>
<html lang="en">
<head>
    <meta charset="UTF-8">
    <title></title>
    <style>
        *{margin:0; padding:0;}
        html, body{width:100%; height:100%; overflow:hidden; background-color:#AFAFAF;}
    </style>
</head>
<body>
    <canvas id="canvas"></canvas>
    <script>
        var canvas = document.getElementById('canvas'),
            context = canvas.getContext('2d');
        canvas.width = document.body.clientWidth;
        canvas.height = document.body.clientHeight;
        context.lineWidth = 3;
        context.strokeStyle = 'red';
        context.rect(0, 0, 200, 200);
        context.clip();
        context.beginPath();
        context.arc(200, 200, 100, (Math.PI / 180) * 0, (Math.PI / 180) * 360, false);
        context.stroke();
        context.closePath();
    </script>
</body>
</html>效果

也可以使用arc绘制圆形的剪裁区域
<!DOCTYPE html>
<html lang="en">
<head>
    <meta charset="UTF-8">
    <title></title>
    <style>
        *{margin:0; padding:0;}
        html, body{width:100%; height:100%; overflow:hidden; background-color:#AFAFAF;}
    </style>
</head>
<body>
    <canvas id="canvas"></canvas>
    <script>
        var canvas = document.getElementById('canvas'),
            context = canvas.getContext('2d');
        canvas.width = document.body.clientWidth;
        canvas.height = document.body.clientHeight;
        context.lineWidth = 3;
        context.strokeStyle = 'red';
        context.arc(100, 100, 150, (Math.PI / 180) * 0, (Math.PI / 180) * 360, false);
        context.clip();
        context.beginPath();
        context.arc(200, 200, 100, (Math.PI / 180) * 0, (Math.PI / 180) * 360, false);
        context.stroke();
        context.closePath();
    </script>
</body>
</html>效果
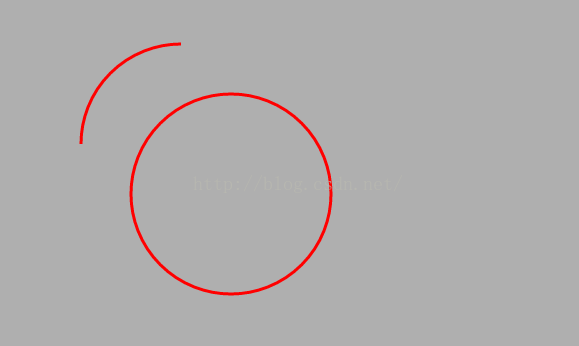
使用save和restore实现只裁剪单个路径
<!DOCTYPE html>
<html lang="en">
<head>
    <meta charset="UTF-8">
    <title></title>
    <style>
        *{margin:0; padding:0;}
        html, body{width:100%; height:100%; overflow:hidden; background-color:#AFAFAF;}
    </style>
</head>
<body>
    <canvas id="canvas"></canvas>
    <script>
        var canvas = document.getElementById('canvas'),
            context = canvas.getContext('2d');
        canvas.width = document.body.clientWidth;
        canvas.height = document.body.clientHeight;
        context.lineWidth = 3;
        context.strokeStyle = 'red';
        context.save();
        context.rect(0, 0, 200, 200);
        context.clip();
        context.beginPath();
        context.arc(200, 200, 100, (Math.PI / 180) * 0, (Math.PI / 180) * 360, false);
        context.stroke();
        context.closePath();
        context.restore();
        context.beginPath();
        context.arc(250, 250, 100, (Math.PI / 180) * 0, (Math.PI / 180) * 360, false);
        context.stroke();
        context.closePath();
    </script>
</body>
</html>效果
上述就是小编为大家分享的如何正确的使用canvas裁剪函数clip()了,如果刚好有类似的疑惑,不妨参照上述分析进行理解。如果想知道更多相关知识,欢迎关注亿速云行业资讯频道。
亿速云「云服务器」,即开即用、新一代英特尔至强铂金CPU、三副本存储NVMe SSD云盘,价格低至29元/月。点击查看>>
免责声明:本站发布的内容(图片、视频和文字)以原创、转载和分享为主,文章观点不代表本网站立场,如果涉及侵权请联系站长邮箱:is@yisu.com进行举报,并提供相关证据,一经查实,将立刻删除涉嫌侵权内容。
原文链接:https://www.jb51.net/html5/601756.html


 计算
计算 安全
安全 数据库
数据库 网络和加速
网络和加速 企业服务
企业服务


