一、部署LAMP环境,安装顺序
二、编译、安装php
三、安装xcache,为php(opcode)加速
四、其他
一、部署LAMP环境,安装顺序
编译安装部署LAMP环境,安装顺序
1、编译安装apache,http://64314491.blog.51cto.com/2784219/1652948
2、编译安装mysql,http://64314491.blog.51cto.com/2784219/1652999
3、编译安装php
二、编译、安装php
1、下载php并解压
[root@localhost downloads]# wget http://cn2.php.net/distributions/php-5.4.41.tar.bz2
[root@localhost downloads]# tar xf php-5.4.41.tar.bz2
2、编译前准备工作
(1)、编译选项
./configure --prefix=/usr/local/php --with-mysql=/usr/local/mysql --with-openssl --with-mysqli=/usr/local/mysql/bin/mysql_config --enable-mbstring --with-freetype-dir --with-jpeg-dir --with-png-dir --with-zlib --with-libxml-dir=/usr --enable-xml --enable-sockets --with-apxs2=/usr/local/apache/bin/apxs --with-mcrypt --with-config-file-path=/etc --with-config-file-scan-dir=/etc/php.d --with-bz2 --enable-maintainer-zts
(2)、直接编译,会有如下提醒,所以需提前准备
1、configure: error: xml2-config not found. Please check your libxml2 installation.
2、configure: error: Please reinstall the BZip2 distribution
3、configure: error: mcrypt.h not found. Please reinstall libmcrypt.
4、configure: error: Cannot find MySQL header files under /usr/local/mysql.    #这个问题就需要先安装mysql后,再来编译php了,所以最好按照步骤apache-->mysql-->php
所以编译前需要安装依赖环境
1、# yum -y  install libxml2 libxml2-devel
2、# yum -y  install bzip2-devel

下载libmcrypt libmcrypt-devel,并安装
# wget http://mirrors.sohu.com/fedora-epel/6Server/x86_64/libmcrypt-2.5.8-9.el6.x86_64.rpm
# wget http://mirrors.sohu.com/fedora-epel/6Server/x86_64/libmcrypt-devel-2.5.8-9.el6.x86_64.rpm
3、# rpm -ivh libmcrypt-2.5.8-9.el6.x86_64.rpm
   # rpm -ivh libmcrypt-devel-2.5.8-9.el6.x86_64.rpm
3、编译、安装php
# ./configure --prefix=/usr/local/php --with-mysql=/usr/local/mysql --with-openssl --with-mysqli=/usr/local/mysql/bin/mysql_config --enable-mbstring --with-freetype-dir --with-jpeg-dir --with-png-dir --with-zlib --with-libxml-dir=/usr --enable-xml  --enable-sockets --with-apxs2=/usr/local/apache/bin/apxs --with-mcrypt  --with-config-file-path=/etc --with-config-file-scan-dir=/etc/php.d --with-bz2  --enable-maintainer-zts
# make && make install
注:--enable-maintainer-zts 编译模块worker、event时,需要使用该选项
4、编辑/etc/httpd/httpd.conf
(1)、在AddType application/x-gzip .gz .tgz后添加以下信息,使httpd识别php格式的页面
ADDType application/x-httpd-php .php
ADDType application/x-httpd-php-source .phps
(2)、添加默认起始页文件名
DirectoryIndex index.php
<IfModule dir_module>
    DirectoryIndex index.php index.html
</IfModule>
完成配置后,重载配置
[root@localhost ~]# service httpd graceful
(3)、为php提供配置文件,在我们解压出的源码目录中,有两个配置文件样例
[root@localhost ~]# cd /root/downloads/php-5.4.41
[root@localhost php-5.4.41]# ls |grep php.ini
php.ini-development    #适用于开发环境
php.ini-production    #适用于生产环境
编译安装时,我们指定了php的配置文件目录/etc,这里我们把适用于生产环境的配置文件复制过去
[root@localhost php-5.4.41]# cp php.ini-production /etc/php.ini
(4)、测试
之前编译安装的apache,配置文件中,默认网站根目录是DocumentRoot "/usr/local/apache/htdocs"
在该路径新建一个测试页面index.php,内容如下
<h2>host1</h2>
<?php
        phpinfo();
?>
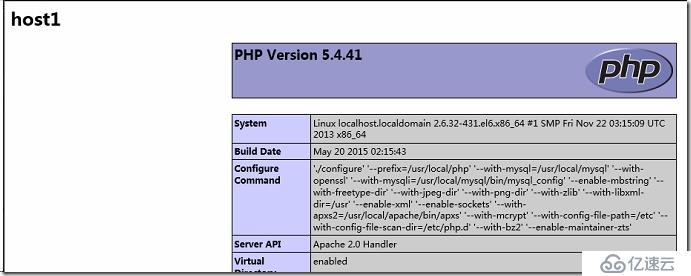
在浏览器输入主机地址测试,出现下图所示,说明安装、配置成功

(5)、测试连接mysql
/usr/local/apache/htdocs在该路径新建一个测试页面pcmysql.php,内容如下
<h2>host1</h2>
<?php
        $link=mysql_connect(localhost,root,'password');    #注意之前给mysql的root用户改过密码执行函数返回值mysql_connect(localhost,"root",)存储在变量$link中
        if ($link)
                echo "Sueccess.";
        else
                echo "Failure.";
?>
然后用浏览器访问这个页面,显示如下信息则说明php成功连接mysql

三、安装xcache,为php(opcode)加速
1、下载xcache
wget http://xcache.lighttpd.net/pub/Releases/3.1.2/xcache-3.1.2.tar.gz
2、为php添加xcache
[root@localhost downloads]# tar xf xcache-3.1.2.tar.gz
[root@localhost downloads]# cd xcache-3.1.2
[root@localhost xcache-3.1.2]# /usr/local/php/bin/phpize
Configuring for:
PHP Api Version:         20100412
Zend Module Api No:      20100525
Zend Extension Api No:   220100525
3、编译安装xcache
[root@localhost xcache-3.1.2]# ./configure --enable-xcache --with-php-config=/usr/local/php/bin/php-config
[root@localhost xcache-3.1.2]# make && make install
安装完成,提示模块安装的位置
Installing shared extensions: /usr/local/php/lib/php/extensions/no-debug-zts-20100525/
4、将xcache配置文件复制到php配置文件目录
[root@localhost xcache-3.1.2]# mkdir /etc/php.d
[root@localhost xcache-3.1.2]# cp xcache.ini /etc/php.d
[root@localhost xcache-3.1.2]# vim /etc/php.d/xcache.ini
[root@localhost xcache-3.1.2]# service httpd graceful    #重载配置
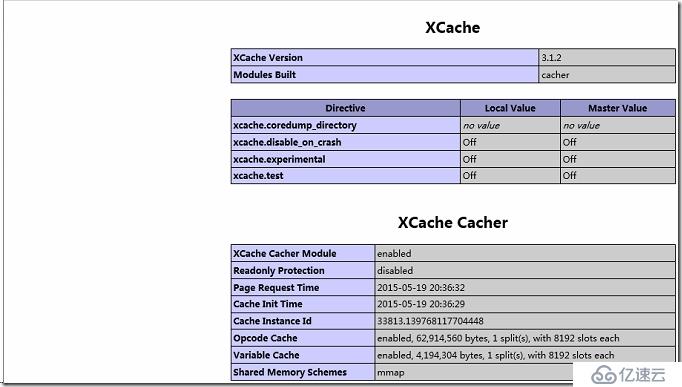
新建测试页面,在浏览器中访问测试页面,显示如下画面,说明模块正常加载
vim /usr/local/apache/htdocs/test.php
编辑如下内容
<?php
        phpinfo();
?>

 #配置文件已经载入
如果xcache没有正常工作,试试编辑xcache.ini,编辑extension = xcache.so,修改为全路径
extension = /usr/local/php/lib/php/extensions/no-debug-zts-20100525/xcache.so
四、其他
配置文件/etc/php.ini,/etc/php.d/目录下的*.ini
php.ini官方文档:
配置参数:http://www.php.net/manual/zh/ini.list.php
核心配置参数详解:http://www.php.net/manual/zh/ini.core.php
免责声明:本站发布的内容(图片、视频和文字)以原创、转载和分享为主,文章观点不代表本网站立场,如果涉及侵权请联系站长邮箱:is@yisu.com进行举报,并提供相关证据,一经查实,将立刻删除涉嫌侵权内容。