一、项目设计
CentOS 6.6:配置双网卡,提供编译开发环境 ;
编译安装httpd 2.4.9:建立两个虚拟主机站点www.a.com(172.16.13.20)和 www.b.org(13.21);
二进制码格式安装MariaDB;
php-5.4.26附加为httpd模块进行编译安装;
编译安装xcache,实现php模块加速;
使用3w.a.com实现drupal
使用3w.b.org 以https方式实现phpMyAdmin
二、配置双网卡,绑定ip,提供开发环境
1.给虚拟机centos6.6添加两块网卡
2.修改/etc/sysconfig/network-scripts/ifcfg-eth0 IPADDR=172.16.13.20
新建/etc/sysconfig/network-scripts/ifcfg-eth2 IPADDR=172.16.13.21
3.提供编译开发环境:
yum grouplist
yum groupinstall "Development tools" "Server Platform Development"
三、编译安装apache
1.解决依赖关系
httpd-2.4.9需要较新版本的apr和apr-util的支持
从网上获取 最新版本 apr-1.5.0.tar.bz2和 apr-util-1.5.3.tar.bz2
(1)编译安装apr
tar xf apr-1.5.0.tar.bz2
cd apr-1.5.0
./configure --prefix=/usr/local/apr
make && make install
(2)编译安装apr-util
tar xf apr-util-1.5.3.tar.bz2
cd apr-util-1.5.3
./configure --prefix=/usr/local/apr-util --with-apr=/usr/local/apr
make && make install
(3)安装依赖包pcre-devel
yum install pcre-devel
2.编译安装apache
下载httpd-2.4.9到本地

# tar xf httpd-2.4.9.tar.bz2
# cd httpd-2.4.9
# ./configure --prefix=/usr/local/apache --sysconfdir=/etc/httpd24 --enable-so --enable-ssl --enable-cgi --enable-rewrite --with-zlib --with-pcre --with-apr=/usr/local/apr --with-apr-util=/usr/local/apr-util --enable-modules=most --enable-mpms-shared=all --with-mpm=event
# make && make install
3.修改httpd的主配置文件,设置其pid文件路径
# vim /etc/httpd24/httpd.conf 添加内容
PidFile "/var/run/httpd.pid"
4.提供SysV风格服务脚本
# cp /etc/rc.d/init.d/httpd /etc/rc.d/init.d/httpd24
# vim /etc/rc.d/init.d/httpd

5.设置apachectl默认读取路径
# vim /etc/profile.d/httpd.sh 添加内容
export PATH=/usr/local/apache/bin:$PATH
6.设置头文件软链接路径
ln -sv /usr/local/apache/include/ /usr/include/httpd
7.配置两个虚拟主机站点
(1)创建两个站点主页目录
# mkdir /vhosts/{a.com,b.org}/html -pv
# vim /vhosts/a.com/html/index.html
# vim /vhosts/b.org/html/index.html
(2)开启虚拟站点及其模块文件
#vim /etc/httpd24/httpd.conf 开启
Include /etc/httpd24/extra/httpd-vhosts.conf
开启模块:

(3)172.16.13.20和172.16.13.21
# vim /etc/httpd24/extra/httpd-vhosts.conf
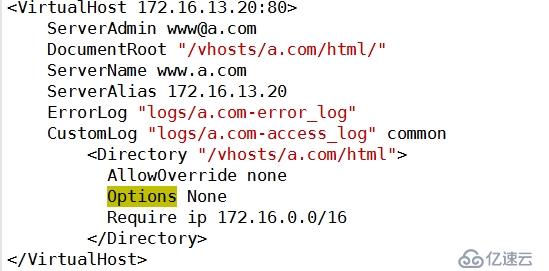
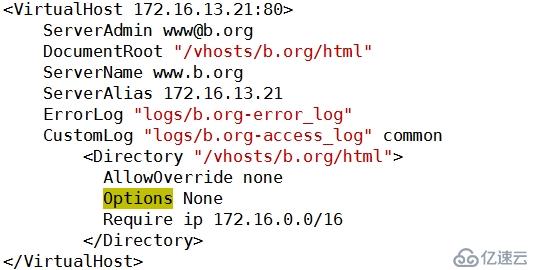
8.给172.16.13.21(3w.b.org)开启ssl,实现https访问b.org
(1)给b.org创建私钥和证书申请
# mkdir -pv /etc/httpd24/ssl
# cd /etc/httpd24/ssl
# (umask 077; openssl genrsa -out server.key 2048)
# openssl req -new -key ./server.key -out ./server.csr -days 90

(2)将证书申请发给私建CA服务器,签发证书后发还给b.org
# scp ./server.csr root@172.16.13.201:/tmp
切换到172.16.13.201,签发证书
# openssl ca -in /tmp/server.csr -out /tmp/server.crt -days 90
# scp /tmp/server.crt root@172.16.13.20:/etc/httpd24/ssl
(3)开启ssl功能,配置ssl.conf文件
# vim /etc/httpd24/httpd.conf开启
Include /etc/httpd24/extra/httpd-ssl.conf
开启相关模块:
LoadModule ssl_module modules/mod_ssl.so
LoadModule socache_shmcb_module modules/mod_socache_shmcb.so
配置ssl.conf文件
# vim /etc/httpd24/extra/httpd-ssl.conf
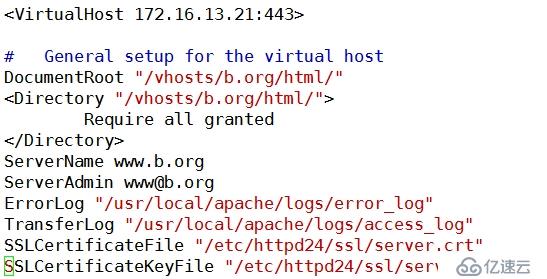
(4)开启httpd24服务
#httpd -t (查看配置文件有没有错误)
# service httpd24 start ( 注意:一定是 httpd24不能写成http,因为虚拟机上装有httpd-2.2)
# ss -tnl (查看对应的80端口,和ssl对应的443端口是不是开启)
(5)测试证书有效性
# scp /etc/pki/CA/cacert.pem root@172.16.13.21:/tmp (将根证书复制到b.org主机/tmp目录中)
#openssl s_client connect 172.16.13.21:443 CAfile /tmp/cacert.pem
(在b.org主机测试证书可不可以使用,如果返回值为9,说明两台主机的时间不一致,返回值 为21说明给的路径错误,返回值为0说明证书有效可用)
9.测试
(1)在windonws浏览器上输入172.16.13.20测试a.com

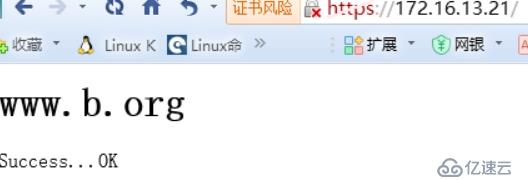
(2)在浏览器输入https://172.16.13.21测试b.org

四、安装二进制格式MariaDB
1.新建逻辑空间
准备一个大小20G的分区sda5,磁盘系统为8e
pvcreate /dev/sda5
vgcreate myvg /dev/sda5
lvcreate -L 10G -n mydata myvg
mke2fs -t ext4 -L MYDATA /dev/myvg/mydata
编辑/etc/fstab文件实现开机自动挂载
创建/data目录挂载逻辑空间mydata
mount /dev/myvg/mydata /data
2.下载MariaDB安装包并解压至 /usr/local下


3.所有的程序都应该以普通用户身份运行


4.初始化mysql
把配置文件的模板样本复制一份到 /etc/mysql

cp /usr/local/mysql/support-files/my-large.cnf /etc/mysql/my.cnf
vim /etc/mysql/my.cnf添加一些内容
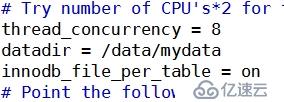
执行初始化脚本

5.编辑数据库服务脚本实现开机自动启动cp /usr/local/mysql/support-files/mysql.server /etc/rc.d/init.d/mysqld

使用ss -tnl查看3306端口是不是开启


7.测试一下MariaDB是不是可以使用


给MariaDB添加默认用户密码,然后使用密码登录:
> SET PASSWORD FOR 'root'@'localhost' = PASSWORD ('123456')
> exit
# mysql -uroot -h227.0.0.1 -p123456
>会提示登录成功
五、编译安装php-5.4.40为httpd的模块
1.解决依赖关系:
#yum -y groupinstall "Desktop Platform Development"
#yum -y install bzip2-devel libmcrypt-devel
2.编译安装php-5.5.40
下载php-5.4.40.tar.bz2
# tar xf php-5.4.40.tar.bz2
# cd php-5.4.40
# ./configure --prefix=/usr/local/php --with-mysql=/usr/local/mysql --with-openssl --with-mysqli=/usr/local/mysql/bin/mysql_config --enable-mbstring --with-freetype-dir --with-jpeg-dir --with-png-dir --with-zlib --with-libxml-dir=/usr --enable-xml --enable-sockets --with-apxs2=/usr/local/apache/bin/apxs --with-mcrypt --with-config-file-path=/etc --with-config-file-scan-dir=/etc/php.d --with-bz2 --enable-maintainer-zts
# make && make install
为php提供配置文件:
#cp php.ini-production /etc/php/php.ini
3.编辑apache配置文件httpd.conf,实现支持php格式显示网页
# vim /etc/httpd/httpd.conf
(1)添加如下二行
AddType application/x-httpd-php .php
AddType application/x-httpd-php-source .phps
(2)定位至DirectoryIndex index.html
修改为:
DirectoryIndex index.php index.html
(3)添加index.php主页
#vim /vhosts/b.org/html/index.php 添加内容如下
<?php
$link = mysql_connect('127.0.0.1','root','123456');
if ($link)
echo "OK";
else
echo "Failure";
mysql_close();
?>
而后重新启动httpd,或让其重新载入配置文件即可测试php是否已经可以正常使用。
六、在b.org站点下安装使用phpMyAdmin
1、下载安装包phpMyAdmin-4.0.5-all-languages.zip
2、解压缩至/vhosts/b.org/html/pma
# unzip phpMyAdmin-4.0.5-all-languages.zip
# mv phpMyAdmin-4.0.5-all-languages /vhosts/b.org/html/pma
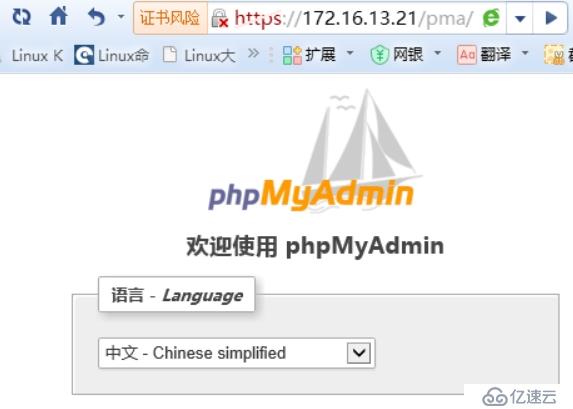
3、测试站点可不可以访问
七、在a.com站点下安装使用drupal
1、下载安装包至家目录
# mv Discuz_X3.2_SC_UTF8.zip /vhosts/a.com/html/
# cd /vhosts/a.com/html/
# unzip Discuz_X3.2_SC_UTF8.zip
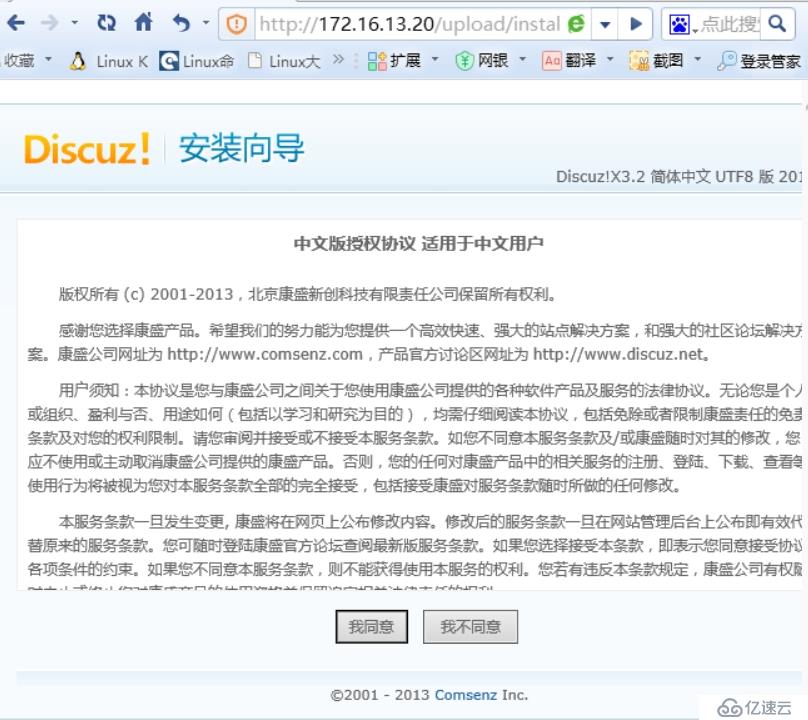
2、在浏览器输入172.16.13.20/upload
八、安装xcache,为php加速
1、安装xcache
# tar xf xcache-3.0.3.tar.gz
# cd xcache-3.0.3
# /usr/local/php/bin/phpize (使用php自带的phpize命令使扩展的xcache模块可以编译进行)
# ./configure --enable-xcache --with-php-config=/usr/local/php/bin/php-config
# make && make install
安装结束时,会出现类似如下行:
Installing shared extensions: /usr/local/php/lib/php/extensions/no-debug-zts-20100525/
2、编辑php.ini,整合php和xcache:
首先将xcache提供的样例配置导入php.ini
# mkdir /etc/php.d
# cp xcache.ini /etc/php.d
接下来编辑/etc/php.d/xcache.ini,找到extension开头的行,修改为如下行:
extension = /usr/local/php/lib/php/extensions/no-debug-zts-20100525/xcache.so
注意:如果php.ini文件中有多条extension指令行,要确保此新增的行排在第一位。

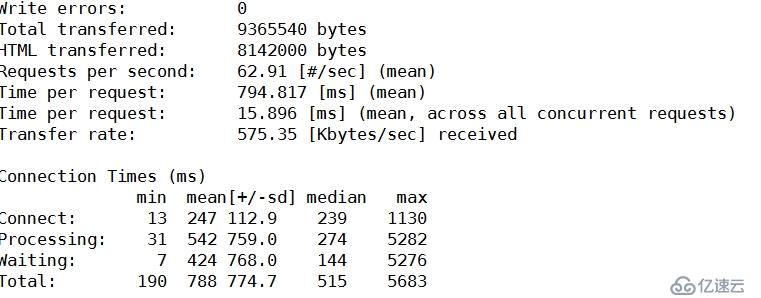
3、使用ab命令测试php网页速度
ab -n 1000 -c 500 https://172.16.13.21/pma/index.php
免责声明:本站发布的内容(图片、视频和文字)以原创、转载和分享为主,文章观点不代表本网站立场,如果涉及侵权请联系站长邮箱:is@yisu.com进行举报,并提供相关证据,一经查实,将立刻删除涉嫌侵权内容。