Matplotlib是 Python 2D-绘图领域使用最广泛的套件,可以简易地将数据图形化,并且提供多样化的输出格式。
matplotlib有两个接口,一个是状态机层的接口,通过pyplot模块来进行管理;一个是面向对象的接口,通过pylab模块将所有的功能函数全部导入其单独的命名空间内。
使用conda安装如下:conda install matplotlib
Matplotlib基本图表结构包括坐标轴(X轴、Y轴)、坐标轴标签(axisLabel)、
坐标轴刻度(tick)、坐标轴刻度标签(tick label)、绘图区(axes)、画布(figure)。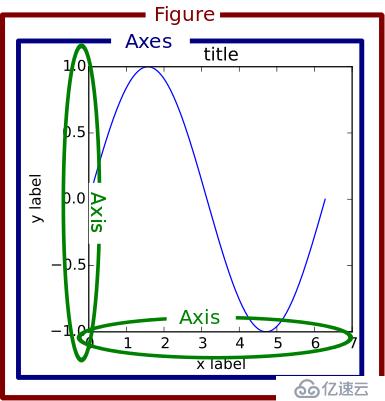
Figure代表一个绘制面板,其中可以包涵多个Axes(即多个图表)。
Axes表示一个图表 ,一个Axes包涵:titlek、xaxis、yaxis。
为了支持pylab中的gca()等函数,Figure对象内部保存有当前轴的信息,因此不建议直接对Figure.axes属性进行列表操作,而应该使用add_subplot, add_axes, delaxes等方法进行添加和删除操作。
# -*- coding=utf-8 -*-
import matplotlib.pyplot as plt
import numpy as np

if __name__ == "__main__":
    fig = plt.figure()
    ax1 = fig.add_axes([0.1, 0.45, 0.8, 0.5])
    ax2 = fig.add_axes([0.1, 0.1, 0.8, 0.2])
    x1 = np.linspace(0.0, 5.0)
    x2 = np.linspace(0.0, 3.0)

    y1 = np.cos(2 * np.pi * x1) * np.exp(-x1)
    y2 = np.cos(2 * np.pi * x2)

    ax1.patch.set_facecolor("green")
    ax1.grid(True)
    line1 = ax1.plot(x1, y1, 'yo-')
    line2 = ax2.plot(x2, y2, 'r.-')
    plt.show()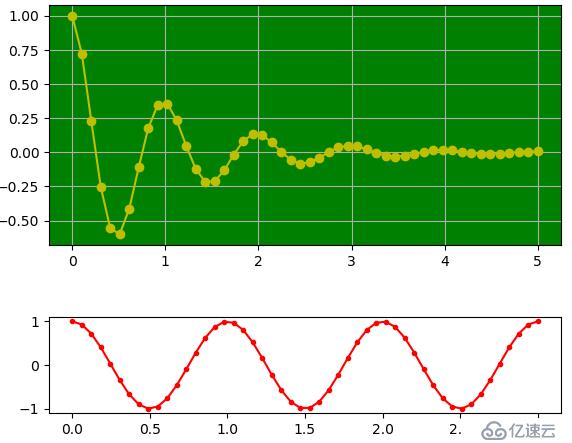
网格线设置plt.grid(color='r',linestyle='-.')
axis:坐标轴,可选值为x,y
color:支持十六进制颜色
linestyle: –,-.,:
alpha:透明度,0——1
坐标轴范围设置plt.axis([xmin,xmax,ymin,ymax])
也可以通过xlim(xmin,xmax),ylim(xmin,xmax)方法设置坐标轴范围
# -*- coding=utf-8 -*-
import matplotlib.pyplot as plt
import numpy as np

if __name__ == "__main__":
    x = np.arange(-10, 10, 0.1)
    y = x ** 2
    plt.plot(x, y,)
    plt.axis([-10, 10, 0, 100])
    plt.show()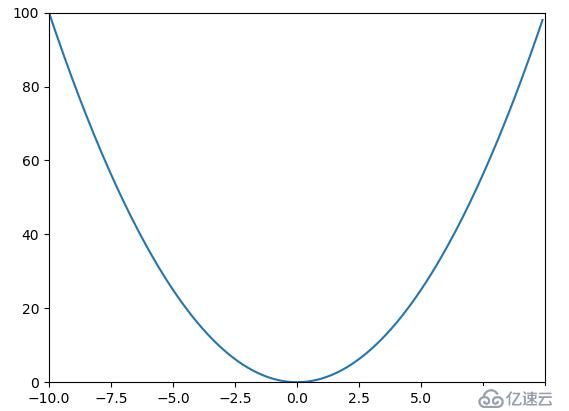
关闭坐标轴plt.axis('off')
设置画布比例plt.figure(figsize=(a,b))
a是x轴刻度比例,b是y轴刻度比例。
图例设置有两种方法,一种是分别在plot函数中使用label参数指定,再调用plt.legend()方法显示图例;一种是直接在legend方法中传入字符串列表设置图例。
# -*- coding=utf-8 -*-
import matplotlib.pyplot as plt
import numpy as np

if __name__ == "__main__":
    x = np.arange(-10, 10, 0.1)
    y = x ** 2
    plt.plot(x, y, label='y = x ** 2')
    plt.legend()
    plt.show()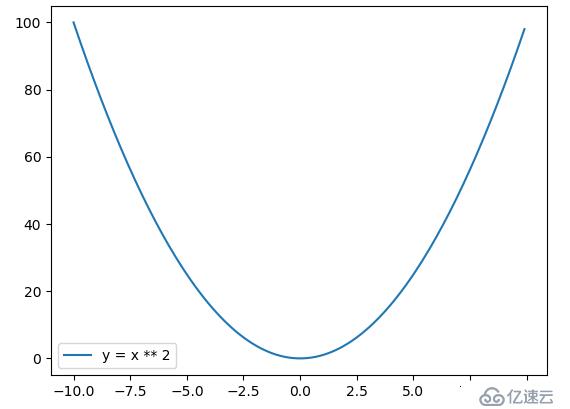
使用legend函数设置图例时,参数如下:
图例名称列表:传递的图例名称列表必须与曲线绘制顺序一致。
loc:用于设置图例标签的位置,matplotlib预定义了多种数字表示的位置。
best:0,upper right:1,upper left:2,lower left:3,lower right:4,right:5,center left:6,center right:7,lower center:8,upper center:9,center:10,loc参数可以是2个元素的元组,表示图例左下角的坐标,[0,0] 左下,[0,1] 左上,[1,0] 右下,[1,1] 右上。
ncol:图例的列数
# -*- coding=utf-8 -*-
import matplotlib.pyplot as plt
import numpy as np

if __name__ == "__main__":
    x1 = np.linspace(0, 2 * np.pi, 100)
    y1 = np.sin(x1)
    plt.plot(x1, y1)
    x2 = x1 = np.linspace(0, 2 * np.pi, 100)
    y2 = np.cos(x1)
    plt.plot(x2, y2)
    plt.legend(['sin(x)', 'cos(x)'], loc=0, ncol=1)
    plt.show()
标题设置可以使用plt.title()方法或ax.set_title()方法。
抛物线绘制:
# -*- coding=utf-8 -*-
import matplotlib.pyplot as plt
import numpy as np

if __name__ == "__main__":
    x = np.arange(-10, 10, 0.1)
    y = x ** 2
    plt.plot(x, y)
    plt.show()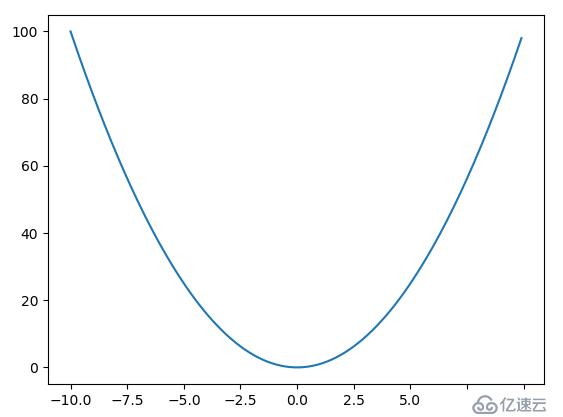
正弦曲线绘制:
# -*- coding=utf-8 -*-
import matplotlib.pyplot as plt
import numpy as np

if __name__ == "__main__":
    x = np.linspace(0, 2 * np.pi, 100)
    y = np.sin(x)
    plt.plot(x, y)
    plt.show()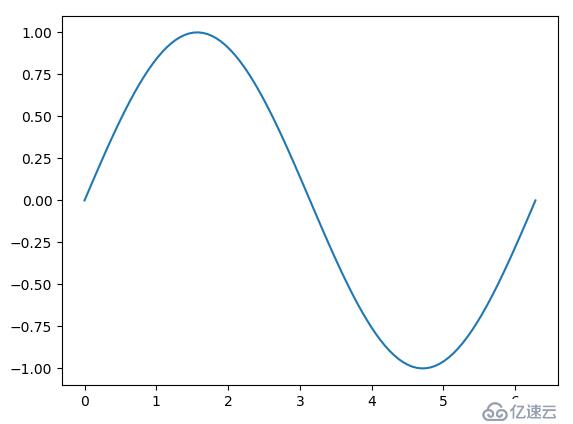
多条曲线绘制:
多次调用plot函数可以在图上绘制多条曲线。
# -*- coding=utf-8 -*-
import matplotlib.pyplot as plt
import numpy as np

if __name__ == "__main__":
    x1 = np.linspace(0, 2 * np.pi, 100)
    y1 = np.sin(x1)
    plt.plot(x1, y1)
    x2 = x1 = np.linspace(0, 2 * np.pi, 100)
    y2 = np.cos(x1)
    plt.plot(x2, y2)
    plt.show()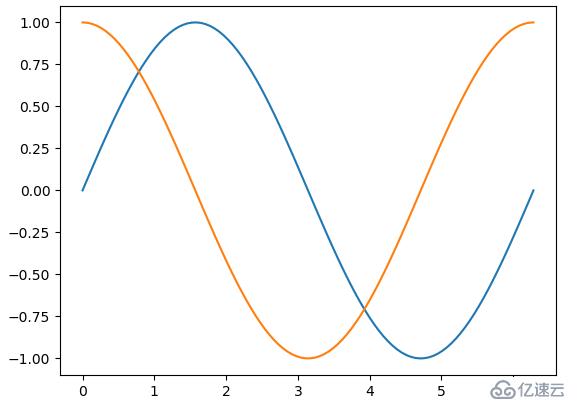
可以在一个plot函数中传入多对X,Y值,在一个图中绘制多个曲线。
# -*- coding=utf-8 -*-
import matplotlib.pyplot as plt
import numpy as np

if __name__ == "__main__":
    x1 = np.linspace(0, 2 * np.pi, 100)
    y1 = np.sin(x1)
    x2 = x1 = np.linspace(0, 2 * np.pi, 100)
    y2 = np.cos(x1)
    plt.plot(x1, y1, x2, y2)
plt.show()# -*- coding=utf-8 -*-
import matplotlib.pyplot as plt
import numpy as np
if __name__ == "__main__":
x = np.random.randint(0, 100, 100)
bins = np.arange(0, 101, 10)
fig = plt.figure(figsize=(12, 6))
plt.subplot(1, 1, 1)
plt.hist(x, bins, color='b', alpha=0.6)
plt.show()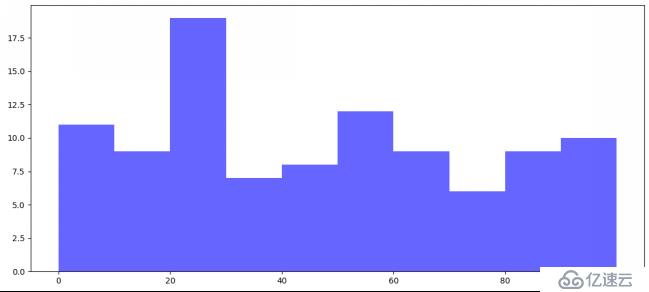
# -*- coding=utf-8 -*-
import matplotlib.pyplot as plt
import numpy as np

if __name__ == "__main__":
    x = [1, 2, 3, 4, 5]
    y = [2.3, 3.4, 1.2, 6.6, 7.0]
    fig = plt.figure(figsize=(12, 6))
    plt.subplot(1, 1, 1)
    plt.plot(x, y, color='r', linestyle='-')
    plt.show()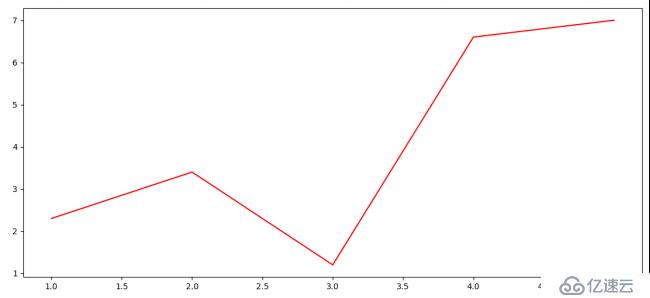
# -*- coding=utf-8 -*-
import matplotlib.pyplot as plt
import numpy as np

if __name__ == "__main__":
    x = [1, 2, 3, 4, 5]
    y = [2.3, 3.4, 1.2, 6.6, 7.0]

    plt.figure()
    plt.bar(x, y)
    plt.title("bar")
    plt.show()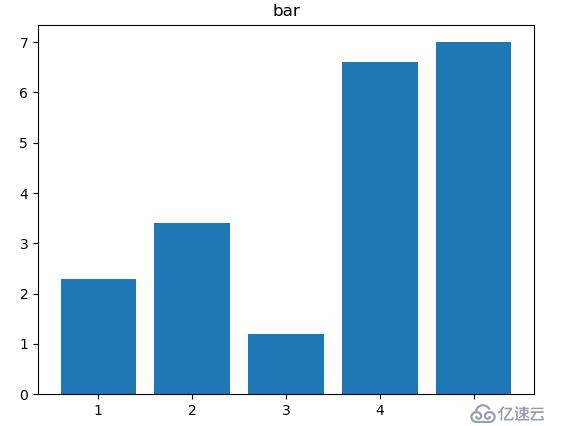
# -*- coding=utf-8 -*-
import matplotlib.pyplot as plt
import numpy as np

if __name__ == "__main__":
    y = [2.3, 3.4, 1.2, 6.6, 7.0]
    plt.figure()
    plt.pie(y)
    plt.title('PIE')
    plt.show()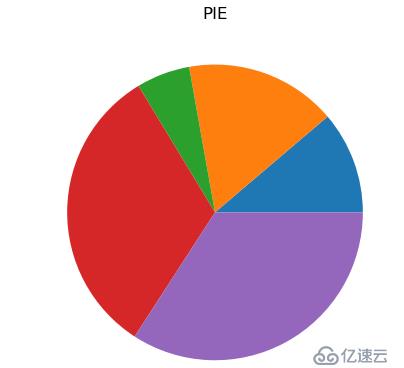
# -*- coding=utf-8 -*-
import matplotlib.pyplot as plt
import numpy as np

if __name__ == "__main__":
    n = 1024
    X = np.random.normal(0, 1, n)
    Y = np.random.normal(0, 1, n)
    T = np.arctan2(Y, X)

    plt.axes([0.025, 0.025, 0.95, 0.95])
    plt.scatter(X, Y, s=75, c=T, alpha=.5)

    plt.xlim(-1.5, 1.5), plt.xticks([])
    plt.ylim(-1.5, 1.5), plt.yticks([])
    plt.show()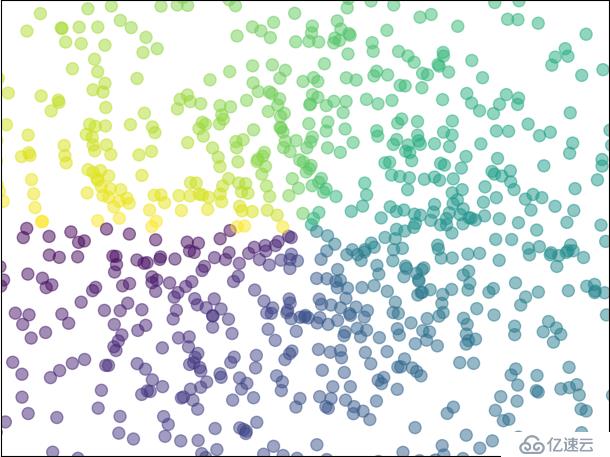
# -*- coding=utf-8 -*-
import matplotlib.pyplot as plt
import numpy as np

def get_height(x, y):
    # the height function
    return (1 - x / 2 + x ** 5 + y ** 3) * np.exp(-x ** 2 - y ** 2)

if __name__ == "__main__":
    n = 256
    x = np.linspace(-3, 3, n)
    y = np.linspace(-3, 3, n)
    X, Y = np.meshgrid(x, y)

    plt.figure(figsize=(14, 8))

    plt.contourf(X, Y, get_height(X, Y), 16, alpah=0.7, cmap=plt.cm.hot)
    #
    C = plt.contour(X, Y, get_height(X, Y), 16, color='black', linewidth=.5)
    # adding label
    plt.clabel(C, inline=True, fontsize=16)

    plt.xticks(())
    plt.yticks(())
    plt.show()
# -*- coding=utf-8 -*-
import matplotlib.pyplot as plt
import numpy as np
from mpl_toolkits.mplot3d import Axes3D

if __name__ == "__main__":
    fig = plt.figure()
    ax = Axes3D(fig)
    X = np.arange(-4, 4, 0.25)
    Y = np.arange(-4, 4, 0.25)
    X, Y = np.meshgrid(X, Y)
    R = np.sqrt(X ** 2 + Y ** 2)
    Z = np.sin(R)

    ax.plot_surface(X, Y, Z, rstride=1, cstride=1, cmap=plt.cm.hot)
    ax.contourf(X, Y, Z, zdir='z', offset=-2, cmap=plt.cm.hot)
    ax.set_zlim(-2, 2)

    plt.show()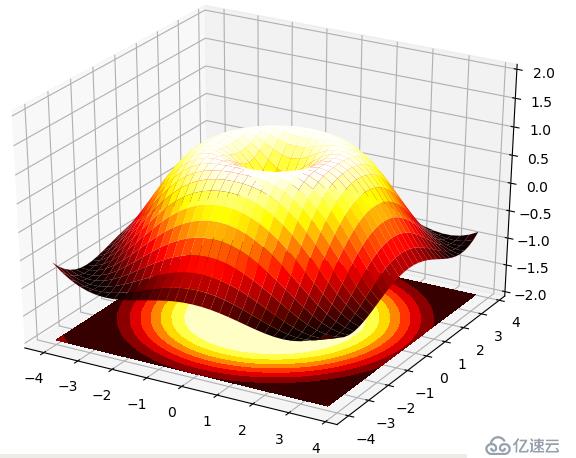
图片加载显示:
# -*- coding=utf-8 -*-
import matplotlib.pyplot as plt

if __name__ == "__main__":
    img = plt.imread('network.png')
    plt.imshow(img)
    plt.show()
图片保存:
# -*- coding=utf-8 -*-
import matplotlib.pyplot as plt
import numpy as np

if __name__ == "__main__":
    x1 = np.linspace(0, 2 * np.pi, 100)
    y1 = np.sin(x1)
    plt.plot(x1, y1)
    x2 = x1 = np.linspace(0, 2 * np.pi, 100)
    y2 = np.cos(x1)
    plt.plot(x2, y2)
    plt.legend(['sin(x)', 'cos(x)'], loc=0, ncol=1)
    plt.savefig('test.png')
plt.show()# -*- coding=utf-8 -*-
import matplotlib.pyplot as plt
import numpy as np
if __name__ == "__main__":
# 创建一个 8 * 6 点(point)的图,并设置分辨率为 80
plt.figure(figsize=(8, 6), dpi=80)
# 创建一个新的 1 * 1 的子图,接下来的图样绘制在其中的第 1 块(也是唯一的一块)
plt.subplot(1, 1, 1)
X = np.linspace(-np.pi, np.pi, 256, endpoint=True)
C, S = np.cos(X), np.sin(X)
# 绘制余弦曲线,使用蓝色的、连续的、宽度为 1 (像素)的线条
plt.plot(X, C, color="blue", linewidth=2.5, line)
# 绘制正弦曲线,使用绿色的、连续的、宽度为 1 (像素)的线条
plt.plot(X, S, color="red", linewidth=2.5, line)
# 坐标轴的范围
xmin, xmax = X.min(), X.max()
ymin, ymax = C.min(), C.max()
# 计算坐标轴的冗余
dx = (xmax - xmin) * 0.2
dy = (ymax - ymin) * 0.2
# 设置横轴的上下限
plt.xlim(xmin - dx, xmax + dx)
# 设置纵轴的上下限
plt.ylim(ymin - dy, ymax + dy)
# 设置横轴记号
plt.xticks([-np.pi, -np.pi/2, 0, np.pi/2, np.pi], [r'$-\pi$', r'$-\pi/2$', r'$0$', r'$+\pi/2$', r'$+\pi$'])
# 设置纵轴记号
plt.yticks([-1, 0, +1], [r'$-1$', r'$0$', r'$+1$'])
# 设置坐标轴位置
ax = plt.gca()
ax.spines['right'].set_color('none')
ax.spines['top'].set_color('none')
ax.xaxis.set_ticks_position('bottom')
ax.spines['bottom'].set_position(('data', 0))
ax.yaxis.set_ticks_position('left')
ax.spines['left'].set_position(('data', 0))
# 设置图例
plt.plot(X, C, color="blue", linewidth=2.5, line, label="cosine")
plt.plot(X, S, color="red", linewidth=2.5, line, label="sine")
plt.legend(loc='upper left')
# 在2pi/3位置做标注
t = 2 * np.pi / 3
plt.plot([t, t], [0, np.cos(t)], color='blue', linewidth=2.5, line)
plt.scatter([t, ], [np.cos(t), ], 50, color='blue')
plt.annotate(r'$\sin(\frac{2\pi}{3})=\frac{\sqrt{3}}{2}$',
xy=(t, np.sin(t)), xycoords='data',
xytext=(+10, +30), textcoords='offset points', fontsize=16,
arrowprops=dict(arrow, connection))
plt.plot([t, t], [0, np.sin(t)], color='red', linewidth=2.5, line)
plt.scatter([t, ], [np.sin(t), ], 50, color='red')
plt.annotate(r'$\cos(\frac{2\pi}{3})=-\frac{1}{2}$',
xy=(t, np.cos(t)), xycoords='data',
xytext=(-90, -50), textcoords='offset points', fontsize=16,
arrowprops=dict(arrow, connection))
# 坐标轴刻度标签半透明化
for label in ax.get_xticklabels() + ax.get_yticklabels():
label.set_fontsize(16)
label.set_bbox(dict(facecolor='white', edgecolor='None', alpha=0.65))
plt.show()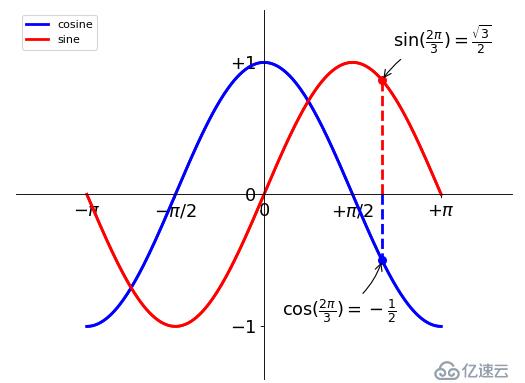
# -*- coding=utf-8 -*-
import matplotlib.pyplot as plt
import numpy as np

if __name__ == "__main__":
    fig = plt.figure(figsize=(10, 6))
    fig.set_facecolor('white')

    x = [1, 2, 3, 4, 5, 6, 7]
    y = [1, 3, 4, 2, 5, 8, 6]

    # 大图
    left, bottom, width, weight = 0.1, 0.1, 0.8, 0.8
    ax = fig.add_axes([left, bottom, width, weight])
    ax.plot(x, y, 'r')
    ax.set_xlabel(r'$X$')
    ax.set_ylabel(r'$Y$')
    ax.set_title(r'$BigFigure$')
    ax.spines['right'].set_color('none')
    ax.spines['top'].set_color('none')

    # 左上小图
    left, bottom, width, weight = 0.2, 0.6, 0.25, 0.25
    ax1 = fig.add_axes([left, bottom, width, weight])
    ax1.plot(y, x, 'b')
    ax1.set_xlabel(r'$x$')
    ax1.set_ylabel(r'$y$')
    ax1.set_title(r'$figure1$')
    ax1.spines['right'].set_color('none')
    ax1.spines['top'].set_color('none')

    plt.show()
可以直接使用Pandas的Series、DataFrame实例的plot直接进行绘图。
Series示例如下:
# -*- coding=utf-8 -*-
import matplotlib.pyplot as plt
import numpy as np
import pandas as pd

if __name__ == "__main__":
    # Series绘图
    x = np.linspace(0, 2 * np.pi, 100)
    # 正弦曲线
    y = np.sin(x)
    s = pd.Series(data=y, index=x)
    s.plot()

    plt.show()
DataFrame实例:
# -*- coding=utf-8 -*-
import matplotlib.pyplot as plt
import numpy as np
import pandas as pd

if __name__ == "__main__":
    # DataFrame绘图
    x = np.linspace(0, 2 * np.pi, 100)
    df = pd.DataFrame(data={'sin': np.sin(x), 'cos': np.cos(x)}, index=x)
    df.plot()
    # 取出某列数据进行绘图
    # df['sin'].plot()

    plt.show()
DataFrame绘制柱状图:
# -*- coding=utf-8 -*-
import matplotlib.pyplot as plt
import numpy as np
import pandas as pd

if __name__ == "__main__":
    df = pd.DataFrame(np.random.randint(0, 10, size=(8, 4)), index=list('abcdefgh'), columns=list('ABCD'))
    ax = df.plot(kind='bar')
    ax.spines['right'].set_color('none')
    ax.spines['top'].set_color('none')

    plt.show()
kind='barh'参数表示绘制水平柱状图。
免责声明:本站发布的内容(图片、视频和文字)以原创、转载和分享为主,文章观点不代表本网站立场,如果涉及侵权请联系站长邮箱:is@yisu.com进行举报,并提供相关证据,一经查实,将立刻删除涉嫌侵权内容。