MongoDB 提供了多样性的索引支持,索引信息被保存在system.indexes 中,且默认总是为_id创建索引,它的索引使用基本和MySQL 等关系型数据库一样。其实可以这样说说,索引是凌驾于数据存储系统之上的另一层系统,所以各种结构迥异的存储都有相同或相似的索引实现及使用接口并不足为 奇。
在字段age 上创建索引,1(升序);-1(降序):
db.users.ensureIndex({age:1})_id 是创建表的时候自动创建的索引,此索引是不能够删除的。当系统已有大量数据时,创建索引就是个非常耗时的活,我们可以在后台执行,只需指定“backgroud:true”即可。
db.users.ensureIndex({age:1} , {backgroud:true})索引可以任何类型的字段,甚至文档:
db.factories.insert( { name: "wwl", addr: { city: "Beijing", state: "BJ" } } );在addr 列上创建索引
db.factories.ensureIndex( { addr : 1 } );下面这个查询将会用到我们刚刚建立的索引
db.factories.find( { addr: { city: "Beijing", state: "BJ" } } );但是下面这个查询将不会用到索引,因为查询的顺序跟索引建立的顺序不一样
db.factories.find( { addr: { state: "BJ" , city: "Beijing"} } );跟其它数据库产品一样,MongoDB 也是有组合索引的,下面我们将在addr.city 和addr.state上建立组合索引。当创建组合索引时,字段后面的1 表示升序,-1 表示降序,是用1 还是用-1 主要是跟排序的时候或指定范围内查询 的时候有关的。
db.factories.ensureIndex( { "addr.city" : 1, "addr.state" : 1 } );下面的查询都用到了这个索引
db.factories.find( { "addr.city" : "Beijing", "addr.state" : "BJ" } );

db.factories.find( { "addr.city" : "Beijing" } );

db.factories.find().sort( { "addr.city" : 1, "addr.state" : 1 } );

db.factories.find().sort( { "addr.city" : 1 } );只需在ensureIndex 命令中指定”unique:true”即可创建唯一索引。例如,往表t4 中插入2 条记录时候报错。
db.t4.ensureIndex({firstname: 1, lastname: 1}, {unique: true});hint 命令可以强制使用某个索引。
db.t5.find({age:{$lt:30}}).hint({name:1, age:1}).explain()删除t3 表中的所有索引
db.t3.dropIndexes()删除t4 表中的firstname 索引
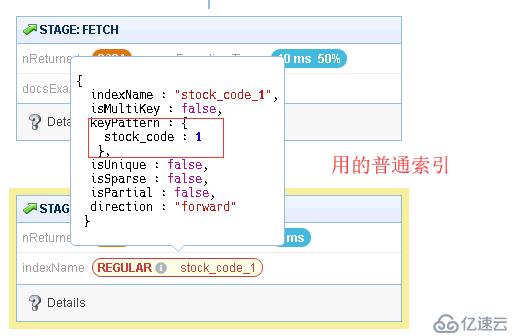
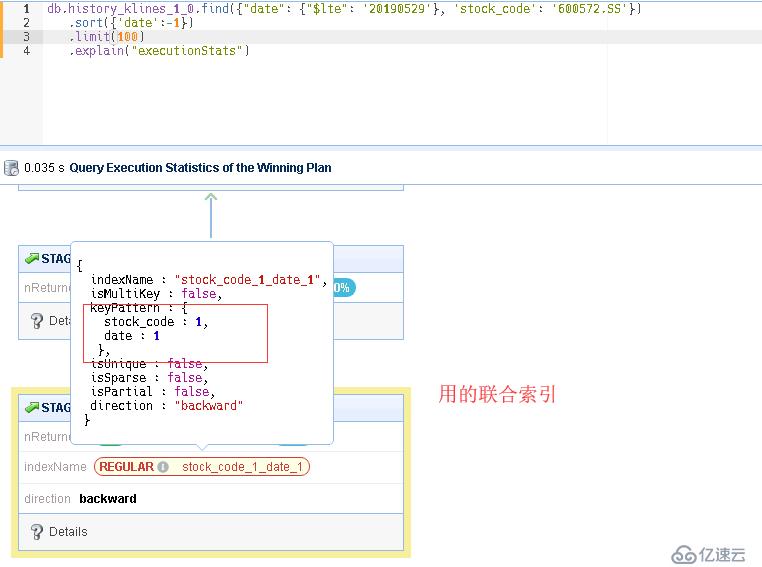
db.t4.dropIndex({firstname: 1})MongoDB 提供了一个 explain 命令让我们获知系统如何处理查询请求。利用 explain 命令,我们可以很好地观察系统如何使用索引来加快检索,同时可以针对性优化索引。
db.sang_collect.find({x:1}).explain()
# 返回值, 在python中运行
{
    "queryPlanner" : {
        "plannerVersion" : 1,
        "namespace" : "sang.sang_collect",
        "indexFilterSet" : false,
        "parsedQuery" : {
            "x" : {
                "$eq" : 1.0
            }
        },
        "winningPlan" : {
            "stage" : "COLLSCAN",
            "filter" : {
                "x" : {
                    "$eq" : 1.0
                }
            },
            "direction" : "forward"
        },
        "rejectedPlans" : []
    },
    "serverInfo" : {
        "host" : "localhost.localdomain",
        "port" : 27017,
        "version" : "3.4.9",
        "gitVersion" : "876ebee8c7dd0e2d992f36a848ff4dc50ee6603e"
    },
    "ok" : 1.0
}


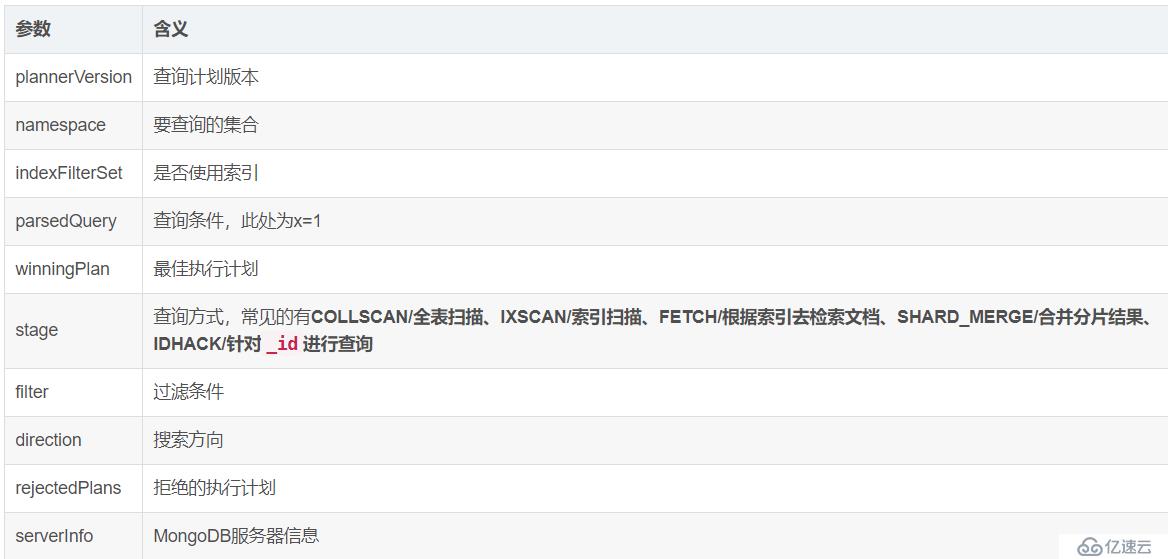
字段说明:
executionStats会返回最佳执行计划的一些统计信息,如下:
db.sang_collect.find({x:1}).explain('executionStats')

{
    "queryPlanner" : {
        "plannerVersion" : 1,
        "namespace" : "sang.sang_collect",
        "indexFilterSet" : false,
        "parsedQuery" : {},
        "winningPlan" : {
            "stage" : "COLLSCAN",
            "direction" : "forward"
        },
        "rejectedPlans" : []
    },
    "executionStats" : {
        "executionSuccess" : true,
        "nReturned" : 10000,
        "executionTimeMillis" : 4,
        "totalKeysExamined" : 0,
        "totalDocsExamined" : 10000,
        "executionStages" : {
            "stage" : "COLLSCAN",
            "nReturned" : 10000,
            "executionTimeMillisEstimate" : 0,
            "works" : 10002,
            "advanced" : 10000,
            "needTime" : 1,
            "needYield" : 0,
            "saveState" : 78,
            "restoreState" : 78,
            "isEOF" : 1,
            "invalidates" : 0,
            "direction" : "forward",
            "docsExamined" : 10000
        }
    },
    "serverInfo" : {
        "host" : "localhost.localdomain",
        "port" : 27017,
        "version" : "3.4.9",
        "gitVersion" : "876ebee8c7dd0e2d992f36a848ff4dc50ee6603e"
    },
    "ok" : 1.0
}
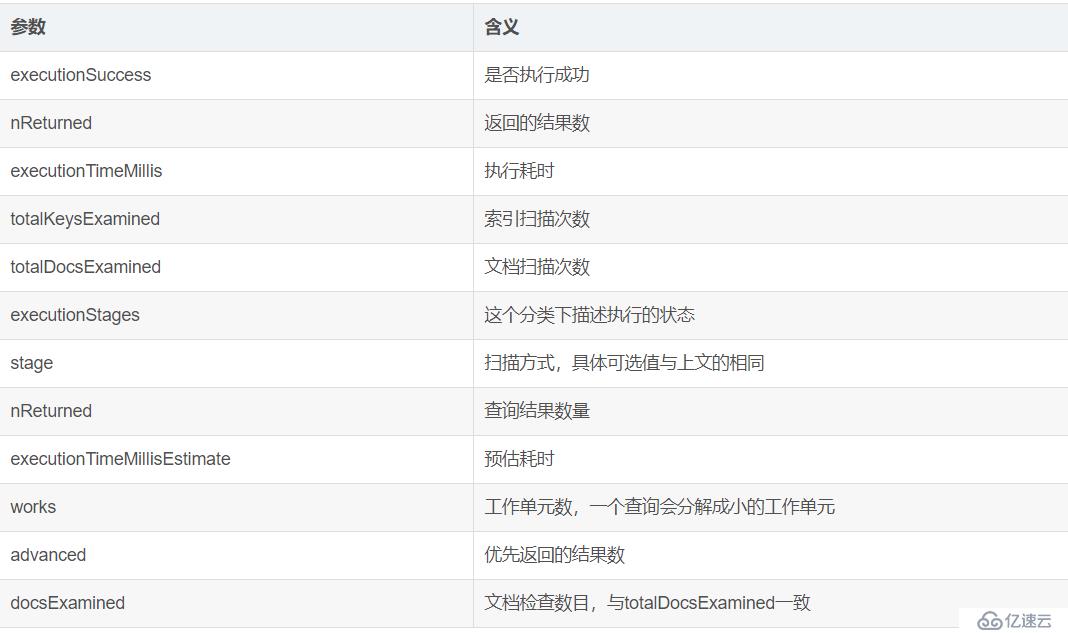
这里除了我们上文介绍到的一些参数之外,还多了executionStats参数,含义如下:
在MySQL 中,慢查询日志是经常作为我们优化数据库的依据,那在MongoDB 中是否有类似的功能呢?答案是肯定的,那就是MongoDB Database Profiler。
有两种方式可以控制 Profiling 的开关和级别,第一种是直接在启动参数里直接进行设置。启动MongoDB 时加上–profile=级别 即可。也可以在客户端调用db.setProfilingLevel(级别) 命令来实时配置,Profiler 信息保存在system.profile 中。我们可以通过db.getProfilingLevel()命令来获取当前的Profile 级别,类似如下操作:
db.setProfilingLevel(2);上面profile 的级别可以取0,1,2 三个值,他们表示的意义如下:
0 – 不开启
1 – 记录慢命令 (默认为>100ms)
2 – 记录所有命令
Profile 记录在级别1 时会记录慢命令,那么这个慢的定义是什么?上面我们说到其默认为100ms,当然有默认就有设置,其设置方法和级别一样有两种,一种是通过添加 –slowms 启动参数配置。第二种是调用db.setProfilingLevel 时加上第二个参数:
db.setProfilingLevel( level , slowms )

db.setProfilingLevel( 1 , 10 );与MySQL 的慢查询日志不同,MongoDB Profile 记录是直接存在系统db 里的,记录位置system.profile ,所以,我们只要查询这个Collection 的记录就可以获取到我们的 Profile 记录了。列出执行时间长于某一限度(5ms)的 Profile 记录:
db.system.profile.find( { millis : { $gt : 5 } } )MongoDB Shell 还提供了一个比较简洁的命令show profile,可列出最近5 条执行时间超过1ms 的 Profile 记录。
创建索引, 当查询的字段有2个时,数据量较大时,可以使用联合索引
限定返回结果数
只查询使用到的字段
采用capped collection
采用Server Side Code Execution
使用Hint,强制使用索引
采用Profiling
免责声明:本站发布的内容(图片、视频和文字)以原创、转载和分享为主,文章观点不代表本网站立场,如果涉及侵权请联系站长邮箱:is@yisu.com进行举报,并提供相关证据,一经查实,将立刻删除涉嫌侵权内容。