这篇文章主要讲解了“C语言结构体强制转换的方法”,文中的讲解内容简单清晰,易于学习与理解,下面请大家跟着小编的思路慢慢深入,一起来研究和学习“C语言结构体强制转换的方法”吧!
在C语言中,结构体无法用以下方式强制转换:
Struct_B b;
Struct_A a = (Struct_A)b;但可以使用指针间接转换:
Struct_B *b;
Struct_A *a = (Struct_A *)b;很明显,这样强行给指针赋值,容易出现异常。让我们来做一下测试。
先定义4个结构体
typedef struct {
    int array[4];
}Struct_A;

typedef struct {
    int *ptr_b;
} Struct_B;

typedef struct {
    int int1;
    int int_array1[2];
    float float_array2[2];
}Struct_C;

typedef struct{
    char char1;
    char char_array[2];
}Struct_D;然后进行转换测试
void main(){
    //先对定义Struct_A变量a
    Struct_A *a = malloc(sizeof(Struct_A));
    if(a==NULL){return;};
    int temp_a[4] = {0,1,2,3};
    memcpy(a->array, &temp_a, 4*sizeof(int));

    //将指针a赋值给b, c, d
    Struct_B *b = (Struct_B *)a;
    Struct_C *c = (Struct_C *)a;
    Struct_D *d = (Struct_D *)a;

    //打印一些重要的长度作为参考
    printf("The system bits is %d\n", __WORDSIZE);
    printf("The Size of int: %d Byte\nThe Size of int poniter: %d Byte\n", sizeof(int), sizeof(int*));
    printf("The Size of float: %d Byte\n", sizeof(float));
    printf("The Size of char: %d Byte\nThe Size of char pointer: %d Byte\n", sizeof(char),  sizeof(char*));

    //打印赋值结果
    print_all_struct(a,b,c,d);
    printf_a(a);
    printf_b(b);
    printf_c(c);
    printf_d(d);
    return;
}输出(注释为后期添加)为:
The system bits is 64
The Size of int: 4 Byte     #64 位系统int占4个字节
The Size of int poniter: 8 Byte     #64 位系统指针占8字节
The Size of float: 4 Byte   #64 位系统float占4字节
The Size of char: 1 Byte    #64 位系统char占1个字节
The Size of char pointer: 8 Byte     #64 位系统指针占8字节

Show points    #四个结构体的指针相等,说明指针赋值成功
 ------------------------------------------------------------------------
|Pointer of a     |Pointer of b     |Pointer of c     |Pointer of d     |
 ------------------------------------------------------------------------
|0x5555555592a0   |0x5555555592a0   |0x5555555592a0   |0x5555555592a0   |
 ------------------------------------------------------------------------
Struct_A:    #包含一个数组array[4]
0x5555555592a0: a->array[0] = 0    #结构体中第1个元素(array)起始地址与结构体指针(a)相等
0x5555555592a4: a->array[1] = 1    #结构体指针(a)+int长度(4字节) 得array中第2个元素地址
0x5555555592a8: a->array[2] = 2    #结构体指针(a)+int长度(4字节)*2 得array中第3个元素地址
0x5555555592ac: a->array[3] = 3

Struct_B:    #包含一个int指针ptr_b
&(b->ptr_b): 0x5555555592a0    #结构体中第1个元素int指针ptr_b的 地址 等于结构体指针(b)
b->ptr_b: 0x100000000   #是地址相等,而不是值相等,要注意区分。没有为指针ptr_b分配内存,故地址为0x100000000

Struct_C:
0x5555555592a0: c->int1: 0    #第1个元素地址等于指针c,该地址有值,元素类型与内存的值中一致,"赋值"成功
0x5555555592a4: c->int_array1[0]: 1    #指针c+int长度(4字节)得到元素 c->int_array1[0]的地址,该地址有值,值类型与内存的值中一致,"赋值"成功
0x5555555592a8: c->int_array1[1]: 2    #指针c+int长度(4字节)*2刚好是 c->int_array1[1]的起始地址,该地址有值,值类型与内存的值中一致,"赋值"成功
0x5555555592ac: c->float_array2[0]: 0.000000  #地址有值,但类型不是float,”赋值“失败
0x5555555592b0: c->float_array2[1]: 0.000000  #这个地址没有值,float默认值为0.000000

Struct_D:
0x5555555592a0: d->char1: (null)    #第1个元素地址等于指针d, 但值的类型与内存中不同,”赋值“失败
0x5555555592a1: d->char_array[0]: (null)    #值的类型不同,导致长度不同,得到的地址中无值
0x5555555592a2: d->char_array[1]: (null) #同上我们先来看输出结果的图解: 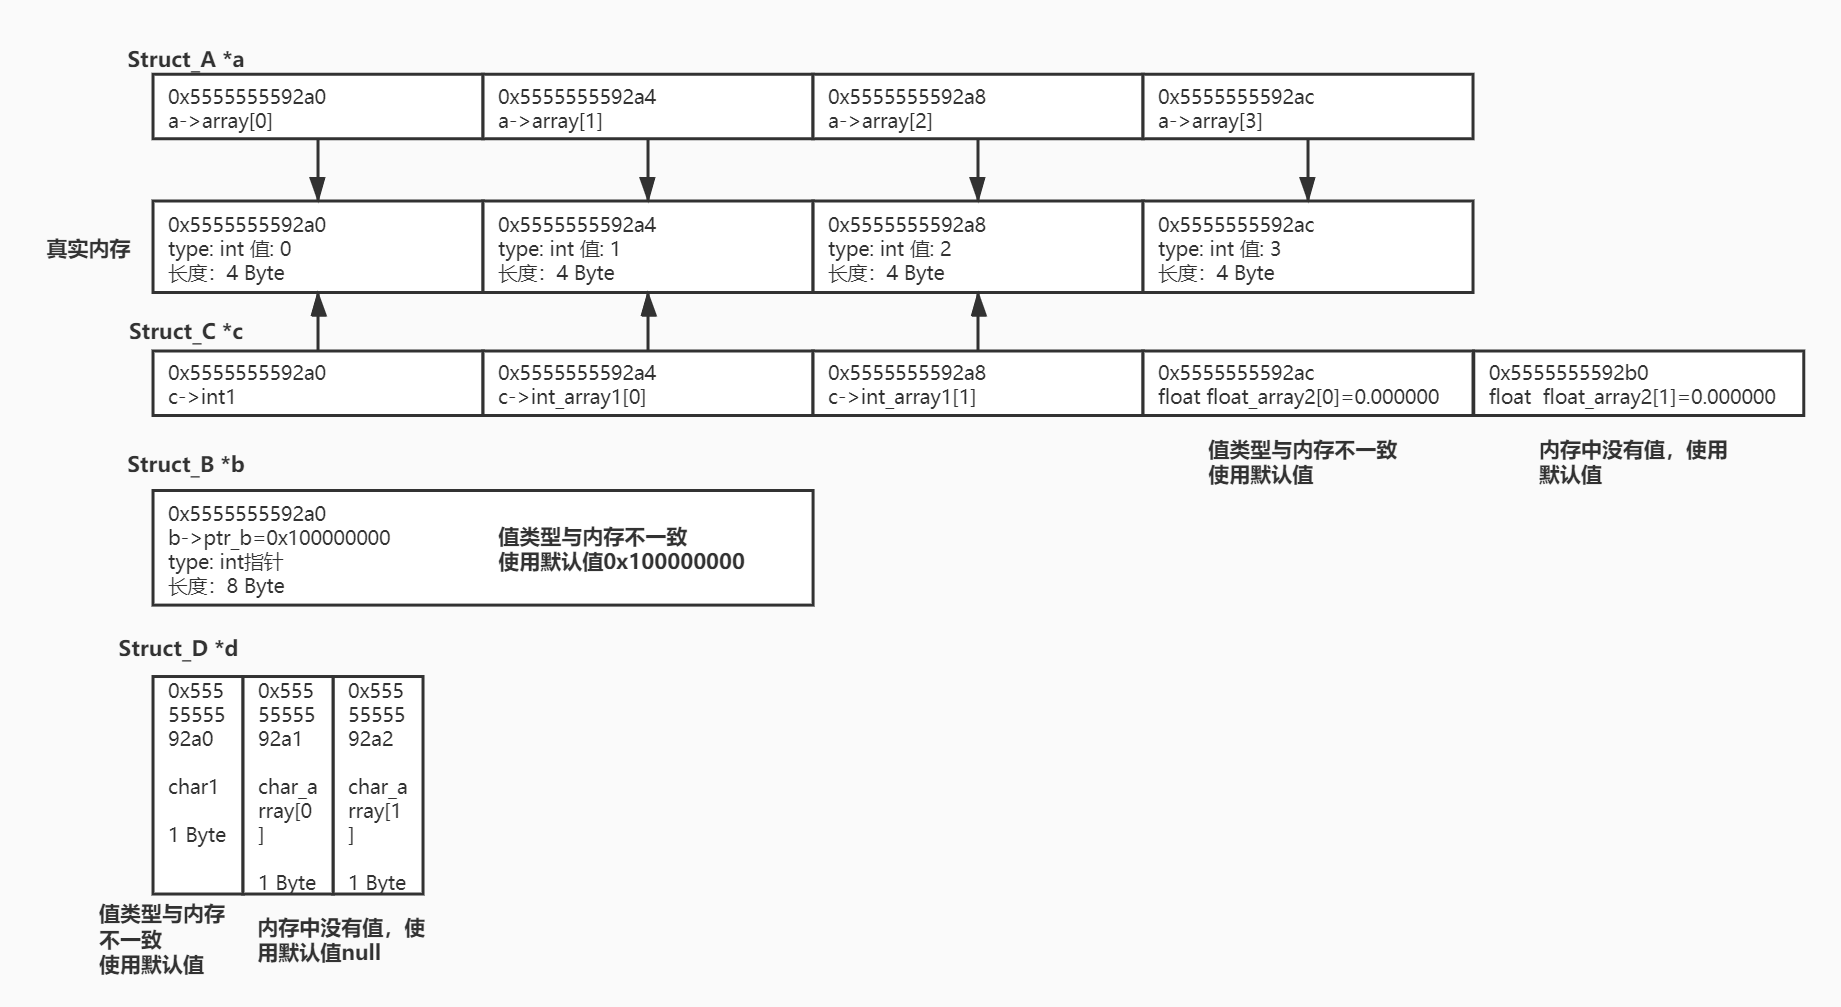
从上面的结果我们可以得出几个结论:
结构体指针等于第一个元素的起始地址
如果第一个元素是指针p,请注意是指针变量的地址&p,而不是指针本身p
结构体内的元素在内存中顺序排列,赋值时也是顺序”赋值“。满足两个条件即可”赋值“成功:
元素起始地址上有值
元素类型与内存中的值类型一致
严格来说其实并不是赋值,而是指定了结构体的起始地址,根据元素的长度可以顺序得到各个元素的地址,如果元素地址上有值,且元素类型与内存中的值一致,则可以直接使用,否则无法使用,自动转为默认值。
补充: 到这里有的读者可能会问,内存中并没有存储数据类型,为什么笔者一直在强调元素类型与内存中的值类型是否一致呢?
原因是不同类型的值在内存中的编码存储方式不一样,一个按int编码值是无法按float方式直接读取的。详细原理此处不再赘述。
最后附上完整代码
#include <stdio.h>
#include <malloc.h>
#include <bits/wordsize.h>

typedef struct {
    int array[4];
}Struct_A;

typedef struct {
    int *ptr_b;
} Struct_B;

typedef struct {
    int int1;
    int int_array1[2];
    float float_array2[2];
}Struct_C;

typedef struct{
    char char1;
    char char_array[2];
}Struct_D;

void printf_a(Struct_A *a){
    printf("Struct_A:\n");
    for(int i=0; i<4; i++){
        printf("%p: a->array[%d] = %d\n", &((a->array)[i]), i, (a->array)[i]);
    }
}

void printf_b(Struct_B *b){
    printf("Struct_B:\n");
    printf("&(b->ptr_b): %p\n",&(b->ptr_b));
    printf("b->ptr_b: %p\n", b->ptr_b);
}

void printf_c(Struct_C *c){
    printf("Struct_C:\n");
    printf("%p: c->int1: %d\n", &(c->int1), c->int1);
    printf("%p: c->int_array1[0]: %d\n", &(c->int_array1[0]), c->int_array1[0]);
    printf("%p: c->int_array1[1]: %d\n", &(c->int_array1[1]), c->int_array1[1]);
    printf("%p: c->float_array2[0]: %f\n", &(c->float_array2[0]), c->float_array2[0]);
    printf("%p: c->float_array2[1]: %f\n", &(c->float_array2[1]), c->float_array2[1]);
}

void printf_d(Struct_D *d){
    printf("Struct_D:\n");
    printf("%p: d->char1: %s\n", &(d->char1), d->char1);
    printf("%p: d->char_array[0]: %s\n", &(d->char_array[0]), d->char_array[0]);
    printf("%p: d->char_array[1]: %s\n", &(d->char_array[1]), d->char_array[1]);
}

void print_all_struct(Struct_A *a, Struct_B *b, Struct_C *c, Struct_D *d){
    printf("Show points\n");
    printf(" -----------------------------------------------------------------------\n");
    printf("|Pointer of a     |Pointer of b     |Pointer of c     |Pointer of d     |\n");
    printf(" -----------------------------------------------------------------------\n");
    printf("|%p   |%p   |%p   |%p   |\n", a, b, c, d);
    printf(" -----------------------------------------------------------------------\n");
}

void main(){
    Struct_A *a = malloc(sizeof(Struct_A));
    if(a==NULL){return;};
    int temp_a[4] = {0,1,2,3};
    memcpy(a->array, &temp_a, 4*sizeof(int));

    Struct_B *b = (Struct_B *)a;
    Struct_C *c = (Struct_C *)a;
    Struct_D *d = (Struct_D *)a;

    printf("The system bits is %d\n", __WORDSIZE);
    printf("The Size of int: %d Byte\nThe Size of int poniter: %d Byte\n", sizeof(int), sizeof(int*));
    printf("The Size of float:%d\n",sizeof(float));
    printf("The Size of char: %d Byte\nThe Size of char pointer: %d Byte\n", sizeof(char),  sizeof(char*));
    print_all_struct(a,b,c,d);

    printf_a(a);
    printf_b(b);
    printf_c(c);
    printf_d(d);
    return;
}感谢各位的阅读,以上就是“C语言结构体强制转换的方法”的内容了,经过本文的学习后,相信大家对C语言结构体强制转换的方法这一问题有了更深刻的体会,具体使用情况还需要大家实践验证。这里是亿速云,小编将为大家推送更多相关知识点的文章,欢迎关注!
亿速云「云服务器」,即开即用、新一代英特尔至强铂金CPU、三副本存储NVMe SSD云盘,价格低至29元/月。点击查看>>
免责声明:本站发布的内容(图片、视频和文字)以原创、转载和分享为主,文章观点不代表本网站立场,如果涉及侵权请联系站长邮箱:is@yisu.com进行举报,并提供相关证据,一经查实,将立刻删除涉嫌侵权内容。
原文链接:https://my.oschina.net/vxb/blog/4829059


 计算
计算 安全
安全 数据库
数据库 网络和加速
网络和加速 企业服务
企业服务


