这篇“MicroPython如何实现智能小车”文章的知识点大部分人都不太理解,所以小编给大家总结了以下内容,内容详细,步骤清晰,具有一定的借鉴价值,希望大家阅读完这篇文章能有所收获,下面我们一起来看看这篇“MicroPython如何实现智能小车”文章吧。
1.效果展示
2.材料准备
TPYBoard v102 1块
蓝牙串口模块 1个
TPYBoard v102小车扩展板(包含4个车轮,4个电机)
18650电池 2节
数据线 1条
杜邦线 若干
蓝牙APP
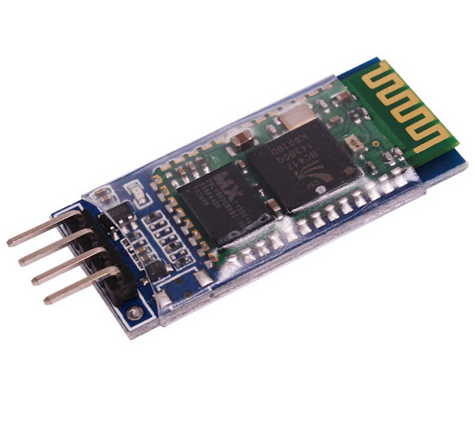
3.蓝牙模块
蓝牙( Bluetooth):是一种无线技术标准,可实现固定设备、移动设备和楼宇个人域网之间的短距离数据交换(使用2.4-2.485GHz的ISM波段的UHF无线电波)。
我们在此使用的蓝牙模块(HC-06)已经在内部实现了蓝牙协议,不用我们再去自己开发调试协议。这类模块一般都是借助于串口协议通信,因此我们只需借助串口将我们需要发送的数据发送给蓝牙模块,蓝牙模块会自动将数据通过蓝牙协议发送给配对好的蓝牙设备。
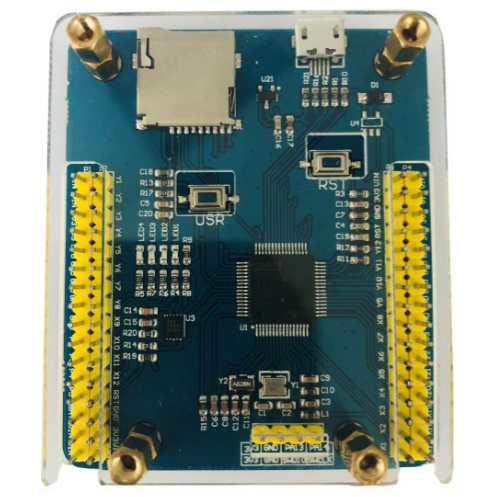
4.单片机-TPYBoard v102
TPYBoard v102 是遵循MIT协议,由TurnipSmart公司制作的一款MicroPython开发板,它基于STM32F405单片机,通过USB接口进行数据传输。该开发板内置4个LED灯、一个加速度传感器,可在3V-10V之间的电压正常工作。让你会Python就能做极客, 用Python控制硬件,支持Python语言的开发板。比树莓派更小巧,更简单,更便宜,比Arduino更强大,更加容易编程。
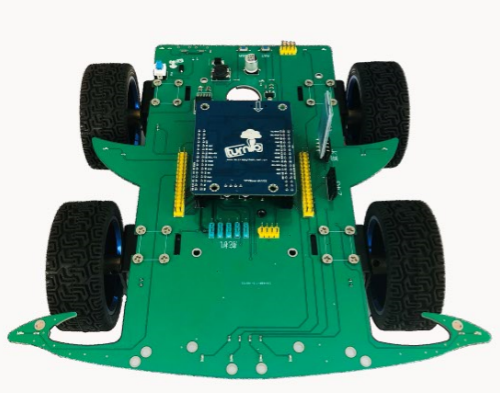
小车扩展板
以TPYBoard v102开发板为主控板,小车扩展板具有四路PWM调速电机、8个可控LED、1个蜂鸣器、5路舵机接口、1个蓝牙接口、1个PS2无线接口、引出TPYBoard v102开发板全部针脚,可装载循迹模块、超声波模块、机械手臂、红外接收头,兼容入门级电机和专业级电机,两节18650单独供电。
源代码
我们只需要把TPYBoard v102 插小车扩展板上,把蓝牙模块插上,把程序写入就行,下面是main.py源程序
# main.py -- put your code here!
from pyb import Pin
from pyb import UART

N1 = Pin('Y1', Pin.OUT_PP)
N2 = Pin('Y2', Pin.OUT_PP)
N3 = Pin('Y3', Pin.OUT_PP)
N4 = Pin('Y4', Pin.OUT_PP)
N5 = Pin('Y6', Pin.OUT_PP)
N6 = Pin('Y7', Pin.OUT_PP)
N7 = Pin('Y8', Pin.OUT_PP)
N8 = Pin('Y9', Pin.OUT_PP)

led_red=Pin('Y5', Pin.OUT_PP)
led_right=Pin('Y12', Pin.OUT_PP)
led_left=Pin('Y11', Pin.OUT_PP)

led_red.value(1)
led_right.value(0)
led_left.value(0)


blue=UART(1,9600,timeout=100)

def	go(speed):
	M1_0=pyb.Timer(8, freq=10000).channel(1, pyb.Timer.PWM, pin=pyb.Pin.board.Y1, pulse_width=(speed*200)+10000)
	M1_1=pyb.Timer(8, freq=10000).channel(2, pyb.Timer.PWM, pin=pyb.Pin.board.Y2, pulse_width=0)

	M2_0=pyb.Timer(4, freq=10000).channel(3, pyb.Timer.PWM, pin=pyb.Pin.board.Y3, pulse_width=(speed*100)+5000)
	M2_1=pyb.Timer(4, freq=10000).channel(4, pyb.Timer.PWM, pin=pyb.Pin.board.Y4, pulse_width=0)

	M3_0=pyb.Timer(1, freq=10000).channel(1, pyb.Timer.PWM, pin=pyb.Pin.board.Y6, pulse_width=(speed*220)+10000)
	M3_1=pyb.Timer(1, freq=10000).channel(2, pyb.Timer.PWM, pin=pyb.Pin.board.Y7, pulse_width=0)

	M4_0=pyb.Timer(2, freq=10000).channel(3, pyb.Timer.PWM, pin=pyb.Pin.board.Y9, pulse_width=(speed*50)+5000)
	M4_1=pyb.Timer(12, freq=10000).channel(2, pyb.Timer.PWM, pin=pyb.Pin.board.Y8, pulse_width=0)

	led_red.value(0)

def	back(speed):
	M1_0=pyb.Timer(8, freq=10000).channel(1, pyb.Timer.PWM, pin=pyb.Pin.board.Y1, pulse_width=0)
	M1_1=pyb.Timer(8, freq=10000).channel(2, pyb.Timer.PWM, pin=pyb.Pin.board.Y2, pulse_width=(speed*200)+10000)

	M2_0=pyb.Timer(4, freq=10000).channel(3, pyb.Timer.PWM, pin=pyb.Pin.board.Y3, pulse_width=0)
	M2_1=pyb.Timer(4, freq=10000).channel(4, pyb.Timer.PWM, pin=pyb.Pin.board.Y4, pulse_width=(speed*100)+10000)

	M3_0=pyb.Timer(1, freq=10000).channel(1, pyb.Timer.PWM, pin=pyb.Pin.board.Y6, pulse_width=0)
	M3_1=pyb.Timer(1, freq=10000).channel(2, pyb.Timer.PWM, pin=pyb.Pin.board.Y7, pulse_width=(speed*200)+10000)

	M4_0=pyb.Timer(2, freq=10000).channel(3, pyb.Timer.PWM, pin=pyb.Pin.board.Y9, pulse_width=0)
	M4_1=pyb.Timer(12, freq=10000).channel(2, pyb.Timer.PWM, pin=pyb.Pin.board.Y8, pulse_width=(speed*100)+10000)

	led_red.value(1)

def	stop():
	M1_0=pyb.Timer(8, freq=10000).channel(1, pyb.Timer.PWM, pin=pyb.Pin.board.Y1, pulse_width=0)
	M1_1=pyb.Timer(8, freq=10000).channel(2, pyb.Timer.PWM, pin=pyb.Pin.board.Y2, pulse_width=0)

	M2_0=pyb.Timer(4, freq=10000).channel(3, pyb.Timer.PWM, pin=pyb.Pin.board.Y3, pulse_width=0)
	M2_1=pyb.Timer(4, freq=10000).channel(4, pyb.Timer.PWM, pin=pyb.Pin.board.Y4, pulse_width=0)

	M3_0=pyb.Timer(1, freq=10000).channel(1, pyb.Timer.PWM, pin=pyb.Pin.board.Y6, pulse_width=0)
	M3_1=pyb.Timer(1, freq=10000).channel(2, pyb.Timer.PWM, pin=pyb.Pin.board.Y7, pulse_width=0)

	M4_0=pyb.Timer(12, freq=10000).channel(2, pyb.Timer.PWM, pin=pyb.Pin.board.Y8, pulse_width=0)
	M4_1=pyb.Timer(2,  freq=10000).channel(3, pyb.Timer.PWM, pin=pyb.Pin.board.Y9, pulse_width=0)
	led_right.value(0)
	led_left.value(0)
	led_red.value(1)

def	left(speed):
	M1_0=pyb.Timer(8, freq=10000).channel(1, pyb.Timer.PWM, pin=pyb.Pin.board.Y1, pulse_width=(speed*30)+10000)
	M1_1=pyb.Timer(8, freq=10000).channel(2, pyb.Timer.PWM, pin=pyb.Pin.board.Y2, pulse_width=0)

	M2_0=pyb.Timer(4, freq=10000).channel(3, pyb.Timer.PWM, pin=pyb.Pin.board.Y3, pulse_width=(speed*100)+10000)
	M2_1=pyb.Timer(4, freq=10000).channel(4, pyb.Timer.PWM, pin=pyb.Pin.board.Y4, pulse_width=0)

	M3_0=pyb.Timer(1, freq=10000).channel(1, pyb.Timer.PWM, pin=pyb.Pin.board.Y6, pulse_width=(speed*30)+10000)
	M3_1=pyb.Timer(1, freq=10000).channel(2, pyb.Timer.PWM, pin=pyb.Pin.board.Y7, pulse_width=0)

	M4_0=pyb.Timer(2, freq=10000).channel(3, pyb.Timer.PWM, pin=pyb.Pin.board.Y9, pulse_width=(speed*100)+10000)
	M4_1=pyb.Timer(12, freq=10000).channel(2, pyb.Timer.PWM, pin=pyb.Pin.board.Y8, pulse_width=0)
	led_right.value(1)
	led_left.value(0)

def	right(speed):
	M1_0=pyb.Timer(8, freq=10000).channel(1, pyb.Timer.PWM, pin=pyb.Pin.board.Y1, pulse_width=(speed*200)+20000)
	M1_1=pyb.Timer(8, freq=10000).channel(2, pyb.Timer.PWM, pin=pyb.Pin.board.Y2, pulse_width=0)

	M2_0=pyb.Timer(4, freq=10000).channel(3, pyb.Timer.PWM, pin=pyb.Pin.board.Y3, pulse_width=(speed*200)+3000)
	M2_1=pyb.Timer(4, freq=10000).channel(4, pyb.Timer.PWM, pin=pyb.Pin.board.Y4, pulse_width=0)

	M3_0=pyb.Timer(1, freq=10000).channel(1, pyb.Timer.PWM, pin=pyb.Pin.board.Y6, pulse_width=(speed*100)+20000)
	M3_1=pyb.Timer(1, freq=10000).channel(2, pyb.Timer.PWM, pin=pyb.Pin.board.Y7, pulse_width=0)

	M4_0=pyb.Timer(2, freq=10000).channel(3, pyb.Timer.PWM, pin=pyb.Pin.board.Y9, pulse_width=(speed*100)+3000)
	M4_1=pyb.Timer(12, freq=10000).channel(2, pyb.Timer.PWM, pin=pyb.Pin.board.Y8, pulse_width=0)
	led_right.value(0)
	led_left.value(1)


while True:
    if blue.any()>0:
        data=blue.read().decode()
        print(data)
        if data.find('0')>-1:
            #stop
            stop()
            print('stop')
        if data.find('1')>-1:
            pyb.LED(2).on()
            pyb.LED(3).off()
            pyb.LED(4).off()
            #-------------
            go(5)
            print('go')
        if data.find('2')>-1:
            pyb.LED(2).off()
            pyb.LED(3).on()
            pyb.LED(4).off()
            #-------------
            back(5)

        if data.find('3')>-1:
            pyb.LED(2).off()
            pyb.LED(3).off()
            pyb.LED(4).on()
            left(5)
        if data.find('4')>-1:
            pyb.LED(2).off()
            pyb.LED(3).off()
            pyb.LED(4).on()
right(5)以上就是关于“MicroPython如何实现智能小车”这篇文章的内容,相信大家都有了一定的了解,希望小编分享的内容对大家有帮助,若想了解更多相关的知识内容,请关注亿速云行业资讯频道。
亿速云「云服务器」,即开即用、新一代英特尔至强铂金CPU、三副本存储NVMe SSD云盘,价格低至29元/月。点击查看>>
免责声明:本站发布的内容(图片、视频和文字)以原创、转载和分享为主,文章观点不代表本网站立场,如果涉及侵权请联系站长邮箱:is@yisu.com进行举报,并提供相关证据,一经查实,将立刻删除涉嫌侵权内容。
原文链接:https://my.oschina.net/micropython/blog/1859500


 计算
计算 安全
安全 数据库
数据库 网络和加速
网络和加速 企业服务
企业服务


