这篇文章主要讲解了“如何理解Sentinel分布式系统限流降级框架”,文中的讲解内容简单清晰,易于学习与理解,下面请大家跟着小编的思路慢慢深入,一起来研究和学习“如何理解Sentinel分布式系统限流降级框架”吧!
在分布式系统中,许多服务之间通过远程调用实现信息交互,调用时难免会出现调用失败的情况,Sentinel能保证在一个服务出现问题的情况下,不会导致整体服务失败,防止服务雪崩,提高分布式系统的可用性。
常用的容错方式有:
1、超时:设置比较短的超时时间,如果调用不成功,在很短时间内就释放连接,避免大量线程堵塞等待。
2、限流:超过设置的阈值就拒绝请求。
3、断路器:保护服务过载,当有服务发生无法调用请求堆积时,能够及时切换该服务,防止整个服务的崩溃。
Sentinel的地位和SpringCloud中的Hystrix类似,Sentinel以流量为切入点,从流量控制、熔断降级、系统负载保护等多个维度保护服务的稳定性。
首先我们在sentinel的github官网上下载sentinel-dashboard-1.7.2.jar
然后通过jar命令启动起来,端口默认8080,直接ip+端口访问,这是sentinel的控制后台,账号密码都是sentinel
 接着在项目中引入依赖
<dependency>
    <groupId>com.alibaba.cloud</groupId>
    <artifactId>spring-cloud-starter-alibaba-sentinel</artifactId>
</dependency>在配置文件中,输入Sentinel的后台地址,地址和端口写自己的,端口默认8080
spring.cloud.sentinel.transport.dashboard=localhost:8080启动后在Sentinel后台就可以看到这个应用
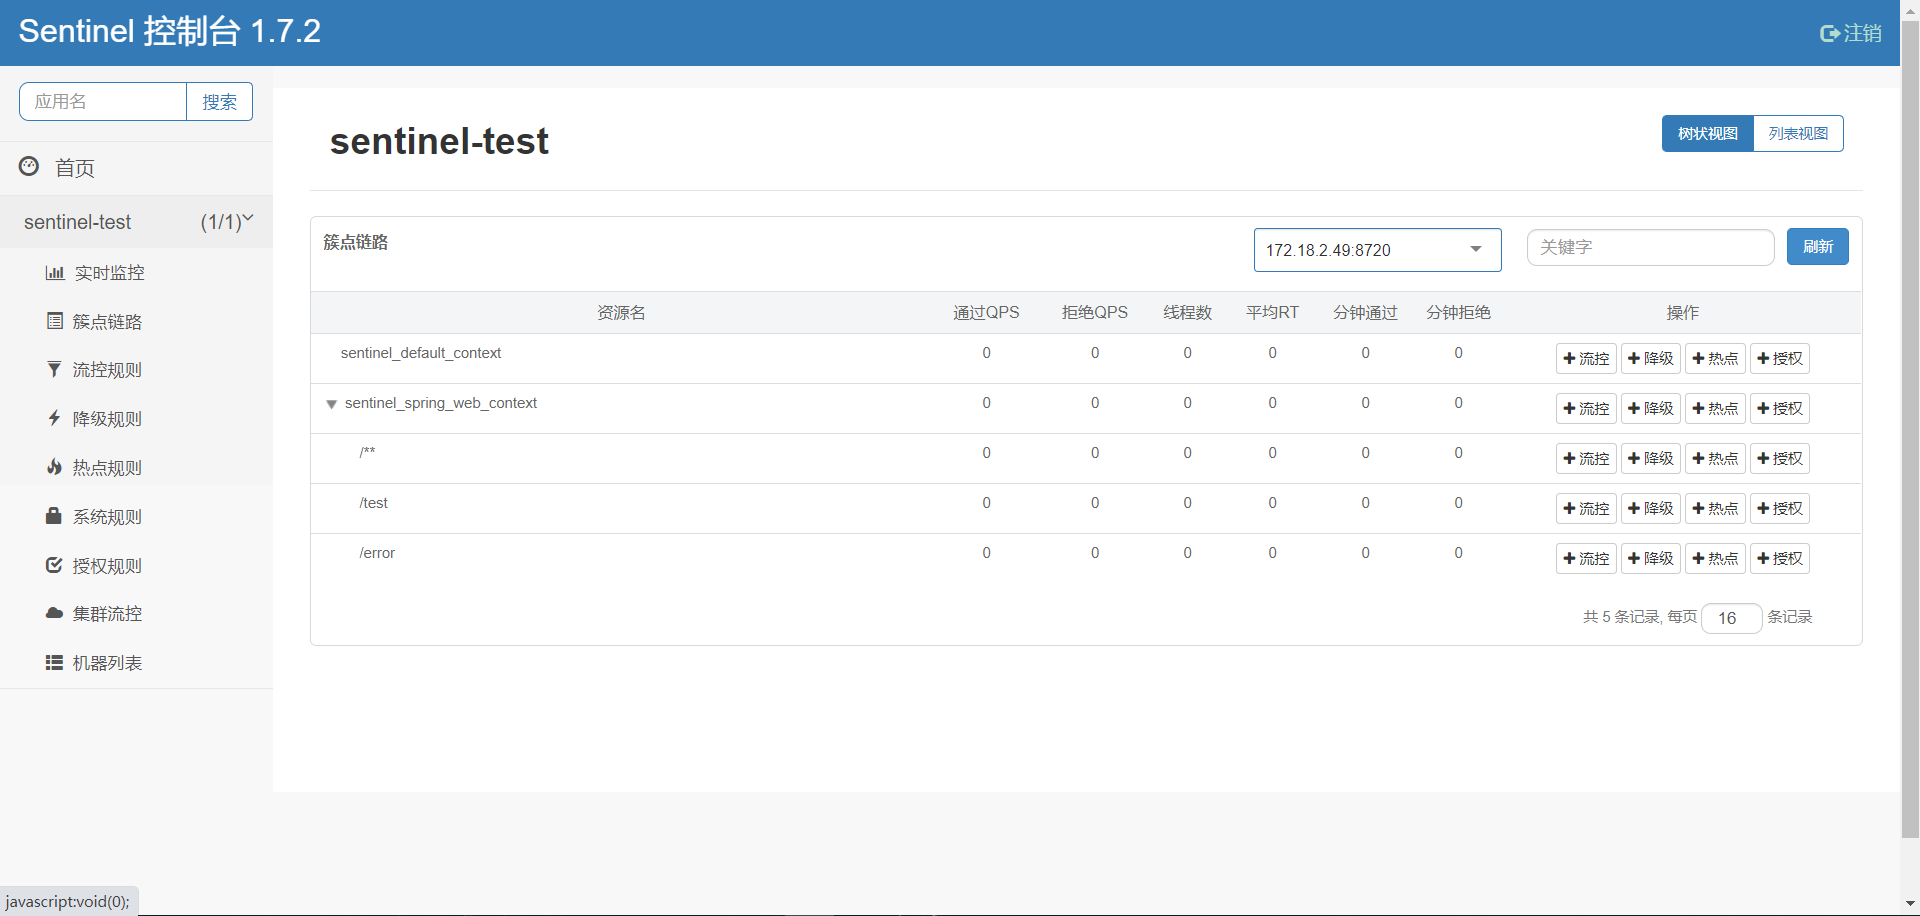
sentinel控制台调用的API默认是http://ip:8719/api,在本地启动了引入sentinel依赖的项目启动后,默认在8719这个端口上会暴露一个api出来。
写了一个简单的请求:
@RestController
public class TestController {
    @GetMapping("/test")
    public String test(){
        return "test";
    }
}接下来通过这个请求去了解sentinel的流控规则,所谓流控规则,就是对请求的控制
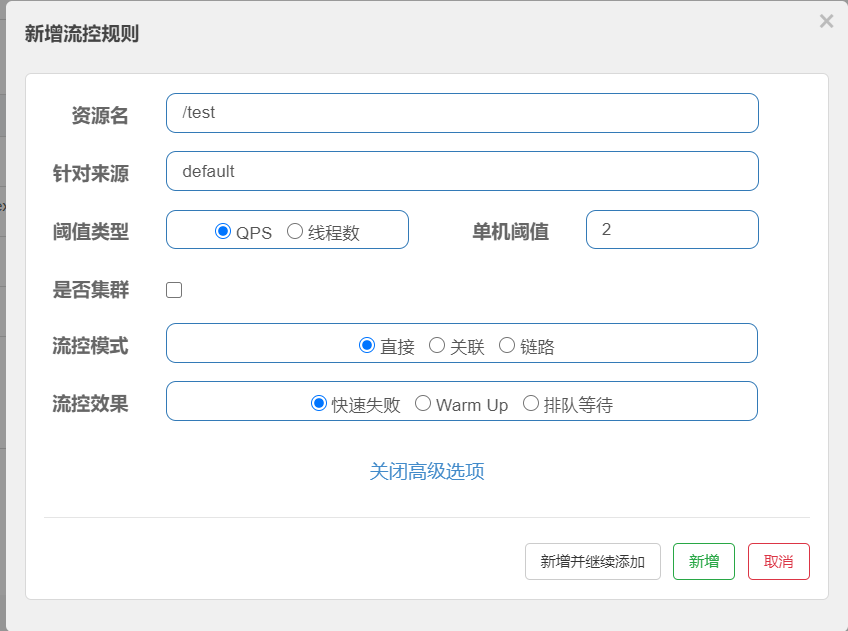
资源名:默认是请求的路径
针对来源:Sentinel可以针对调用者进行限流,填写微服务名,指定对哪个微服务进行限流 ,默认default(不区分来源,全部限制)
阈值类型:可选QPS和线程数,可以设置达到多少后执行流控策略
是否集群:你的环境是否是集群
流控模式:
1、直接:直接对该资源进行控制,比如上面的/test访问达到阈值,就限流
2、关联:当关联的资源达到阈值时,就限流自己。
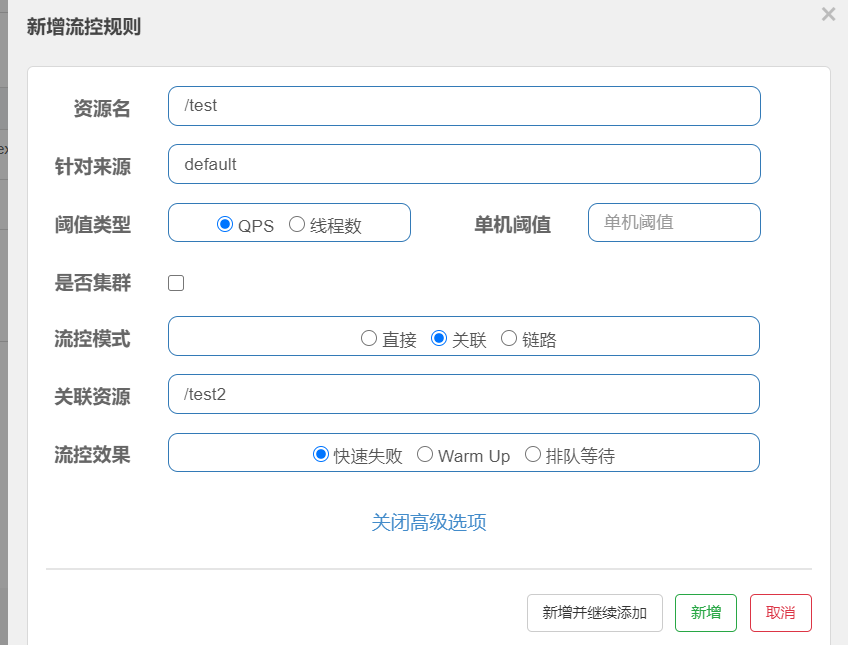 看图,如果/test2访问达到阈值,就限流/test
3、链路:只记录指定链路上的流量(指定资源从入口资源进来的流量,如果达到阈值,就可以限流),这个链路的名称可以从簇点链路中获取。

流控效果
1、快速失败:直接失败
2、Warm Up:预热模式,根据codeFactory的值(默认3),从阈值/codeFactory,经过预热时长,才达到设置的QPS阈值。比如设置QPS为90,设置预热为10秒,则最初的阈值为90/3=30,经过10秒后才达到90。
3、排队等待:比如设置阈值为10,超时时间为500毫秒,当第11个请求到的时候,不会直接报错,而是等待500毫秒,如果之后阈值还是超过10,则才会被限流。
设置完流控规则后,不停刷新去触发到阈值,看到出现了下面的提示:

这样的提示不太友好,可以自定义限流后返回的数据信息,分别对应于五种限流异常:
public class MyBlockException implements BlockExceptionHandler {
    @Override
    public void handle(HttpServletRequest httpServletRequest, HttpServletResponse httpServletResponse, BlockException e) throws Exception {
        JSONObject object=new JSONObject();
        if (e instanceof FlowException){
            object.put("status","100");
            object.put("message","接口限流");
            object.put("data",null);
        }else if (e instanceof DegradeException){
            object.put("status","101");
            object.put("message","服务降级");
            object.put("data",null);
        }else if (e instanceof ParamFlowException){
            object.put("status","102");
            object.put("message","热点参数限流");
            object.put("data",null);
        }else if (e instanceof SystemBlockException){
            object.put("status","103");
            object.put("message","触发系统保护");
            object.put("data",null);
        }else if (e instanceof AuthorityException){
            object.put("status","104");
            object.put("message","授权规则不通过");
            object.put("data",null);
        }

        httpServletResponse.setStatus(500);
        httpServletResponse.setCharacterEncoding("utf-8");
        httpServletResponse.setContentType(MediaType.APPLICATION_JSON_VALUE);
        new ObjectMapper().writeValue(httpServletResponse.getWriter(),object);
    }
}代码中定义了五种不同的
降级规则指的是在应用高峰期,将个别的服务关闭,使得能够有更多地资源去处理重要的业务,比如双十一的时候,我们会发现支付宝的部分功能会被暂时关闭。
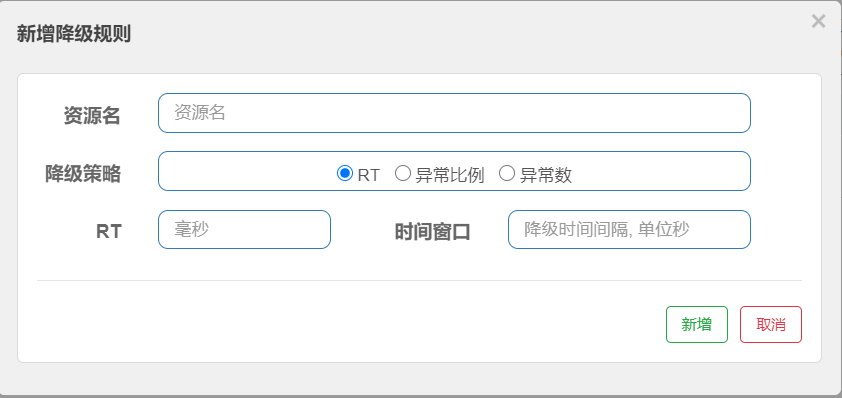
RT模式:平均响应时间、当1S内持续进入N个请求,如果平均响应时间超过阈值,那么在接下来的时间窗口内,按降级逻辑进行处理(报一个DegradeException错误)。
异常比例:可以输入一个0.0~1.0的数字,表示出现异常的比例。如果一秒内超过这个比例,那么在接下来的时间窗口内,按降级逻辑进行处理。
异常数:指当资源近一分钟的异常数超过阈值之后会,那么在接下来的时间窗口内,按降级逻辑进行处理。
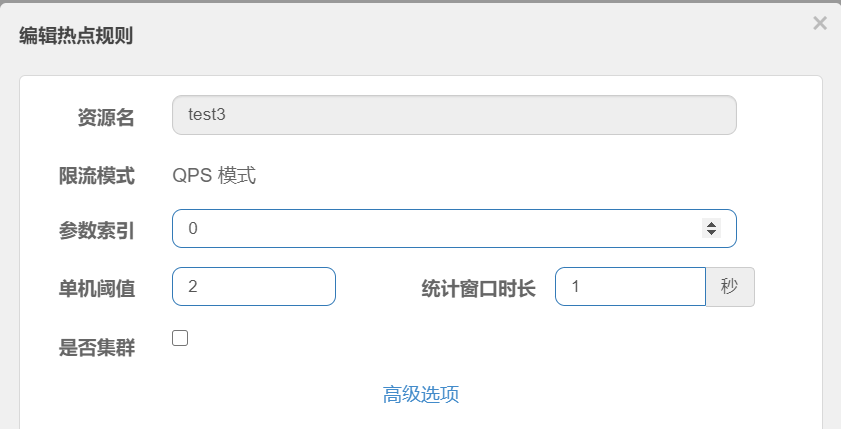
所谓热点规则,就是对某些经常访问的数据(热点数据),对其访问进行限制,
比如以商品ID为参数,限制这个商品的访问次数。在代码中需要对要限制的请求进行埋点
@GetMapping("/test3")
@SentinelResource(value = "test3",blockHandler = "handHotKey")
public String test3(@RequestParam(value = "a",required = false)String a,
                    @RequestParam(value = "b",required = false)String b){
    return "test3"+a+b;
}

public String handHotKey(String a1, String a2, BlockException e){
    return "热点数据限流";
}设置热点规则,这里的资源名就是@SentinelResource中所设置的value,参数索引的表示对第几个参数进行限流控制,阈值和窗口时长表示在1秒内如果有2个对参数0的请求,就限流。限流后会执行自己设置的blockHandler方法。
高级设置中可以设置参数例外项,即根据设置参数的值进行限流:
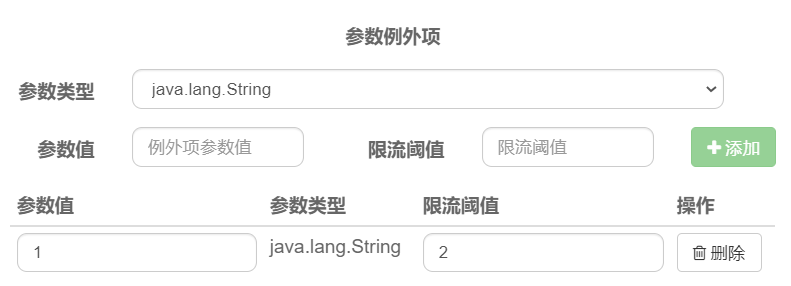
这样设置后,如果访问/test3?a=1,则按照下面的阈值进行控制。
通过监控系统的一些参数进行规则限流: 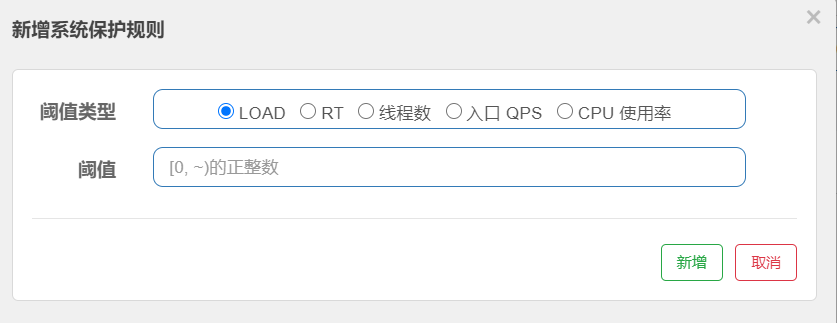
Load:这个参数只能在Linux或类Unix机器生效,将系统的1分钟的loadAverage作为指标,这个值一般设置为CPU核心数量*2.5。
RT:当单台机器上所有入口流量的平均RT达到阈值就触发系统保护,单位是毫秒。
并发线程数:当单台机器上所有入口流量的并发线程数达到阈值就触发系统保护。
入口QPS:当单台机器上所有入口流量的QPS达到阈值就触发阈值就触发系统保护。
CPU使用率:当系统CPU使用率超过阈值就触发系统保护。
授权规则可以指定哪些请求可以访问哪些不能访问,首先来看如何配置:
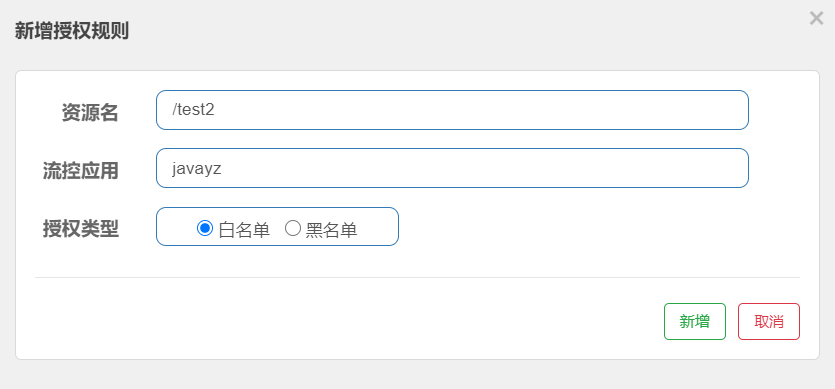
资源名就是请求名,流控应用中可以手动输入一些应用名,如果是白名单,则流控应用中设置的这些可以访问,如果是黑名单则流控应用中设置的不能访问。
接着需要在代码中去获取请求:
@Component
public class MyRequestOriginParser implements RequestOriginParser {
    @Override
    public String parseOrigin(HttpServletRequest httpServletRequest) {
        String origin=httpServletRequest.getParameter("origin");
        if (origin==null){
            throw new IllegalArgumentException("origin参数未指定");
        }
        return origin;

    }
}通过设置后,所有请求必须带上参数origin=XXX,以上面的配置为例,只有origin=javayz的请求才能通过访问。如果不喜欢参数的方式,可以在代码中换成header传递,效果一样。
使用Sentinel需要引入引入sentinel依赖,其中sentinel-transport-simple-http依赖会将微服务注册到SentinelDashboard中。启动微服务之后,会在8719端口自动开放一系列api接口,我们也可以通过http://ip:8719/api访问到这些api接口,SentinelDashboard就是通过这些API与微服务之间进行通信。
这个8719端口可以在配置文件中修改:
spring.cloud.sentinel.transport.port=8719默认情况下,我们代码中的所有GetMapping、PostMapping请求都会被Sentinel保护,也就是都会经过Sentinel的拦截器,但是也可以手动关闭这个拦截。
spring.cloud.sentinel.filter.enabled=false这样的话sentinel就没法捕捉请求了。但是还是可以通过代码的方式使用Sentinel
@GetMapping("/test4")
public String test4(){
    ContextUtil.enter("test4","abc");
    Entry entry=null;
    try {
        entry= SphU.entry("test4");
        //业务代码
        return "业务处理结束";
    } catch (BlockException e) {
        e.printStackTrace();
        //一系列的异常处理。参考MyBlockException
        //.....
        return "触发限流";
    }catch (NullPointerException e){
        //对异常进行监控
        Tracer.trace(e);
        return "空指针异常";
    }finally {
        if (entry!=null){
            entry.exit();
        }
        ContextUtil.exit();
    }
}或者还可以使用注解方式加入埋点
@SentinelResource(value = "test3",blockHandler = "handHotKey")这样配置后就增加了资源test3的拦截,如果触发限流策略,就会进入当前类的handHotKey方法,或者配置blockHandlerClass,就会进入blockHandlerClass所配置类中的handHotKey方法。
首先需要在配置文件中开启对RestTemplate的支持,默认也是true
resttemplate.sentinel.enabled=true接着在RestTemplate注入Bean的代码中增加一个Sentinel注解:
@SentinelRestTemplate(blockHandler = "fallback",blockHandlerClass = MyBlockHandlerClass.class)
@LoadBalanced //负载均衡
@Bean
public RestTemplate restTemplate(){
    return new RestTemplate();
}调用的限流处理方法如下:
public class MyBlockHandlerClass {
    public static SentinelClientHttpResponse block(){
        return new SentinelClientHttpResponse("block info");
    }
}首先需要在配置文件中开启对Feign的支持,默认为false:
feign.sentinel.enabled=true接在在@FeignClient注解中增加fallback的类:
@FeignClient(name = "nacos-discovery-provider",fallback = TestServiceFallback.class,configuration = FeignConfiguration.class)
public interface TestService {
    @GetMapping("/{name}")
    String index(@PathVariable("name") String string);
}

最后设置规则后就会触发fallback中对应的方法,具体实现
public class TestServiceFallback implements TestService{
    @Override
    public String index(String string) {
        return "fallback";
    }
}默认模式:
在前面介绍Sentinel时,会发现每次重启微服务后Sentinel中的配置都会丢失,这是因为API将规则推送到了客户端的内存中,重启后就消失了。
Pull模式:
在Sentinel Dashboard中设置规则之后,推送给客户端后不仅保存在内存中,还会保存到本地文件中。Pull模式需要通过代码实现,这段代码可以直接拿去复用:
@Slf4j
public class FileDataSourceInit implements InitFunc {
    @Override
    public void init() throws Exception {

        String ruleDir=System.getProperty("user.home")+"/sentinel/rules";
        log.info(ruleDir);
        //限流规则路径
        String flowRulePath = ruleDir + "/flow-rule.json";
        //降级规则路径
        String degradeRulePath = ruleDir + "/degrade-rule.json";
        //热点规则路径
        String paramFlowRulePath = ruleDir+"/param-flow-rule.json";
        //系统规则路径
        String systemRulePath = ruleDir+"/system-rule.json";
        //权限规则路径
        String authorityRulePath=ruleDir+"/authority-rule.json";

        this.mkdirIfNotExists(ruleDir);
        this.createFileIfNotExists(flowRulePath);
        this.createFileIfNotExists(flowRulePath);
        this.createFileIfNotExists(flowRulePath);
        this.createFileIfNotExists(flowRulePath);
        this.createFileIfNotExists(flowRulePath);

        // 流控规则,可读取数据
        ReadableDataSource<String, List<FlowRule>> flowRuleRDS=new FileRefreshableDataSource<>(
                flowRulePath,
                flowRuleListParser
        );
        //将可读数据源注入到FlowRuleManager,当文件发生变化时就会更新规则到缓存
        FlowRuleManager.register2Property(flowRuleRDS.getProperty());
        //流控规则:可写数据源
        WritableDataSource<List<FlowRule>> flowRuleWDS=new FileWritableDataSource<List<FlowRule>>(
                flowRulePath,
                this::encodeJson
        );
        WritableDataSourceRegistry.registerFlowDataSource(flowRuleWDS);

        //降级规则:可读数据源
        ReadableDataSource<String, List<DegradeRule>> degradeRuleRDS=new FileRefreshableDataSource<>(
                degradeRulePath,
                degradeRuleListParser
        );
        DegradeRuleManager.register2Property(degradeRuleRDS.getProperty());
        //降级规则:可写数据源
        WritableDataSource<List<DegradeRule>> degradeRuleWDS=new FileWritableDataSource<List<DegradeRule>>(
                flowRulePath,
                this::encodeJson
        );
        WritableDataSourceRegistry.registerDegradeDataSource(degradeRuleWDS);

        //热点参数:可读数据源
        ReadableDataSource<String, List<ParamFlowRule>> paramFlowRuleRDS=new FileRefreshableDataSource<>(
                paramFlowRulePath,
                paramFlowRuleListParser
        );
        ParamFlowRuleManager.register2Property(paramFlowRuleRDS.getProperty());
        //热点参数:可写数据源
        WritableDataSource<List<ParamFlowRule>> paramFlowRuleWDS=new FileWritableDataSource<List<ParamFlowRule>>(
                paramFlowRulePath,
                this::encodeJson
        );
        ModifyParamFlowRulesCommandHandler.setWritableDataSource(paramFlowRuleWDS);

        //系统规则:可读数据源
        ReadableDataSource<String, List<SystemRule>> systemRuleRDS=new FileRefreshableDataSource<>(
                systemRulePath,
                systemRuleListParser
        );
        SystemRuleManager.register2Property(systemRuleRDS.getProperty());
        //系统规则:可写数据源
        WritableDataSource<List<SystemRule>> systemRuleWDS=new FileWritableDataSource<List<SystemRule>>(
                systemRulePath,
                this::encodeJson
        );
        WritableDataSourceRegistry.registerSystemDataSource(systemRuleWDS);

        //授权规则:可读数据源
        ReadableDataSource<String, List<AuthorityRule>> authorityRuleRDS=new FileRefreshableDataSource<>(
                authorityRulePath,
                authorityRuleListParser
        );
        AuthorityRuleManager.register2Property(authorityRuleRDS.getProperty());
        WritableDataSource<List<AuthorityRule>> authorityRuleWDS=new FileWritableDataSource<List<AuthorityRule>>(
                authorityRulePath,
                this::encodeJson
        );
        WritableDataSourceRegistry.registerAuthorityDataSource(authorityRuleWDS);
    }

    private Converter<String,List<FlowRule>> flowRuleListParser=source-> JSON.parseObject(
            source,
            new TypeReference<List<FlowRule>>(){}
    );
    private Converter<String,List<DegradeRule>> degradeRuleListParser=source-> JSON.parseObject(
            source,
            new TypeReference<List<DegradeRule>>(){}
    );
    private Converter<String,List<SystemRule>> systemRuleListParser=source-> JSON.parseObject(
            source,
            new TypeReference<List<SystemRule>>(){}
    );
    private Converter<String,List<AuthorityRule>> authorityRuleListParser=source-> JSON.parseObject(
            source,
            new TypeReference<List<AuthorityRule>>(){}
    );
    private Converter<String,List<ParamFlowRule>> paramFlowRuleListParser=source-> JSON.parseObject(
            source,
            new TypeReference<List<ParamFlowRule>>(){}
    );


    private void mkdirIfNotExists(String filePath) {
        File file=new File(filePath);
        if (!file.exists()){
            file.mkdirs();
        }
    }

    private void createFileIfNotExists(String filePath) throws IOException {
        File file=new File(filePath);
        if (!file.exists()){
            file.createNewFile();
        }
    }

    private <T> String encodeJson(T t){
        return JSON.toJSONString(t);
    }
}sentinel的数据持久化是通过SPI机制实现的,因此需要在resource下新建文件夹META-INF/services,然后新建一个文件com.alibaba.csp.sentinel.init.InitFunc
文件中写入上面这个类的全限定名:

之后产生规则后就会在代码中设定的路径下产生json文件,重启后之前的配置也不会消失。
Push模式: 客户端通过注册监听器的方式时刻监听变化,比如使用Nacos、Zookeeper等配置中心,这种方式保证了很好的实时性和一致性,生产环境中一般采用push模式。我们用Nacos实现
1、添加sentinel-datasource-nacos依赖
<dependency>
    <groupId>com.alibaba.csp</groupId>
    <artifactId>sentinel-datasource-nacos</artifactId>
</dependency>2、配置持久化数据源
spring.cloud.sentinel.datasource.ds1.nacos.server-addr=192.168.78.128:8848
spring.cloud.sentinel.datasource.ds1.nacos.data-id=${spring.application.name}.json
spring.cloud.sentinel.datasource.ds1.nacos.group-id=DEFAULT_GROUP
spring.cloud.sentinel.datasource.ds1.nacos.data-type=json
spring.cloud.sentinel.datasource.ds1.nacos.rule-type=flow3、在Nacos中手动添加配置文件,这里的配置文件取的就是和本地配置文件相同格式
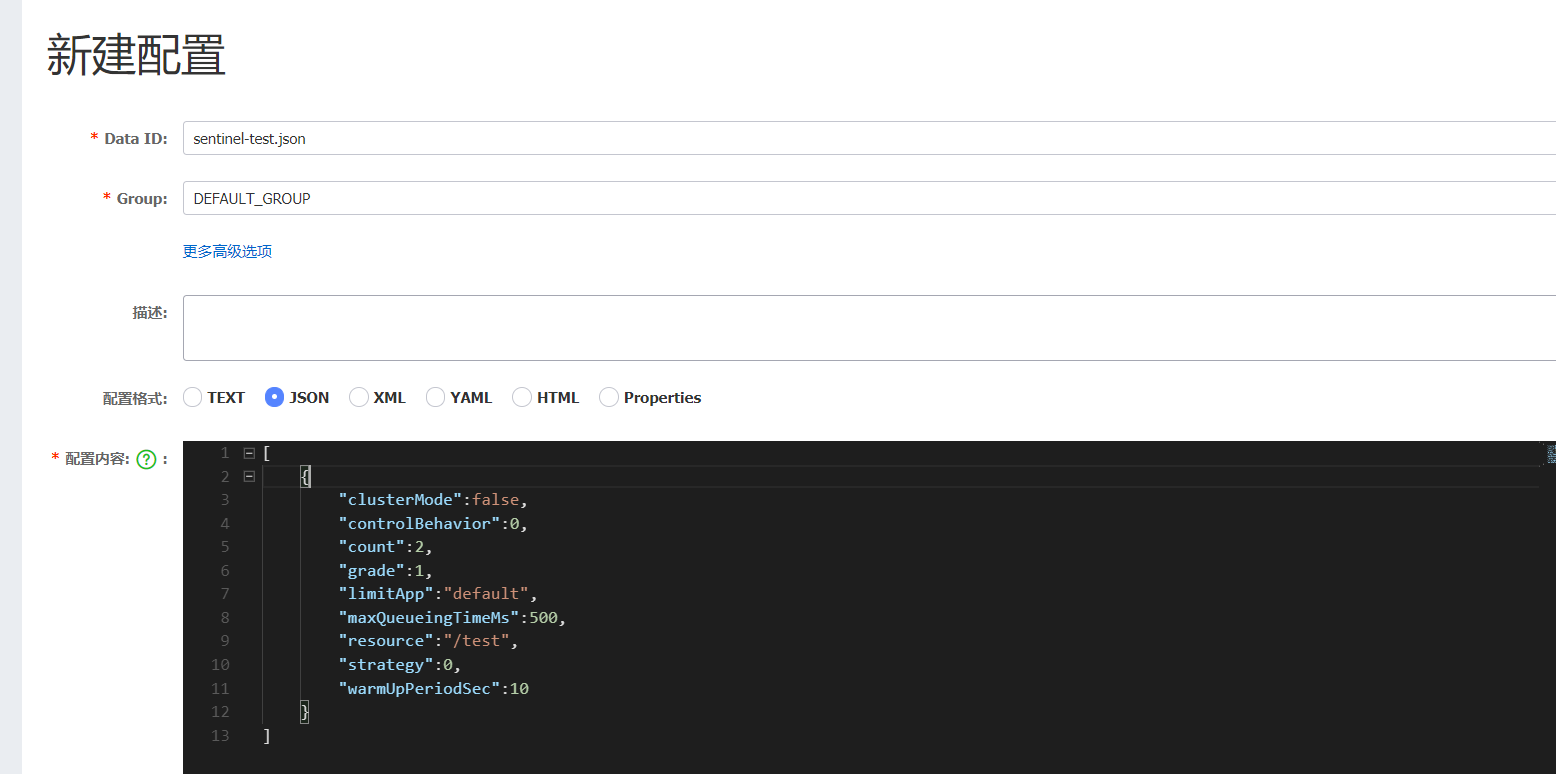
[
    {
        "clusterMode":false,
        "controlBehavior":0,
        "count":2,
        "grade":1,
        "limitApp":"default",
        "maxQueueingTimeMs":500,
        "resource":"/test",
        "strategy":0,
        "warmUpPeriodSec":10
    }
]push模式目前还有缺点,Nacos修改配置文件后可同步到Sentinel,但是在Sentinel中修改配置后无法同步到Nacos,需要手动去同步数据。
感谢各位的阅读,以上就是“如何理解Sentinel分布式系统限流降级框架”的内容了,经过本文的学习后,相信大家对如何理解Sentinel分布式系统限流降级框架这一问题有了更深刻的体会,具体使用情况还需要大家实践验证。这里是亿速云,小编将为大家推送更多相关知识点的文章,欢迎关注!
亿速云「云服务器」,即开即用、新一代英特尔至强铂金CPU、三副本存储NVMe SSD云盘,价格低至29元/月。点击查看>>
免责声明:本站发布的内容(图片、视频和文字)以原创、转载和分享为主,文章观点不代表本网站立场,如果涉及侵权请联系站长邮箱:is@yisu.com进行举报,并提供相关证据,一经查实,将立刻删除涉嫌侵权内容。
原文链接:https://my.oschina.net/u/4873431/blog/5023326