本文小编为大家详细介绍“Nginx请求限制和访问控制怎么实现”,内容详细,步骤清晰,细节处理妥当,希望这篇“Nginx请求限制和访问控制怎么实现”文章能帮助大家解决疑惑,下面跟着小编的思路慢慢深入,一起来学习新知识吧。
一、nginx的请求限制
1. http协议的连接与请求
http协议版本与连接关系
| http协议版本 | 连接关系 |
|---|---|
| http1.0 | tcp不能复用 |
| http1.1 | 顺序性tcp复用 |
| http2.0 | 多路复用tcp复用 |
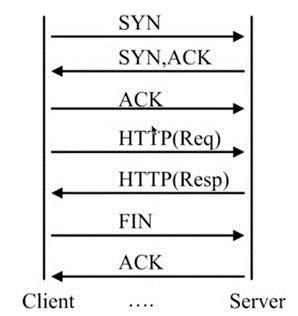
http请求建立在一次tcp连接的基础上。
一次tcp连接至少可以产生一次http请求,http1.1版本以后,建立一次tcp连接可以发送多次http请求。
1. 连接频率限制
语法
syntax:    limit_conn_zone key zone=name:size;
default:  —
context:  http

syntax:    limit_conn zone number;
default:  —
context: http, server, location用法
在nginx配置文件中的 http 下配置
http {
  # ...其它代码省略...
  # 开辟一个10m的连接空间,命名为addr
  limit_conn_zone $binary_remote_addr zone=addr:10m;
  server {
    ...
    location /download/ {
      # 服务器每次只允许一个ip地址连接
      limit_conn addr 1;
    }
  }
}2. 请求频率限制
语法
syntax:    limit_req_zone key zone=name:size rate=rate;
default:  —
context:  http


syntax:    limit_req zone=name [burst=number] [nodelay];
default:  —
context: http, server, location用法
在nginx配置文件中的 http 下配置
http {

  # ...其它代码省略...

  # 开辟一个10m的请求空间,命名为one。同一个ip发送的请求,平均每秒只处理一次
  limit_req_zone $binary_remote_addr zone=one:10m rate=1r/s;

  server {
      ...

    location /search/ {
      limit_req zone=one;
      # 当客户端请求超过指定次数,最多宽限5次请求,并延迟处理,1秒1个请求
      # limit_req zone=one burst=5;
      # 当客户端请求超过指定次数,最多宽限5次请求,并立即处理。
      # limit_req zone=one burst=5 nodelay;

    }
  }
}二、nginx的访问控制
1. 基于ip的访问控制
语法
syntax:    allow address | cidr | unix: | all;
default:  —
context:  http, server, location, limit_except

syntax:    deny address | cidr | unix: | all;
default:  —
context: http, server, location, limit_exceptaddress:ip地址,例如:192.168.1.1cidr:例如:192.168.1.0/24;unix:socket方式all:所有
用法
在nginx配置文件中的 server 下配置
server {
  # ...其它代码省略...
  location ~ ^/index_1.html {
    root  /usr/share/nginx/html;
    deny 151.19.57.60; # 拒绝这个ip访问
    allow all; # 允许其他所有ip访问
  }

  location ~ ^/index_2.html {
    root  /usr/share/nginx/html;
    allow 151.19.57.0/24; # 允许ip 151.19.57.* 访问
    deny all; # 拒绝其他所有ip访问
  }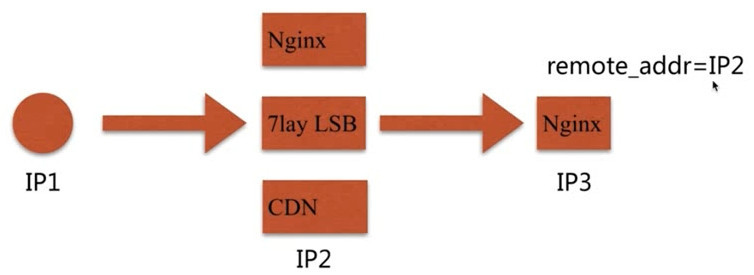
}ngx_http_access_module 的局限性
当客户端通过代理访问时,nginx的remote_addr获取的是代理的ip
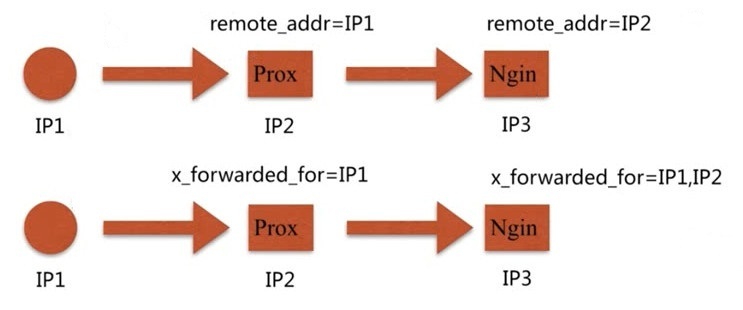
http_x_forwarded_for
http_x_forwarded_for = client ip, proxy1 ip, proxy2 ip, ...
remote_addr 获取的是直接和服务端建立连接的客户端ip。http_x_forwarded_for 可以记录客户端及所有中间代理的ip
2. 基于用户的登录认证
语法
syntax:    auth_basic string | off;
default:  auth_basic off;
context:  http, server, location, limit_except


syntax:    auth_basic_user_file file;
default:  —
context: http, server, location, limit_except用法
要使用 htpasswd 命令,需要先安装httpd-tools
[root~]# yum -y install httpd-tools使用 htpasswd 命令创建账号密码文件
[root/etc/nginx]# htpasswd -c ./auth_conf auth_root
new password:
re-type new password:
adding password for user auth_root

[root/etc/nginx]# ll auth_conf
-rw-r--r-- 1 root root 48 7月  9 11:38 auth_conf

[root/etc/nginx]# cat auth_conf
auth_root:$apr1$2v6gftlm$oo2le8glgqwi68mcqtcn90在nginx配置文件中的 server 下配置
server {
  # ...其它代码省略...

  location ~ ^/index.html {
    root  /usr/share/nginx/html;
    auth_basic "auth access! input your password!";
    auth_basic_user_file /etc/nginx/auth_conf;
  }
}修改后重新载入配置文件nginx -s reload
使用浏览器访问 http://192.168.33.88/index.html
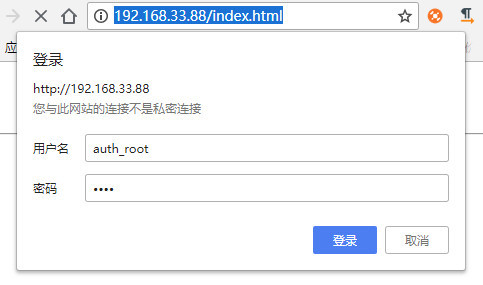
输入正确的用户名和密码,即可正常访问。
ngx_http_auth_basic_module 的局限性
用户信息依赖文件方式
操作管理效率低下
读到这里,这篇“Nginx请求限制和访问控制怎么实现”文章已经介绍完毕,想要掌握这篇文章的知识点还需要大家自己动手实践使用过才能领会,如果想了解更多相关内容的文章,欢迎关注亿速云行业资讯频道。
亿速云「云服务器」,即开即用、新一代英特尔至强铂金CPU、三副本存储NVMe SSD云盘,价格低至29元/月。点击查看>>
免责声明:本站发布的内容(图片、视频和文字)以原创、转载和分享为主,文章观点不代表本网站立场,如果涉及侵权请联系站长邮箱:is@yisu.com进行举报,并提供相关证据,一经查实,将立刻删除涉嫌侵权内容。
原文链接:https://my.oschina.net/u/4581704/blog/4375717


 计算
计算 安全
安全 数据库
数据库 网络和加速
网络和加速 企业服务
企业服务


