这篇文章主要介绍“Springboot+LDAP调研日志的方法是什么”,在日常操作中,相信很多人在Springboot+LDAP调研日志的方法是什么问题上存在疑惑,小编查阅了各式资料,整理出简单好用的操作方法,希望对大家解答”Springboot+LDAP调研日志的方法是什么”的疑惑有所帮助!接下来,请跟着小编一起来学习吧!
LDAP是轻量目录访问协议,英文全称是Lightweight Directory Access Protocol,一般都简称为LDAP。它是基于X.500标准的,但是简单得多并且可以根据需要定制。与X.500不同,LDAP支持TCP/IP,这对访问Internet是必须的。LDAP的核心规范在RFC中都有定义,所有与LDAP相关的RFC都可以在LDAPman RFC网页中找到。以上内容来源于百度百科
难题
每个企业在运行过程中,会使用邮箱、考勤、CRM、ERP等系统,每个系统都需要账号去登录认证,每一个新员工入职的时候,HR需要为其开通好多个系统账号,一方面,需要开通的账号比较多,员工离职的时候再挨个去将这些账号冻结,增加了HR的工作量;另一方面,员工自己拥有这么多账号和密码,管理起来也不是很方便,聪明的需要做一个personInfo.txt去维护了。
这个时候搭建一个统一的账号认证中心,使用一个账号,可以到处登录,然后在每个系统中去分配不同的权限即可,这样就可以解决上述两个问题。
为什么用LDAP认证
是对读操作进行优化的种数据库,读操作效率高。
可以灵活的改变数据类型,增加字段不会影响到查询。
LDAP是个开放的标准协议,提供所有的程序语言的标准API接口
LDAP支持强认证方式,可以达到很高的安全别。在国际化方面,LDAP使用了UTF-8编码来存储各种语言的字符
先上官网链接 http://www.openldap.org/ 本人是在docker中启动的,如果选择在linux中启动,可以参考 https://yq.aliyun.com/articles/549058 这篇帖子
如果对docker命令不是特别熟悉,本人自己另一篇帖子可供简单了解 https://www.jianshu.com/p/af7977b1075c
拉取镜像
docker pull osixia/openldap:1.2.2
启动镜像
docker run -p 389:389 -p 689:689 --name my-openldap \
--env LDAP_ORGANISATION="my-company" --env LDAP_DOMAIN="my-company.com" --env LDAP_ADMIN_PASSWORD="123456" --detach osixia/openldap:1.2.2查看
docker ps -a
CONTAINER ID        IMAGE                   COMMAND                  CREATED             STATUS                      PORTS                                                 NAMES
d90a057443b0 osixia/openldap:1.2.2 "/container/tool/run" 47 hours ago Up 47 hours 0.0.0.0:389->389/tcp, 0.0.0.0:689->689/tcp, 636/tcp my-openldap可以看到我已经启动成功,映射出两个端口,389和689,我们的主要操作就在389上
使用客户端工具进行连接
下载地址:http://directory.apache.org/studio
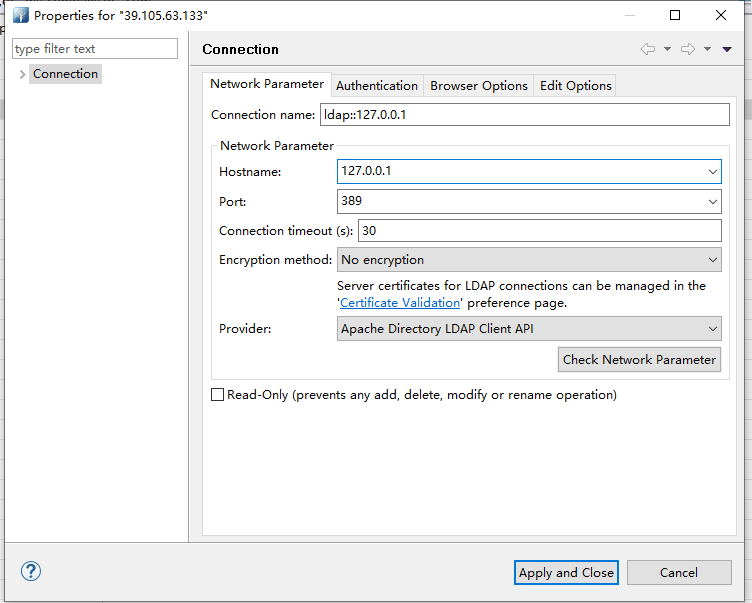
ConnectionName 是自己给这个连接起个容易记住的名字
Hostname 是自己服务器IP地址,我是本地启动的
Port 是端口,默认都是389
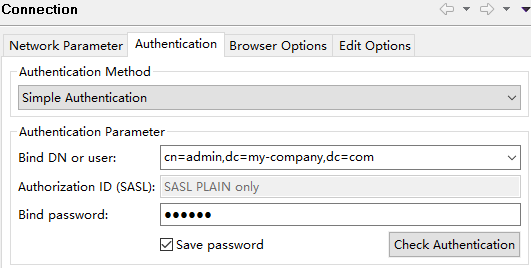
AuthenticationMethod : Simple Authentication 简单验证
Bind DN or User: cn=admin,dc=my_company,dc=com 之前设置的管理员用户名
Bind Password :设置的管理员密码
简写含义
| 属性 | 含义 | 举栗子 |
|---|---|---|
| c | Country国家 | c=chinese |
| dc | DomainComponent,常用来指一个域名的一部分 | dc=my_company,dc=com |
| cn | CommonName,一个对象的名字,如果指人,使用全名 | cn=calvin |
| ou | OrganizationalUnit 一个组织单元的名字 | ou = bj_develop(北京研发部) |
| sn | Surname,一个人的姓 | sn=赵、钱、孙、李 |
| uid | Userid,某个用户的登录名,与Linux系统中用户的uid不同 | 给一个唯一的ID |
| o | Organization 组织的名字 | o=develop |
核心Attribute
| 名称 | 描述 | 必要属性 |
|---|---|---|
| domain | ||
| organization | o | |
| organizationalUnit | ou | |
| person | sn,cn | |
| organizationPerson | cn,sn | |
| top | 抽象型,顶级ObjectClass | |
| posixAccount | Linux用户 | cn,gidNumber,homeDirectory,uid,uidNumber |
| posixGroup | Linux用户组 | cn,gidNumber |
以上资料来源https://cloud.tencent.com/developer/article/1444535
经过上面的安装,我们就算是成功启动了一个OpenLdap的服务,环境准备好了,接下来正式开始搭建项目
pom.xml
    <parent>
        <groupId>org.springframework.boot</groupId>
        <artifactId>spring-boot-starter-parent</artifactId>
        <version>1.5.14.RELEASE</version>
        <relativePath/> <!-- lookup parent from repository -->
    </parent>
    <groupId>com.calvin.ldap</groupId>
    <artifactId>ldap-test</artifactId>
    <version>0.0.1-SNAPSHOT</version>
    <name>ldap-test</name>

    <properties>
        <java.version>1.8</java.version>
    </properties>

    <dependencies>
        <dependency>
            <groupId>org.springframework.boot</groupId>
            <artifactId>spring-boot-starter</artifactId>
        </dependency>
        <!-- LDAP 相关配置-->
        <dependency>
            <groupId>org.springframework.ldap</groupId>
            <artifactId>spring-ldap-core</artifactId>
        </dependency>
        <dependency>
            <groupId>com.sun</groupId>
            <artifactId>ldapbp</artifactId>
            <version>1.0</version>
        </dependency>

        <dependency>
            <groupId>org.springframework.boot</groupId>
            <artifactId>spring-boot-starter-test</artifactId>
            <scope>test</scope>
        </dependency>
    </dependencies>

    <build>
        <plugins>
            <plugin>
                <groupId>org.springframework.boot</groupId>
                <artifactId>spring-boot-maven-plugin</artifactId>
            </plugin>
        </plugins>
</build>application.yml
calvin:
  ldap:
    url: 'ldap://127.0.0.1:389'
    base: 'dc=my-company,dc=com'
    user_dn: 'cn=admin,dc=my-company,dc=com'
password: '123456'LdapConfigruation.java
/**
 * <p>
 *     LDAP配置类
 * </p>
 * @author Calvin
 * @date 2019/10/14
 * @since 1.0
 */
@Configuration
public class LdapConfiguration {

    /**
     * 服务器地址
     */
    @Value("${calvin.ldap.url}")
    private String ldapUrl;

    /**
     * 公司、部门
     */
    @Value("${calvin.ldap.base}")
    private String baseDC;

    /**
     * 管理员用户
     */
    @Value("${calvin.ldap.user_dn}")
    private String ldapUser;

    /**
     * 管理员密码
     */
    @Value("${calvin.ldap.password}")
    private String ldapPassword;

    /**
     * LDAP环境配置
     * @return
     */
    @Bean
    public LdapContextSource ldapContextSource(){
        LdapContextSource source = new LdapContextSource();

        Map<String, Object> config = new HashMap<>();
        config.put("java.naming.ldap.attributes.binary", "objectGUID");

        source.setUrl(ldapUrl);
        source.setBase(baseDC);
        source.setPassword(ldapPassword);
        source.setUserDn(ldapUser);
        source.setPooled(true);
        source.setBaseEnvironmentProperties(config);

        return source;
    }

    /**
     * LDAP操作类的Bean定义
     * @return
     */
    @Bean
    public LdapTemplate ldapTemplate(){
        LdapTemplate ldapTemplate = new LdapTemplate();
        ldapTemplate.setContextSource(ldapContextSource());
        return ldapTemplate;
    }
}JSONObjectMapper.java
/**
 * <p>
 *     JSONObjectMapper,转换类,将Attributes转换成一个JSONObject方便接收打印
 * </p>
 *
 * @author Calvin
 * @date 2019/10/17
 * @since
 */
public class JSONObjectMapper implements AttributesMapper<JSONObject> {
    @Override
    public JSONObject mapFromAttributes(Attributes attributes) throws NamingException {
        NamingEnumeration<? extends Attribute> all = attributes.getAll();
        JSONObject jsonObject = new JSONObject();
        while (all.hasMore()){
            Attribute next = all.next();
            jsonObject.put(next.getID(),next.get());
        }
        return jsonObject;
    }
}LdapTest.java
@RunWith(SpringRunner.class)
@SpringBootTest
public class LdapTest {

    @Autowired
    private LdapTemplate ldapTemplate;

}先查询一下admin用户,确保配置正确
/**
 * 查询一下Admin用户
 */
@Test
public void test1() {
    AndFilter filter = new AndFilter();
    filter.and(new EqualsFilter("cn", "admin"));
    List search = ldapTemplate.search("", filter.encode(), new JSONObjectMapper());
    search.forEach(System.out::println);
}
上图中显示已经能正常查询admin用户,所以确定配置正确
开始创建一个组
/**
     * 添加一个组织
     */
    @Test
    public void test2(){
        BasicAttributes attributes = new BasicAttributes();
        BasicAttribute objectClass = new BasicAttribute("objectClass");
        objectClass.add("organizationalUnit");
        objectClass.add("top");
        attributes.put(objectClass);
        attributes.put("description","this is develop dept");
        LdapNameBuilder nameBuilder = LdapNameBuilder.newInstance();
        nameBuilder.add("ou","develop");
        ldapTemplate.bind(nameBuilder.build(),null, attributes);
}通过工具查看,就可以看到我们的组织已经添加好了

在这个组中添加一个员工
/**
 * 增加一个员工
 */
@Test
public void test3(){
    //设置objectClass
    BasicAttribute objectClass = new BasicAttribute("objectClass");
    objectClass.add("top");
    objectClass.add("person");
    objectClass.add("inetOrgPerson");
    objectClass.add("organizationalPerson");
    Attributes attr = new BasicAttributes();
    attr.put(objectClass);
    //设置其他属性
    attr.put("cn", "Jack");
    attr.put("sn", "Ma");
    attr.put("description", "this is first Employee");
    attr.put("userPassword", DigestUtils.md5DigestAsHex("123456".getBytes()));
    attr.put("telephoneNumber", "138 8888 8888");
    //设置dn
    LdapNameBuilder nameBuilder = LdapNameBuilder.newInstance();
    nameBuilder.add("ou","develop");
    nameBuilder.add("uid","0000001");
    //bind方法即是添加一条记录。
    ldapTemplate.bind(nameBuilder.build(), null, attr);
}工具客户端查看,员工已经添加成功 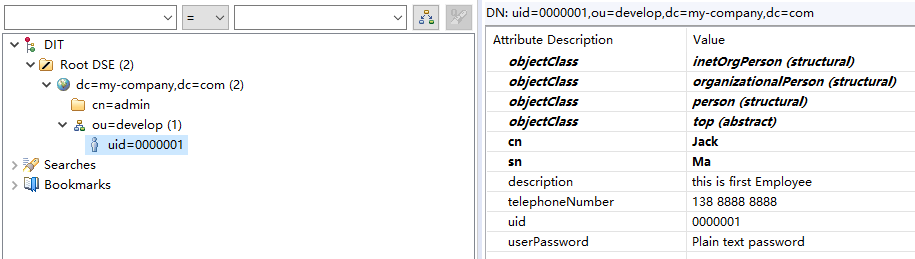
接下来我们更换uid和cn,sn,多增加几个员工
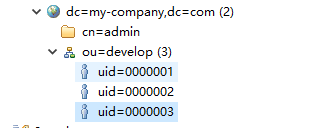
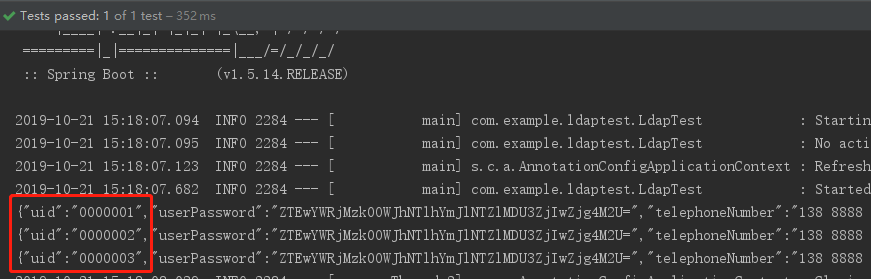
使用代码查询员工列表
/**
 * 查询develop部门下的员工
 */
@Test
public void test4(){
    AndFilter filter = new AndFilter();
    filter.and(new EqualsFilter("objectClass", "person"));
    LdapQueryBuilder queryBuilder = LdapQueryBuilder.query();
    List search = ldapTemplate.search(queryBuilder.base("ou=develop").filter(filter), new JSONObjectMapper());
    search.forEach(System.out::println);
}
使用创建的用户登录
 /**
  * 尝试登陆
  */
 @Test
 public void test5(){
     AndFilter filter = new AndFilter();
     filter.and(new EqualsFilter("objectClass", "person"));
     boolean isSuccess = ldapTemplate.authenticate("uid=0000001,ou=develop",
             filter.encode(), DigestUtils.md5DigestAsHex("123456".getBytes()));
     System.out.println(isSuccess);
}到此,关于“Springboot+LDAP调研日志的方法是什么”的学习就结束了,希望能够解决大家的疑惑。理论与实践的搭配能更好的帮助大家学习,快去试试吧!若想继续学习更多相关知识,请继续关注亿速云网站,小编会继续努力为大家带来更多实用的文章!
亿速云「云服务器」,即开即用、新一代英特尔至强铂金CPU、三副本存储NVMe SSD云盘,价格低至29元/月。点击查看>>
免责声明:本站发布的内容(图片、视频和文字)以原创、转载和分享为主,文章观点不代表本网站立场,如果涉及侵权请联系站长邮箱:is@yisu.com进行举报,并提供相关证据,一经查实,将立刻删除涉嫌侵权内容。
原文链接:https://my.oschina.net/devilsblog/blog/3120194


 计算
计算 安全
安全 数据库
数据库 网络和加速
网络和加速 企业服务
企业服务


