这篇文章主要介绍“MyBatis编写hello world代码的方法”,在日常操作中,相信很多人在MyBatis编写hello world代码的方法问题上存在疑惑,小编查阅了各式资料,整理出简单好用的操作方法,希望对大家解答”MyBatis编写hello world代码的方法”的疑惑有所帮助!接下来,请跟着小编一起来学习吧!
准备 SQL 脚本
下载需要的依赖 jar 包
准备日志配置文件 & jdbc 配置
编写 hello world
这里我使用的数据库是 MySQL 7 版本 。表设计了 student (学生表) , course (课程表),score(分数表)脚本如下:
SET NAMES utf8mb4;
SET FOREIGN_KEY_CHECKS = 0;

-- ----------------------------
-- Table structure for course
-- ----------------------------
DROP TABLE IF EXISTS `course`;
CREATE TABLE `course`  (
  `course_id` int(10) UNSIGNED NOT NULL AUTO_INCREMENT,
  `name` varchar(255) CHARACTER SET utf8mb4 COLLATE utf8mb4_general_ci NOT NULL DEFAULT '',
  PRIMARY KEY (`course_id`) USING BTREE
) ENGINE = InnoDB CHARACTER SET = utf8mb4 COLLATE = utf8mb4_general_ci ROW_FORMAT = Dynamic;

-- ----------------------------
-- Records of course
-- ----------------------------
INSERT INTO `course` VALUES (1, '仁德');
INSERT INTO `course` VALUES (2, '霸道');
INSERT INTO `course` VALUES (3, '兵法');
INSERT INTO `course` VALUES (4, '骑马');
INSERT INTO `course` VALUES (5, '射箭');
INSERT INTO `course` VALUES (6, '防御');
INSERT INTO `course` VALUES (7, '青龙偃月刀');
INSERT INTO `course` VALUES (8, '丈八蛇矛');
INSERT INTO `course` VALUES (9, '长枪');
INSERT INTO `course` VALUES (10, '制衡');
INSERT INTO `course` VALUES (11, '医术');
INSERT INTO `course` VALUES (12, '观星');
INSERT INTO `course` VALUES (13, '天文');
INSERT INTO `course` VALUES (14, '地理');
INSERT INTO `course` VALUES (15, '兵器');
INSERT INTO `course` VALUES (16, '双股剑');
INSERT INTO `course` VALUES (17, '龙胆');
INSERT INTO `course` VALUES (18, '铁骑');

-- ----------------------------
-- Table structure for score
-- ----------------------------
DROP TABLE IF EXISTS `score`;
CREATE TABLE `score`  (
  `score_id` int(11) UNSIGNED NOT NULL AUTO_INCREMENT,
  `student_id` int(10) UNSIGNED NOT NULL,
  `course_id` int(10) UNSIGNED NOT NULL,
  `score` decimal(65, 0) UNSIGNED NOT NULL,
  PRIMARY KEY (`score_id`) USING BTREE
) ENGINE = InnoDB CHARACTER SET = utf8mb4 COLLATE = utf8mb4_general_ci ROW_FORMAT = Dynamic;

-- ----------------------------
-- Records of score
-- ----------------------------
INSERT INTO `score` VALUES (1, 1, 7, 99);
INSERT INTO `score` VALUES (2, 2, 8, 95);
INSERT INTO `score` VALUES (3, 3, 17, 99);
INSERT INTO `score` VALUES (4, 4, 5, 90);
INSERT INTO `score` VALUES (5, 5, 18, 96);
INSERT INTO `score` VALUES (6, 5, 9, 90);
INSERT INTO `score` VALUES (7, 4, 9, 96);
INSERT INTO `score` VALUES (8, 6, 1, 99);
INSERT INTO `score` VALUES (9, 6, 3, 60);
INSERT INTO `score` VALUES (10, 6, 16, 80);
INSERT INTO `score` VALUES (11, 7, 12, 96);
INSERT INTO `score` VALUES (12, 7, 13, 93);
INSERT INTO `score` VALUES (13, 7, 14, 98);
INSERT INTO `score` VALUES (14, 8, 12, 96);
INSERT INTO `score` VALUES (15, 9, 10, 91);
INSERT INTO `score` VALUES (16, 10, 2, 99);
INSERT INTO `score` VALUES (17, 10, 3, 95);
INSERT INTO `score` VALUES (18, 11, 11, 100);
INSERT INTO `score` VALUES (19, 12, 15, 93);

-- ----------------------------
-- Table structure for student
-- ----------------------------
DROP TABLE IF EXISTS `student`;
CREATE TABLE `student`  (
  `student_id` int(11) UNSIGNED NOT NULL AUTO_INCREMENT,
  `name` varchar(255) CHARACTER SET utf8mb4 COLLATE utf8mb4_general_ci NOT NULL,
  `sex` varchar(255) CHARACTER SET utf8mb4 COLLATE utf8mb4_general_ci NOT NULL,
  `age` tinyint(4) UNSIGNED NOT NULL,
  `create_time` datetime(0) NOT NULL ON UPDATE CURRENT_TIMESTAMP(0),
  `modify_time` datetime(0) NOT NULL ON UPDATE CURRENT_TIMESTAMP(0),
  PRIMARY KEY (`student_id`) USING BTREE
) ENGINE = InnoDB CHARACTER SET = utf8mb4 COLLATE = utf8mb4_general_ci ROW_FORMAT = Dynamic;

-- ----------------------------
-- Records of student
-- ----------------------------
INSERT INTO `student` VALUES (1, '关羽', '男', 55, '2019-10-31 10:23:50', '2019-10-31 10:23:52');
INSERT INTO `student` VALUES (2, '张飞', '男', 52, '2019-10-31 10:25:50', '2019-10-31 10:25:50');
INSERT INTO `student` VALUES (3, '赵云', '男', 50, '2019-10-31 10:24:37', '2019-10-31 10:24:39');
INSERT INTO `student` VALUES (4, '黄忠', '男', 60, '2019-10-31 10:25:06', '2019-10-31 10:25:08');
INSERT INTO `student` VALUES (5, '马超', '男', 40, '2019-10-31 10:25:23', '2019-10-31 10:25:27');
INSERT INTO `student` VALUES (6, '刘备', '男', 55, '2019-10-31 10:25:43', '2019-10-31 10:25:46');
INSERT INTO `student` VALUES (7, '诸葛亮', '男', 30, '2019-10-31 10:26:05', '2019-10-31 10:26:07');
INSERT INTO `student` VALUES (8, '郭嘉', '男', 25, '2019-10-31 10:26:32', '2019-10-31 10:26:35');
INSERT INTO `student` VALUES (9, '孙权', '男', 27, '2019-10-31 10:26:51', '2019-10-31 10:26:53');
INSERT INTO `student` VALUES (10, '曹操', '男', 60, '2019-10-31 10:27:08', '2019-10-31 10:27:10');
INSERT INTO `student` VALUES (11, '华佗', '男', 70, '2019-10-31 10:27:23', '2019-10-31 10:27:25');
INSERT INTO `student` VALUES (12, '孙尚香', '女', 25, '2019-10-31 10:27:42', '2019-10-31 10:27:45');

SET FOREIGN_KEY_CHECKS = 1;
这里我使用的项目构建工具是 maven , 以下代码只选取 dependencies 标签部分 :
<dependencies>
        <dependency>
            <groupId>org.mybatis</groupId>
            <artifactId>mybatis</artifactId>
            <version>3.5.3</version>
        </dependency>

        <dependency>
            <groupId>junit</groupId>
            <artifactId>junit</artifactId>
            <version>4.12</version>
            <scope>test</scope>
        </dependency>

        <dependency>
            <groupId>org.projectlombok</groupId>
            <artifactId>lombok</artifactId>
            <version>1.18.10</version>
            <scope>provided</scope>
        </dependency>

        <dependency>
            <groupId>mysql</groupId>
            <artifactId>mysql-connector-java</artifactId>
            <version>6.0.6</version>
        </dependency>

        <dependency>
            <groupId>log4j</groupId>
            <artifactId>log4j</artifactId>
            <version>1.2.17</version>
        </dependency>

        <dependency>
            <groupId>org.slf4j</groupId>
            <artifactId>slf4j-api</artifactId>
            <version>1.7.28</version>
        </dependency>

    </dependencies>
log4j.rootLogger=TRACE, stdout
log4j.appender.stdout=org.apache.log4j.ConsoleAppender
log4j.appender.stdout.layout=org.apache.log4j.PatternLayout
log4j.appender.stdout.layout.ConversionPattern=%-d{yyyy-MM-dd HH:mm:ss.SSS} [%t] -[%c] -[%p]%m%n

log4j.logger.org.apache.ibatis=TRACEjdbc.driver=com.mysql.cj.jdbc.Driver jdbc.url=jdbc:mysql://localhost:3306/mybatis-demo?characterEncoding=utf8&allowMultiQueries=true&useSSL=false&serverTimezone=Asia/Shanghai jdbc.user=xxx jdbc.password=xxx
注意使用 mysql-connector-java 6 以上版本的时候需要指定serverTimezone 参数,否则启动时会报错。
package org.hepeng.demo.mybatis.entity;

import lombok.Data;

import java.util.Date;

/**
 * @author he peng
 */


@Data
public class Student {

    private Integer studentId;
    private String name;
    private String sex;
    private Byte age;
    private Date createTime;
    private Date modifyTime;

}package org.hepeng.demo.mybatis.entity;
import lombok.Data;
/**
* @author he peng
*/
@Data
public class Course {
private Integer courseId;
private String name;
}package org.hepeng.demo.mybatis.entity;
import lombok.Data;
/**
* @author he peng
*/
@Data
public class Score {
private Integer scoreId;
private Integer studentId;
private Integer courseId;
private Double score;
}<?xml version="1.0" encoding="UTF-8" ?>
<!DOCTYPE configuration
PUBLIC "-//mybatis.org//DTD Config 3.0//EN"
"http://mybatis.org/dtd/mybatis-3-config.dtd">
<configuration>
<!-- 加载 jdbc.properties 配置文件 -->
<properties resource="jdbc.properties" />
<settings>
<!-- 指定日志的实现使用 log4j -->
<setting name="logImpl" value="LOG4J"/>
</settings>
<environments default="development">
<environment id="development">
<transactionManager type="JDBC"/>
<dataSource type="POOLED">
<property name="driver" value="${jdbc.driver}"/>
<property name="url" value="${jdbc.url}"/>
<property name="username" value="${jdbc.user}"/>
<property name="password" value="${jdbc.password}"/>
</dataSource>
</environment>
</environments>
<mappers>
<mapper resource="mapper/StudentMapper.xml" />
</mappers>
</configuration><?xml version="1.0" encoding="UTF-8" ?> <!DOCTYPE mapper PUBLIC "-//mybatis.org//DTD Mapper 3.0//EN" "http://mybatis.org/dtd/mybatis-3-mapper.dtd"> <!-- namespace 可以随意指定但是要保证同一个 JVM 内 , namespace.id 拼接起来后的唯一性 --> <mapper namespace="Student"> <select id="selectAll" resultType="org.hepeng.demo.mybatis.entity.Student"> select * from student </select> </mapper>
package org.hepeng.demo.mybatis;

import lombok.extern.slf4j.Slf4j;
import org.apache.ibatis.io.Resources;
import org.apache.ibatis.session.SqlSessionFactory;
import org.apache.ibatis.session.SqlSessionFactoryBuilder;
import org.junit.Assert;
import org.junit.Before;

import java.io.InputStream;
import java.util.List;

/**
 * @author he peng
 */

@Slf4j
public class Test {

    SqlSessionFactory sqlSessionFactory;

    @Before
    public void sqlSessionFactory() throws Exception {
        InputStream inputStream = Resources.getResourceAsStream("mybatis-config.xml");
        sqlSessionFactory = new SqlSessionFactoryBuilder().build(inputStream);
    }

    @org.junit.Test
    public void helloWorld() {

        // sqlId = mapper.xml 中的 namespace.id
        String sqlId = "Student.selectAll";
        List<Object> list = sqlSessionFactory.openSession(true).selectList(sqlId);
        Assert.assertNotNull(list);
        Assert.assertFalse(list.isEmpty());
        log.info("{}" , list);
    }
}
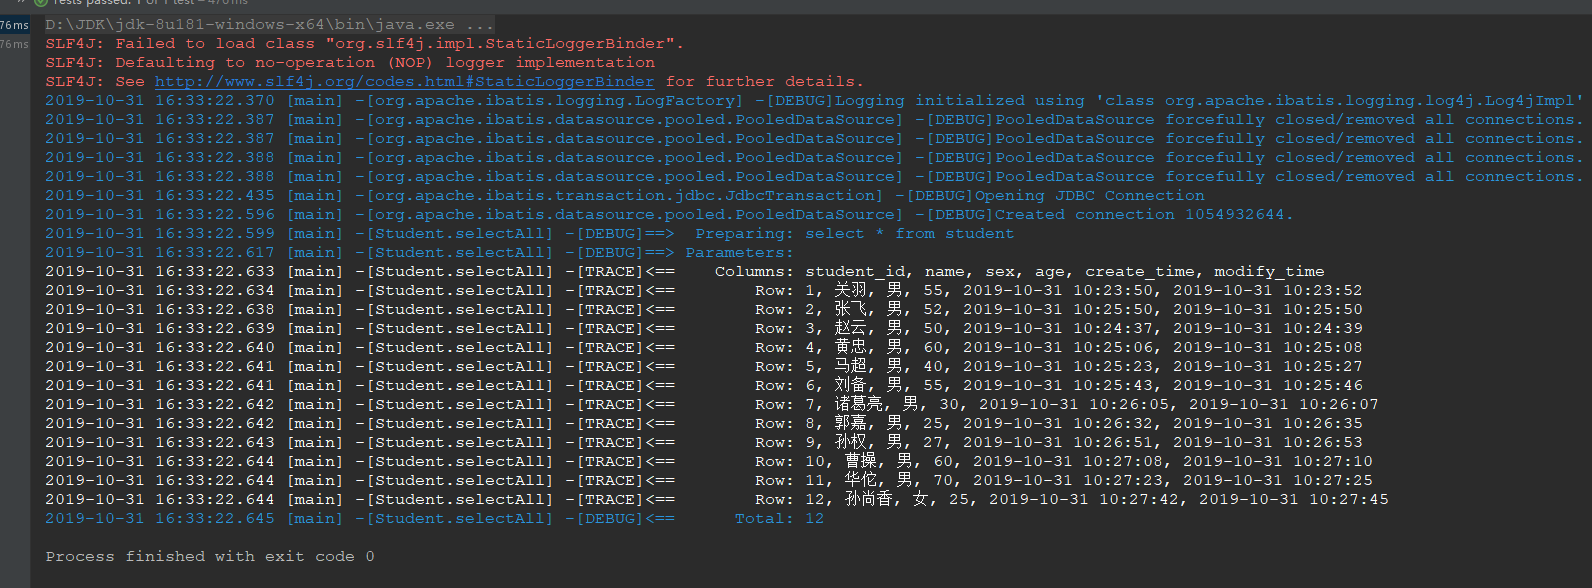
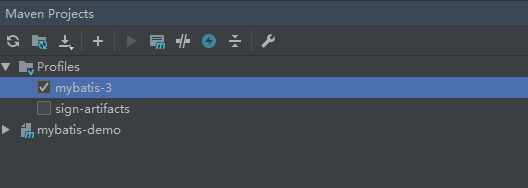
经过以上这几步骤我们就完成了 mybatis hello world 的代码编写,经过测试成功运行。通过观察输出的日志也可以分析出 mybatis 的一些行为,认真仔细观察日志也是学习的一种不错的方法。完整代码在码云 https://gitee.com/kernelHP/java-demo 目录中的 mybatis-demo 下 ,编译前先选择 maven profile , 如图 : 
这样做是为了方便测试不同的 mybatis 版本。这个 demo 使用的是 jdk 1.8 , 如果你的机器上没有安装 jdk 1.8 可以从这里下载到 https://jdk.java.net/ .
到此,关于“MyBatis编写hello world代码的方法”的学习就结束了,希望能够解决大家的疑惑。理论与实践的搭配能更好的帮助大家学习,快去试试吧!若想继续学习更多相关知识,请继续关注亿速云网站,小编会继续努力为大家带来更多实用的文章!
免责声明:本站发布的内容(图片、视频和文字)以原创、转载和分享为主,文章观点不代表本网站立场,如果涉及侵权请联系站长邮箱:is@yisu.com进行举报,并提供相关证据,一经查实,将立刻删除涉嫌侵权内容。