Spring Boot与日志SLF4J的操作方法,针对这个问题,这篇文章详细介绍了相对应的分析和解答,希望可以帮助更多想解决这个问题的小伙伴找到更简单易行的方法。
市面上的日志框架:
| 日志门面(日志的抽象层) | 日志实现 |
|---|---|
| JCL(Jakarta Commons Logging)SLF4J(Simple Logging Facade for Java) Jboss-logging | Log4j JUL(java.util.logging) Log4j2 Logback |
左边选一个门面,右边选一个实现(加粗的是同一人所写,Logback比Log4j更加新)
日志门面:SLF4J
日志实现:Logback
Spring Boot:底层使用Spring框架,Spring框架默认使用JCL;
Spring Boot选用SLF4J和Logback;
以后开发的时候,日志方法的调用,不应该直接调用日志的实现类,而是应该调用日志抽象层的方法
应该给系统中导入slf4j的jar包和logback的实现jar包
import org.slf4j.Logger;
import org.slf4j.LoggerFactory;

public class HelloWorld {
    public static void main(String[] args) {
        Logger logger = LoggerFactory.getLogger(HelloWorld.class);
        logger.info("Hello World!");
    }
}
public static Logger getLogger(String name) {
ILoggerFactory iLoggerFactory = getILoggerFactory();
return iLoggerFactory.getLogger(name);
}
public static Logger getLogger(Class<?> clazz) {
Logger logger = getLogger(clazz.getName());
if (DETECT_LOGGER_NAME_MISMATCH) {
Class<?> autoComputedCallingClass = Util.getCallingClass();
if (autoComputedCallingClass != null && nonMatchingClasses(clazz, autoComputedCallingClass)) {
Util.report(String.format("Detected logger name mismatch. Given name: \"%s\"; computed name: \"%s\".", logger.getName(), autoComputedCallingClass.getName()));
Util.report("See http://www.slf4j.org/codes.html#loggerNameMismatch for an explanation");
}
}
return logger;
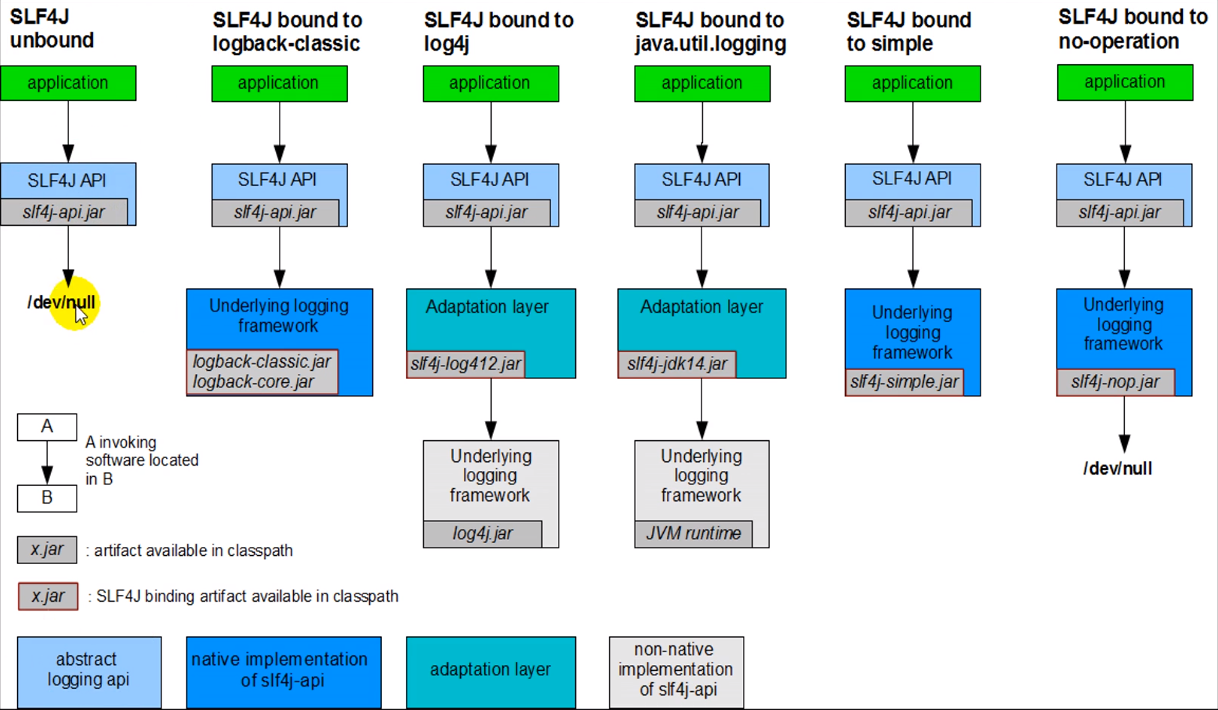
}图示:

每一个日志框架都有自己的配置文件格式,使用slf4j之后,仍然需要使用各日志实现框架的配置文件进行配置
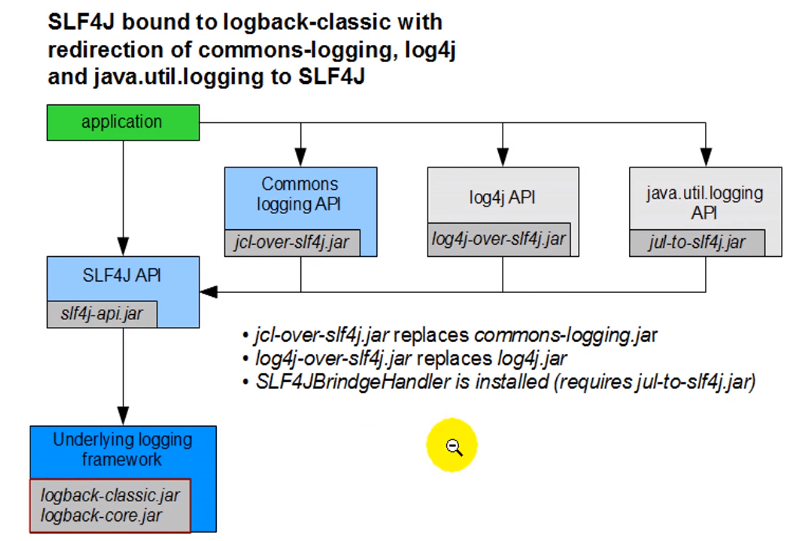
同一个项目中使用了很多框架,各框架使用的日志实现肯定会出现不同,如何统一使用slf4j + logback统一进行日志输出呢?
将系统中其他日志框架先排除出去
用中间包来替换原有的日志框架
导入slf4j的其他的实现
 slf4j" title="log4j --> slf4j">

总结:
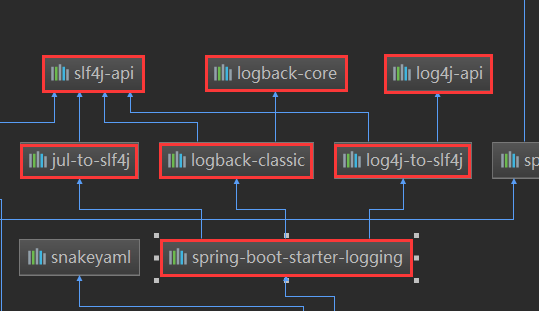
spring boot底层也使用slf4j + logback的方式实现
spring boot把其他日志都替换成了slf4j
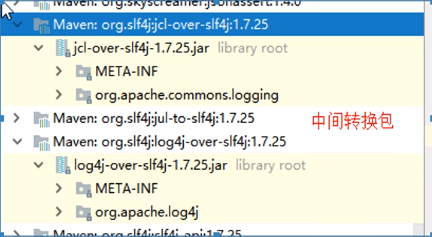
中间替换包
转换示例:

如果我们要引入其他框架,我们一定要排除原来的框架
SpringBoot默认帮我们配置好了日志模块;
SpringBoot日志记录的调用方式:
//记录器
Logger logger = LoggerFactory.getLogger(SpringBoot03LoggingApplication.class);

@Test
public void contextLoads() {
    //System.out.println("");
    //日志的级别,级别由低到高trace<debug<info<warn<error
    //可以调整输出的日志级别,日志只会输出当前级别及更高级别的日志
    logger.trace("这是trace日志...");
    logger.debug("这是debug日志...");
    logger.info("这是info日志...");//SpringBoot默认日志级别为info(root级别),没有指定日志级别的,默认使用root级别
    logger.warn("这是warn日志...");
    logger.error("这是error日志...");
}
SpringBoot修改日志的默认配置:
#日志级别配置项,可以指定到具体的包或者类
logging.level.com.qiang.springboot=debug

#日志文件名,如不指定路径,则默认生成在当前项目根目录下
#也可以指定具体的生成路径
#logging.file=springboot.log
#logging.file=F:/WorkspaceIDEA/logs/springboot.log

#日志生成路径,在指定路径下生成日志文件,文件默认名称为spring.log
#此设置和logging.file冲突,如果二者同时出现,则logging.file生效
logging.path=F:/WorkspaceIDEA/logs

#日志输出格式
#console指控制台的日志格式,file指日志文件的日志格式
logging.pattern.console=%d{yyyy-MM-dd} [%thread] %-5level %logger{50} - %msg%n
logging.pattern.file=%d{yyyy-MM-dd HH:mm:ss.SSS} | %thread | %-5level | %logger{50} | %msg%
logging.file | logging.path | Example | Description |
|---|---|---|---|
| (none) | (none) | Console only logging. | |
| Specific file | (none) | my.log | Writes to the specified log file. Names can be an exact location or relative to the current directory. |
| (none) | Specific directory | /var/log | Writes spring.log to the specified directory. Names can be an exact location or relative to the current directory. |
在类路径下放每个日志框架自己的配置文件即可;SpringBoot就不使用默认的日志配置了
| Logging System | Customization |
|---|---|
| Logback | logback-spring.xml, logback-spring.groovy, logback.xml, or logback.groovy |
| Log4j2 | log4j2-spring.xml or log4j2.xml |
| JDK (Java Util Logging) | logging.properties |
SpringBoot推荐使用logback-spring.xml进行配置**,因为:
logback.xml 直接就被日志框架识别了,无法使用更多的扩展特性
logback-spring.xml:日志框架就无法识别此配置文件,而由SpringBoot框架解析配置,这样就可以使用SpringBoot的高级特性了,如springProfile特性
<springProfile name="staging">
	<!-- configuration to be enabled when the "staging" profile is active -->
    <!-- 可以指定某段配置只在某个环境下生效,类似yml配置文件中的段 -->
</springProfile>

<springProfile name="dev | staging">
	<!-- configuration to be enabled when the "dev" or "staging" profiles are active -->
</springProfile>

<springProfile name="!production">
	<!-- configuration to be enabled when the "production" profile is not active -->
</springProfile>
可以根据slf4j的日志适配图,进行相关的切换
另外,如果想使用log4j2,可以使用如下的方式进行
<dependency>
    <groupId>org.springframework.boot</groupId>
    <artifactId>spring-boot-starter-web</artifactId>
    <exclusions>
        <exclusion>
            <artifactId>spring-boot-starter-logging</artifactId>
            <groupId>org.springframework.boot</groupId>
        </exclusion>
    </exclusions>
</dependency>

<dependency>
    <groupId>org.springframework.boot</groupId>
    <artifactId>spring-boot-starter-log4j2</artifactId>
</dependency>
关于Spring Boot与日志SLF4J的操作方法问题的解答就分享到这里了,希望以上内容可以对大家有一定的帮助,如果你还有很多疑惑没有解开,可以关注亿速云行业资讯频道了解更多相关知识。
免责声明:本站发布的内容(图片、视频和文字)以原创、转载和分享为主,文章观点不代表本网站立场,如果涉及侵权请联系站长邮箱:is@yisu.com进行举报,并提供相关证据,一经查实,将立刻删除涉嫌侵权内容。