这期内容当中小编将会给大家带来有关Springboot2.X如何解决单点登陆,文章内容丰富且以专业的角度为大家分析和叙述,阅读完这篇文章希望大家可以有所收获。
<dependency>
    <groupId>com.majiaxueyuan</groupId>
    <artifactId>sso-core</artifactId>
    <version>1.2.2</version>
</dependency>由于使用的是springboot2.2.0版本,所以配置需要实现WebMvcConfigurer
import com.majiaxueyuan.sso.core.filter.MaJiaSSOIntercepter;
import org.springframework.context.annotation.Bean;
import org.springframework.context.annotation.Configuration;
import org.springframework.web.servlet.config.annotation.InterceptorRegistry;
import org.springframework.web.servlet.config.annotation.WebMvcConfigurer;

/**
 * @Author:MuJiuTian
 * @Description: 单点登陆配置WebMvcConfigurer
 * @Date: Created in 下午5:34 2019/10/21
 */
@Configuration
public class SsoConfig implements WebMvcConfigurer {

    @Override
    public void addInterceptors(InterceptorRegistry registry) {
        registry.addInterceptor(ssoIntercepter()).addPathPatterns("/**");
    }

    @Bean
    public MaJiaSSOIntercepter ssoIntercepter() {
        return new MaJiaSSOIntercepter().setTokenSalt("pwd_salt");
    }
}如果是其他版本可以使用集成WebMvcConfigurerAdapter
import com.majiaxueyuan.sso.core.filter.MaJiaSSOIntercepter;
import org.springframework.context.annotation.Bean;
import org.springframework.context.annotation.Configuration;
import org.springframework.web.servlet.config.annotation.InterceptorRegistry;
import org.springframework.web.servlet.config.annotation.WebMvcConfigurerAdapter;

/**
 * @Author:MuJiuTian
 * @Description: 单点登陆配置WebMvcConfigurerAdapter
 * @Date: Created in 下午5:34 2019/10/21
 */
@Configuration
public class SsoConfig extends WebMvcConfigurerAdapter {

    @Override
    public void addInterceptors(InterceptorRegistry registry) {
        registry.addInterceptor(ssoIntercepter()).addPathPatterns("/**");
    }

    @Bean
    public MaJiaSSOIntercepter ssoIntercepter() {
        return new MaJiaSSOIntercepter().setTokenSalt("pwd_salt");
    }
}@Data
@AllArgsConstructor
@NoArgsConstructor
public class User {
private int userId;
private String slat;
private String account;
// ....其他的字段就不写了
}/**
* @Author:MuJiuTian
* @Description: 简单测试,我就不写接口了,直接以class的形式
* @Date: Created in 下午5:47 2019/10/21
*/
@Service
public class LoginService {
public User checkUser(String account, String pwd){
// 做假数据,加入密码登陆成功,返回user实体类
return new User(1,account,"ewdsbj");
}
}import com.majiaxueyuan.sso.core.annotation.NoToken;
import com.majiaxueyuan.sso.core.constans.Result;
import com.majiaxueyuan.sso.core.helper.TokenLoginHelper;
import org.springframework.beans.factory.annotation.Autowired;
import org.springframework.web.bind.annotation.GetMapping;
import org.springframework.web.bind.annotation.RestController;
/**
* @Author:MuJiuTian
* @Description: 测试单点登录框架
* @Date: Created in 下午5:25 2019/10/21
*/
@RestController
public class LoginController {
@Autowired
LoginService loginService;
@GetMapping(value = "/testToken")
public String testToken() {
return "需要token";
}
@GetMapping(value = "/login")
@NoToken(notNeedToken = true)
public String login(String account, String password) {
// 测试用户输入的用户名、密码是否正确
User user = loginService.checkUser(account, password);
if (user == null){
return "密码错误";
}
// 如果密码成功后,获取用户主键id、以及注册时的salt
Long user_id = Long.valueOf(user.getUserId());
String salt = user.getSlat();
// 然后通过sso-core框架获取token
Result loginSuccess = TokenLoginHelper.loginSuccess(user_id,account,"",salt);
// 获取token
String token = "";
if (loginSuccess.getCode() == 200){
token = loginSuccess.getData().toString();
}
return token;
}
}测试接口1:
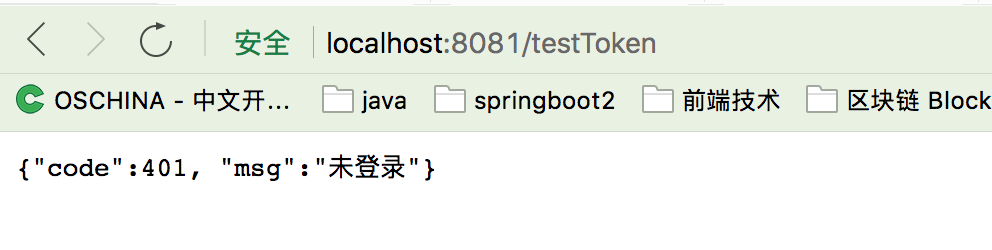
测试接口2:

用户获取到Token之后,返回给前端,前端携带时需要将Token添加到Header中的Authorization字段。当前强制使用此请求头字段,这些数据存储headers中带过来检测token是否过期或者登陆...情况。
SSOUser user = (SSOUser) request.getAttribute("ssoUser");当有某个请求不需要认证即可访问时,在此请求方法上添加注解@NoToken,不加注解需要验证,只要加上注解就表示不需要认证,不管@NoToken(notNeedToken = true)还是@NoToken(notNeedToken = false),都不需要验证,至少在目前最新1.2.2版本是这样。
上述就是小编为大家分享的Springboot2.X如何解决单点登陆了,如果刚好有类似的疑惑,不妨参照上述分析进行理解。如果想知道更多相关知识,欢迎关注亿速云行业资讯频道。
亿速云「云服务器」,即开即用、新一代英特尔至强铂金CPU、三副本存储NVMe SSD云盘,价格低至29元/月。点击查看>>
免责声明:本站发布的内容(图片、视频和文字)以原创、转载和分享为主,文章观点不代表本网站立场,如果涉及侵权请联系站长邮箱:is@yisu.com进行举报,并提供相关证据,一经查实,将立刻删除涉嫌侵权内容。
原文链接:https://my.oschina.net/mdxlcj/blog/3120348


 计算
计算 安全
安全 数据库
数据库 网络和加速
网络和加速 企业服务
企业服务


