жӮЁеҘҪпјҢзҷ»еҪ•еҗҺжүҚиғҪдёӢи®ўеҚ•е“ҰпјҒ
жӮЁеҘҪпјҢзҷ»еҪ•еҗҺжүҚиғҪдёӢи®ўеҚ•е“ҰпјҒ
иҝҷзҜҮж–Үз« дё»иҰҒи®Іи§ЈдәҶвҖңCSS+JSжҖҺд№ҲеҲ¶дҪңзҡ®еҚЎдёҳеҠЁз”»вҖқпјҢж–Үдёӯзҡ„и®Іи§ЈеҶ…е®№з®ҖеҚ•жё…жҷ°пјҢжҳ“дәҺеӯҰд№ дёҺзҗҶи§ЈпјҢдёӢйқўиҜ·еӨ§е®¶и·ҹзқҖе°Ҹзј–зҡ„жҖқи·Ҝж…ўж…ўж·ұе…ҘпјҢдёҖиө·жқҘз ”з©¶е’ҢеӯҰд№ вҖңCSS+JSжҖҺд№ҲеҲ¶дҪңзҡ®еҚЎдёҳеҠЁз”»вҖқеҗ§пјҒ
еҲ©з”Ё transparentз”»еҮәеҗҲйҖӮзҡ„дёүи§’еҪў
.nose {
  position: absolute;
  border: 10px solid black;
  border-color: black transparent transparent;
  border-bottom: none;
  left: 50%;
  top: 145px;
  margin-left: -10px;
}еҶҚз”»еҮәдёүи§’еҪўдёҠйқўзҡ„еҚҠеңҶе…ұеҗҢз»„жҲҗжүҮеҪў
.yuan {
  position: absolute;
  height: 8px;
  width: 20px;
  top: -18px;
  left: -10px;
  border-radius: 8px 8px 0 0;
  background-color: black;
}.eye {
position: absolute;
border: 2px solid #000000;
width: 64px;
height: 64px;
left: 50%;
top: 100px;
margin-left: -32px;
border-radius: 50%;
background-color: #2e2e2e;
}
.eye.left {
transform: translateX(-118px);
}
.eye.right {
transform: translateX(118px);
}еҶҚз”»еҮәй»‘зңјзқӣйҮҢйқўзҡ„зҷҪзңјзқӣ
.eye::after {
  content: "";
  display: block;
  position: absolute;
  border: 2px solid black;
  background: #ffffff;
  width: 30px;
  height: 30px;
  border-radius: 50%;
  left: 10px;
}еҲ¶дҪңе·Ұиҫ№ lip
.mouth .up .lip.left {
  border: 3px solid black;
  width: 86px;
  height: 24px;
  border-radius: 0 0 0 50px;
  border-top-color: transparent;
  border-right-color: transparent;
  position: relative;
  transform: rotate(-15deg);
  position: absolute;
  left: 50%;
  margin-left: -50%;
}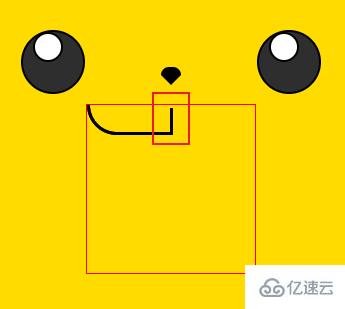
然еҗҺз”ЁдјӘе…ғзҙ йҒ®дҪҸйј»еӯҗдёӢж–№зҡ„й»‘иүІз«–зәҝ
.mouth .up .lip.left::before {
  content: "";
  display: block;
  width: 5px;
  height: 30px;
  position: absolute;
  right: -4px;
  bottom: 0px;
  background-color: #ffdb00;
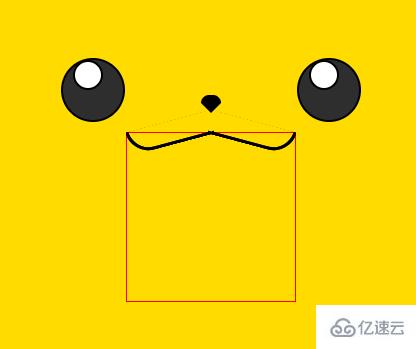
}еҗҢж ·еҺҹзҗҶеҲ¶дҪңеҸі lip
.mouth .up .lip.right {
  border: 3px solid black;
  width: 86px;
  height: 24px;
  border-radius: 0 0 50px 0;
  border-top-color: transparent;
  border-left-color: transparent;
  position: relative;
  transform: rotate(15deg);
  position: absolute;
  right: 50%;
  margin-right: -50%;
}
.mouth .up .lip.right::before {
content: "";
display: block;
width: 5px;
height: 30px;
position: absolute;
left: -4px;
bottom: 0px;
background-color: #ffdb00;
}
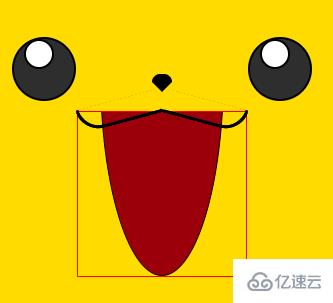
еҲ¶дҪңдёӢеҳҙе”Ү
.mouth .down {
  border: 1px solid red;
  height: 166px;
  width: 100%;
  position: relative;
  overflow: hidden;
}

.mouth .down .yuan1 {
  border: 1px solid black;
  position: absolute;
  width: 124px;
  height: 1000px;
  left: 50%;
  margin-left: -62px;
  bottom: 0;
  border-radius: 85px/280px;
  background: #9b000a;
}
然еҗҺеңЁ .mouth .up .lip дёӯ еҠ е…Ҙе’Ң body дёҖж ·зҡ„иғҢжҷҜ 然еҗҺз”»йҮҢйқўзҡ„йғЁеҲҶе’Ңзәўи„ёйўҠ
.mouth .down .yuan1 .yuan2 {
  border: 1px solid red;
  position: absolute;
  width: 150px;
  height: 300px;
  background: #fa595b;
  left: 50%;
  margin-left: -75px;
  bottom: -165px;
  border-radius: 100px;
}

.face {
  border: 3px solid black;
  position: absolute;
  width: 88px;
  height: 88px;
  left: 50%;
  margin-left: -44px;
  top: 210px;
}
.face.left {
  transform: translateX(-166px);
  border-radius: 50%;
  background: #ff0000;
}
.face.right {
  transform: translateX(166px);
  border-radius: 50%;
  background: #ff0000;
}з»ҷйј»еӯҗж·»еҠ еҠЁз”»ж•Ҳжһң
@keyframes wave {
  0% {
    transform: rotate(0);
  }
  33% {
    transform: rotate(6deg);
  }
  66% {
    transform: rotate(-6deg);
  }
  100% {
    transform: rotate(0);
  }
}
.nose:hover {
  transform-origin: center bottom;
  animation: wave 220ms infinite linear;
}и®©дёҖдёӘж•°еӯ—иҮӘеҠЁдёҖзӣҙеҠ 1
ж–°е»әдёҖдёӘ test.html е’Ң test.js
еңЁ test.html дёӯеҶҷдёҖдёӘ id дёә demo зҡ„ div
let n = 1;
demo.innerHTML = n;
setInterval(() => {
  n += 1;
  demo.innerHTML = n;
}, 1000);дёӢйқўе°ұеҸҜд»ҘеҶҷдёҖж®өиҜқпјҢдёҖдёӘеӯ—дёҖдёӘеӯ—зҡ„еҮәзҺ°
const string = "еӨ§е®¶еҘҪпјҢжҲ‘жҳҜдҪ 们зҡ„иҖҒжңӢеҸӢ";
let n = 1;
demo.innerHTML = string.substr(0, n);
setInterval(() => {
n += 1;
demo.innerHTML = string.substr(0, n);
}, 300);дҪҶжҳҜдёҠйқўд»Јз ҒиҝҳеӯҳеңЁ bug пјҢжү“еҮә n пјҢдјҡеҸ‘зҺ°еҪ“еӯ—жҳҫзӨәе®ҢдәҶд№ӢеҗҺпјҢn иҝҳжҳҜдёҖзӣҙеўһеҠ пјҢжҲ‘们еҸӘйңҖиҰҒеңЁжҳҫзӨәе®Ңеӯ—д№ӢеҗҺеҸ–ж¶Ҳи®Ўж—¶еҷЁеҚіеҸҜпјҢеҸ–ж¶Ҳи®Ўж—¶еҷЁж–№жі•еҰӮдёӢ
const string = "еӨ§е®¶еҘҪпјҢжҲ‘жҳҜдҪ 们зҡ„иҖҒжңӢеҸӢ";
let n = 1;
demo.innerHTML = string.substr(0, n);
let id = setInterval(() => {
n += 1;
if (n > string.length) {
window.clearInterval(id);
return;
}
demo.innerHTML = string.substr(0, n);
}, 300);зҹҘйҒ“дәҶдёҖдёӘеӯ—дёҖдёӘеӯ—жҳҫзӨәзҡ„еҺҹзҗҶпјҢжҺҘдёӢжқҘжҳҫзӨәжҲ‘们зҡ„ CSSгҖӮ
test.html дёӯеҮҶеӨҮдёӨдёӘ div пјҢдёҖдёӘз”ЁжқҘеҶҷ CSS ж ҮзӯҫпјҢдёҖдёӘз”ЁжқҘе°Ҷ CSS еҶ…е®№жҳҫзӨәеңЁйЎөйқўдёҠгҖӮ
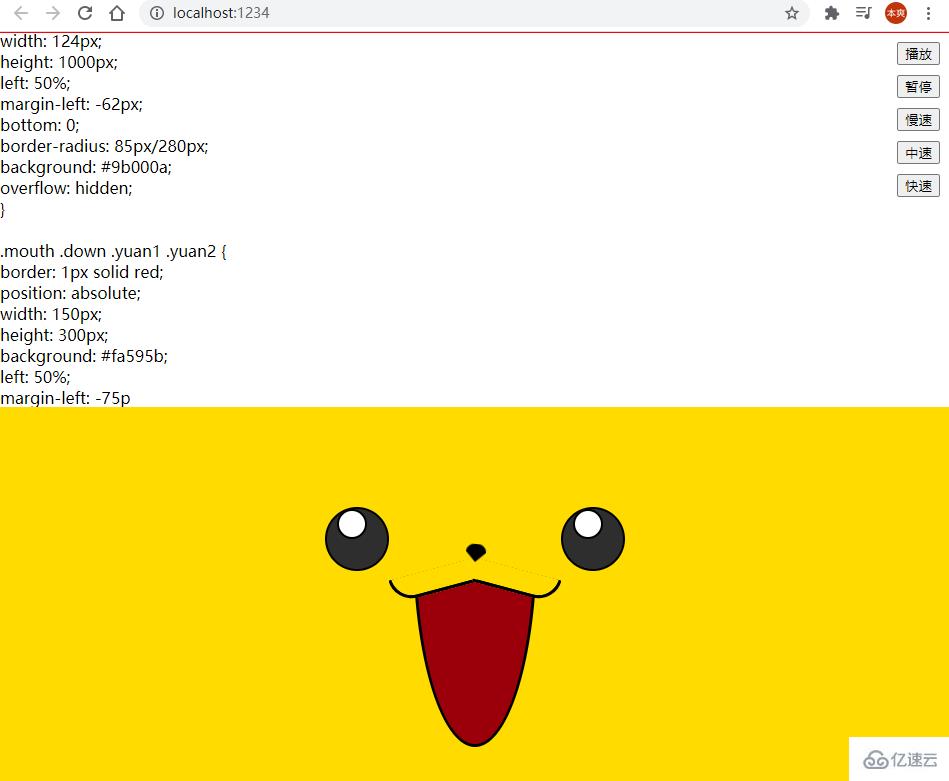
дҪҶжҳҜпјҢиҝҷж ·д№ӢеҗҺиҝҳжҳҜжңүдёҖдёӘжңүй—®йўҳпјҢжҳҫзӨәзҡ„еҠЁз”»иў«ж–Үеӯ—йЎ¶дёӢеҺ»дәҶгҖӮ еҰӮеӣҫжүҖзӨә
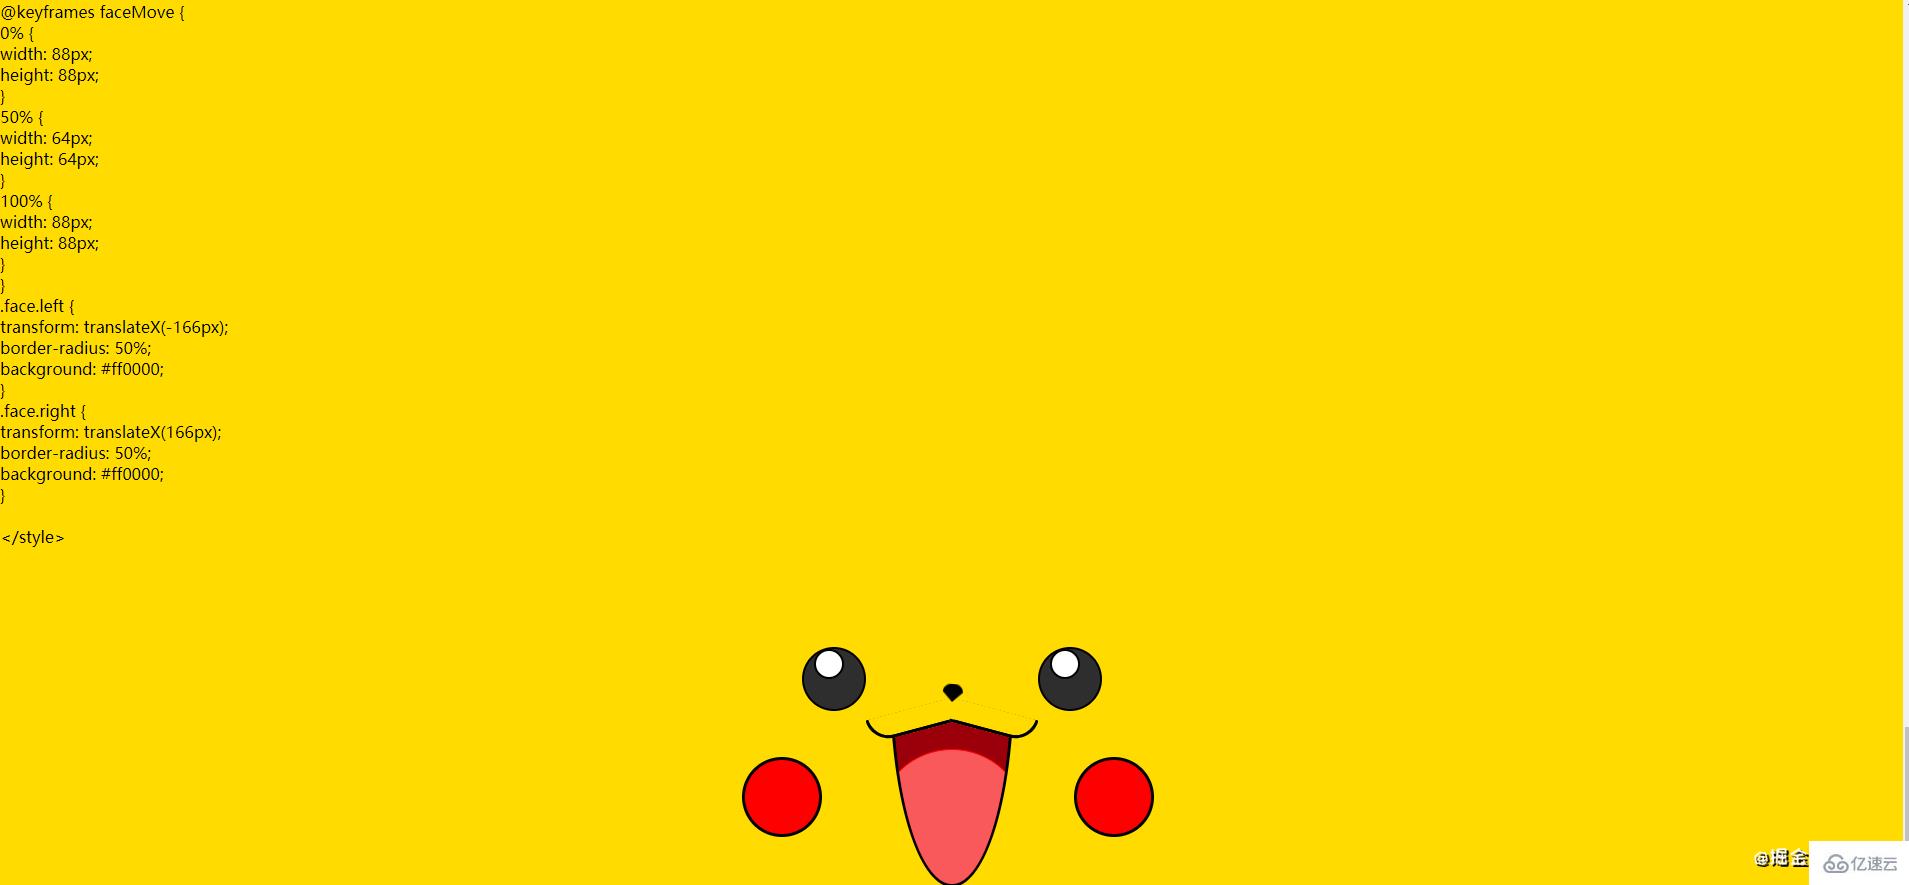
еңЁ test.html дёӯеҠ е…ҘдёӢйқўд»Јз Ғ
<style>
  #html {
    position: absolute;
    bottom: 0;
    left: 0;
    width: 100%;
    height: 50vh;
  }
</style>жҲ‘们解еҶідәҶеҰӮдҪ•и®©еҠЁз”»зҡ„й—®йўҳпјҢеҸҲеҮәзҺ°дәҶд»Јз ҒзңӢдёҚи§Ғзҡ„й—®йўҳпјҢжҺҘдёӢжқҘи§ЈеҶіжҖҺд№Ҳи®©ж»ҡеҠЁжқЎиҮӘеҠЁеҫҖдёӢж»ҡпјҢ并且еҠЁз”»еӣәе®ҡдёҚеҠЁ
html зҡ„еҶ…е®№жҳҜдёҚйңҖиҰҒиў«з”ЁжҲ·зңӢи§Ғзҡ„пјҢеҸҜд»ҘзӣҙжҺҘйҡҗи—Ҹ
<style>
  #demo2 {
    display: none;
  }
  #demo{
    position: fixed;
    height: 50vh;
    top: 0;
    left: 0;
    width: 100%;
    overflow-y: auto;
  }
  #html {
    position: absolute;
    bottom: 0;
    left: 0;
    width: 100%;
    height: 50vh;
  }
</style>еңЁ test.js жӣҙж–°д»Јз ҒпјҢи®©ж»ҡеҠЁжқЎиҮӘеҠЁеҫҖдёӢж»ҡ
let id = setInterval(() => {
n += 1;
if (n > string.length) {
window.clearInterval(id);
return;
}
demo.innerText = string.substr(0, n);
demo2.innerHTML = string.substr(0, n);
demo.scrollTop = demo.scrollHeight; //жӣҙж–°дәҶиҝҷйҮҢ
}, 0);йҡҗи—Ҹж»ҡеҠЁжқЎд№ӢеҗҺпјҢз”ЁжҲ·дҫқ然еҸҜд»Ҙж»ҡеҠЁеҶ…е®№
#demo::-webkit-scrollbar {
  display: none;
}ж·»еҠ ж’ӯж”ҫгҖҒжҡӮеҒңгҖҒж…ўйҖҹгҖҒдёӯйҖҹгҖҒеҝ«йҖҹжҢүй’®
еҲ·ж–°еҗҺпјҢеҸ‘зҺ°жҢүй’®е…ҲеҸҳеӨ§еҶҚеӨҚеҺҹпјҢиҝҷжҳҜеӣ дёә CSS reset еҪұе“ҚеҲ°жҢүй’®пјҢеңЁ test,js дёӯжӣҙж–°д»Јз Ғ
е°Ҷж ·ејҸеҲҶдёәдёӨеқ—пјҢдә’дёҚеҪұе“Қ
.skin * {
  margin: 0;
  padding: 0;
  box-sizing: border-box;
}
.skin *::before,
*::after {
  box-sizing: border-box;
}
.skin {
  background: #ffdb00;
  min-height: 50vh;
  position: relative;
}
3.жҖқи·Ҝ
жҡӮеҒңпјҡжё…йҷӨи®Ўж—¶еҷЁпјҲй—№й’ҹпјү
ж’ӯж”ҫпјҡиҝҗиЎҢи®Ўж—¶еҷЁ
ж…ўйҖҹпјҡз ёдәҶй—№й’ҹпјҢйҮҚж–°и®ҫдёҖдёӘпјҢж—¶й—ҙжӣҙж…ў
btnSlow.onclick = () => {
window.clearInterval(id);
time = 300;
id = setInterval(() => {
run();
}, time);
};
// зӯүд»·дәҺ
btnSlow.onclick = () => {
window.clearInterval(id);
time = 300;
id = setInterval(run, time);
};е®Ңж•ҙдјҳеҢ–еҰӮдёӢ
жҡӮеҒң;
btnPause.onclick = () => {
window.clearInterval(id);
};
ж’ӯж”ҫ;
btnPlay.onclick = () => {
id = setInterval(() => {
run();
}, time);
};
ж…ўйҖҹ;
btnSlow.onclick = () => {
window.clearInterval(id);
time = 300;
id = setInterval(() => {
run();
}, time);
};
дёӯйҖҹ;
btnNormal.onclick = () => {
window.clearInterval(id);
time = 50;
id = setInterval(() => {
run();
}, time);
};
еҝ«йҖҹ;
btnFast.onclick = () => {
window.clearInterval(id);
time = 0;
id = setInterval(() => {
run();
}, time);
};дёҠйқўд»Јз ҒдјҳеҢ–з»“жһңеҰӮдёӢвҶ“вҶ“вҶ“
const run = () => {
n += 1;
if (n > string.length) {
window.clearInterval(id);
return;
}
demo.innerText = string.substr(0, n);
demo2.innerHTML = string.substr(0, n);
demo.scrollTop = demo.scrollHeight;
};
const play = () => {
return setInterval(run, time);
};
let id = play();
const pause = () => {
window.clearInterval(id);
};
//жҡӮеҒң
btnPause.onclick = () => {
pause();
};
// ж’ӯж”ҫ
btnPlay.onclick = () => {
id = play();
};
//ж…ўйҖҹ
btnSlow.onclick = () => {
pause();
time = 300;
id = play();
};
//дёӯйҖҹ
btnNormal.onclick = () => {
pause();
time = 50;
id = play();
};
//еҝ«йҖҹ
btnFast.onclick = () => {
pause();
time = 0;
id = play();
};дҫӢеҰӮ
btnSlow.onclick = () => {
slow();
};
//зӯүд»·
btnSlow.onclick = slow;const play = () => {
return setInterval(run, time);
};
let id = play();
const pause = () => {
window.clearInterval(id);
};
const slow = () => {
pause();
time = 300;
id = play();
};
const normal = () => {
pause();
time = 50;
id = play();
};
const fast = () => {
pause();
time = 0;
id = play();
};const player = {
run: () => {
n += 1;
if (n > string.length) {
window.clearInterval(id);
return;
}
demo.innerText = string.substr(0, n);
demo2.innerHTML = string.substr(0, n);
demo.scrollTop = demo.scrollHeight;
},
play: () => {
return setInterval(player.run, time);
},
pause: () => {
window.clearInterval(id);
},
slow: () => {
player.pause();
time = 300;
id = player.play();
},
normal: () => {
player.pause();
time = 50;
id = player.play();
},
fast: () => {
player.pause();
time = 0;
id = player.play();
},
};.....
  bindEvents: () => {
    document.querySelector("#btnPause").onclick = player.pause;
    document.querySelector("#btnPlay").onclick = player.play;
    document.querySelector("#btnSlow").onclick = player.slow;
    document.querySelector("#btnNormal").onclick = player.normal;
    document.querySelector("#btnFast").onclick = player.fast;
  }
//жҠҠдёҖе Ҷд»Јз Ғж”ҫеҲ°дёҖдёӘж–Ү件йҮҢеҜјеҮәпјҢеңЁеҜје…Ҙ
ж„ҹи°ўеҗ„дҪҚзҡ„йҳ…иҜ»пјҢд»ҘдёҠе°ұжҳҜвҖңCSS+JSжҖҺд№ҲеҲ¶дҪңзҡ®еҚЎдёҳеҠЁз”»вҖқзҡ„еҶ…е®№дәҶпјҢз»ҸиҝҮжң¬ж–Үзҡ„еӯҰд№ еҗҺпјҢзӣёдҝЎеӨ§е®¶еҜ№CSS+JSжҖҺд№ҲеҲ¶дҪңзҡ®еҚЎдёҳеҠЁз”»иҝҷдёҖй—®йўҳжңүдәҶжӣҙж·ұеҲ»зҡ„дҪ“дјҡпјҢе…·дҪ“дҪҝз”Ёжғ…еҶөиҝҳйңҖиҰҒеӨ§е®¶е®һи·өйӘҢиҜҒгҖӮиҝҷйҮҢжҳҜдәҝйҖҹдә‘пјҢе°Ҹзј–е°ҶдёәеӨ§е®¶жҺЁйҖҒжӣҙеӨҡзӣёе…ізҹҘиҜҶзӮ№зҡ„ж–Үз« пјҢж¬ўиҝҺе…іжіЁпјҒ
е…ҚиҙЈеЈ°жҳҺпјҡжң¬з«ҷеҸ‘еёғзҡ„еҶ…е®№пјҲеӣҫзүҮгҖҒи§Ҷйў‘е’Ңж–Үеӯ—пјүд»ҘеҺҹеҲӣгҖҒиҪ¬иҪҪе’ҢеҲҶдә«дёәдё»пјҢж–Үз« и§ӮзӮ№дёҚд»ЈиЎЁжң¬зҪ‘з«ҷз«ӢеңәпјҢеҰӮжһңж¶үеҸҠдҫөжқғиҜ·иҒ”зі»з«ҷй•ҝйӮ®з®ұпјҡis@yisu.comиҝӣиЎҢдёҫжҠҘпјҢ并жҸҗдҫӣзӣёе…іиҜҒжҚ®пјҢдёҖз»ҸжҹҘе®һпјҢе°Ҷз«ӢеҲ»еҲ йҷӨж¶үе«ҢдҫөжқғеҶ…е®№гҖӮ