жӮЁеҘҪпјҢзҷ»еҪ•еҗҺжүҚиғҪдёӢи®ўеҚ•е“ҰпјҒ
жӮЁеҘҪпјҢзҷ»еҪ•еҗҺжүҚиғҪдёӢи®ўеҚ•е“ҰпјҒ
иҝҷзҜҮж–Үз« дё»иҰҒд»Ӣз»ҚвҖңSpringдёӯзҡ„AOPжңүд»Җд№ҲеҠҹиғҪвҖқпјҢеңЁж—Ҙеёёж“ҚдҪңдёӯпјҢзӣёдҝЎеҫҲеӨҡдәәеңЁSpringдёӯзҡ„AOPжңүд»Җд№ҲеҠҹиғҪй—®йўҳдёҠеӯҳеңЁз–‘жғ‘пјҢе°Ҹзј–жҹҘйҳ…дәҶеҗ„ејҸиө„ж–ҷпјҢж•ҙзҗҶеҮәз®ҖеҚ•еҘҪз”Ёзҡ„ж“ҚдҪңж–№жі•пјҢеёҢжңӣеҜ№еӨ§е®¶и§Јзӯ”вҖқSpringдёӯзҡ„AOPжңүд»Җд№ҲеҠҹиғҪвҖқзҡ„з–‘жғ‘жңүжүҖеё®еҠ©пјҒжҺҘдёӢжқҘпјҢиҜ·и·ҹзқҖе°Ҹзј–дёҖиө·жқҘеӯҰд№ еҗ§пјҒ
AOP пјҲAspect Orient Programmingпјү,зӣҙиҜ‘иҝҮжқҘе°ұжҳҜ йқўеҗ‘еҲҮйқўзј–зЁӢгҖӮAOP жҳҜдёҖз§Қзј–зЁӢжҖқжғіпјҢжҳҜйқўеҗ‘еҜ№иұЎзј–зЁӢпјҲOOPпјүзҡ„дёҖз§ҚиЎҘе……гҖӮйқўеҗ‘еҜ№иұЎзј–зЁӢе°ҶзЁӢеәҸжҠҪиұЎжҲҗеҗ„дёӘеұӮж¬Ўзҡ„еҜ№иұЎпјҢиҖҢйқўеҗ‘еҲҮйқўзј–зЁӢжҳҜе°ҶзЁӢеәҸжҠҪиұЎжҲҗеҗ„дёӘеҲҮйқўгҖӮ
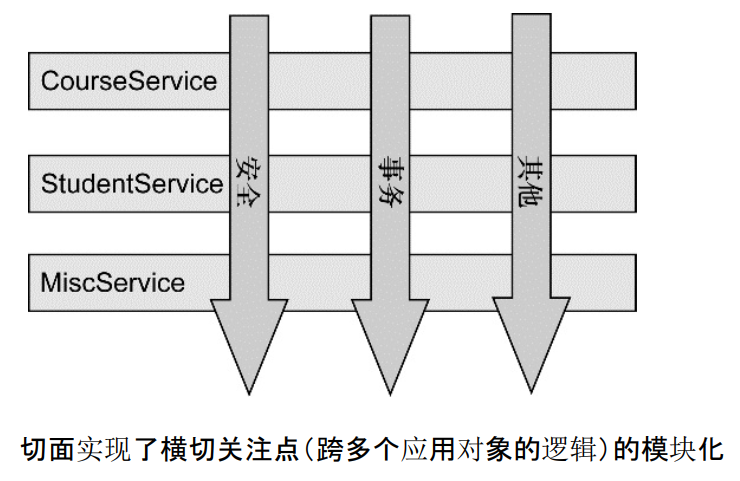
з»ҷдёҖеј еӣҫпјҡ

д»ҺиҜҘеӣҫеҸҜд»ҘеҫҲеҪўиұЎең°зңӢеҮәпјҢжүҖи°“еҲҮйқўпјҢзӣёеҪ“дәҺеә”з”ЁеҜ№иұЎй—ҙзҡ„жЁӘеҲҮзӮ№пјҢжҲ‘们еҸҜд»Ҙе°Ҷе…¶еҚ•зӢ¬жҠҪиұЎдёәеҚ•зӢ¬зҡ„жЁЎеқ—гҖӮ
<?xml version="1.0" encoding="UTF-8"?> <beans xmlns="http://www.springframework.org/schema/beans" xmlns:xsi="http://www.w3.org/2001/XMLSchema-instance" xmlns:aop="http://www.springframework.org/schema/aop" xsi:schemaLocation="http://www.springframework.org/schema/beans https://www.springframework.org/schema/beans/spring-beans.xsd http://www.springframework.org/schema/aop https://www.springframework.org/schema/aop/spring-aop.xsd"> <!-- й…ҚзҪ®Service --> <bean id="accountService" class="com.itheima.service.impl.AccountServiceImpl"> <!-- жіЁе…Ҙdao --> <property name="accountDao" ref="accountDao"></property> </bean> <!-- йҖҡзҹҘж–№жі• --> <!-- й…ҚзҪ®дәӢеҠЎз®ЎзҗҶеҷЁ--> <bean id="txManager" class="com.itheima.utils.TransactionManager"> <!-- жіЁе…ҘConnectionUtils --> <property name="connectionUtils" ref="connectionUtils"></property> </bean> <!-- еҲҮйқў --> <aop:config> <aop:pointcut id="pc" expression="execution(* com.itheima.service.impl.*.*(..))"/> <aop:aspect ref="txManager"> <aop:before method="beginTransaction" pointcut-ref="pc"/> <aop:after-returning method="commit" pointcut-ref="pc"/> <aop:after-throwing method="rollback" pointcut-ref="pc"/> <aop:after method="release" pointcut-ref="pc"/> </aop:aspect> </aop:config>
йқўеҗ‘еҲҮйқўзј–зЁӢгҖӮжЁӘеҗ‘йҮҚеӨҚпјҢзәөеҗ‘жҠҪеҸ–гҖӮ
з®ҖеҚ•зҡ„иҜҙе®ғе°ұжҳҜжҠҠжҲ‘们зЁӢеәҸйҮҚеӨҚзҡ„д»Јз ҒжҠҪеҸ–еҮәжқҘпјҢеңЁйңҖиҰҒжү§иЎҢзҡ„ж—¶еҖҷпјҢдҪҝз”ЁеҠЁжҖҒд»ЈзҗҶзҡ„жҠҖжңҜпјҢеңЁдёҚдҝ®ж”№жәҗз Ғзҡ„еҹәзЎҖдёҠпјҢеҜ№жҲ‘们зҡ„е·Іжңүж–№жі•иҝӣиЎҢеўһејәгҖӮ
е®һзҺ°еҺҹзҗҶпјҡеҠЁжҖҒд»ЈзҗҶ
еҠЁжҖҒд»ЈзҗҶд№ӢеүҚ
еңЁжҲ‘们еҺҹе§Ӣзҡ„жҺ§еҲ¶дәӢеҠЎдёӯпјҢ
ConnectionUtilsзұ»пјҡжҺ§еҲ¶еҚ•зәҝзЁӢеҶ…еҸӘдҪҝз”ЁдёҖдёӘж•°жҚ®еә“иҝһжҺҘ(connection)--->TransactionManagerзұ» ,д№ҰеҶҷж–№жі•пјҡ
гҖҖгҖҖ1) жү“ејҖжүӢеҠЁжҸҗдәӨдәӢеҠЎconn.setAutoCommit(false)пјӣ
гҖҖгҖҖ2) жҸҗдәӨдәӢеҠЎconn.commit()пјӣ
гҖҖгҖҖ3) еӣһж»ҡдәӢеҠЎconn.rollback()пјӣ
гҖҖгҖҖ4) йҮҠж”ҫеҪ“еүҚж•°жҚ®еә“иҝһжҺҘпјҲжүӢеҶҷпјүгҖӮ--->еңЁдёҡеҠЎеұӮдёӯпјҢ
try{
1)
дёҡеҠЎж–№жі•
2)
}
catch(Throws t){
3)
} finally{
4)
}еңЁжҜҸдёӘйңҖиҰҒдәӢеҠЎжҺ§еҲ¶зҡ„ж–№жі•йғҪеғҸиҝҷж ·еҠ дёҠдәӢеҠЎжҺ§еҲ¶гҖӮ
иҝҷж ·д№ҰеҶҷзҡ„дёҡеҠЎеұӮзҡ„д»Јз ҒпјҢиҝҮдәҺиҮғиӮҝпјҢйҮҚеӨҚд»Јз ҒиҝҮеӨҡгҖӮ
дәӢе…ҲеҶҷдёҖдёӘз”ҹжҲҗеҲӣе»әServiceзҡ„д»ЈзҗҶеҜ№иұЎзҡ„е·ҘеҺӮзұ»
/**
* з”ЁдәҺеҲӣе»әServiceзҡ„д»ЈзҗҶеҜ№иұЎзҡ„е·ҘеҺӮ
*/
public class BeanFactory {
private IAccountService accountService;
private TransactionManager txManager;
public void setTxManager(TransactionManager txManager) {
this.txManager = txManager;
}
public final void setAccountService(IAccountService accountService) {
this.accountService = accountService;
}
/**
* иҺ·еҸ–Serviceд»ЈзҗҶеҜ№иұЎ
* @return
*/
public IAccountService getAccountService() {
return (IAccountService)Proxy.newProxyInstance(accountService.getClass().getClassLoader(),
accountService.getClass().getInterfaces(),
new InvocationHandler() {
/**
* ж·»еҠ дәӢеҠЎзҡ„ж”ҜжҢҒ
*
* @param proxy
* @param method
* @param args
* @return
* @throws Throwable
*/
@Override
public Object invoke(Object proxy, Method method, Object[] args) throws Throwable {
Object rtValue = null;
try {
//1.ејҖеҗҜдәӢеҠЎ
txManager.beginTransaction();
//2.жү§иЎҢж“ҚдҪң
rtValue = method.invoke(accountService, args);
//3.жҸҗдәӨдәӢеҠЎ
txManager.commit();
//4.иҝ”еӣһз»“жһң
return rtValue;
} catch (Exception e) {
//5.еӣһж»ҡж“ҚдҪң
txManager.rollback();
throw new RuntimeException(e);
} finally {
//6.йҮҠж”ҫиҝһжҺҘ
txManager.release();
}
}
});
}BeanFactory дҪҝз”ЁеҠЁжҖҒд»ЈзҗҶиҝ”еӣһдёҖдёӘ IAccountService еҜ№иұЎе№¶и°ғз”Ёзӣёеә”ж–№жі•гҖӮ
жҠҠиҝҷдёӘеҲӣе»әзҡ„еҜ№иұЎеӯҳе…ҘSpringе®№еҷЁдёӯпјҢ并注е…ҘеҺҹжқҘзҡ„ accountService е’Ң txManagerпјҲдәӢеҠЎз®ЎзҗҶе·Ҙе…·зұ»пјүпјӣ
<!--й…ҚзҪ®beanfactory--> <bean id="beanFactory" class="com.itheima.factory.BeanFactory"> <!-- жіЁе…Ҙservice --> <property name="accountService" ref="accountService"></property> <!-- жіЁе…ҘдәӢеҠЎз®ЎзҗҶеҷЁ --> <property name="txManager" ref="txManager"></property> </bean> жҠҠеҠЁжҖҒд»ЈзҗҶеҲӣе»әзҡ„ IAccountService пјҢд№ҹеӯҳе…ҘеҲ° Spring е®№еҷЁдёӯгҖӮ <!--й…ҚзҪ®д»ЈзҗҶзҡ„service--> <bean id="proxyAccountService" factory-bean="beanFactory" factory-method="getAccountService"></bean>
жҠҠеҠЁжҖҒд»ЈзҗҶеҲӣе»әзҡ„ IAccountService пјҢд№ҹеӯҳе…ҘеҲ° Spring е®№еҷЁдёӯгҖӮ
<!--й…ҚзҪ®д»ЈзҗҶзҡ„service--> <bean id="proxyAccountService" factory-bean="beanFactory" factory-method="getAccountService"></bean>
жөӢиҜ•ж–№жі•пјҡ
/**
* дҪҝз”ЁJunitеҚ•е…ғжөӢиҜ•пјҡжөӢиҜ•жҲ‘们зҡ„й…ҚзҪ®
*/
@RunWith(SpringJUnit4ClassRunner.class)
@ContextConfiguration(locations = "classpath:bean.xml")
public class AccountServiceTest {
@Autowired
@Qualifier("proxyAccountService")
private IAccountService as;
@Test
public void testTransfer(){
as.transfer("aaa","bbb",100f);
}
}еңЁеҒҡдёҡеҠЎеұӮзҡ„дәӢеҠЎжҺ§еҲ¶ж—¶пјҢеҸҜзӣҙжҺҘи°ғз”Ёе·ҘеҺӮзұ»еҲӣе»әеҮәзҡ„д»ЈзҗҶеҜ№иұЎпјҢе®һзҺ°дәӢеҠЎжҺ§еҲ¶пјҢд»ҺиҖҢд№ҹдҪҝзЁӢеәҸе‘ҳеңЁеҶҷдёҡеҠЎеұӮж—¶еҸӘз®ЎеҶҷдёҡеҠЎпјҢиҖҢдёҚз”Ёз®ЎдәӢеҠЎд»Јз ҒгҖӮ
еҪ“然жҲ‘们иғҪжғіеҲ°иҝҷж ·зҡ„еҠһжі•пјҢspringд№ҹж—©е°ұе°ҒиЈ…еҘҪдәҶпјҢеңЁд№ҰеҶҷxmlй…ҚзҪ®ж–Ү件时жӣҙеҠ з®ҖжҙҒпјҢеҸҜи§ӮгҖӮ
гҖҖгҖҖйҖҡиҝҮй…ҚзҪ®зҡ„ж–№ејҸе®һзҺ°дёҠиҝ°еҠҹиғҪпјҢдёҚз”ЁеҶҚиҮӘе·ұд№ҰеҶҷе·ҘеҺӮзұ»гҖӮ
Joinpoint(иҝһжҺҘзӮ№):
жүҖи°“иҝһжҺҘзӮ№жҳҜжҢҮйӮЈдәӣиў«жӢҰжҲӘеҲ°зҡ„зӮ№гҖӮеңЁspringдёӯ,иҝҷдәӣзӮ№жҢҮзҡ„жҳҜж–№жі•,еӣ дёәspringеҸӘж”ҜжҢҒж–№жі•зұ»еһӢзҡ„иҝһжҺҘзӮ№гҖӮ
Pointcut(еҲҮе…ҘзӮ№):
жүҖи°“еҲҮе…ҘзӮ№жҳҜжҢҮжҲ‘们иҰҒеҜ№е“ӘдәӣJoinpointиҝӣиЎҢжӢҰжҲӘзҡ„е®ҡд№ү
Advice(йҖҡзҹҘ/еўһејә):
жүҖи°“йҖҡзҹҘжҳҜжҢҮжӢҰжҲӘеҲ°Joinpointд№ӢеҗҺжүҖиҰҒеҒҡзҡ„дәӢжғ…е°ұжҳҜйҖҡзҹҘгҖӮ
йҖҡзҹҘзҡ„зұ»еһӢпјҡеүҚзҪ®йҖҡзҹҘ,еҗҺзҪ®йҖҡзҹҘ,ејӮеёёйҖҡзҹҘ,жңҖз»ҲйҖҡзҹҘ,зҺҜз»•йҖҡзҹҘгҖӮ
Introduction(еј•д»Ӣ):
еј•д»ӢжҳҜдёҖз§Қзү№ж®Ҡзҡ„йҖҡзҹҘеңЁдёҚдҝ®ж”№зұ»д»Јз Ғзҡ„еүҚжҸҗдёӢ, IntroductionеҸҜд»ҘеңЁиҝҗиЎҢжңҹдёәзұ»еҠЁжҖҒең°ж·»еҠ дёҖдәӣж–№жі•жҲ–FieldгҖӮ
Target(зӣ®ж ҮеҜ№иұЎ):
д»ЈзҗҶзҡ„зӣ®ж ҮеҜ№иұЎгҖӮ
Weaving(з»Үе…Ҙ):
жҳҜжҢҮжҠҠеўһејәеә”з”ЁеҲ°зӣ®ж ҮеҜ№иұЎжқҘеҲӣе»әж–°зҡ„д»ЈзҗҶеҜ№иұЎзҡ„иҝҮзЁӢгҖӮ
springйҮҮз”ЁеҠЁжҖҒд»ЈзҗҶз»Үе…ҘпјҢиҖҢAspectJйҮҮз”Ёзј–иҜ‘жңҹз»Үе…Ҙе’Ңзұ»иЈ…иҪҪжңҹз»Үе…ҘгҖӮ
ProxyпјҲд»ЈзҗҶпјү:
дёҖдёӘзұ»иў«AOPз»Үе…ҘеўһејәеҗҺпјҢе°ұдә§з”ҹдёҖдёӘз»“жһңд»ЈзҗҶзұ»гҖӮ
Aspect(еҲҮйқў):
жҳҜеҲҮе…ҘзӮ№е’ҢйҖҡзҹҘпјҲеј•д»Ӣпјүзҡ„з»“еҗҲгҖӮ
aгҖҒејҖеҸ‘йҳ¶ж®өпјҲжҲ‘们еҒҡзҡ„пјү
зј–еҶҷж ёеҝғдёҡеҠЎд»Јз ҒпјҲејҖеҸ‘дё»зәҝпјүпјҡеӨ§йғЁеҲҶзЁӢеәҸе‘ҳжқҘеҒҡпјҢиҰҒжұӮзҶҹжӮүдёҡеҠЎйңҖжұӮгҖӮ
жҠҠе…¬з”Ёд»Јз ҒжҠҪеҸ–еҮәжқҘпјҢеҲ¶дҪңжҲҗйҖҡзҹҘгҖӮпјҲејҖеҸ‘йҳ¶ж®өжңҖеҗҺеҶҚеҒҡпјүпјҡAOPзј–зЁӢдәәе‘ҳжқҘеҒҡгҖӮ
еңЁй…ҚзҪ®ж–Ү件дёӯпјҢеЈ°жҳҺеҲҮе…ҘзӮ№дёҺйҖҡзҹҘй—ҙзҡ„е…ізі»пјҢеҚіеҲҮйқўгҖӮпјҡAOPзј–зЁӢдәәе‘ҳжқҘеҒҡгҖӮ
bгҖҒиҝҗиЎҢйҳ¶ж®өпјҲSpringжЎҶжһ¶е®ҢжҲҗзҡ„пјү
SpringжЎҶжһ¶зӣ‘жҺ§еҲҮе…ҘзӮ№ж–№жі•зҡ„жү§иЎҢгҖӮдёҖж—Ұзӣ‘жҺ§еҲ°еҲҮе…ҘзӮ№ж–№жі•иў«иҝҗиЎҢпјҢдҪҝз”Ёд»ЈзҗҶжңәеҲ¶пјҢеҠЁжҖҒеҲӣе»әзӣ®ж ҮеҜ№иұЎзҡ„д»ЈзҗҶеҜ№иұЎпјҢж №жҚ®йҖҡзҹҘзұ»еҲ«пјҢеңЁд»ЈзҗҶеҜ№иұЎзҡ„еҜ№еә”дҪҚзҪ®пјҢе°ҶйҖҡзҹҘеҜ№еә”зҡ„еҠҹиғҪз»Үе…ҘпјҢе®ҢжҲҗе®Ңж•ҙзҡ„д»Јз ҒйҖ»иҫ‘иҝҗиЎҢгҖӮ
жӯҘйӘӨ
1гҖҒеҜјеҢ…
2гҖҒд№ҰеҶҷspringй…ҚзҪ®ж–Ү件
<?xml version="1.0" encoding="UTF-8"?> <beans xmlns="http://www.springframework.org/schema/beans" xmlns:xsi="http://www.w3.org/2001/XMLSchema-instance" xmlns:aop="http://www.springframework.org/schema/aop" xsi:schemaLocation="http://www.springframework.org/schema/beans https://www.springframework.org/schema/beans/spring-beans.xsd http://www.springframework.org/schema/aop https://www.springframework.org/schema/aop/spring-aop.xsd"> <!-- й…ҚзҪ®Service --> <bean id="accountService" class="com.itheima.service.impl.AccountServiceImpl"> <!-- жіЁе…Ҙdao --> <property name="accountDao" ref="accountDao"></property> </bean> <!-- йҖҡзҹҘж–№жі• --> <!-- й…ҚзҪ®дәӢеҠЎз®ЎзҗҶеҷЁ--> <bean id="txManager" class="com.itheima.utils.TransactionManager"> <!-- жіЁе…ҘConnectionUtils --> <property name="connectionUtils" ref="connectionUtils"></property> </bean> <!-- еҲҮйқў --> <aop:config> <aop:pointcut id="pc" expression="execution(* com.itheima.service.impl.*.*(..))"/> <aop:aspect ref="txManager"> <aop:before method="beginTransaction" pointcut-ref="pc"/> <aop:after-returning method="commit" pointcut-ref="pc"/> <aop:after-throwing method="rollback" pointcut-ref="pc"/> <aop:after method="release" pointcut-ref="pc"/> </aop:aspect> </aop:config>
3.дёҡеҠЎеұӮд»Јз Ғ
public void transfer(String sourceName, String targetName, Float money) {
System.out.println("transfer....");
//2.1ж №жҚ®еҗҚз§°жҹҘиҜўиҪ¬еҮәиҙҰжҲ·
Account source = accountDao.findAccountByName(sourceName);
//2.2ж №жҚ®еҗҚз§°жҹҘиҜўиҪ¬е…ҘиҙҰжҲ·
Account target = accountDao.findAccountByName(targetName);
//2.3иҪ¬еҮәиҙҰжҲ·еҮҸй’ұ
source.setMoney(source.getMoney()-money);
//2.4иҪ¬е…ҘиҙҰжҲ·еҠ й’ұ
target.setMoney(target.getMoney()+money);
//2.5жӣҙж–°иҪ¬еҮәиҙҰжҲ·
accountDao.updateAccount(source);
// int i=1/0;
//2.6жӣҙж–°иҪ¬е…ҘиҙҰжҲ·
accountDao.updateAccount(target);
}4.жөӢиҜ•
@RunWith(SpringJUnit4ClassRunner.class)
@ContextConfiguration(locations = "classpath:bean.xml")
public class AccountServiceTest {

    @Autowired
    @Qualifier("accountService")
    private  IAccountService as;

    @Test
    public  void testTransfer(){
        as.transfer("aaa","bbb",100f);
    }
}дҪҝз”Ёspringзҡ„AOPеҹәдәҺеҠЁжҖҒд»ЈзҗҶејҖеҸ‘пјҢз®ҖжҙҒзҡ„е®һзҺ°дәҶиҜҘеҜ№иұЎж–№жі•зҡ„еўһејәпјҢд№ҹе°ұжҳҜе®һзҺ°дәҶеҜ№иҪ¬иҙҰзҡ„дәӢеҠЎжҺ§еҲ¶гҖӮ
/**
* дҪҝз”ЁJunitеҚ•е…ғжөӢиҜ•пјҡжөӢиҜ•жҲ‘们зҡ„й…ҚзҪ®
*/
@RunWith(SpringJUnit4ClassRunner.class)
@ContextConfiguration(locations = "classpath:bean.xml")
public class AccountServiceTest {
@Autowired
@Qualifier("proxyAccountService")
private IAccountService as;
@Test
public void testTransfer(){
as.transfer("aaa","bbb",100f);
}
}еҲ°жӯӨпјҢе…ідәҺвҖңSpringдёӯзҡ„AOPжңүд»Җд№ҲеҠҹиғҪвҖқзҡ„еӯҰд№ е°ұз»“жқҹдәҶпјҢеёҢжңӣиғҪеӨҹи§ЈеҶіеӨ§е®¶зҡ„з–‘жғ‘гҖӮзҗҶи®әдёҺе®һи·өзҡ„жҗӯй…ҚиғҪжӣҙеҘҪзҡ„её®еҠ©еӨ§е®¶еӯҰд№ пјҢеҝ«еҺ»иҜ•иҜ•еҗ§пјҒиӢҘжғіз»§з»ӯеӯҰд№ жӣҙеӨҡзӣёе…ізҹҘиҜҶпјҢиҜ·з»§з»ӯе…іжіЁдәҝйҖҹдә‘зҪ‘з«ҷпјҢе°Ҹзј–дјҡ继з»ӯеҠӘеҠӣдёәеӨ§е®¶еёҰжқҘжӣҙеӨҡе®һз”Ёзҡ„ж–Үз« пјҒ
е…ҚиҙЈеЈ°жҳҺпјҡжң¬з«ҷеҸ‘еёғзҡ„еҶ…е®№пјҲеӣҫзүҮгҖҒи§Ҷйў‘е’Ңж–Үеӯ—пјүд»ҘеҺҹеҲӣгҖҒиҪ¬иҪҪе’ҢеҲҶдә«дёәдё»пјҢж–Үз« и§ӮзӮ№дёҚд»ЈиЎЁжң¬зҪ‘з«ҷз«ӢеңәпјҢеҰӮжһңж¶үеҸҠдҫөжқғиҜ·иҒ”зі»з«ҷй•ҝйӮ®з®ұпјҡis@yisu.comиҝӣиЎҢдёҫжҠҘпјҢ并жҸҗдҫӣзӣёе…іиҜҒжҚ®пјҢдёҖз»ҸжҹҘе®һпјҢе°Ҷз«ӢеҲ»еҲ йҷӨж¶үе«ҢдҫөжқғеҶ…е®№гҖӮ