这篇文章将为大家详细讲解有关openlayers6中地图覆盖物overlay怎么用,小编觉得挺实用的,因此分享给大家做个参考,希望大家阅读完这篇文章后可以有所收获。
①:实例一个
new Overlay(),设置相关的属性,element 是和页面的 最外层弹窗的dom进行绑定
②:通过map.addOverlay(this.overlay)把 overlay弹窗添加到页面
③:closer.onclick添加一个 x 关闭弹窗事件
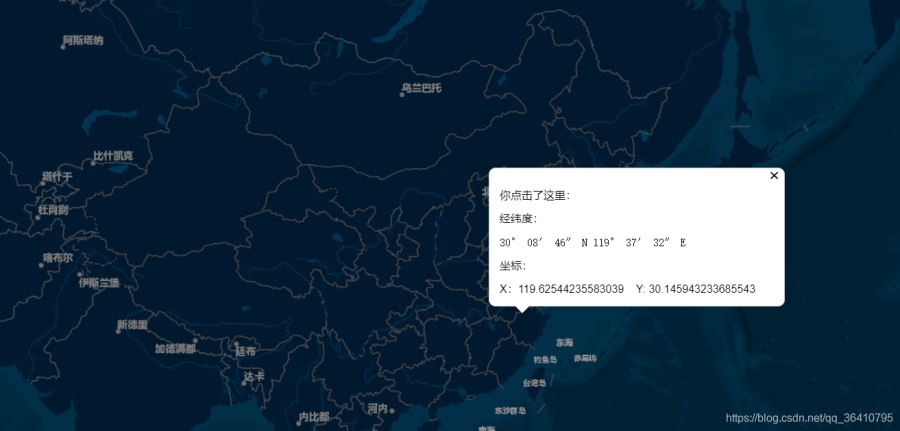
④:通过this.map.on("singleclick", function(evt)事件点击地图触发弹窗效果
具体代码如下:
addPopup() {
// 使用变量存储弹窗所需的 DOM 对象
var container = document.getElementById("popup");
var closer = document.getElementById("popup-closer");
var content = document.getElementById("popup-content");
// 创建一个弹窗 Overlay 对象
this.overlay = new Overlay({
element: container, //绑定 Overlay 对象和 DOM 对象的
autoPan: true, // 定义弹出窗口在边缘点击时候可能不完整 设置自动平移效果
autoPanAnimation: {
duration: 250 //自动平移效果的动画时间 9毫秒)
}
});
// 将弹窗添加到 map 地图中
this.map.addOverlay(this.overlay);
let _that = this;
/**
* 为弹窗添加一个响应关闭的函数
*/
closer.onclick = function() {
_that.overlay.setPosition(undefined);
closer.blur();
return false;
};
/**
* 添加单击map 响应函数来处理弹窗动作
*/
this.map.on("singleclick", function(evt) {
console.log(evt.coordinate);
let coordinate = transform(
evt.coordinate,
"EPSG:3857",
"EPSG:4326"
);
// 点击尺 (这里是尺(米),并不是经纬度);
let hdms = toStringHDMS(toLonLat(evt.coordinate)); // 转换为经纬度显示
content.innerHTML = `
<p>你点击了这里:</p>
<p>经纬度:<p><code> ${hdms} </code> <p>
<p>坐标:</p>X:${coordinate[0]} Y: ${coordinate[1]}`;
_that.overlay.setPosition(evt.coordinate); //把 overlay 显示到指定的 x,y坐标
});
}效果

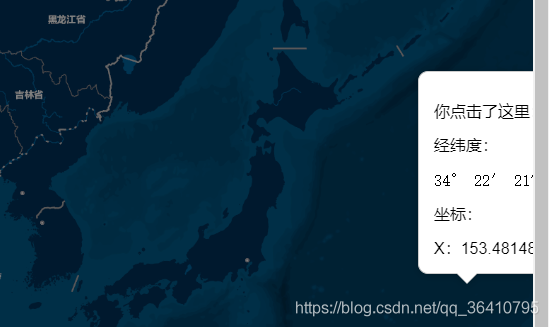
点击了屏幕最右边,可以看到不会根据鼠标点击位置进行适应地图。

vue 页面
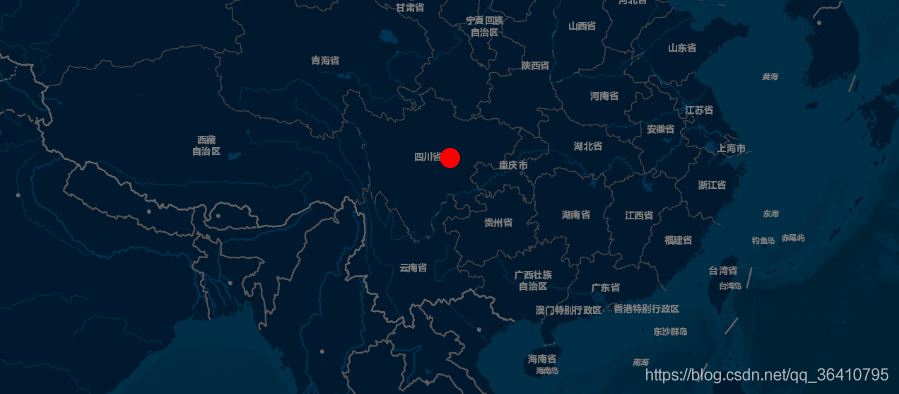
addMarker() {
    var marker = new Overlay({
        position: fromLonLat([104.043505, 30.58165]),
        positioning: "center-center",
        element: document.getElementById("marker"),
        stopEvent: false
    });
    this.map.addOverlay(marker);
},
vue 页面
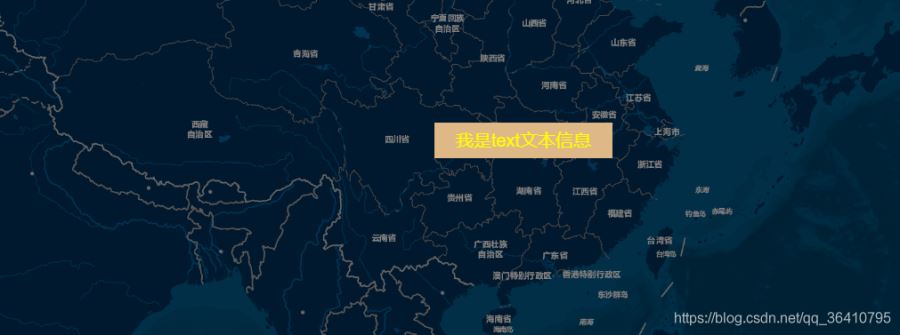
addText() {
    var textInfo = new Overlay({
        position: fromLonLat([104.043505, 30.58165]),
        offset: [20, -20],
        element: document.getElementById("textInfo")
    });
    this.map.addOverlay(textInfo);
},
<template>
<div id="app">
<div id="map" ref="map"></div>
<div id="marker"></div>
<div id="textInfo">我是text文本信息</div>
<div id="popup" class="ol-popup">
<a href="#" rel="external nofollow" id="popup-closer" class="ol-popup-closer"></a>
<div id="popup-content" class="popup-content"></div>
</div>
</div>
</template>
<script>
import "ol/ol.css";
import { Map, View, Coordinate } from "ol";
import { toStringHDMS } from "ol/coordinate";
import TileLayer from "ol/layer/Tile";
import XYZ from "ol/source/XYZ";
import Overlay from "ol/Overlay";
import { fromLonLat, transform, toLonLat } from "ol/proj";
// 弹出窗口实现
export default {
name: "dashboard",
data() {
return {
map: null,
overlay: null
};
},
methods: {
initMap() {
let target = "map"; //跟页面元素的 id 绑定来进行渲染
let tileLayer = new TileLayer({
source: new XYZ({
url:
"http://map.geoq.cn/ArcGIS/rest/services/ChinaOnlineStreetPurplishBlue/MapServer/tile/{z}/{y}/{x}"
})
});
let view = new View({
// projection: "EPSG:4326", //使用这个坐标系
center: fromLonLat([104.912777, 34.730746]), //地图中心坐标
zoom: 4.5 //缩放级别
});
this.map = new Map({
target: target, //绑定dom元素进行渲染
layers: [tileLayer], //配置地图数据源
view: view //配置地图显示的options配置(坐标系,中心点,缩放级别等)
});
},
/**
* 第一种:点标记 marker
* 创建一个标注信息
*/
addMarker() {
var marker = new Overlay({
position: fromLonLat([104.043505, 30.58165]),
positioning: "center-center",
element: document.getElementById("marker"),
stopEvent: false
});
this.map.addOverlay(marker);
},
/**
* 第二种:文字标签 label
* 创建一个label标注信息
*/
addText() {
var textInfo = new Overlay({
position: fromLonLat([104.043505, 30.58165]),
offset: [20, -20],
element: document.getElementById("textInfo")
});
this.map.addOverlay(textInfo);
},
/**
* 第三种:弹窗式窗口 popup
* 创建一个弹窗popup信息
*/
addPopup() {
// 使用变量存储弹窗所需的 DOM 对象
var container = document.getElementById("popup");
var closer = document.getElementById("popup-closer");
var content = document.getElementById("popup-content");
// 创建一个弹窗 Overlay 对象
this.overlay = new Overlay({
element: container, //绑定 Overlay 对象和 DOM 对象的
autoPan: false, // 定义弹出窗口在边缘点击时候可能不完整 设置自动平移效果
autoPanAnimation: {
duration: 250 //自动平移效果的动画时间 9毫秒)
}
});
// 将弹窗添加到 map 地图中
this.map.addOverlay(this.overlay);
let _that = this;
/**
* 为弹窗添加一个响应关闭的函数
*/
closer.onclick = function() {
_that.overlay.setPosition(undefined);
closer.blur();
return false;
};
/**
* 添加单击响应函数来处理弹窗动作
*/
this.map.on("singleclick", function(evt) {
console.log(evt.coordinate);
let coordinate = transform(
evt.coordinate,
"EPSG:3857",
"EPSG:4326"
);
// 点击尺 (这里是尺(米),并不是经纬度);
let hdms = toStringHDMS(toLonLat(evt.coordinate)); // 转换为经纬度显示
content.innerHTML = `
<p>你点击了这里:</p>
<p>经纬度:<p><code> ${hdms} </code> <p>
<p>坐标:</p>X:${coordinate[0]} Y: ${coordinate[1]}`;
_that.overlay.setPosition(evt.coordinate); //把 overlay 显示到指定的 x,y坐标
});
}
},
mounted() {
this.initMap();
// 初始化弹窗方法
this.addText();
this.addMarker();
this.addPopup();
}
};
</script>
<style lang="scss" scoped>
html,
body {
height: 100%;
}
#app {
min-height: calc(100vh - 50px);
width: 100%;
position: relative;
overflow: none;
#map {
height: 888px;
min-height: calc(100vh - 50px);
}
}
.ol-popup {
position: absolute;
background-color: white;
-webkit-filter: drop-shadow(0 1px 4px rgba(0, 0, 0, 0.2));
filter: drop-shadow(0 1px 4px rgba(0, 0, 0, 0.2));
padding: 15px;
border-radius: 10px;
border: 1px solid #cccccc;
bottom: 12px;
left: -50px;
}
.ol-popup:after,
.ol-popup:before {
top: 100%;
border: solid transparent;
content: " ";
height: 0;
width: 0;
position: absolute;
pointer-events: none;
}
.ol-popup:after {
border-top-color: white;
border-width: 10px;
left: 48px;
margin-left: -10px;
}
.ol-popup:before {
border-top-color: #cccccc;
border-width: 11px;
left: 48px;
margin-left: -11px;
}
.ol-popup-closer {
text-decoration: none;
position: absolute;
top: 2px;
right: 8px;
}
.popup-content {
width: 400px;
}
.ol-popup-closer:after {
content: "✖";
}
#marker {
width: 20px;
height: 20px;
background: red;
border-radius: 50%;
}
#textInfo {
width: 200px;
height: 40px;
line-height: 40px;
background: burlywood;
color: yellow;
text-align: center;
font-size: 20px;
}
</style>关于“openlayers6中地图覆盖物overlay怎么用”这篇文章就分享到这里了,希望以上内容可以对大家有一定的帮助,使各位可以学到更多知识,如果觉得文章不错,请把它分享出去让更多的人看到。
免责声明:本站发布的内容(图片、视频和文字)以原创、转载和分享为主,文章观点不代表本网站立场,如果涉及侵权请联系站长邮箱:is@yisu.com进行举报,并提供相关证据,一经查实,将立刻删除涉嫌侵权内容。