这篇文章主要介绍“怎么用Python K-means实现简单图像聚类”,在日常操作中,相信很多人在怎么用Python K-means实现简单图像聚类问题上存在疑惑,小编查阅了各式资料,整理出简单好用的操作方法,希望对大家解答”怎么用Python K-means实现简单图像聚类”的疑惑有所帮助!接下来,请跟着小编一起来学习吧!
这里直接给出第一个版本的直接实现:
import os
import numpy as np
from sklearn.cluster import KMeans
import cv2
from imutils import build_montages
import matplotlib.image as imgplt

image_path = []
all_images = []
images = os.listdir('./images')

for image_name in images:
    image_path.append('./images/' + image_name)
for path in image_path:
    image = imgplt.imread(path)
    image = image.reshape(-1, )
    all_images.append(image)

clt = KMeans(n_clusters=2)
clt.fit(all_images)
labelIDs = np.unique(clt.labels_)

for labelID in labelIDs:
    idxs = np.where(clt.labels_ == labelID)[0]
    idxs = np.random.choice(idxs, size=min(25, len(idxs)),
		replace=False)
    show_box = []
    for i in idxs:
        image = cv2.imread(image_path[i])
        image = cv2.resize(image, (96, 96))
        show_box.append(image)
    montage = build_montages(show_box, (96, 96), (5, 5))[0]

    title = "Type {}".format(labelID)
    cv2.imshow(title, montage)
cv2.waitKey(0)主要需要注意的问题是对K-Means原理的理解。K-means做的是对向量的聚类,也就是说,假设要处理的是224×224×3的RGB图像,那么就得先将其转为1维的向量。在上面的做法里,我们是直接对其展平:
image = image.reshape(-1, )那么这么做的缺陷也是十分明显的。例如,对于两张一模一样的图像,我们将前者向左平移一个像素。这么做下来后两张图像在感官上几乎没有任何区别,但由于整体平移会导致两者的图像矩阵逐像素比较的结果差异巨大。以橘子汽车聚类为例,实验结果如下:
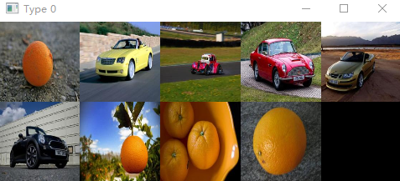

可以看到结果是比较差的。因此,我们进行改进,利用ResNet-50进行图像特征的提取(embedding),在特征的基础上聚类而非直接在像素上聚类,代码如下:
import os
import numpy as np
from sklearn.cluster import KMeans
import cv2
from imutils import build_montages
import torch.nn as nn
import torchvision.models as models
from PIL import Image
from torchvision import transforms
class Net(nn.Module):
def __init__(self):
super(Net, self).__init__()
resnet50 = models.resnet50(pretrained=True)
self.resnet = nn.Sequential(resnet50.conv1,
resnet50.bn1,
resnet50.relu,
resnet50.maxpool,
resnet50.layer1,
resnet50.layer2,
resnet50.layer3,
resnet50.layer4)
def forward(self, x):
x = self.resnet(x)
return x
net = Net().eval()
image_path = []
all_images = []
images = os.listdir('./images')
for image_name in images:
image_path.append('./images/' + image_name)
for path in image_path:
image = Image.open(path).convert('RGB')
image = transforms.Resize([224,244])(image)
image = transforms.ToTensor()(image)
image = image.unsqueeze(0)
image = net(image)
image = image.reshape(-1, )
all_images.append(image.detach().numpy())
clt = KMeans(n_clusters=2)
clt.fit(all_images)
labelIDs = np.unique(clt.labels_)
for labelID in labelIDs:
idxs = np.where(clt.labels_ == labelID)[0]
idxs = np.random.choice(idxs, size=min(25, len(idxs)),
replace=False)
show_box = []
for i in idxs:
image = cv2.imread(image_path[i])
image = cv2.resize(image, (96, 96))
show_box.append(image)
montage = build_montages(show_box, (96, 96), (5, 5))[0]
title = "Type {}".format(labelID)
cv2.imshow(title, montage)
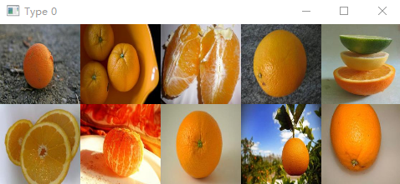
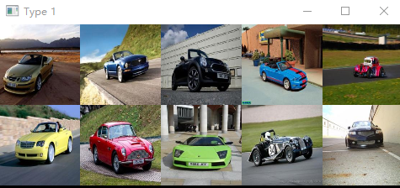
cv2.waitKey(0)可以发现结果明显改善:
到此,关于“怎么用Python K-means实现简单图像聚类”的学习就结束了,希望能够解决大家的疑惑。理论与实践的搭配能更好的帮助大家学习,快去试试吧!若想继续学习更多相关知识,请继续关注亿速云网站,小编会继续努力为大家带来更多实用的文章!
亿速云「云服务器」,即开即用、新一代英特尔至强铂金CPU、三副本存储NVMe SSD云盘,价格低至29元/月。点击查看>>
免责声明:本站发布的内容(图片、视频和文字)以原创、转载和分享为主,文章观点不代表本网站立场,如果涉及侵权请联系站长邮箱:is@yisu.com进行举报,并提供相关证据,一经查实,将立刻删除涉嫌侵权内容。


 计算
计算 安全
安全 数据库
数据库 网络和加速
网络和加速 企业服务
企业服务


