小编给大家分享一下springboot如何自定义异常并捕获异常返给前端,相信大部分人都还不怎么了解,因此分享这篇文章给大家参考一下,希望大家阅读完这篇文章后大有收获,下面让我们一起去了解一下吧!
在开发中,如果用try catch的方式,每个方法都需要单独实现,为了方便分类异常,返回给前端,采用了@ControllerAdvice注解和继承了RuntimeException的方式来实现。
捕获了三类异常
1.业务异常
BusinessException
2.系统异常
SystemException
3.其他异常
利用@ExceptionHandler(RuntimeException.class)去捕获
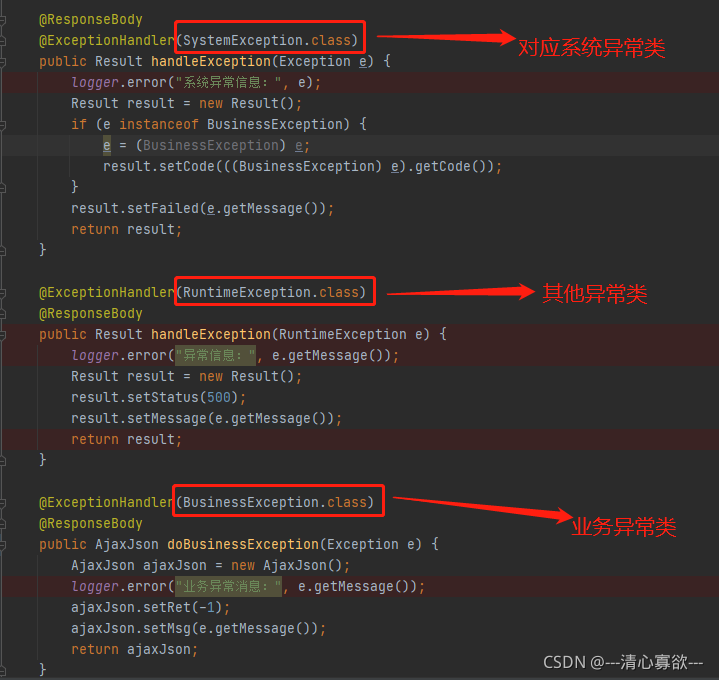
ExceptionAdvice类捕获以上三类异常,并返回自定义类型格式数据
业务异常BusinessException类实现方式,继承RuntimeException
public class BusinessException extends  RuntimeException {
	/**
	 * 错误编码
	 */
	private String code;

	public BusinessException() {
		super();
	}

	public BusinessException(String message) {
		super(message);
	}

	public BusinessException(String code, String message) {
		super(message);
		this.code = code;
	}

	public BusinessException(Throwable cause) {
		super(cause);
	}

	public BusinessException(String message, Throwable cause) {
		super(message, cause);
	}

	public BusinessException(String message, Throwable cause,
							 boolean enableSuppression, boolean writableStackTrace) {
		super(message, cause, enableSuppression, writableStackTrace);
	}

	public String getCode() {
		return code;
	}

	public void setCode(String code) {
		this.code = code;
	}

	@Override
	public String getMessage() {
		return super.getMessage();
	}

	@Override
	public String toString() {
		return this.code + ":" + this.getMessage();
	}
}系统异常SystemException类实现方式,继承RuntimeException,同业务异常类的实现方式一样
public class SystemException extends  RuntimeException {
	/**
	 * 错误编码
	 */
	private String code;

	public SystemException() {
		super();
	}

	public SystemException(String message) {
		super(message);
	}

	public SystemException(String code, String message) {
		super(message);
		this.code = code;
	}

	public SystemException(Throwable cause) {
		super(cause);
	}

	public SystemException(String message, Throwable cause) {
		super(message, cause);
	}

	public SystemException(String message, Throwable cause,
                           boolean enableSuppression, boolean writableStackTrace) {
		super(message, cause, enableSuppression, writableStackTrace);
	}

	public String getCode() {
		return code;
	}

	public void setCode(String code) {
		this.code = code;
	}

	@Override
	public String getMessage() {
		return super.getMessage();
	}

	@Override
	public String toString() {
		return this.code + ":" + this.getMessage();
	}
}ExceptionAdvice类,采用增强Controller注解 @ControllerAdvice的方式来实现
1.方法名称和返回类型都可以根据自己需要定义;
2.采用注解@ExceptionHandler,就是捕获的异常类型,我们只需要把需要捕获异常类型写进来就好
ExceptionAdvice 具体代码实现如下:
import org.slf4j.Logger;
import org.slf4j.LoggerFactory;
import org.springframework.web.bind.annotation.ControllerAdvice;
import org.springframework.web.bind.annotation.ExceptionHandler;
import org.springframework.web.bind.annotation.ResponseBody;
@ControllerAdvice
public class ExceptionAdvice {
public static Logger logger = LoggerFactory.getLogger(ExceptionAdvice.class);
@ResponseBody
@ExceptionHandler(SystemException.class)
public Result handleException(Exception e) {
logger.error("系统异常信息:", e);
Result result = new Result();
if (e instanceof BusinessException) {
e = (BusinessException) e;
result.setCode(((BusinessException) e).getCode());
}
result.setFailed(e.getMessage());
return result;
}
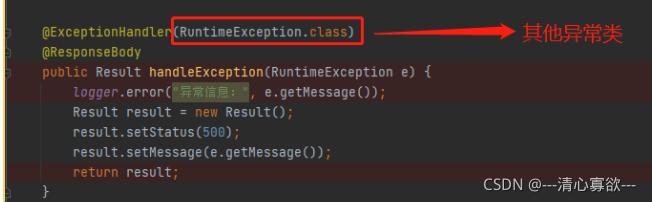
@ExceptionHandler(RuntimeException.class)
@ResponseBody
public Result handleException(RuntimeException e) {
logger.error("异常信息:", e.getMessage());
Result result = new Result();
result.setStatus(500);
result.setMessage(e.getMessage());
return result;
}
@ExceptionHandler(BusinessException.class)
@ResponseBody
public AjaxJson doBusinessException(Exception e) {
AjaxJson ajaxJson = new AjaxJson();
logger.error("业务异常消息:", e.getMessage());
ajaxJson.setRet(-1);
ajaxJson.setMsg(e.getMessage());
return ajaxJson;
}
}1.我们捕获一个业务异常BusinessException,输出aaa
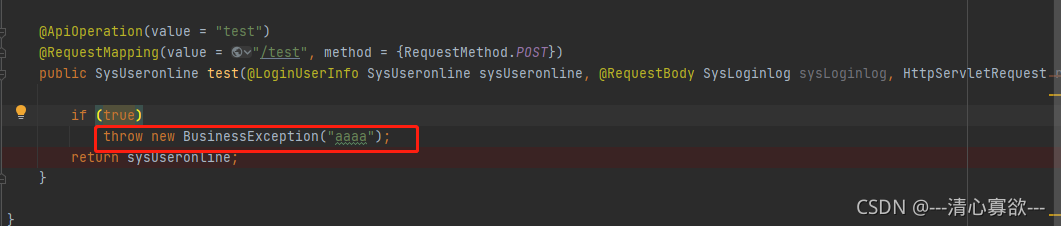
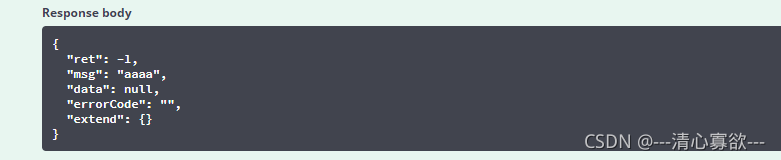
2.捕获系统异常
throw new SystemException("aaaa");3.其他的try catch的异常,这个就可以捕获了
以上是“springboot如何自定义异常并捕获异常返给前端”这篇文章的所有内容,感谢各位的阅读!相信大家都有了一定的了解,希望分享的内容对大家有所帮助,如果还想学习更多知识,欢迎关注亿速云行业资讯频道!
亿速云「云服务器」,即开即用、新一代英特尔至强铂金CPU、三副本存储NVMe SSD云盘,价格低至29元/月。点击查看>>
免责声明:本站发布的内容(图片、视频和文字)以原创、转载和分享为主,文章观点不代表本网站立场,如果涉及侵权请联系站长邮箱:is@yisu.com进行举报,并提供相关证据,一经查实,将立刻删除涉嫌侵权内容。


 计算
计算 安全
安全 数据库
数据库 网络和加速
网络和加速 企业服务
企业服务


