这篇文章主要介绍“shiro拦截认证的过程是什么”,在日常操作中,相信很多人在shiro拦截认证的过程是什么问题上存在疑惑,小编查阅了各式资料,整理出简单好用的操作方法,希望对大家解答”shiro拦截认证的过程是什么”的疑惑有所帮助!接下来,请跟着小编一起来学习吧!
Shiro是apache旗下一个开源安全框架(http://shiro.apache.org/),它将软件系统的安全认证相关的功能抽取出来,实现用户身份认证,权限授权、加密、会话管理等功能,组成了一个通用的安全认证框架。使用shiro就可以非常快速的完成认证、授权等功能的开发,降低系统成本。
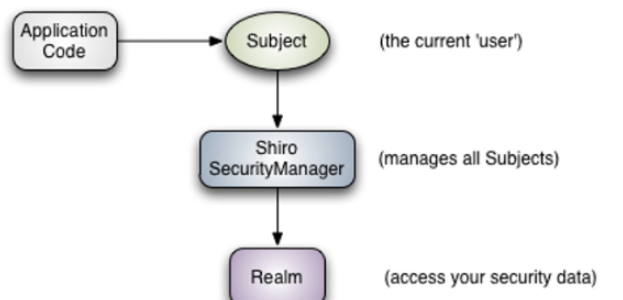
Shiro框架三大核心对象
说明:
1)Subject :主体对象,负责提交用户认证和授权信息。
2)SecurityManager:安全管理器,负责认证,授权等业务实现。(核心)
3)Realm:领域对象,负责从数据层获取业务数据。
1.FilterRegistrationBean过滤注册bean
@Bean
public FilterRegistrationBean shiroFilterRegistration() {
    FilterRegistrationBean registration = new FilterRegistrationBean();
    registration.setFilter(new DelegatingFilterProxy("shiroFilter"));
    //该值缺省为false,表示生命周期由SpringApplicationContext管理,设置为true则表示由ServletContainer管理
    registration.addInitParameter("targetFilterLifecycle", "true");
    registration.setEnabled(true);
    registration.setOrder(Integer.MAX_VALUE - 1);
    registration.addUrlPatterns("/*");
    return registration;
}设置过滤的bean
2.shiroFilter 实际过滤配置bean
@Bean("shiroFilter")
public ShiroFilterFactoryBean shirFilter(SecurityManager securityManager) {
    ShiroFilterFactoryBean shiroFilter = new ShiroFilterFactoryBean();
    shiroFilter.setSecurityManager(securityManager);

    //oauth过滤
    Map<String, Filter> filters = new HashMap<>(10);
    filters.put("oauth3", new Oauth3Filter());
    shiroFilter.setFilters(filters);

    Map<String, String> filterMap = new LinkedHashMap<>();
    filterMap.put("/webjars/**", "anon");
    filterMap.put("/druid/**", "anon");
    filterMap.put("/login", "anon");

    filterMap.put("/**", "oauth3");
    shiroFilter.setFilterChainDefinitionMap(filterMap);

    return shiroFilter;
}配置oauth3Filter为过滤类 过滤对象处/webjars/** /druid/** /login 外的所有
3.过滤类Oauth3Filter 继承 AuthenTicationFilter 重写以下方法
/**
 * 验证是否有效token
 * @param request re
 * @param response res
 * @return 验证token
 * @throws Exception
 */
@Override
protected boolean onAccessDenied(ServletRequest request, ServletResponse response) throws Exception {
    //获取请求token,如果token不存在,直接返回401
    String token = getRequestToken((HttpServletRequest) request);
    if(StringUtils.isBlank(token)){
        HttpServletResponse httpResponse = (HttpServletResponse) response;
        httpResponse.setContentType("application/json;charset=utf-8");
        httpResponse.setHeader("Access-Control-Allow-Credentials", "true");
        httpResponse.setHeader("Access-Control-Allow-Origin", HttpContextUtils.getOrigin());

        String json = new Gson().toJson(new Result().error(ErrorCode.UNAUTHORIZED));

        httpResponse.getWriter().print(json);

        return false;
    }

    return executeLogin(request, response);
}4.调用父类 executeLogin 进行登录验证
protected boolean executeLogin(ServletRequest request, ServletResponse response) throws Exception {
    AuthenticationToken token = this.createToken(request, response);
    if (token == null) {
        String msg = "createToken method implementation returned null. A valid non-null AuthenticationToken must be created in order to execute a login attempt.";
        throw new IllegalStateException(msg);
    } else {
        try {
            Subject subject = this.getSubject(request, response);
            subject.login(token);
            return this.onLoginSuccess(token, subject, request, response);
        } catch (AuthenticationException var5) {
            return this.onLoginFailure(token, var5, request, response);
        }
    }
}5.subject.login(token); 进行登录
login方法被DelegatingSubject重写
public void login(AuthenticationToken token) throws AuthenticationException {
    **
    Subject subject = this.securityManager.login(this, token);
    **
}6.securityManager.login(this, token) login被DefaultSecurityManager
接下来几步没那么重要省略部分
7.ModularRealmAuthenticator AuthenticationInfo 授权信息获取方法
protected AuthenticationInfo doAuthenticate(AuthenticationToken authenticationToken) throws AuthenticationException {
    this.assertRealmsConfigured();
    Collection<Realm> realms = this.getRealms();
    return realms.size() == 1 ? this.doSingleRealmAuthentication((Realm)realms.iterator().next(), authenticationToken) : this.doMultiRealmAuthentication(realms, authenticationToken);
}getRealms 获取我们自己重写的Realms类,主要用户获取用户信息
8.接下来则进入我们自己写的Realms类 我的类叫Oauth3Realm
/**
 * 认证(登录时调用)
 */
@Override
protected AuthenticationInfo doGetAuthenticationInfo(AuthenticationToken token) throws AuthenticationException {
    String accessToken = (String) token.getPrincipal();

    //根据accessToken,查询用户信息
    SysUserTokenEntity tokenEntity = shiroService.getByToken(accessToken);
    //token失效
    if(tokenEntity == null || tokenEntity.getExpireDate().getTime() < System.currentTimeMillis()){
        throw new IncorrectCredentialsException(MessageUtils.getMessage(ErrorCode.TOKEN_INVALID));
    }

    //查询用户信息
    SysUserEntity userEntity = shiroService.getUser(tokenEntity.getUserId());

    //转换成UserDetail对象
    UserDetail userDetail = ConvertUtils.sourceToTarget(userEntity, UserDetail.class);

    //获取用户对应的部门数据权限
    List<Long> deptIdList = shiroService.getDataScopeList(userDetail.getId());
    userDetail.setDeptIdList(deptIdList);

    //账号锁定
    if(userDetail.getStatus() == 0){
        throw new LockedAccountException(MessageUtils.getMessage(ErrorCode.ACCOUNT_LOCK));
    }

    SimpleAuthenticationInfo info = new SimpleAuthenticationInfo(userDetail, accessToken, getName());
    return info;
}负责获取用户信息的方法
这并不是登录的过程,而是授权过滤的过程,通过token到数据库查询是否有这个用户,且没有过期,则证明已经登录。
到此,关于“shiro拦截认证的过程是什么”的学习就结束了,希望能够解决大家的疑惑。理论与实践的搭配能更好的帮助大家学习,快去试试吧!若想继续学习更多相关知识,请继续关注亿速云网站,小编会继续努力为大家带来更多实用的文章!
亿速云「云服务器」,即开即用、新一代英特尔至强铂金CPU、三副本存储NVMe SSD云盘,价格低至29元/月。点击查看>>
免责声明:本站发布的内容(图片、视频和文字)以原创、转载和分享为主,文章观点不代表本网站立场,如果涉及侵权请联系站长邮箱:is@yisu.com进行举报,并提供相关证据,一经查实,将立刻删除涉嫌侵权内容。


 计算
计算 安全
安全 数据库
数据库 网络和加速
网络和加速 企业服务
企业服务


