这篇文章将为大家详细讲解有关Android如何实现流光和光影移动效果,小编觉得挺实用的,因此分享给大家做个参考,希望大家阅读完这篇文章后可以有所收获。
开发过程中,看到有些界面用到一道光线在屏幕中掠过的效果,觉得挺炫的。所以查找相关资料自己实现了一遍。
先上个预览图:

简单来说就是在一个view中绘制好一道光影,并不断改变光影在view中的位置。
1.首先我们先了解一下光影怎么绘制
在了解如何绘制之前,我们先看一下LinearGradient的构造方法
/**
* Create a shader that draws a linear gradient along a line.
*
* @param x0 The x-coordinate for the start of the gradient line
* @param y0 The y-coordinate for the start of the gradient line
* @param x1 The x-coordinate for the end of the gradient line
* @param y1 The y-coordinate for the end of the gradient line
* @param colors The sRGB colors to be distributed along the gradient line
* @param positions May be null. The relative positions [0..1] of
* each corresponding color in the colors array. If this is null,
* the the colors are distributed evenly along the gradient line.
* @param tile The Shader tiling mode
*
*
* 翻译过来:
* x0,y0为渐变起点,x1,y1为渐变的终点
*
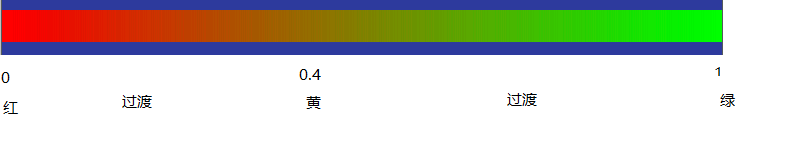
* colors数组为两点间的渐变颜色值,positions数组取值范围是0~1
* 传入的colors[]长度和positions[]长度必须相等,一一对应关系,否则报错
* position传入null则代表colors均衡分布
*
* tile有三种模式
* Shader.TileMode.CLAMP: 边缘拉伸模式,它会拉伸边缘的一个像素来填充其他区域
* Shader.TileMode.MIRROR: 镜像模式,通过镜像变化来填充其他区域
* Shader.TileMode.REPEAT:重复模式,通过复制来填充其他区域
*/
LinearGradient(float x0, float y0, float x1, float y1, @NonNull @ColorInt int[] colors,
@Nullable float[] positions, @NonNull TileMode tile)colors[]和positions[]的说明结合下图,这样理解起来应该就比较明朗了
回到正题,如何绘制光影。我们看到的那道光可以参照下图:
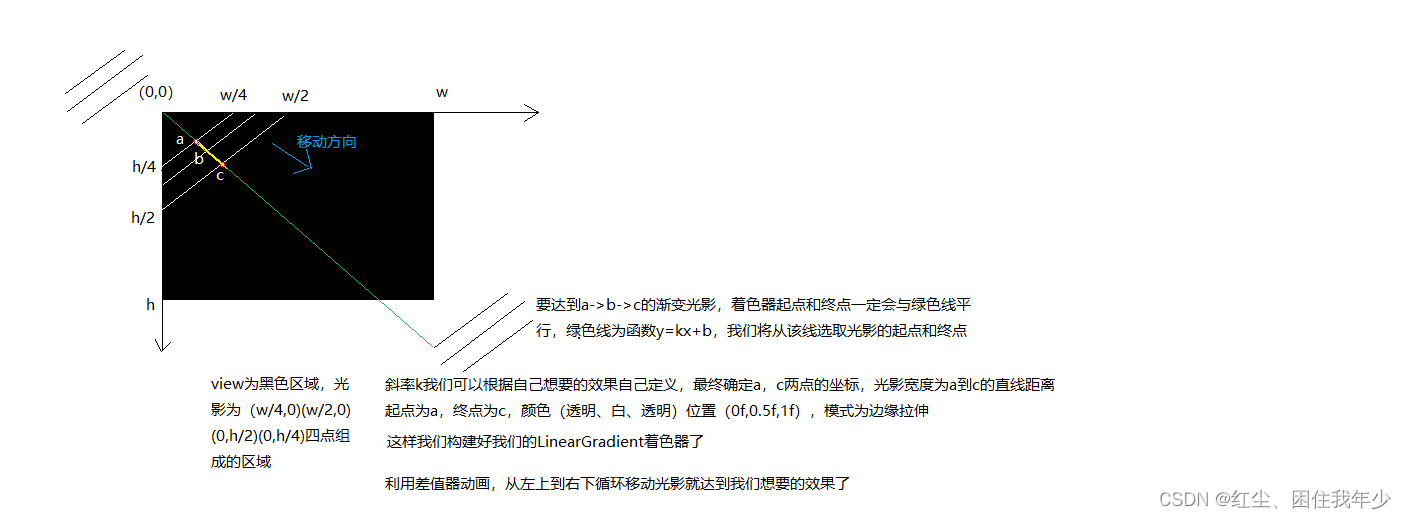
根据分析得到我们的着色器是线性着色器(其他着色器请查询相关api):
LinearGradient(a的x坐标, a的y坐标, c的x坐标, c的y坐标, new int[]{Color.parseColor("#00FFFFFF"), Color.parseColor("#FFFFFFFF"), Color.parseColor("#00FFFFFF")}, new float[]{0f, 0.5f, 1f}, Shader.TileMode.CLAMP)2.给画笔上色。设置着色器mPaint.setShader(mLinearGradient)
3.给定一个数值范围利用数值生成器ValueAnimator产生数值,监听数值变化。每次回调都将该数值传入光影的起点和终点并进行绘制
/**
 * author: caoyb
 * created on: 2021/12/20 15:13
 * description:
 */
public class ConfigLoadingView extends View {

    private Paint mPaint;
    private Path mPath;
    private LinearGradient mLinearGradient;
    private ValueAnimator mValueAnimator;

    public ConfigLoadingView(Context context) {
        this(context, null);
    }

    public ConfigLoadingView(Context context, @Nullable AttributeSet attrs) {
        this(context, attrs, 0);
    }

    public ConfigLoadingView(Context context, @Nullable AttributeSet attrs, int defStyleAttr) {
        super(context, attrs, defStyleAttr);
        init();
    }

    private void init() {
        mPaint = new Paint();
        mPath = new Path();
    }

    private void initPointAndAnimator(int w, int h) {
        Point point1 = new Point(0, 0);
        Point point2 = new Point(w, 0);
        Point point3 = new Point(w, h);
        Point point4 = new Point(0, h);

        mPath.moveTo(point1.x, point1.y);
        mPath.lineTo(point2.x, point2.y);
        mPath.lineTo(point3.x, point3.y);
        mPath.lineTo(point4.x, point4.y);
        mPath.close();

		// 斜率k
        float k = 1f * h / w;
        // 偏移
        float offset = 1f * w / 2;
		// 0f - offset * 2 为数值左边界(屏幕外左侧), w + offset * 2为数值右边界(屏幕外右侧)
		// 目的是使光影走完一遍,加一些时间缓冲,不至于每次光影移动的间隔都那么急促
        mValueAnimator = ValueAnimator.ofFloat(0f - offset * 2, w + offset * 2);
        mValueAnimator.setRepeatCount(-1);
        mValueAnimator.setInterpolator(new LinearInterpolator());
        mValueAnimator.setDuration(1500);
        mValueAnimator.addUpdateListener(new ValueAnimator.AnimatorUpdateListener() {
            @Override
            public void onAnimationUpdate(ValueAnimator animation) {
                float value = (float) animation.getAnimatedValue();
                mLinearGradient = new LinearGradient(value, k * value, value + offset, k * (value + offset),
                        new int[]{Color.parseColor("#00FFFFFF"), Color.parseColor("#1AFFFFFF"), Color.parseColor("#00FFFFFF")}, null, Shader.TileMode.CLAMP);
                mPaint.setShader(mLinearGradient);
                invalidate();
            }
        });
        mValueAnimator.start();
    }

    @Override
    protected void onMeasure(int widthMeasureSpec, int heightMeasureSpec) {
        super.onMeasure(widthMeasureSpec, heightMeasureSpec);
        int widthSize = MeasureSpec.getSize(widthMeasureSpec);
        int heightSize = MeasureSpec.getSize(heightMeasureSpec);
        initPointAndAnimator(widthSize, heightSize);
    }

    @Override
    protected void onDraw(Canvas canvas) {
        super.onDraw(canvas);
        canvas.drawPath(mPath, mPaint);
    }

    @Override
    protected void onDetachedFromWindow() {
        super.onDetachedFromWindow();
        mValueAnimator.cancel();
    }
}LinearGradient里参数之一:
color[]参数只能是16进制的RGB数值,不能传R.color.xxx。R.color.xxx虽然是int型,但拿到的是资源ID,并不是16进制RGB
关于“Android如何实现流光和光影移动效果”这篇文章就分享到这里了,希望以上内容可以对大家有一定的帮助,使各位可以学到更多知识,如果觉得文章不错,请把它分享出去让更多的人看到。
亿速云「云服务器」,即开即用、新一代英特尔至强铂金CPU、三副本存储NVMe SSD云盘,价格低至29元/月。点击查看>>
免责声明:本站发布的内容(图片、视频和文字)以原创、转载和分享为主,文章观点不代表本网站立场,如果涉及侵权请联系站长邮箱:is@yisu.com进行举报,并提供相关证据,一经查实,将立刻删除涉嫌侵权内容。


 计算
计算 安全
安全 数据库
数据库 网络和加速
网络和加速 企业服务
企业服务


