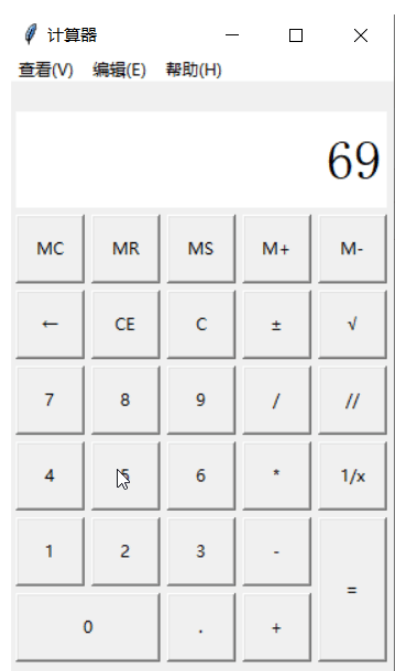
这篇文章主要介绍“基于Python+Tkinter怎么实现一个简易计算器”,在日常操作中,相信很多人在基于Python+Tkinter怎么实现一个简易计算器问题上存在疑惑,小编查阅了各式资料,整理出简单好用的操作方法,希望对大家解答”基于Python+Tkinter怎么实现一个简易计算器”的疑惑有所帮助!接下来,请跟着小编一起来学习吧!
从结构上来说,一个简单的图形界面,需要由界面组件、组件的事件监听器(响应各类事件的逻辑)和具体的事件处理逻辑组成。界面实现的主要工作是创建各个界面组件对象,对其进行初始化,以及控制各组件之间的层次关系和布局

import tkinter
import math
import tkinter.messagebox


class Calculator(object):
    # 界面布局方法
    def __init__(self):
        # 创建主界面,并且保存到成员属性中
        self.root = tkinter.Tk()
        self.root.minsize(280, 450)
        self.root.maxsize(280, 470)
        self.root.title('计算器')
        # 设置显式面板的变量
        self.result = tkinter.StringVar()
        self.result.set(0)
        # 设置一个全局变量  运算数字和f符号的列表
        self.lists = []
        # 添加一个用于判断是否按下运算符号的标志
        self.ispresssign = False
        # 界面布局
        self.menus()
        self.layout()
        self.root.mainloop()

    # 计算器菜单界面摆放

    def menus(self):
        # 添加菜单
        # 创建总菜单
        allmenu = tkinter.Menu(self.root)
        # 添加子菜单
        filemenu = tkinter.Menu(allmenu, tearoff=0)
        # 添加选项卡
        filemenu.add_command(
            label='标准型(T)            Alt+1', command=self.myfunc)
        filemenu.add_command(
            label='科学型(S)            Alt+2', command=self.myfunc)
        filemenu.add_command(
            label='程序员(P)            Alt+3', command=self.myfunc)
        filemenu.add_command(label='统计信息(A)        Alt+4', command=self.myfunc)
        # 添加分割线
        filemenu.add_separator()
        # 添加选项卡
        filemenu.add_command(label='历史记录(Y)      Ctrl+H', command=self.myfunc)
        filemenu.add_command(label='数字分组(I)', command=self.myfunc)
        # 添加分割线
        filemenu.add_separator()
        # 添加选项卡
        filemenu.add_command(
            label='基本(B)             Ctrl+F4', command=self.myfunc)
        filemenu.add_command(label='单位转换(U)      Ctrl+U', command=self.myfunc)
        filemenu.add_command(label='日期计算(D)      Ctrl+E', command=self.myfunc)
        menu1 = tkinter.Menu(filemenu, tearoff=0)
        menu1.add_command(label='抵押(M)', command=self.myfunc)
        menu1.add_command(label='汽车租赁(V)', command=self.myfunc)
        menu1.add_command(label='油耗(mpg)(F)', command=self.myfunc)
        menu1.add_command(label='油耗(l/100km)(U)', command=self.myfunc)
        filemenu.add_cascade(label='工作表(W)', menu=menu1)
        allmenu.add_cascade(label='查看(V)', menu=filemenu)

        # 添加子菜单2
        editmenu = tkinter.Menu(allmenu, tearoff=0)
        # 添加选项卡
        editmenu.add_command(label='复制(C)         Ctrl+C', command=self.myfunc)
        editmenu.add_command(label='粘贴(V)         Ctrl+V', command=self.myfunc)
        # 添加分割线
        editmenu.add_separator()
        # 添加选项卡
        menu2 = tkinter.Menu(filemenu, tearoff=0)
        menu2.add_command(label='复制历史记录(I)', command=self.myfunc)
        menu2.add_command(
            label='编辑(E)                      F2', command=self.myfunc)
        menu2.add_command(label='取消编辑(N)            Esc', command=self.myfunc)
        menu2.add_command(label='清除(L)    Ctrl+Shift+D', command=self.myfunc)
        editmenu.add_cascade(label='历史记录(H)', menu=menu2)
        allmenu.add_cascade(label='编辑(E)', menu=editmenu)

        # 添加子菜单3
        helpmenu = tkinter.Menu(allmenu, tearoff=0)
        # 添加选项卡
        helpmenu.add_command(label='查看帮助(V)       F1', command=self.myfunc)
        # 添加分割线
        helpmenu.add_separator()
        # 添加选项卡
        helpmenu.add_command(label='关于计算器(A)', command=self.myfunc)
        allmenu.add_cascade(label='帮助(H)', menu=helpmenu)

        self.root.config(menu=allmenu)

    # 计算器主界面摆放

    def layout(self):
        # 显示屏
        result = tkinter.StringVar()
        result.set(0)
        show_label = tkinter.Label(self.root, bd=3, bg='white', font=(
            '宋体', 30), anchor='e', textvariable=self.result)
        show_label.place(x=5, y=20, width=270, height=70)
        # 功能按钮MC
        button_mc = tkinter.Button(self.root, text='MC', command=self.wait)
        button_mc.place(x=5, y=95, width=50, height=50)
        # 功能按钮MR
        button_mr = tkinter.Button(self.root, text='MR', command=self.wait)
        button_mr.place(x=60, y=95, width=50, height=50)
        # 功能按钮MS
        button_ms = tkinter.Button(self.root, text='MS', command=self.wait)
        button_ms.place(x=115, y=95, width=50, height=50)
        # 功能按钮M+
        button_mjia = tkinter.Button(self.root, text='M+', command=self.wait)
        button_mjia.place(x=170, y=95, width=50, height=50)
        # 功能按钮M-
        button_mjian = tkinter.Button(self.root, text='M-', command=self.wait)
        button_mjian.place(x=225, y=95, width=50, height=50)
        # 功能按钮←
        button_zuo = tkinter.Button(self.root, text='←', command=self.dele_one)
        button_zuo.place(x=5, y=150, width=50, height=50)
        # 功能按钮CE
        button_ce = tkinter.Button(
            self.root, text='CE', command=lambda: self.result.set(0))
        button_ce.place(x=60, y=150, width=50, height=50)
        # 功能按钮C
        button_c = tkinter.Button(self.root, text='C', command=self.sweeppress)
        button_c.place(x=115, y=150, width=50, height=50)
        # 功能按钮±
        button_zf = tkinter.Button(self.root, text='±', command=self.zf)
        button_zf.place(x=170, y=150, width=50, height=50)
        # 功能按钮√
        button_kpf = tkinter.Button(self.root, text='√', command=self.kpf)
        button_kpf.place(x=225, y=150, width=50, height=50)
        # 数字按钮7
        button_7 = tkinter.Button(
            self.root, text='7', command=lambda: self.pressnum('7'))
        button_7.place(x=5, y=205, width=50, height=50)
        # 数字按钮8
        button_8 = tkinter.Button(
            self.root, text='8', command=lambda: self.pressnum('8'))
        button_8.place(x=60, y=205, width=50, height=50)
        # 数字按钮9
        button_9 = tkinter.Button(
            self.root, text='9', command=lambda: self.pressnum('9'))
        button_9.place(x=115, y=205, width=50, height=50)
        # 功能按钮/
        button_division = tkinter.Button(
            self.root, text='/', command=lambda: self.presscalculate('/'))
        button_division.place(x=170, y=205, width=50, height=50)
        # 功能按钮%
        button_remainder = tkinter.Button(
            self.root, text='//', command=lambda: self.presscalculate('//'))
        button_remainder.place(x=225, y=205, width=50, height=50)
        # 数字按钮4
        button_4 = tkinter.Button(
            self.root, text='4', command=lambda: self.pressnum('4'))
        button_4.place(x=5, y=260, width=50, height=50)
        # 数字按钮5
        button_5 = tkinter.Button(
            self.root, text='5', command=lambda: self.pressnum('5'))
        button_5.place(x=60, y=260, width=50, height=50)
        # 数字按钮6
        button_6 = tkinter.Button(
            self.root, text='6', command=lambda: self.pressnum('6'))
        button_6.place(x=115, y=260, width=50, height=50)
        # 功能按钮*
        button_multiplication = tkinter.Button(
            self.root, text='*', command=lambda: self.presscalculate('*'))
        button_multiplication.place(x=170, y=260, width=50, height=50)
        # 功能按钮1/x
        button_reciprocal = tkinter.Button(
            self.root, text='1/x', command=self.ds)
        button_reciprocal.place(x=225, y=260, width=50, height=50)
        # 数字按钮1
        button_1 = tkinter.Button(
            self.root, text='1', command=lambda: self.pressnum('1'))
        button_1.place(x=5, y=315, width=50, height=50)
        # 数字按钮2
        button_2 = tkinter.Button(
            self.root, text='2', command=lambda: self.pressnum('2'))
        button_2.place(x=60, y=315, width=50, height=50)
        # 数字按钮3
        button_3 = tkinter.Button(
            self.root, text='3', command=lambda: self.pressnum('3'))
        button_3.place(x=115, y=315, width=50, height=50)
        # 功能按钮-
        button_subtraction = tkinter.Button(
            self.root, text='-', command=lambda: self.presscalculate('-'))
        button_subtraction.place(x=170, y=315, width=50, height=50)
        # 功能按钮=
        button_equal = tkinter.Button(
            self.root, text='=', command=lambda: self.pressequal())
        button_equal.place(x=225, y=315, width=50, height=105)
        # 数字按钮0
        button_0 = tkinter.Button(
            self.root, text='0', command=lambda: self.pressnum('0'))
        button_0.place(x=5, y=370, width=105, height=50)
        # 功能按钮.
        button_point = tkinter.Button(
            self.root, text='.', command=lambda: self.pressnum('.'))
        button_point.place(x=115, y=370, width=50, height=50)
        # 功能按钮+
        button_plus = tkinter.Button(
            self.root, text='+', command=lambda: self.presscalculate('+'))
        button_plus.place(x=170, y=370, width=50, height=50)

    # 计算器菜单功能

    def myfunc(self):
        tkinter.messagebox.showinfo('', '预留接口,学成之后,你是不是有冲动添加该功能.')

    # 数字方法
    def pressnum(self, num):
        # 全局化变量
        # 判断是否按下了运算符号
        if self.ispresssign == False:
            pass
        else:
            self.result.set(0)
            # 重置运算符号的状态
            self.ispresssign = False
        if num == '.':
            num = '0.'
        # 获取面板中的原有数字
        oldnum = self.result.get()
        # 判断界面数字是否为0
        if oldnum == '0':
            self.result.set(num)
        else:
            # 连接上新按下的数字
            newnum = oldnum + num

            # 将按下的数字写到面板中
            self.result.set(newnum)

    # 运算函数
    def presscalculate(self, sign):
        # 保存已经按下的数字和运算符号
        # 获取界面数字
        num = self.result.get()
        self.lists.append(num)
        # 保存按下的操作符号
        self.lists.append(sign)
        # 设置运算符号为按下状态
        self.ispresssign = True

    # 获取运算结果

    def pressequal(self):
        # 获取所有的列表中的内容(之前的数字和操作)
        # 获取当前界面上的数字
        curnum = self.result.get()
        # 将当前界面的数字存入列表
        self.lists.append(curnum)
        # 将列表转化为字符串
        calculatestr = ''.join(self.lists)
        # 使用eval执行字符串中的运算即可
        endnum = eval(calculatestr)
        # 将运算结果显示在界面中
        self.result.set(str(endnum)[:10])
        if self.lists != 0:
            self.ispresssign = True
        # 清空运算列表
        self.lists.clear()

    # 暂未开发说明

    def wait(self):
        tkinter.messagebox.showinfo('', '更新中......')

    # ←按键功能

    def dele_one(self):
        if self.result.get() == '' or self.result.get() == '0':
            self.result.set('0')
            return
        else:
            num = len(self.result.get())
            if num > 1:
                strnum = self.result.get()
                strnum = strnum[0:num - 1]
                self.result.set(strnum)
            else:
                self.result.set('0')

    # ±按键功能

    def zf(self):
        strnum = self.result.get()
        if strnum[0] == '-':
            self.result.set(strnum[1:])
        elif strnum[0] != '-' and strnum != '0':
            self.result.set('-' + strnum)

    # 1/x按键功能

    def ds(self):
        dsnum = 1 / int(self.result.get())
        self.result.set(str(dsnum)[:10])
        if self.lists != 0:
            self.ispresssign = True
        # 清空运算列表
        self.lists.clear()

    # C按键功能

    def sweeppress(self):
        self.lists.clear()
        self.result.set(0)

    # √按键功能

    def kpf(self):
        strnum = float(self.result.get())
        endnum = math.sqrt(strnum)
        if str(endnum)[-1] == '0':
            self.result.set(str(endnum)[:-2])
        else:
            self.result.set(str(endnum)[:10])
        if self.lists != 0:
            self.ispresssign = True
        # 清空运算列表
        self.lists.clear()


# 实例化对象
my_calculator = Calculator()
到此,关于“基于Python+Tkinter怎么实现一个简易计算器”的学习就结束了,希望能够解决大家的疑惑。理论与实践的搭配能更好的帮助大家学习,快去试试吧!若想继续学习更多相关知识,请继续关注亿速云网站,小编会继续努力为大家带来更多实用的文章!
免责声明:本站发布的内容(图片、视频和文字)以原创、转载和分享为主,文章观点不代表本网站立场,如果涉及侵权请联系站长邮箱:is@yisu.com进行举报,并提供相关证据,一经查实,将立刻删除涉嫌侵权内容。