这篇文章主要介绍了Mybatis全局配置及映射关系怎么实现,具有一定借鉴价值,感兴趣的朋友可以参考下,希望大家阅读完这篇文章之后大有收获,下面让小编带着大家一起了解一下。
mybatis.xml就是Mybatis的全局配置文件。
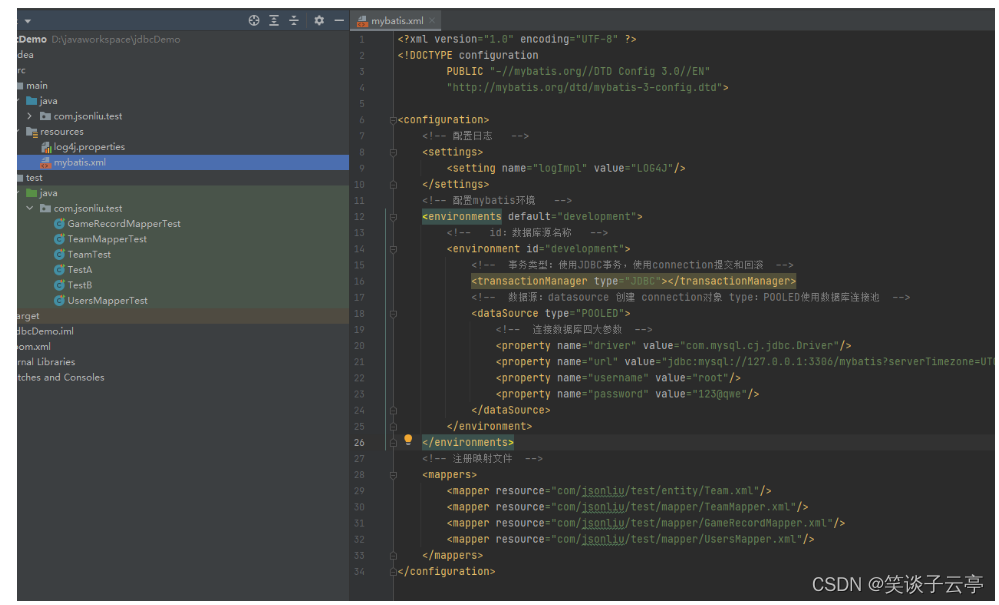
全局配置文件需要在头部使用约束文件。
<?xml version="1.0" encoding="UTF-8" ?>
<!DOCTYPE configuration
        PUBLIC "-//mybatis.org//DTD Config 3.0//EN"
"http://mybatis.org/dtd/mybatis-3-config.dtd">配置文件的顶层结构如下:
configuration(配置)
    properties--属性:加载外部配置文件,例如数据库的连接信息
    Settings--全局配置参数:例如日志配置
    typeAliases--类型别名
    typeHandlers--类型处理器
    objectFactory--对象工厂
    Plugins--插件:例如分页插件
    Environments--环境集合属性对象
        environment(环境变量)
            transactionManager(事务管理器)
            dataSource(数据源)
Mappers--映射器:注册映射文件属性可以在外部配置,并可以进行动态替换。我们既可以在properties元素的子元素设置(例如Datasource中的properties节点)也可以在java属性文件中配置。
数据源中有连接数据库的四个参数数据,我们一般都放在专门的属性文件中,mybatis的全局配置文件直接从属性文件中读取数据。
1、resources目录下创建jdbc.properties
jdbc.driver=com.mysql.cj.jdbc.Driver
jdbc.url=jdbc:mysql://127.0.0.1:3306/mybatis?serverTimezone=UTC&characterEncoding=utf-8&serverTimezone=Asia/Shanghai
jdbc.username=root
jdbc.password=123@qwe2、mybatis.xml中引入配置文件
<properties resource="jdbc.properties"/>3、使用属性文件中的值
 <dataSource type="POOLED">
    <!--  连接数据库四大参数  -->
    <property name="driver" value="${jdbc.driver}"/>
    <property name="url" value="${jdbc.url}"/>
    <property name="username" value="${jdbc.username}"/>
    <property name="password" value="${jdbc.password}"/>
</dataSource>Mybatis中极为重要的调整设置,它们会改变Mybatis的运行行为,例如日志。
 <!-- 配置日志   -->
    <settings>
        <setting name="logImpl" value="LOG4J"/>
</settings>可以为java类型设置一个缩写别名,仅用于xml配置,意在减低冗余全限定类名书写。
MyBatis中已经支持一些常见类型的别名,如下:
| 别名 | 映射的类型 |
|---|---|
| _byte | byte |
| _long | long |
| _short | short |
| _int | int |
| _integer | int |
| _double | double |
| _float | float |
| _boolean | boolean |
| string | String |
| byte | Byte |
| long | Long |
| short | Short |
| int | Integer |
| integer | Integer |
| double | Double |
| float | Float |
| boolean | Boolean |
| date | Date |
| decimal | BigDecimal |
| bigdecimal | BigDecimal |
| object | Object |
| map | Map |
| hashmap | HashMap |
| list | List |
| arraylist | ArrayList |
| collection | Collection |
| iterator | Iterator |
也支持自定义别名:
 <typeAliases>
        <!--  对单个实体类定义别名 -->
        <typeAlias type="com.jsonliu.test.entity.Users" alias="Users" />
        <!--  推荐:批量定义别名,扫描指定包下所有类,同时别名定义为类名,别名首字母大小写都可以 -->
        <package name="com.jsonliu.test.entity"/>
</typeAliases>1.4.1、使用相对于类路径的资源引用
语法:<mapper resource="">
使用相对于类路径的资源,从classpath路径查找文件
例如:<mapper resource="com/jsonliu/test/entity/Team.xml"/>
1.4.2、使用映射器接口实现类的完全限定类名
语法:<mapper class="">
要求:接口和映射文件同包同名
<mapper class="com.jsonliu.test.mapper.UsersMapper"/>
1.4.3、将包内映射器接口全部注册为映射器
推荐
语法:<package name="">
指定包下的所有mapper接口
例如:<package name="com.jsonliu.test.mapper"/>
注意:此种方法要求Mapper接口名称和mapper映射文件名称相同,且在同一个目录中
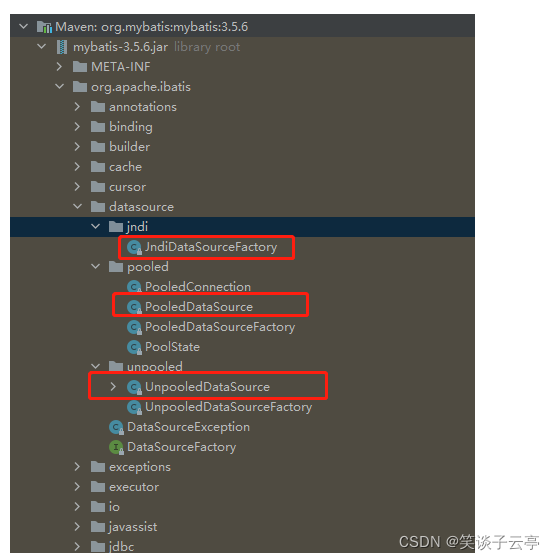
Mybatis中访问数据库支持连接池技术,而且采用的自己的连接池技术。在mybatis.xml文件中进行配置,根据type属性创建相应类型数据源DataSource。
Mybatis数据源分三类:
UNPOOLED:不使用连接池数据源
POOLED:使用连接池数据源
JNDI:使用JNDI实现的数据源
前两个数据源都实现了javax.sql.Datasource接口
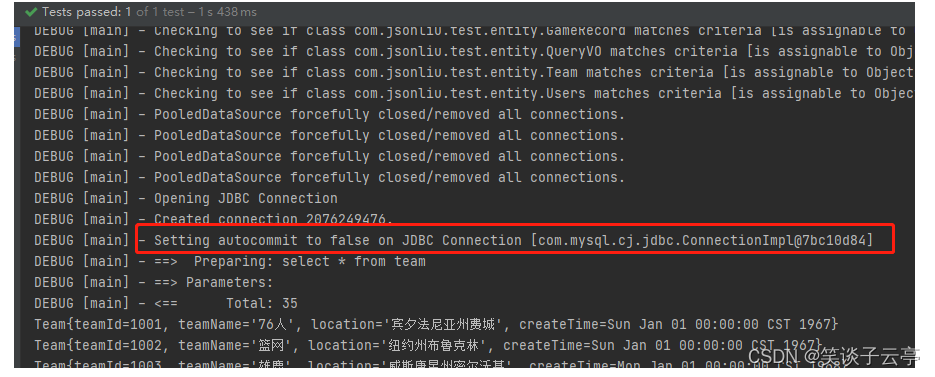
默认手动提交事务:
Mybatis框架是对JDBC的封装,所以Mybatis事务的控制方式本身也是用JDBC的connection对象的commit()、rollback()方法,connection对象的setAutoCommit()设置事务提交方式为手动或者自动。
<!--  事务类型:使用JDBC事务,使用connection提交和回滚  -->
<transactionManager type="JDBC" />transactionManager 指定Mybatis所用事务管理器,支持:JDBC与MANAGED
JDBC事务管理机制,通过Connection对象的commit()方法提交,rollback()方法回滚。默认情况下Mybatis将关闭自动提交功能,观察日志可以看出,提交或者回滚都需要我们手动设置。
MANAGED:由容器来管理事务的整个生命周期(如Spring容器)
SqlSessionFactory的openSession()方法存在重载,可以设置自动提交方式。
如果sqlSession = SqlSessionFactory.openSession(true);
参数设置为true,再次执行增删改不需要执行sqlSession.commit(),事务会自动提交。
表结构如下:
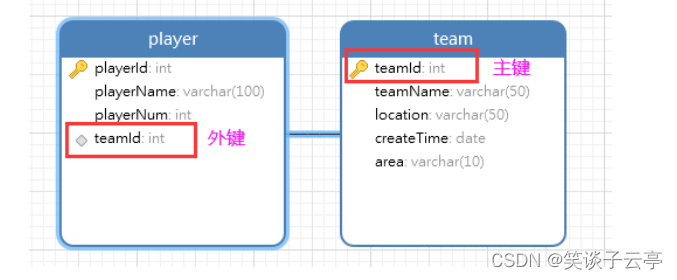
添加实体类Player:
public class Player {
    private Integer playerId;
    private String playerName;
    private Integer playerNum;
    private Integer teamId;
    private Team team1;

    public Player() {
    }

    public Player(Integer playerId, String playerName, Integer playerNum, Integer teamId) {
        this.playerId = playerId;
        this.playerName = playerName;
        this.playerNum = playerNum;
        this.teamId = teamId;
    }

    @Override
    public String toString() {
        return "Player{" +
                "playerId=" + playerId +
                ", playerName='" + playerName + '\'' +
                ", playerNum=" + playerNum +
                ", teamId=" + teamId +
                ", team1=" + team1 +
                '}';
    }

    public Integer getPlayerId() {
        return playerId;
    }

    public void setPlayerId(Integer playerId) {
        this.playerId = playerId;
    }

    public String getPlayerName() {
        return playerName;
    }

    public void setPlayerName(String playerName) {
        this.playerName = playerName;
    }

    public Integer getPlayerNum() {
        return playerNum;
    }

    public void setPlayerNum(Integer playerNum) {
        this.playerNum = playerNum;
    }

    public Integer getTeamId() {
        return teamId;
    }

    public void setTeamId(Integer teamId) {
        this.teamId = teamId;
    }

    public Team getTeam1() {
        return team1;
    }

    public void setTeam1(Team team1) {
        this.team1 = team1;
    }
}Mapper接口:
public interface PlayerMapper {

    Player queryById(int playerId);
    Player queryById1(int playerId);
    Player queryById2(int playerId);
    Player queryById3(int playerId);

}Mapper映射文件:
<?xml version="1.0" encoding="UTF-8" ?>
<!DOCTYPE mapper
        PUBLIC "-//mybatis.org//DTD Mapper 3.0//EN"
        "http://mybatis.org/dtd/mybatis-3-mapper.dtd">
<mapper namespace="com.jsonliu.test.mapper.PlayerMapper">
    <select id="queryById" resultType="player">
        select * from player where playerId=#{playerId}
    </select>

    <select id="queryById1" resultMap="joinTeamResult1">
        select * from player a inner join team b on a.teamId=b.teamId
        where a.playerId=#{playerId}
    </select>

    <select id="queryById2" resultMap="joinTeamResult2">
        select * from player a inner join team b on a.teamId=b.teamId
        where a.playerId=#{playerId}
    </select>

    <select id="queryById3" resultMap="joinTeamResult3">
        select * from player where playerId=#{playerId}
    </select>

    <resultMap id="baseResultMap" type="player">
        <id property="playerId" column="playerId" ></id>
        <result property="playerName" column="playerName"></result>
        <result property="playerNum" column="playerNum"></result>
        <result property="teamId" column="teamId"></result>
    </resultMap>

    <!-- 方式一:关联对象.属性,要求连接查询。 extends=表示继承其他的resultMap的ID  -->
    <resultMap id="joinTeamResult1" type="player" extends="baseResultMap">
        <id property="team1.teamId" column="teamId"></id>
        <result property="team1.teamName" column="teamName"></result>
        <result property="team1.location" column="location"></result>
        <result property="team1.createTime" column="createTime"></result>
    </resultMap>

    <!-- 方式二:直接引用关联对象的mapper映射,要求连接查询。 property=关联对象的属性名
        javaType=关联对象的类型  resultMap=关联对象命名空间中的resultMap-->
    <resultMap id="joinTeamResult2" type="player" extends="baseResultMap">
        <association property="team1" javaType="team" resultMap="com.jsonliu.test.mapper.TeamMapper.baseResultMap"/>
    </resultMap>

    <!-- 方式三:直接引用关联对象的查询方法,要求关联对象的mapper中必须有单独的查询方法。 property=关联对象的属性名
    javaType=关联对象的类型 select=关联对象的单独查询语句 column=外键列 -->
    <resultMap id="joinTeamResult3" type="player" extends="baseResultMap">
        <association property="team1" javaType="team" select="com.jsonliu.test.mapper.TeamMapper.queryById" column="teamId"/>
    </resultMap>
</mapper>测试类:
public class PlayerMapperTest {

    private PlayerMapper mapper=MybatisUtil.getSqlSession().getMapper(PlayerMapper.class);

    @Test
    public void test1(){
        Player player = mapper.queryById1(1);
        System.out.println(player);
    }

    @Test
    public void test2(){
        Player player = mapper.queryById2(1);
        System.out.println(player);
    }

    @Test
    public void test3(){
        Player player = mapper.queryById3(1);
        System.out.println(player);
    }
}修改实体类Team.java:
public class Team {
    /**
     * 球队ID
     */
    private Integer teamId;
    /**
     * 球队名称
     */
    private String teamName;
    /**
     * 球队地址
     */
    private String location;
    /**
     * 创立时间
     */
    private Date createTime;
    /**
     * 队员集合
     */
    private List<Player> playerList;
    ...
}TeamMapper接口中添加方法:
    Team queryById1(int teamId);

Team queryById2(int teamId);PlayerMapper接口中添加方法:
List<Player> queryByTeamId(int teamId);TeamMapper.xml中添加映射:
 <!-- 方式一:使用collection,property=关联对象集合名称,javaType=关联对象集合类型,ofType=关联对象集合的泛型,
       resultMap=引起关联对象的结果映射  -->
    <resultMap id="joinResult1" type="team" extends="baseResultMap">
        <collection property="playerList" javaType="arrayList" ofType="Player" resultMap="com.jsonliu.test.mapper.PlayerMapper.baseResultMap"/>
    </resultMap>

    <!-- 方式一:使用collection,property=关联对象集合名称,javaType=关联对象集合类型,ofType=关联对象集合的泛型,
      select=引起关联对象的单独查询方法,使用的前提是关联对象中该方法可用
      column=引起关联对象的单独查询方法的参数,一般是外键-->
    <resultMap id="joinResult2" type="team" extends="baseResultMap">
        <collection property="playerList" javaType="arrayList" select="com.jsonliu.test.mapper.PlayerMapper.queryByTeamId" column="teamId"/>
</resultMap>PlayerMapper.xml中添加映射:
  <select id="queryByTeamId" resultType="player">
        select * from player where teamId=#{teamId}
</select>测试类中添加测试方法:
 @Test
    public void test13(){
        TeamMapper mapper = sqlSession.getMapper(TeamMapper.class);
        Team team = mapper.queryById1(1025);
        System.out.println(team);
    }

    @Test
    public void test14(){
        TeamMapper mapper = sqlSession.getMapper(TeamMapper.class);
        Team team = mapper.queryById2(1025);
        System.out.println(team);
}感谢你能够认真阅读完这篇文章,希望小编分享的“Mybatis全局配置及映射关系怎么实现”这篇文章对大家有帮助,同时也希望大家多多支持亿速云,关注亿速云行业资讯频道,更多相关知识等着你来学习!
亿速云「云服务器」,即开即用、新一代英特尔至强铂金CPU、三副本存储NVMe SSD云盘,价格低至29元/月。点击查看>>
免责声明:本站发布的内容(图片、视频和文字)以原创、转载和分享为主,文章观点不代表本网站立场,如果涉及侵权请联系站长邮箱:is@yisu.com进行举报,并提供相关证据,一经查实,将立刻删除涉嫌侵权内容。


 计算
计算 安全
安全 数据库
数据库 网络和加速
网络和加速 企业服务
企业服务


