这篇“jQuery如何实现首页悬浮框”文章的知识点大部分人都不太理解,所以小编给大家总结了以下内容,内容详细,步骤清晰,具有一定的借鉴价值,希望大家阅读完这篇文章能有所收获,下面我们一起来看看这篇“jQuery如何实现首页悬浮框”文章吧。
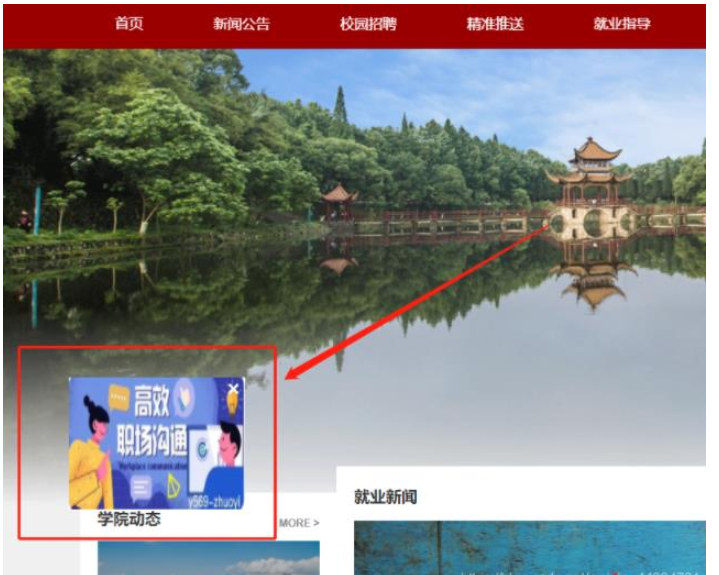
基于jQuery实现首页悬浮框,如下图所示

1、在页面中引入jQuery.bay-window.js,jQuery.bay-window.js的代码如下:
!function($){
  /**
   * Description: jquery飘窗插件,可自适应浏览器宽高的变化
   * Author: ddqre12345
   * CreateTime: 2017.5.3
   * param: args={startL:default, startT:default, angle:-Math.PI/4, speed: 125}
   * 参数说名: startL飘窗初始时距离左边的距离, startT飘窗初始化距离顶部的距离, angle飘窗初始运动方向, speed运动速度(px/s)
   */
  $.fn.autoMove = function(args){
    //先定义一些工具函数判断边距
    function isTop(pos, w_w, w_h, d_w, d_h){//飘窗到达上边距
      return (pos.top<=0) ? true : false;
    }
    function isBottom(pos, w_w, w_h, d_w, d_h){//飘窗到达下边距
      return (pos.top>=(w_h-d_h)) ? true : false;
    }
    function isLeft(pos, w_w, w_h, d_w, d_h){//飘窗到达左边距
      return (pos.left<=0) ? true : false;
    }
    function isRight(pos, w_w, w_h, d_w, d_h){//飘窗到达右边距
      return (pos.left>=(w_w-d_w)) ? true : false;
    }
    return this.each(function(){
      var w_w = parseInt($(window).width()),
        w_h = parseInt($(window).height()),
        d_w = parseInt($(this).width()),
        d_h = parseInt($(this).height()),
        d_l = (w_w-d_w)/2,
        d_t = (w_h-d_h)/2,
        max_l = w_w - d_w;
      max_t = w_h - d_h;
      //位置及参数的初始化
      var setobj = $.extend({startL:d_l, startT:d_t, angle:Math.PI/4, speed:100}, args);
      $(this).css({position: 'fixed', left: setobj['startL']+'px', top: setobj['startT']+'px'});
      var position = {left: setobj['startL'], top: setobj['startT']};//飘窗位置对象
      var that = $(this);
      var angle= setobj.angle;
      var time = 10;//控制飘窗运动效果,值越小越细腻
      var step = setobj.speed * (time/1000);//计算运动步长
      var decoration = {x:step*Math.cos(angle), y:step*Math.sin(angle)};//计算二维上的运动增量
      var mvtid;
      $(window).on('resize', function(){//窗口大小变动时重新设置运动相关参数
          w_w = parseInt($(window).width());
          w_h = parseInt($(window).height());
          max_l = w_w - d_w;
          max_t = w_h - d_h;
      });
      function move(){
        position.left += decoration.x;
        position.top  += decoration.y;
        if(isLeft(position, w_w, w_h, d_w, d_h)||isRight(position, w_w, w_h, d_w, d_h)){
          decoration.x = -1*decoration.x;
        }
        if(isRight(position, w_w, w_h, d_w, d_h)){
          position.left = max_l;
        }
        if(isTop(position, w_w, w_h, d_w, d_h)||isBottom(position, w_w, w_h, d_w, d_h)){
          decoration.y = -1*decoration.y;
        }
        if(isBottom(position, w_w, w_h, d_w, d_h)){
          position.top = max_t;
        }
        //that.css({left:position.left, top:position.top});
        that.stop().animate({left:position.left, top:position.top}, time);//改用jquery动画函数使其更加平滑
        mvtid = setTimeout(move, time);//递归调用,使飘窗连续运动
      }
      move();//触发动作
      that.on('mouseenter', function(){ clearTimeout(mvtid) });//添加鼠标事件
      that.on('mouseleave', function(){ move() });
    });
  }; //end plugin definition
}(jQuery);
2、接口获取悬浮框相关的数据
http("POST", "/School/detail", {"id":s_id}, function (e) {

        vm.piaoc = e.data;
        vm.$nextTick(function () {
            $('.automv').autoMove({angle:-Math.PI/4, speed:50});
            $("body").on("click",".automv span",function(){
                $(this).parent().find("a").removeAttr("href");
                $(this).parent().hide();
            })
        })
    })
3、html页面引入相关html代码
<template v-if="piaoc != null">
      <template v-if="piaoc.is_open_float_win == '1'">
                <div class="automv" :>
                    <span>×</span>
                    <a :href="piaoc.open_float_url" rel="external nofollow" >
                        <template v-if="piaoc.open_float_image">
                            <img :src="piaoc.open_float_image_name+'!y'" alt="">
                        </template>
                        <template v-else>
                            <img src="../image/piaochuang.jpg" alt="">
                        </template>
                    </a>
                </div>
            </template>
            <template v-else>
                <div class="automv" ></div>
      </template>
</template>
4、相关悬浮框的css
.automv{
    width: 200px;
    height: 150px;
    z-index: 1032;
    position: relative;
}
.automv a{
    display: block;
    width: 100%;
    height: 100%;
}
.automv a img{
    width: 100%;
    height: 100%;
}
.automv span{
    position: absolute;
    right: 3px;
    top: 3px;
    font-size: 26px;
    color: #fff;
    cursor: pointer;
    display: block;
    width: 20px;
    height: 20px;
    line-height: 20px;
    text-align: center;
}
.automv:hover span{
    color: #fc87a3;
}
以上就是关于“jQuery如何实现首页悬浮框”这篇文章的内容,相信大家都有了一定的了解,希望小编分享的内容对大家有帮助,若想了解更多相关的知识内容,请关注亿速云行业资讯频道。
免责声明:本站发布的内容(图片、视频和文字)以原创、转载和分享为主,文章观点不代表本网站立场,如果涉及侵权请联系站长邮箱:is@yisu.com进行举报,并提供相关证据,一经查实,将立刻删除涉嫌侵权内容。