本篇内容主要讲解“Babel怎么实现自动生成Attribute文档”,感兴趣的朋友不妨来看看。本文介绍的方法操作简单快捷,实用性强。下面就让小编来带大家学习“Babel怎么实现自动生成Attribute文档”吧!
利用Babel自动解析源码属性上的注释生成对应Markdown文档,这个场景的应用主要包括在组件库文档对组件属性的介绍中
2.1.1 创建babel-plugin-auto-attr-doc文件夹;
2.1.2 安装npm i -g yo generator-babel-plugin-x;
2.1.3 在新建目录下执行 yo babel-plugin-x:v7-ts;
生成的插件模板如下:
babel-plugin-auto-attr-doc
├─ lib
│  └─ index.js
├─ src
│  └─ index.ts
├─ __tests__
│  ├─ fixtures
│  │  └─ example
│  │     ├─ actual.ts
│  │     └─ expected.ts
│  └─ index.js
├─ package-lock.json
├─ package.json
├─ README.md
└─ tsconfig.json
转换过程:利用Babel将Typescript脚本解析为AST,通过对AST结构分析抽离对应的注释部分,再拼接Markdown表格风格的语法;
源码要求:**我们应该将组件涉及到对外提供的属性统一到对应的types.ts文件管理,分别导出对应的type字段;
注释要求:**分别定义字段描述、类型、可选项、默认值4项,由于解析器关键词冲突原因,我们应该尽量避免;
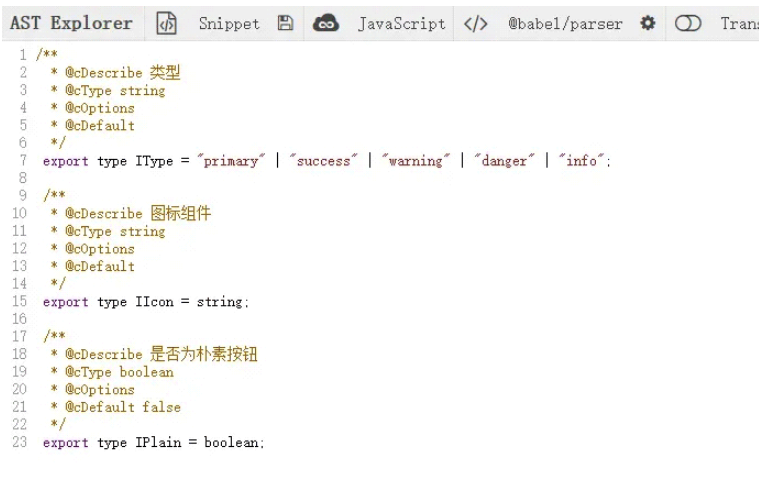
/**
  * @cDescribe 类型
  * @cType string
  * @cOptions
  * @cDefault
  */
 export type IType = "primary" | "success" | "warning" | "danger" | "info";
 /**
  * @cDescribe 图标组件
  * @cType string
  * @cOptions
  * @cDefault
  */
 export type IIcon = string;
 /**
  * @cDescribe 是否为朴素按钮
  * @cType boolean
  * @cOptions
  * @cDefault false
  */
 export type IPlain = boolean;
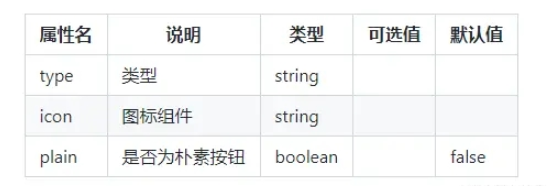
Markdown表格:**展示组件的属性、描述、类型、可选值和默认值这几项;

准备插件待解析源码文件source-code.ts;
准备实际生成MD后应该显示的内容文件actual.md;
| 属性名 | 说明 | 类型 | 可选值	| 默认值 |
| ------ | ---- | ---- | ----- | ----- |
| type | 类型 | string |  |  |
| icon | 图标组件 | string |  |  |
| plain | 是否为朴素按钮 | boolean |  | false |
调整单元测试文件读取:
it(`should ${caseName.split("-").join(" ")}`, () => {
  const actualPath = path.join(fixtureDir, "source-code.ts");
  // 对源码进行加载解析
  transformFileSync(actualPath);
  // 读取我们准备好的md文件
  const actual = fs
    .readFileSync(path.join(fixtureDir, "actual.md"))
    .toString();
  // 读取插件解析生成的md文件
  const expected = fs
    .readFileSync(path.join(fixtureDir, "api-doc.md"))
    .toString();
  // diff
  const diff = diffChars(actual, expected);
  diff.length > 1 && _print(diff);
  expect(diff.length).toBe(1);
});通过在AST explorer的源码分析,我们在Babel中可以通过遍历ExportNamedDeclaration(命名导出声明);
在leadingComments数组中可以取出所有注释文本的集合,在Babel处理时我们需要依次处理每一块注释后增加标记来避免重复处理;
在(path.node.declaration as t.TypeAlias).id.name中取属性名称;
将注释文本通过doctrine模块解析为对象后和属性名合并对转换Markdown所需要的所有数据~

type Comment =
  | {
      describe: string;
      type: any;
      options?: any;
      default?: any;
    }
  | undefined;
type ApiTable = {
attributeName: any;
attributeDescribe: any;
attributeType: any;
attributeOptions: any;
attributeDefault: any;
};pre:初始化存放apidoc容器,避免在存放时找不到容器;
visitor:解析源码并获取组织MD内容数据暂存到apidoc中;
post:取出所有的apidoc内容解析并输出到本地文件中;
export default declare(
  (api: BabelAPI, options: Record<string, any>, dirname: string) => {
    api.assertVersion(7);
    return {
      name: "auto-attr-doc",
      pre(this: PluginPass, file: BabelFile) {
        this.set("api-doc", []);
      },
      visitor: {
        ExportNamedDeclaration(
          path: NodePath<t.ExportNamedDeclaration>,
          state: PluginPass
        ) {
          const apidoc = state.get("api-doc");
          // 处理 path.node.leadingComments 中未处理的数据后塞到apidoc中
          state.set("api-doc", apidoc);
        },
      },
      post(this: PluginPass, file: BabelFile) {
        const apidoc = this.get("api-doc");
        const output = generateMD(apidoc);
        const root = path.parse(file.opts.filename || "./").dir;
        fs.writeFileSync(path.join(root, "api-doc.md"), output, {
          encoding: "utf-8",
        });
      },
    } as PluginObj<PluginPass>;
  }
);leadingComments数组会在依次访问ExportNamedDeclaration时不停增加,我们在处理掉当前索引的对象后增加一个处理过的标记skip,下次循环直接跳过;
通过parseComment函数解析后的对象可以通过tags数组获取到所有的注释项目,通过对应的title得到对应description内容;
在往apidoc存放数据时需要处理属性名称符合一定的规则,并将apidoc对象存放到原容器中;
{
  ExportNamedDeclaration(
    path: NodePath<t.ExportNamedDeclaration>,
    state: PluginPass
  ) {
    const apidoc = state.get("api-doc");
    let _comment: Comment = undefined;
    path.node.leadingComments?.forEach((comment) => {
      if (!Reflect.has(comment, "skip")) {
        const tags = parseComment(comment.value)?.tags;
        _comment = {
          describe:
            tags?.find((v) => v.title === "cDescribe")?.description || "",
          type: tags?.find((v) => v.title === "cType")?.description || "",
          options:
            tags?.find((v) => v.title === "cOptions")?.description || "",
          default:
            tags?.find((v) => v.title === "cDefault")?.description || "",
        };
        Reflect.set(comment, "skip", true);
      }
    });
    apidoc.push({
      attributeName: (path.node.declaration as t.TypeAlias).id.name.substr(1).toLocaleLowerCase(),
      attributeDescribe: _comment!.describe,
      attributeType: _comment!.type,
      attributeOptions: _comment!.options,
      attributeDefault: _comment!.default,
    } as ApiTable);
    state.set("api-doc", apidoc);
  },
}const parseComment = (comment: string) => {
if (!comment) {
return;
}
return doctrine.parse(comment, {
unwrap: true,
});
};const generateMD = (apidoc: Array<ApiTable>) => {
let raw = `| 属性名 | 说明 | 类型 | 可选值 | 默认值 |\n| ------ | ---- | ---- | ----- | ----- |\n`;
apidoc.forEach((item) => {
raw += `| ${item.attributeName} | ${item.attributeDescribe} | ${item.attributeType} | ${item.attributeOptions} | ${item.attributeDefault} |\n`;
});
return raw;
};
到此,相信大家对“Babel怎么实现自动生成Attribute文档”有了更深的了解,不妨来实际操作一番吧!这里是亿速云网站,更多相关内容可以进入相关频道进行查询,关注我们,继续学习!
免责声明:本站发布的内容(图片、视频和文字)以原创、转载和分享为主,文章观点不代表本网站立场,如果涉及侵权请联系站长邮箱:is@yisu.com进行举报,并提供相关证据,一经查实,将立刻删除涉嫌侵权内容。