жӮЁеҘҪпјҢзҷ»еҪ•еҗҺжүҚиғҪдёӢи®ўеҚ•е“ҰпјҒ
жӮЁеҘҪпјҢзҷ»еҪ•еҗҺжүҚиғҪдёӢи®ўеҚ•е“ҰпјҒ
иҝҷзҜҮвҖңvueеҰӮдҪ•е®һзҺ°дёҖдёӘеҲҶйЎөз»„еҠҹиғҪвҖқж–Үз« зҡ„зҹҘиҜҶзӮ№еӨ§йғЁеҲҶдәәйғҪдёҚеӨӘзҗҶи§ЈпјҢжүҖд»Ҙе°Ҹзј–з»ҷеӨ§е®¶жҖ»з»“дәҶд»ҘдёӢеҶ…е®№пјҢеҶ…е®№иҜҰз»ҶпјҢжӯҘйӘӨжё…жҷ°пјҢе…·жңүдёҖе®ҡзҡ„еҖҹйүҙд»·еҖјпјҢеёҢжңӣеӨ§е®¶йҳ…иҜ»е®ҢиҝҷзҜҮж–Үз« иғҪжңүжүҖ收иҺ·пјҢдёӢйқўжҲ‘们дёҖиө·жқҘзңӢзңӢиҝҷзҜҮвҖңvueеҰӮдҪ•е®һзҺ°дёҖдёӘеҲҶйЎөз»„еҠҹиғҪвҖқж–Үз« еҗ§гҖӮ
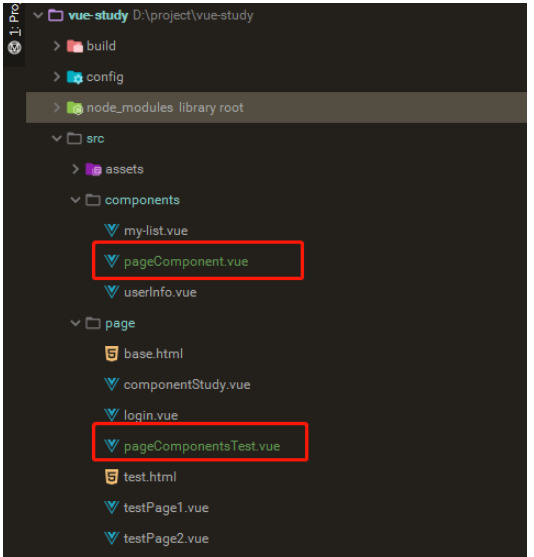
ж–Ү件зҡ„зӣ®еҪ•пјҡ

жҲ‘们еңЁ pageComponentsTest.vue йЎөйқўеј•е…ҘдәҶ pageComponent.vue еҲҶйЎө组件гҖӮж•ҙдҪ“жҖқи·ҜжҳҜйҖҡиҝҮ props
жқҘиҫҫеҲ°з»„件зҡ„зҒөжҙ»йҖҡз”Ёзҡ„ж•ҲжһңпјҢж•ҙдҪ“иҜӯжі•жҳҜдҪҝз”Ёvueзҡ„VMиҜӯжі•гҖӮ
pageComponent.vueе®һзҺ°
йҰ–е…Ҳе®һзҺ°дёҖдёӘеҲҶйЎөпјҢйңҖиҰҒзҹҘйҒ“ж•°жҚ®жҖ»жқЎж•°пјҢдёҖдёӘйЎөйқўжҳҫзӨәзҡ„ж•°жҚ®жқЎж•°е’ҢеҪ“еүҚжҳҫзӨә第еҮ йЎөзҡ„ж•°жҚ®гҖӮйӮЈд№ҲжҲ‘们еңЁ pageComponent.vue йҮҢйқўзҡ„ props е°ұжңүдәҶгҖӮзңӢдёӢйқўзҡ„д»Јз Ғпјҡ
props: {
// еҲҶйЎөй…ҚзҪ®
pageConfig: {
type: Object, require: true, default() {
return {
pageSize: 10, //дёҖйЎөзҡ„ж•°жҚ®жқЎж•°
pageNo: 0, //еҪ“еүҚйЎөзҡ„зҙўеј•
total: 0, //жҖ»зҡ„ж•°жҚ®жқЎж•°
pageTotal: 0 //жҖ»зҡ„йЎөж•°
}
}
}ж №жҚ®з”ЁжҲ·е…ҘеҸӮпјҢжҲ‘们еҸҜд»ҘдҪҝз”Ёи®Ўз®—еұһжҖ§жқҘи®Ўз®—дёҖдёӘжҖ»йЎөж•°зҡ„еҸҳйҮҸпјҡ
computed: {
//и®Ўз®—жҖ»йЎөж•°пјҢеҰӮжһңдј дәҶpageTotal,зӣҙжҺҘеҸ–pageTotalзҡ„еҖјпјҢеҰӮжһңдј дәҶtotalпјҢйӮЈд№Ҳж №жҚ®pageSizeеҺ»и®Ўз®—
pageTotal(){
const config = this.pageConfig
if(config.pageTotal){
return config.pageTotal
}else {
if(config.pageSize && config.total){
return Math.ceil(config.total/config.pageSize)
}else {
return 0
}
}
}
}жңүдәҶжҖ»йЎөж•°пјҢе’ҢеҪ“еүҚйЎөпјҢе°ұйңҖиҰҒеҗ„з§ҚеҲӨж–ӯжқҘе®һзҺ°жҲ‘们зҡ„htmlйғЁеҲҶдәҶпјҢиҝҷйҮҢеҲҶ4дёӯжғ…еҶө
жҖ»йЎөж•°е°ҸдәҺ8пјҢеҸӘйңҖиҰҒзӣҙжҺҘйҒҚеҺҶеҲ°8е°ұиЎҢдәҶгҖӮ
жҖ»йЎөж•°еӨ§дәҺ8пјҢдҪҶеҪ“еүҚйЎөе°ҸдәҺ4зҡ„гҖӮ
жҖ»йЎөж•°еӨ§дәҺ8пјҢеҪ“еүҚйЎөйқ еҗҺзҡ„гҖӮ
жҖ»йЎөж•°еӨ§дәҺ8пјҢеҪ“еүҚйЎөеңЁдёӯй—ҙзҡ„гҖӮ
дёӢйқўзңӢе…·дҪ“зҡ„е®һзҺ°пјҡ
<!--дёҠдёҖйЎө-->
<button @click="prePage" :disabled="currentPage === 1">дёҠдёҖйЎө</button>
<!--жҖ»йЎөж•°е°ҸдәҺ8зҡ„-->
<template v-if="pageTotal <= showPageNo">
<button v-for="i in pageTotal" @click="changeCurrentPage(i)" :class="{active:i === currentPage}" :key="i">{{i}}</button>
</template>
<template v-else-if="currentPage < 4">
<button v-for="i in 6" @click="changeCurrentPage(i)" :class="{active:i === currentPage}" :key="i">{{i}}</button>
<button :disabled="true">В·В·В·</button>
<button>{{pageTotal}}</button>
</template>
<template v-else-if="currentPage > pageTotal - 4">
<button>1</button>
<button :disabled="true">В·В·В·</button>
<button v-for="i in 6" @click="changeCurrentPage(i + (pageTotal - 6))" :class="{active:(i + (pageTotal - 6)) === currentPage}" :key="i">{{i + (pageTotal - 6)}}</button>
</template>
<template v-else>
<button>1</button>
<button :disabled="true">В·В·В·</button>
<button @click="changeCurrentPage(currentPage - 2)">{{currentPage - 2}}</button>
<button @click="changeCurrentPage(currentPage - 1)">{{currentPage - 1}}</button>
<button class="active">{{currentPage}}</button>
<button @click="changeCurrentPage(currentPage + 1)">{{currentPage + 1}}</button>
<button @click="changeCurrentPage(currentPage + 2)">{{currentPage + 2}}</button>
<button :disabled="true">В·В·В·</button>
<button @click="changeCurrentPage(pageTotal)">{{pageTotal}}</button>
</template>
<!--дёӢдёҖйЎө-->
<button @click="nextPage" :disabled="currentPage === pageTotal">дёӢдёҖйЎө</button>еҸҜд»ҘзңӢеҲ°йЎөйқўдёҠйңҖиҰҒе®һзҺ°3дёӘж–№жі•пјҢеҲҶеҲ«жҳҜдёҠдёӢйЎөпјҢе’ҢзӮ№еҮ»йЎөйқўзҡ„ж–№жі•гҖӮ
methods: {
   prePage(){
    this.currentPage -= 1
    this.$emit('changeCurrentPage',this.currentPage)
   },
   nextPage(){
    this.currentPage += 1
    this.$emit('changeCurrentPage',this.currentPage)
   },
   changeCurrentPage(i){
    this.currentPage = i
    this.$emit('changeCurrentPage',this.currentPage)
   }
}д»ҘдёҠе°ұжҳҜ pageComponent.vue зҡ„еӨ§иҮҙе®һзҺ°дәҶпјҢжҜҸж¬ЎйЎөйқўж”№еҸҳпјҢйғҪдјҡи§ҰеҸ‘дёҖдёӘ changeCurrentPage ж–№жі•зҡ„еӣһи°ғпјҢз”ЁжқҘйҖҡзҹҘеҪ“еүҚдҪҝ用组件зҡ„йЎөйқўеҪ“еүҚйЎөе·Із»Ҹж”№еҸҳгҖӮ
pageComponentsTest.vueзҡ„е®һзҺ°
еј•з”ЁйЎөйқўе°ұжҜ”иҫғз®ҖеҚ•дәҶпјҢеҸӘиҰҒдј е…Ҙ组件йңҖиҰҒзҡ„еҜ№еә”зҡ„еҸӮж•°пјҢе°ұиғҪжҳҫзӨәжҲ‘们зҡ„组件дәҶгҖӮ еј•з”ЁйғЁеҲҶпјҡ
<template>
 <div class="pageComponentsTest">
  <page-component :page-config="pageConfigTotal" @changeCurrentPage="changePage"></page-component>
  <page-component :page-config="pageConfigPageTotal"></page-component>
 </div>
</template>
й…ҚеҗҲе…ҘеҸӮйғЁеҲҶпјҡ
{
  name: "pageComponentsTest",
  data() {
   return {
    pageConfigTotal:{total:21,pageSize:10,pageNo:1},
    pageConfigPageTotal:{total:21,pageSize:10,pageNo:1,pageTotal:50}
   }
  },
  components:{'page-component':pageComponent},
  methods: {
   changePage(page){
    this.pageConfigTotal.pageNo = page
   }
  }
}VueжҳҜдёҖж¬ҫеҸӢеҘҪзҡ„гҖҒеӨҡз”ЁйҖ”дё”й«ҳжҖ§иғҪзҡ„JavaScriptжЎҶжһ¶пјҢдҪҝз”ЁvueеҸҜд»ҘеҲӣе»әеҸҜз»ҙжҠӨжҖ§е’ҢеҸҜжөӢиҜ•жҖ§жӣҙејәзҡ„д»Јз Ғеә“пјҢVueе…Ғи®ёеҸҜд»Ҙе°ҶдёҖдёӘзҪ‘йЎөеҲҶеүІжҲҗеҸҜеӨҚз”Ёзҡ„组件пјҢжҜҸдёӘ组件йғҪеҢ…еҗ«еұһдәҺиҮӘе·ұзҡ„HTMLгҖҒCSSгҖҒJavaScriptпјҢд»Ҙз”ЁжқҘжёІжҹ“зҪ‘йЎөдёӯзӣёеә”зҡ„ең°ж–№пјҢжүҖд»Ҙи¶ҠжқҘи¶ҠеӨҡзҡ„еүҚз«ҜејҖеҸ‘иҖ…дҪҝз”ЁvueгҖӮ
д»ҘдёҠе°ұжҳҜе…ідәҺвҖңvueеҰӮдҪ•е®һзҺ°дёҖдёӘеҲҶйЎөз»„еҠҹиғҪвҖқиҝҷзҜҮж–Үз« зҡ„еҶ…е®№пјҢзӣёдҝЎеӨ§е®¶йғҪжңүдәҶдёҖе®ҡзҡ„дәҶи§ЈпјҢеёҢжңӣе°Ҹзј–еҲҶдә«зҡ„еҶ…е®№еҜ№еӨ§е®¶жңүеё®еҠ©пјҢиӢҘжғідәҶи§ЈжӣҙеӨҡзӣёе…ізҡ„зҹҘиҜҶеҶ…е®№пјҢиҜ·е…іжіЁдәҝйҖҹдә‘иЎҢдёҡиө„и®Ҝйў‘йҒ“гҖӮ
е…ҚиҙЈеЈ°жҳҺпјҡжң¬з«ҷеҸ‘еёғзҡ„еҶ…е®№пјҲеӣҫзүҮгҖҒи§Ҷйў‘е’Ңж–Үеӯ—пјүд»ҘеҺҹеҲӣгҖҒиҪ¬иҪҪе’ҢеҲҶдә«дёәдё»пјҢж–Үз« и§ӮзӮ№дёҚд»ЈиЎЁжң¬зҪ‘з«ҷз«ӢеңәпјҢеҰӮжһңж¶үеҸҠдҫөжқғиҜ·иҒ”зі»з«ҷй•ҝйӮ®з®ұпјҡis@yisu.comиҝӣиЎҢдёҫжҠҘпјҢ并жҸҗдҫӣзӣёе…іиҜҒжҚ®пјҢдёҖз»ҸжҹҘе®һпјҢе°Ҷз«ӢеҲ»еҲ йҷӨж¶үе«ҢдҫөжқғеҶ…е®№гҖӮ