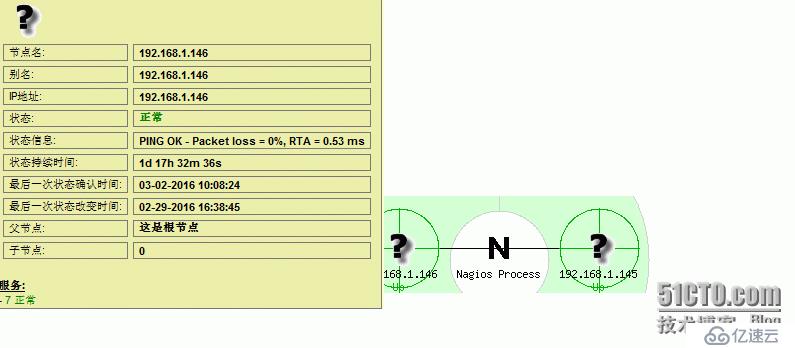
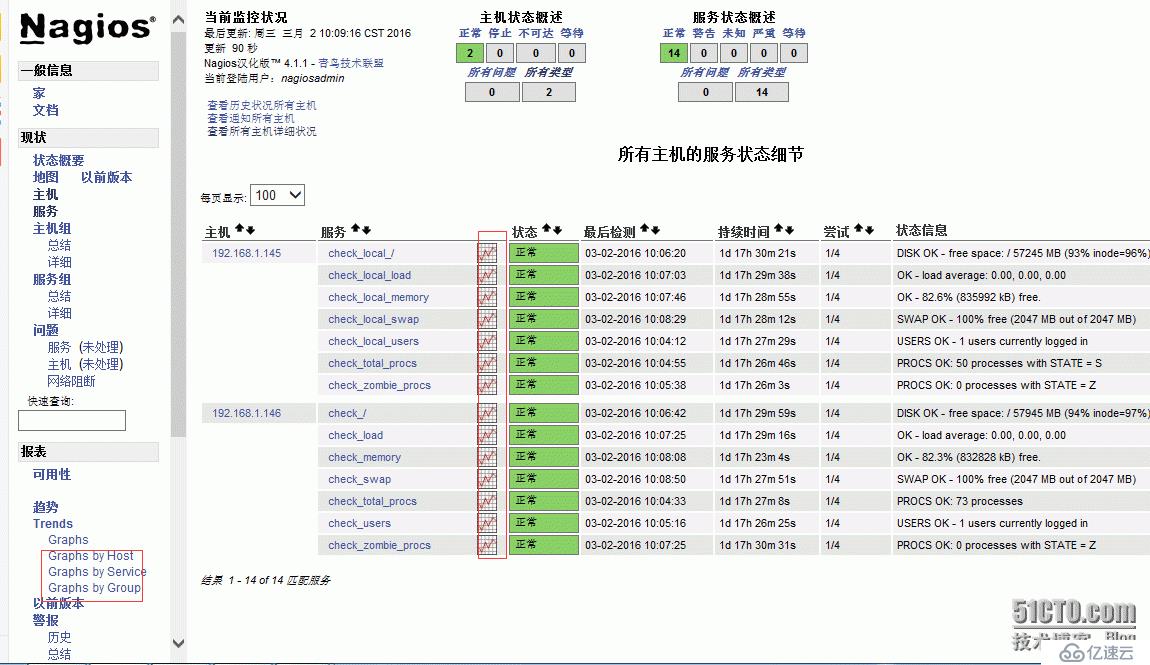
先展示几张效果图片,安装步骤文章后面;


tar -zxvfapr-1.5.2.tar.gz
cdapr-1.5.2
./configure--prefix=/usr/local/apr
make
makeinstall
tar -zxvfapr-util-1.5.4.tar.gz
cdapr-util-1.5.4
./configure--prefix=/usr/local/apr-util --with-apr=/usr/local/apr
make
makeinstall
unzippcre-8.38.zip
cdpcre-8.38
./configure--prefix=/usr/local/pcre
make
makeinstall
tar -zxvfhttpd-2.4.18.tar.gz
cdhttpd-2.4.18
./configure --prefix=/usr/local/apache --enable-so --enable-ssl --enable-cgi--enable-rewrite --with-zlib --with-pcre=/usr/local/pcre--with-apr=/usr/local/apr --with-apr-util=/usr/local/apr-util/--enable-modules=most --enable-mpms-shared=all --with-mpm=event
make
make install
cd /etc/profile.d
vim apache.sh
增加# /etc/profile
增加PATH=/usr/local/apache/bin:$PATH
vim /etc/man.config
增加MANPATH/usr/local/apache/man
apachectlstart
tar -zxvfphp-5.6.18.tar.gz
cdphp-5.6.18
yuminstall libxml2-devel.x86_64 libxml2.x86_64 -y
./configure--prefix=/usr/local/php --with-apxs2=/usr/local/apache/bin/apxs
make
makeinstall
cpphp.ini-development /usr/local/lib/php.ini
LoadModule php5_module modules/libphp5.so #编辑 httpd.conf文件以调用 PHP 模块
Install required packages
yuminstall gd -y
安装gd-devel,由于在新版的系统不自带这个组件了,我们需要单独下载安装
首先安装gd-devel的依耐组件
yuminstall fontconfig-devel.x86_64libX11-devel libXpm-devel libjpeg-devel libpng-devel zlib-devel
rpm -ivh gd-devel-2.0.35-11.el6.x86_64.rpm
yuminstall php gcc glibc glibc-common make net-snmp
yum install gcc-c++.x86_64 openssl-devel
yuminstall perl-CGI perl-Time-HiResperl-CPAN perl-Module-Build rrdtool
rpm -ivhperl-GD-2.45-1.el6.rfx.x86_64.rpm
rpm -ivhrrdtool-perl-1.3.8-6.el6.x86_64.rpm
(需额外下载的包gd-devel-2.0.35-11.el6.x86_64.rpm
perl-GD-2.45-1.el6.rfx.x86_64.rpm
rrdtool-perl-1.3.8-6.el6.x86_64.rpm
rrdtool-php-1.3.8-6.el6.x86_64.rpm)
Install nagios core
groupadd-g 3000 nagios
groupadd-g 3001 nagcmd
useradd-u 3000 -g nagios -G nagcmd -d /usr/local/nagios -c 'Nagios Admin' nagios
usermod -a nagios nagios apache
usermod -a -G nagcmd apache
tar -zxvfnagios-cn-4.1.1.tar.gz
cdnagios-4.1.1
./configure --prefix=/usr/local/nagios--with-nagios-user=nagios --with-nagios-group=nagios --with-command-user=nagios--with-command-group=nagcmd --with-httpd-conf=/usr/local/apache/conf/extra
make all
makeinstall
makeinstall-init
makeinstall-commandmode
makeinstall-config
make install-webconf
vimhttpd.conf
增加Includeconf/extra/nagios.conf
修改User apache
修改Group apache
修改 <IfModuledir_module>
DirectoryIndex index.html index.php
</IfModule>
末行添加 AddType application/x-httpd-php .php
开启模块 cgid_module cgi_module php5_module actions_module
cp -Rcontrib/eventhandlers/ /usr/local/nagios/libexec/
chown -Rnagios:nagios /usr/local/nagios/libexec/eventhandlers
/usr/local/nagios/bin/nagios-v /usr/local/nagios/etc/nagios.cfg
/etc/init.d/nagiosstart
apachectlstart
htpasswd-c /usr/local/nagios/etc/htpasswd.users nagiosadmin
设定密码
chown nagios:nagcmd /usr/local/nagios/etc/htpasswd.users
tar -zxvf nagios-plugins-2.1.1.tar.gz
cd nagios-plugins-2.1.1
./configure --with-nagios-user=nagios--with-nagios-group=nagios
make
make install
chown -R nagios.nagios/usr/local/nagios/libexec
tar -zxvf nrpe-2.15.tar.gz
cd nrpe-2.15
./configure
make all
make install-plugin
make install-daemon
make install-daemon-config
make install-xinetd
编辑 /etc/xinetd.d/nrpe 文件,添加监控ip
only_from = 127.0.0.1 <nagios_ip_address>
编辑/etc/services添加NRPE daemon
nrpe 5666/tcp # NRPE
service xinetd restart
/usr/local/nagios/libexec/check_nrpe -Hlocalhost #验证插件,和client验证,-H后面添加client地址
chown nagios.nagios /usr/local/nagios
chown -R nagios.nagios/usr/local/nagios/libexec
客户端:
useradd -s /sbin/nologin nagios
安装 nagios-plugins
./configure --with-nagios-user=nagios--with-nagios-group=nagios
make
make install
….参照 三、四 两点安装
tar -zxvf nagiosgraph-1.5.2.tar.gz
cd nagiosgraph-1.5.2
perl install.pl --check-prereq
perl install.pl
./install.pl --layout overlay --prefix/usr/local/nagios
(配置路径部分均选择/usr/local/nagios)
vi share/nagiosgraph.ssi
src="/nagiosgraph/nagiosgraph.js" to src="/nagios/nagiosgraph.js"
cp share/nagiosgraph.ssi/usr/local/nagios/share/ssi/common-header.ssi
编辑Nagiosgraphp配置文件,确保一下参数路径
vi/usr/local/nagios/etc/nagiosgraph/nagiosgraph.conf
perflog =/usr/local/nagios/var/perfdata.log
rrddir = /usr/local/nagios/var/rrd
mapfile =/usr/local/nagios/etc/nagiosgraph/map
nagiosgraphcgiurl = /nagios/cgi-bin
javascript =/nagios/nagiosgraph.js
stylesheet =/nagios/nagiosgraph.css
logfile =/usr/local/nagios/var/nagiosgraph.log
cgilogfile =/usr/local/nagios/var/nagiosgraph-cgi.log
调整以下文件所属用户
chown nagios:nagios/usr/local/nagios/etc/nagiosgraph
chown nagios:nagios /usr/local/nagios/sbin
chown nagios:nagios/usr/local/nagios/libexec/insert.pl
chown nagios:nagios/usr/local/nagios/share/nagiosgraph.css /usr/local/nagios/share/nagiosgraph.js
chown nagios:nagios/usr/local/nagios/share/ssi/common-header.ssi
创建RRD目录,并设置以下权限
mkdir /usr/local/nagios/var/rrd
chmod nagios:apache/usr/local/nagios/var/rrd
chmod 755 /usr/local/nagios/var/rrd
创建nagiosgraph.log nagiosgraph-cgi.log文件(有就不必创建),并调整权限
touch /usr/local/nagios/var/nagiosgraph.log
chown nagios/usr/local/nagios/var/nagiosgraph.log
chmod 644/usr/local/nagios/var/nagiosgraph.log
touch/usr/local/nagios/var/nagiosgraph-cgi.log
chown apache/usr/local/nagios/var/nagiosgraph-cgi.log
chmod 644/usr/local/nagios/var/nagiosgraph-cgi.log
编辑/usr/local/nagios/share/side.php在 ‘Trends’ heading下添加:
<li><ahref="<?php echo $cfg["cgi_base_url"];?>/trends.cgi"target="<?php echo $link_target;?>">Trends</a>
<ul>
<li><ahref="<?php echo $cfg["cgi_base_url"];?>/show.cgi"target="<?php echo$link_target;?>">Graphs</a></li>
<li><ahref="<?php echo$cfg["cgi_base_url"];?>/showhost.cgi" target="<?phpecho $link_target;?>">Graphs by Host</a></li>
<li><ahref="<?php echo$cfg["cgi_base_url"];?>/showservice.cgi"target="<?php echo $link_target;?>">Graphs byService</a></li>
<li><ahref="<?php echo$cfg["cgi_base_url"];?>/showgroup.cgi" target="<?phpecho $link_target;?>">Graphs by Group</a></li>
</ul>
</li>
验证配置并重启nagios
/usr/local/nagios/bin/nagios -v/usr/local/nagios/etc/nagios.cfg
/etc/init.d/nagios restart
验证nagiosgraphconfiguration
http://localhost/nagios/cgi-bin/showconfig.cgi
或者
http://Server-IP-Address/nagios/cgi-bin/showconfig.cgi
验证ok ,抓取一些数据,看看图形效果
http://localhost/nagios/cgi-bin/show.cgi
或者
http://Server-IP-Address/nagios/cgi-bin/show.cgi
Now we need to definean action URL for the services that we want to graph, so that you can click togo directly to the graphs for that service from the Nagios Core web interface.
编辑/usr/local/nagios/etc/objects/templates.cfg,添加graph URL service,以便直接在 web上点击链接。
define service {
name graphed-service
action_url /nagiosgraph/cgi-bin/show.cgi?host=$HOSTNAME$&service=$SERVICEDESC$'onMouseOver='showGraphPopup(this)' onMouseOut='hideGraphPopup()'rel='/nagiosgraph/cgi-bin/showgraph.cgi?host=$HOSTNAME$&service=$SERVICEDESC$&period=week&rrdopts=-w+450+-j
register 0
}
服务用法示范
define service {
use generic-service,graphed-service
host_name web001
service_description PING
check_commandcheck_ping!100,10%!200,20%
}
/usr/local/nagios/bin/nagios -v/usr/local/nagios/etc/nagios.cfg
/etc/init.d/nagios reload
vim /usr/local/apache/conf/extra/nagiosgraph.conf
ScriptAlias/nagiosgraph/cgi-bin "/usr/local/nagios/sbin"
<Directory"/usr/local/nagios/sbin">
Options ExecCGI
AllowOverride None
Order allow,deny
Allow from all
AuthName "Nagios Access"
AuthType Basic
# AuthUserFile NAGIOS_ETC_DIR/htpasswd.users
AuthUserFile/usr/local/nagios/etc/htpasswd.users
Require valid-user
</Directory>
# enablenagiosgraph CSS and JavaScript
Alias/nagiosgraph "/usr/local/nagios/share"
<Directory"/usr/local/nagios/share">
Options None
AllowOverride None
Order allow,deny
Allow from all
</Directory>
vim httpd.conf
DirectoryIndexindex.html index.php
Includeconf/extra/nagiosgraph.conf
cp /usr/local/src/nagios/nagios-4.1.1/sample-config/mrtg.cfg/usr/local/nagios/etc/
mkdir -p/usr/local/nagios/share/stats
vim/usr/local/nagios/etc/mrtg.cfg,在前面添加
WorkDir:/usr/local/nagios/share/stats
初始化
env /usr/bin/mrtg/usr/local/nagios/etc/mrtg.cfg
创建HTML页面
/usr/bin/indexmaker/usr/local/nagios/etc/mrtg.cfg--output=/usr/local/nagios/share/stats/index.html
配置定时任务
vim/etc/cron.d/mrtg-nagios
Add thefollowing:
*/5 * * * * root env /usr/bin/mrtg /usr/local/nagios/etc/mrtg.cfg
You can nownavigate to https://example.org/nagios/stats/ to see the graphs.
编辑 sidebar file:
vim/usr/local/nagios/share/side.php
And add thefollowing somewhere in the menu:
<divclass="navsection">
<divclass="navsectiontitle">Extra Tools</div>
<divclass="navsectionlinks">
<ulclass="navsectionlinks">
<li><ahref="/nagios/stats" target="<?php echo$link_target;?>">MRTG stats</a></li>
<li><ahref="/nagiosgraph/cgi-bin/show.cgi" target="<?php echo$link_target;?>">Nagios Graph</a></li>
</ul>
</div>
</div>
</div>
hosts.cfg
hostgroups.cfg
service-test.cfg
servicegroups.cfg
重点强调templates.cfg commands.cfg
vim templates.cfg添加
define service {
name graphed-service
action_url /nagiosgraph/cgi-bin/show.cgi?host=$HOSTNAME$&service=$SERVICEDESC$'onMouseOver='showGraphPopup(this)' onMouseOut='hideGraphPopup()'rel='/nagiosgraph/cgi-bin/showgraph.cgi?host=$HOSTNAME$&service=$SERVICEDESC$&period=week&rrdopts=-w+450+-j
register 0
}
vim commands.cfg
define command{
command_name check_nrpe
command_line /usr/local/nagios/libexec/check_nrpe -H$HOSTADDRESS$ -c $ARG1$ -t 120
}
由于整理资料费时,配置文件配置可参考/usr/local/nagios/etc/object/localhost.cfg,这里不细写 安装过程有其他问题google一下。
参考文件有官网的Installing_Nagios_Core_From_Source.pdf 、NRPE.pdf、安装nagiosgraph.txt和Nagios网络监控中文版.pdf
官网地址:https://www.nagios.org
2016-03-01 lin3
免责声明:本站发布的内容(图片、视频和文字)以原创、转载和分享为主,文章观点不代表本网站立场,如果涉及侵权请联系站长邮箱:is@yisu.com进行举报,并提供相关证据,一经查实,将立刻删除涉嫌侵权内容。