这篇文章主要为大家详细介绍了webUI框架的运用指南,文中步骤介绍的非常详细,图文详解容易学习,非常适合初学者入门,感兴趣的小伙伴们可以参考一下。
目录
1.miniUI
2.easyUI
3.extJS
4.Bootstrap
内容
一、miniUI
1.下载:http://www.miniui.com/download
2.文档:http://www.miniui.com/docs/api/index.html
3.部署:
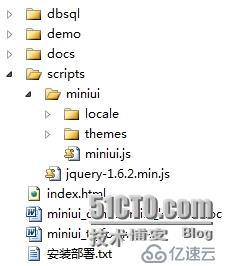
下载后,解压缩,会有如下文件结构:

各目录文件解释如下:
· dbsql:示例数据库sql文件。
· demo:页面示例。
· docs:api文档、开发指南。
· scripts/miniui:MiniUI产品的javascript和css。
· scripts/miniui/locale:语言资源文件。
· scripts/miniui/themes:多套皮肤样式。
· index.html:开发包导航页面。
· miniui_commercial_license.doc:授权说明文档。
· miniui_tryform.doc:试用申请表文档。
· 安装部署.txt:安装部署说明文档。
Note:开发者只需要引用jquery.js、miniui.js、miniui.css即可。
为更好演示DataGrid相关示例,以及提供可参考的数据交互代码,我们提供了示例数据库和一定的服务端代码。
标准页面模板如下:
<!DOCTYPE html /><html><head> <title>Hello MiniUI!</title> <!--jQuery js--> <script src="../jquery.js" type="text/javascript"></script> <!--MiniUI--> <link href="../themes/default/miniui.css" rel="stylesheet" type="text/css" /> <script src="../miniui.js" type="text/javascript"></script></head><body> </body></html>
二、easyUI
1.下载:http://www.jeasyui.com/download/index.php
2.文档:http://www.w3cschool.cc/jeasyui/jqueryeasyui-tutorial.html
3.部署:
1) 引用Jquery的Js文件<script src="jquery-easyui-1.3.4/jquery-1.8.0.min.js" type="text/javascript"></script>
2) 引用Easy UI的Js文件<script src="jquery-easyui-1.3.4/jquery.easyui.min.js" type="text/javascript"></script>
3) 导入Easy UI的主题Css文件<link href="jquery-easyui-1.3.4/themes/default/easyui.css" rel="stylesheet" type="text/css" />
4) 导入Easy UI的图标Css文件<link href="jquery-easyui-1.3.4/themes/icon.css" rel="stylesheet" type="text/css" />
5) 引用Easy UI的国际化文件以下为让它显示中文<script src="jquery-easyui-1.3.4/locale/easyui-lang-zh_CN.js" type="text/javascript"></script>
6) 页面上加上UTF-8编码 防止jquery.easyui.min.js 内容乱码
<meta http-equiv="content-type" content="text/html;charset=UTF-8" />
三、extJS
1.下载:http://pan.baidu.com/s/1pJ5CoOF
2.文档:http://docs.sencha.com/extjs/5.0/apidocs/#!/api/Ext.app.ViewController
3.部署:
<html>
<head>
<title>Welcome to Ext JS!</title>
<link rel="stylesheet" type="text/css" href="ext-5.0.0/build/packages/ext-theme-neptune/build/resources/ext-theme-neptune-all.css">
<script type="text/javascript" src="ext-5.0.0/build/ext-all.js"></script>
<script type="text/javascript" src="ext-5.0.0/build/packages/ext-theme-neptune/build/ext-theme-neptune.js"></script>
<script type ="text/javascript" src="app.js"></script>
</head>
<body></body>
</html>
四、Bootstrap
1.文档:http://pan.baidu.com/s/1pJnvtsn
2.部署:
<html>
<head>
<title>Welcome to Ext JS!</title>
<link rel="stylesheet" type="text/css" href="ext-5.0.0/build/packages/ext-theme-neptune/build/resources/ext-theme-neptune-all.css">
<script type="text/javascript" src="ext-5.0.0/build/ext-all.js"></script>
<script type="text/javascript" src="ext-5.0.0/build/packages/ext-theme-neptune/build/ext-theme-neptune.js"></script>
<script type ="text/javascript" src="app.js"></script>
</head>
<body></body>
</html>
以上就是webUI框架运用指南的详细内容了,看完之后是否有所收获呢?如果想了解更多相关内容,欢迎关注亿速云行业资讯!
免责声明:本站发布的内容(图片、视频和文字)以原创、转载和分享为主,文章观点不代表本网站立场,如果涉及侵权请联系站长邮箱:is@yisu.com进行举报,并提供相关证据,一经查实,将立刻删除涉嫌侵权内容。