本篇文章给大家分享的是有关cocos2dx3.2如何实现格斗人物选择界面,小编觉得挺实用的,因此分享给大家学习,希望大家阅读完这篇文章后可以有所收获,话不多说,跟着小编一起来看看吧。
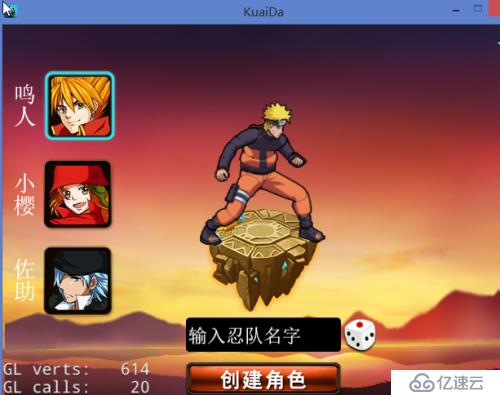
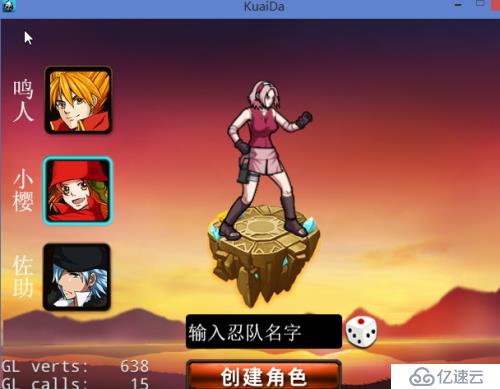
先看最终实现的效果图:


创建以人物选择场景 ChooseHero.h
#ifndef __CHOOSE_HERO_H__
#define __CHOOSE_HERO_H__
#include "cocos2d.h"
#include "ui/CocosGUI.h"
#include "cocos-ext.h"
#include "cocostudio/CocoStudio.h"
using namespace cocos2d::ui;
USING_NS_CC;
class ChooseHero : public Layer
{
public:
static Scene * createScene();
virtual bool init();
void OnGameStartPage(Object *pSender, Widget::TouchEventType type);//创建人物
void textFieldEvent(Object* pSender, Event type);
//void OnBackToLoginPage(Object *pSender, Event type);//返回登录界面
void OnRoleSelect(CCObject *pSender, Widget::TouchEventType type);//角色选择界面
void OnRoleSelect2(CCObject *pSender, Widget::TouchEventType type);//角色选择界面
void OnRoleSelect3(CCObject *pSender, Widget::TouchEventType type);//角色选择界面
bool OnRoleSelectMy(Touch *touch, Event *event);
CREATE_FUNC(ChooseHero);
protected:
//标签
enum
{
enTagStudioMainUiLayer,
enTagRole,
};
intm_nRoleID;//角色ID 1.鸣人2.小樱3.佐助
int btnIndex2;
Button* pBtn_Role ;
Button* pBtn_Role2;
Button* pBtn_Role3;
ImageView * pSelect_Img ;
ImageView * pSelect_Img2;
ImageView * pSelect_Img3;
};
#endifinit实现如下:
bool ChooseHero::init(){
if (!Layer::init()){
return false;
}
m_nRoleID = 1;
//创建主场景UI层
auto pCreateNinja = GUIReader::getInstance()->widgetFromJsonFile("CreateNinja.json");
addChild(pCreateNinja, 100, enTagStudioMainUiLayer);
pCreateNinja->setName("CreateNinjaLayer");
pCreateNinja->setSize(getContentSize());
ArmatureDataManager::getInstance()->addArmatureFileInfo("armature/xiaoyin.ExportJson");
ArmatureDataManager::getInstance()->addArmatureFileInfo("armature/NewProject.ExportJson");
ArmatureDataManager::getInstance()->addArmatureFileInfo("armature/minren1.ExportJson");
////获取开始按钮
Button *pBtn_Create_Team = dynamic_cast<Button*>(pCreateNinja->getChildByName("MainUi")->getChildByName("Btn_Create_Team"));
pBtn_Create_Team->addTouchEventListener(this, toucheventselector(ChooseHero::OnGameStartPage));
////获取输入框
TextField* pTextField = dynamic_cast<TextField*>(pCreateNinja->getChildByName("MainUi")->getChildByName("Team_Name_TextField"));
//CC_BREAK_IF(pTextField == NULL);
pTextField->setTouchEnabled(true);
//pTextField->addEventListenerTextField(this, textfieldeventselector(CNFTeamCreateLayer::textFieldEvent));
pTextField->setText("");
//获取人物按钮
pBtn_Role = static_cast<Button*>(pCreateNinja->getChildByName("MainUi")->getChildByName(String::createWithFormat("Btn_Char_%d", 0 + 1)->getCString()));
pBtn_Role2 = static_cast<Button*>(pCreateNinja->getChildByName("MainUi")->getChildByName(String::createWithFormat("Btn_Char_%d", 1 + 1)->getCString()));
pBtn_Role3 = static_cast<Button*>(pCreateNinja->getChildByName("MainUi")->getChildByName(String::createWithFormat("Btn_Char_%d", 2 + 1)->getCString()));
pSelect_Img = static_cast<ImageView*>(pBtn_Role->getChildByName("Select_Img"));
pSelect_Img2 = static_cast<ImageView*>(pBtn_Role2->getChildByName("Select_Img"));
pSelect_Img3 = static_cast<ImageView*>(pBtn_Role3->getChildByName("Select_Img"));
pBtn_Role->addTouchEventListener(this, toucheventselector(ChooseHero::OnRoleSelect));
pBtn_Role2->addTouchEventListener(this, toucheventselector(ChooseHero::OnRoleSelect2));
pBtn_Role3->addTouchEventListener(this, toucheventselector(ChooseHero::OnRoleSelect3));
pSelect_Img->setVisible(true);
ArmatureDataManager::getInstance()->addArmatureFileInfo("armature/xiaoyin.ExportJson");
ArmatureDataManager::getInstance()->addArmatureFileInfo("armature/NewProject.ExportJson");
ArmatureDataManager::getInstance()->addArmatureFileInfo("armature/minren1.ExportJson");
char cName[3][256] = { "minren1", "xiaoyin", "NewProject" };
Armature *pRole = Armature::create(cName[0]);
pRole->setPosition(ccp(640/ 2, 210));
pRole->setAnchorPoint(ccp(pRole->getAnchorPoint().x, 0));
pRole->getAnimation()->play("hold");
addChild(pRole, 100000, enTagRole);
return true;
}回调方法实现如下:
void ChooseHero::OnRoleSelect(CCObject *pSender, Widget::TouchEventType type){
if (pBtn_Role == pSender){
pSelect_Img2->setVisible(false);
pSelect_Img3->setVisible(false);
pSelect_Img->setVisible(true);
m_nRoleID = 1;
removeChildByTag(enTagRole);
char cName[3][256] = { "minren1", "xiaoyin", "NewProject" };
Armature *pRole = Armature::create(cName[0]);
pRole->setPosition(ccp(640 / 2, 210));
pRole->setAnchorPoint(ccp(pRole->getAnchorPoint().x, 0));
pRole->getAnimation()->play("hold");
addChild(pRole, 100000, enTagRole);
}
else{
pSelect_Img->setVisible(false);
}
}以上就是cocos2dx3.2如何实现格斗人物选择界面,小编相信有部分知识点可能是我们日常工作会见到或用到的。希望你能通过这篇文章学到更多知识。更多详情敬请关注亿速云行业资讯频道。
亿速云「云服务器」,即开即用、新一代英特尔至强铂金CPU、三副本存储NVMe SSD云盘,价格低至29元/月。点击查看>>
免责声明:本站发布的内容(图片、视频和文字)以原创、转载和分享为主,文章观点不代表本网站立场,如果涉及侵权请联系站长邮箱:is@yisu.com进行举报,并提供相关证据,一经查实,将立刻删除涉嫌侵权内容。