基本数据绑定:
事前准备:
此处先建立一个表示员工信息的Employee类作为基本的数据结构以备用
C# Code
public class Employee
{
public int Number { get; set; } //员工号
public string Name { get; set; } //姓名
public string Sex { get; set; } //性别
public int BirthYear { get; set; } // 出生年份
}
创建一个页面,在页面中释放一个Canvas控件并在其中放置两个名为txbNumber和txbName的TextBox控件,分别用以绑定员工和姓名。
在代码文件中的合适位置创建一个Employee类的实例作为绑定源代码如下:
public Employee employee = new Employee
{
Number = 2012,
Name = "MagicBoy",
Sex = "男",
BirthYear = 2000
};
注意:不要忘记添加对System.Windows.Dat命名空间的引用。
下面我们来具体介绍几种基本数据绑定的方法:
(1) 通过Binding对象的Source属性指定数据源
附上代码(注释为基本过程):
Binding bdNumber = new Binding();//(1)新建绑定对象bdNumber
bdNumber.Source = employee; //(2)设置绑定源
bdNumber.Path = new PropertyPath("Number"); //(3)设置绑定路径(即绑定属性)
textBox1.SetBinding(TextBox.TextProperty, bdNumber);//(4)将UI元素的Text属性与“bdNumber对象”绑定
//(5)还可以设置Binding的Mode属性(自动设置为OneWay)
//(6)Converter属性也可以设置,在需要数据转换的情况下
Binding bdName = new Binding();
bdName.Source = employee;
bdName.Path = new PropertyPath("Name");
textBox2.SetBinding(TextBox.TextProperty, bdName);
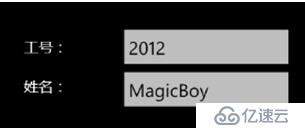
那么,实现的效果就是:

(1) 通过UI元素的DataContext属性指定绑定源
观察上面的代码,会发现,对于每一个绑定对象都要设置一次绑定源显然是冗余的,在绑定对象比较多的情况下尤其繁琐。
由此,silverlight提供了另外一种设置数据源的方式,即UI元素的数据上下文DataContext属性来指定数据源。这是一种上下文有关的确定绑定源的方案。一旦为一个UI元素指定了DataContext属性,则其所有子元素都将继承该属性,与其子元素关联的所有数据绑定在没有另行指定Souce 和DataContext的情况下,都将默认使用该属性指定的对象作为绑定源。
在通常情况下的用法是,先用DataContext属性指定高层UI元素的数据上下文,然后对于特殊的子元素再另行指定绑定源。
所以,上述代码可更改为:
|
public Employee employee = new Employee { Number = 2012, Name = "MagicBoy", Sex = "男", BirthYear = 2000 }; // 构造函数 public MainPage() { InitializeComponent(); canvas1.DataContext = employee; Binding bdNumber = new Binding();//(1)新建绑定对象bdNumber //bdNumber.Source = employee; //(2)设置绑定源 bdNumber.Path = new PropertyPath("Number"); //(3)设置绑定路径(即绑定属性) textBox1.SetBinding(TextBox.TextProperty, bdNumber);//(4)将UI元素的Text属性与“bdNumber对象”绑定 //(5)还可以设置Binding的Mode属性(自动设置为OneWay) //(6)Converter属性也可以设置,在需要数据转换的情况下 Binding bdName = new Binding(); //bdName.Source = employee; bdName.Path = new PropertyPath("Name"); textBox2.SetBinding(TextBox.TextProperty, bdName); } |
(3) 在XAML代码中实现绑定
以上都是直接在C#代码页面中实现建立数据绑定。在实际使用时,通过等价的XAML代码实现绑定可能是更为常用的方式。只需为作为绑定目标的UI元素的特定属性指定声明式的Binding对象即可。基本语法为:
<UI标记 绑定属性=”{Binding Paht=*,Mode=*,Converter=*,Source=*}”…>
按照上述原理,只需按照上述语法在XAML文件中修改textBox1和 textBox2控件的Text属性即可。
附带代码如下:
|
<TextBlock Name="textBlock1" Text="工号:" /> <TextBlock Name="textBlock2" Text="姓名:" /> <TextBox Name="textBox1" Text="{Binding Path=Number, Mode=OneWay}" Width="250" /> <TextBox Name="textBox2" Text="{Binding Path=Name,Mode=OneWay}" Width="250" /> 同时别忘了 C# canvas1.DataContext = employee; |
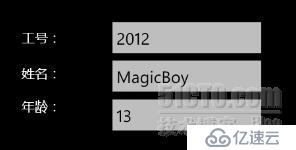
当绑定源提供的数据格式或类型与绑定目标所需不一致时,就需要通过一个数值转换器来进行转换。
Converter的类型为一个实现IValueConverter接口的类。IValueConverter接口定义了两个方法Convert和ConvertBack用来对数据进行双向转换。
现举例说明:
|
新建BirthYearToAgeConverter.cs类文件 注意:同样代码中,也要包含System.Windows.Data命名空间 namespace PhoneApp1 { public class BirthYearToAgeConverter : IValueConverter { public object Convert(object value, Type targetType, object parameter, System.Globalization.CultureInfo culture) { int birthYear = (int)value; int age = DateTime.Today.Year - birthYear; return age; } public object ConvertBack(object value, Type targetType, object parameter, System.Globalization.CultureInfo culture) { int age = (int)value; int birthYear = DateTime.Today.Year - age; return birthYear; }}} |
然后,在XAML文件中,通过声明方式定义一个BirthYearToAgeConverter类型的对象BirthYearToAgeConverter1.
代码如下:
|
<phone:PhoneApplicationPage.Resources> <my:BirthYearToAgeConverter :Key="BirthYearToAgeConverter1"> </my:BirthYearToAgeConverter> </phone:PhoneApplicationPage.Resources> |
注意:可能会出现这样的问题:

解决方法是: 引用了第三方类库,得在页面头部引用程序集
命名空间是PhoneApp1
xmlns:my="clr-namespace:PhoneApp1;assembly=PhoneApp1"
最后一步:
|
<TextBox Canvas.Left="159" Canvas.Top="123" Height="71" Name="textBox3" Text="{Binding Path=BirthYear,Mode=OneWay, Converter={StaticResource BirthYearToAgeConverter1}}" Width="250" /> |

免责声明:本站发布的内容(图片、视频和文字)以原创、转载和分享为主,文章观点不代表本网站立场,如果涉及侵权请联系站长邮箱:is@yisu.com进行举报,并提供相关证据,一经查实,将立刻删除涉嫌侵权内容。