这篇文章主要介绍了怎样定义TensorFlow输入节点,具有一定借鉴价值,感兴趣的朋友可以参考下,希望大家阅读完这篇文章之后大有收获,下面让小编带着大家一起了解一下。
TensorFlow中有如下几种定义输入节点的方法。
通过占位符定义:一般使用这种方式。
通过字典类型定义:一般用于输入比较多的情况。
直接定义:一般很少使用。
一 占位符定义
示例:
具体使用tf.placeholder函数,代码如下:
X = tf.placeholder("float")
Y = tf.placeholder("float")二 字典类型定义
1 实例
通过字典类型定义输入节点
2 关键代码
# 创建模型
# 占位符
inputdict = {
  'x': tf.placeholder("float"),
  'y': tf.placeholder("float")
}3 解释
通过字典定义的方式和第一种比较像,只不过是堆叠到一起。
4 全部代码
import tensorflow as tf
import numpy as np
import matplotlib.pyplot as plt
plotdata = { "batchsize":[], "loss":[] }
def moving_average(a, w=10):
  if len(a) < w:
    return a[:]
  return [val if idx < w else sum(a[(idx-w):idx])/w for idx, val in enumerate(a)]
#生成模拟数据
train_X = np.linspace(-1, 1, 100)
train_Y = 2 * train_X + np.random.randn(*train_X.shape) * 0.3 # y=2x,但是加入了噪声
#图形显示
plt.plot(train_X, train_Y, 'ro', label='Original data')
plt.legend()
plt.show()
# 创建模型
# 占位符
inputdict = {
  'x': tf.placeholder("float"),
  'y': tf.placeholder("float")
}
# 模型参数
W = tf.Variable(tf.random_normal([1]), name="weight")
b = tf.Variable(tf.zeros([1]), name="bias")
# 前向结构
z = tf.multiply(inputdict['x'], W)+ b
#反向优化
cost =tf.reduce_mean( tf.square(inputdict['y'] - z))
learning_rate = 0.01
optimizer = tf.train.GradientDescentOptimizer(learning_rate).minimize(cost) #Gradient descent
# 初始化变量
init = tf.global_variables_initializer()
#参数设置
training_epochs = 20
display_step = 2
# 启动session
with tf.Session() as sess:
  sess.run(init)
  # Fit all training data
  for epoch in range(training_epochs):
    for (x, y) in zip(train_X, train_Y):
      sess.run(optimizer, feed_dict={inputdict['x']: x, inputdict['y']: y})
    #显示训练中的详细信息
    if epoch % display_step == 0:
      loss = sess.run(cost, feed_dict={inputdict['x']: train_X, inputdict['y']:train_Y})
      print ("Epoch:", epoch+1, "cost=", loss,"W=", sess.run(W), "b=", sess.run(b))
      if not (loss == "NA" ):
        plotdata["batchsize"].append(epoch)
        plotdata["loss"].append(loss)
  print (" Finished!")
  print ("cost=", sess.run(cost, feed_dict={inputdict['x']: train_X, inputdict['y']: train_Y}), "W=", sess.run(W), "b=", sess.run(b))
  #图形显示
  plt.plot(train_X, train_Y, 'ro', label='Original data')
  plt.plot(train_X, sess.run(W) * train_X + sess.run(b), label='Fitted line')
  plt.legend()
  plt.show()

  plotdata["avgloss"] = moving_average(plotdata["loss"])
  plt.figure(1)
  plt.subplot(211)
  plt.plot(plotdata["batchsize"], plotdata["avgloss"], 'b--')
  plt.xlabel('Minibatch number')
  plt.ylabel('Loss')
  plt.title('Minibatch run vs. Training loss')

  plt.show()
print ("x=0.2,z=", sess.run(z, feed_dict={inputdict['x']: 0.2}))5 运行结果
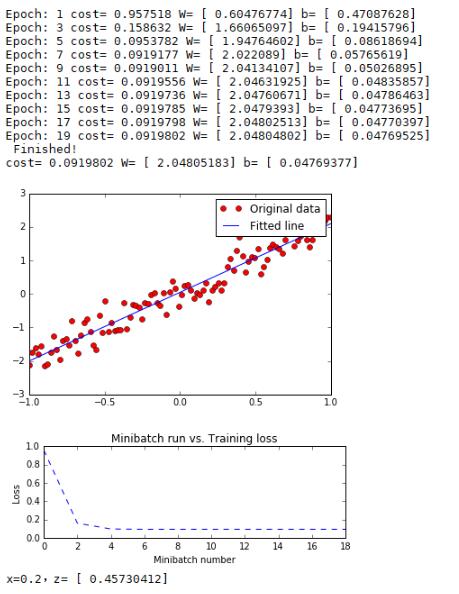
三 直接定义
1 实例
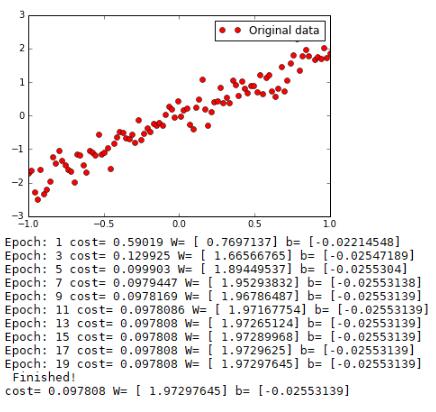
直接定义输入结果
2 解释
直接定义:将定义好的Python变量直接放到OP节点中参与输入的运算,将模拟数据的变量直接放到模型中训练。
3 代码
import tensorflow as tf
import numpy as np
import matplotlib.pyplot as plt
#生成模拟数据
train_X =np.float32( np.linspace(-1, 1, 100))
train_Y = 2 * train_X + np.random.randn(*train_X.shape) * 0.3 # y=2x,但是加入了噪声
#图形显示
plt.plot(train_X, train_Y, 'ro', label='Original data')
plt.legend()
plt.show()
# 创建模型
# 模型参数
W = tf.Variable(tf.random_normal([1]), name="weight")
b = tf.Variable(tf.zeros([1]), name="bias")
# 前向结构
z = tf.multiply(W, train_X)+ b
#反向优化
cost =tf.reduce_mean( tf.square(train_Y - z))
learning_rate = 0.01
optimizer = tf.train.GradientDescentOptimizer(learning_rate).minimize(cost) #Gradient descent
# 初始化变量
init = tf.global_variables_initializer()
#参数设置
training_epochs = 20
display_step = 2
# 启动session
with tf.Session() as sess:
  sess.run(init)
  # Fit all training data
  for epoch in range(training_epochs):
    for (x, y) in zip(train_X, train_Y):
      sess.run(optimizer)
    #显示训练中的详细信息
    if epoch % display_step == 0:
      loss = sess.run(cost)
      print ("Epoch:", epoch+1, "cost=", loss,"W=", sess.run(W), "b=", sess.run(b))
  print (" Finished!")
print ("cost=", sess.run(cost), "W=", sess.run(W), "b=", sess.run(b))4 运行结果
感谢你能够认真阅读完这篇文章,希望小编分享的“怎样定义TensorFlow输入节点”这篇文章对大家有帮助,同时也希望大家多多支持亿速云,关注亿速云行业资讯频道,更多相关知识等着你来学习!
亿速云「云服务器」,即开即用、新一代英特尔至强铂金CPU、三副本存储NVMe SSD云盘,价格低至29元/月。点击查看>>
免责声明:本站发布的内容(图片、视频和文字)以原创、转载和分享为主,文章观点不代表本网站立场,如果涉及侵权请联系站长邮箱:is@yisu.com进行举报,并提供相关证据,一经查实,将立刻删除涉嫌侵权内容。


 计算
计算 安全
安全 数据库
数据库 网络和加速
网络和加速 企业服务
企业服务


