PyAutoGUI是一个纯Python的GUI自动化工具,其目的是可以用程序自动控制鼠标和键盘操作,利用它可以实现自动化任务
本章介绍了许多不同函数,下面是快速的汇总参考:
moveTo(x,y)将鼠标移动到指定的 x、y 坐标。
moveRel (xOffset,yOffset)相对于当前位置移动鼠标。
dragTo(x,y)按下左键移动鼠标。
dragRel (xOffset,yOffset)按下左键,相对于当前位置移动鼠标。
click(x,y,button)模拟点击(默认是左键)。
rightClick() 模拟右键点击。
middleClick() 模拟中键点击。
doubleClick() 模拟左键双击。
mouseDown(x,y,button)模拟在 x、y 处按下指定鼠标按键。
mouseUp(x,y,button)模拟在 x、y 处释放指定键。
scroll (units)模拟滚动滚轮。正参数表示向上滚动,负参数表示向下滚动。
typewrite(message)键入给定消息字符串中的字符。
typewrite([key1,key2,key3])键入给定键字符串。
press(key)按下并释放给定键。
keyDown(key)模拟按下给定键。
keyUp(key)模拟释放给定键。
hotkey([key1,key2,key3])模拟按顺序按下给定键字符串,然后以相反的顺序释放。
screenshot() 返回屏幕快照的 Image 对象(参见第 17 章关于 Image 对象的信息)。
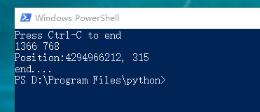
代码部分:
import os
import time
import pyautogui as pag
try:
 while True:
  print("Press Ctrl-C to end")
  screenWidth, screenHeight = pag.size() #获取屏幕的尺寸
  print(screenWidth,screenHeight)
  x,y = pag.position() #获取当前鼠标的位置
  posStr = "Position:" + str(x).rjust(4)+','+str(y).rjust(4)
  print(posStr)
  time.sleep(0.2)
  os.system('cls') #清楚屏幕
except KeyboardInterrupt:
print('end....')实际效果

import pyautogui
screenWidth, screenHeight = pyautogui.size()
currentMouseX, currentMouseY = pyautogui.position()
pyautogui.moveTo(100, 150)
pyautogui.click()
# 鼠标向下移动10像素
pyautogui.moveRel(None, 10)
pyautogui.doubleClick()
# 用缓动/渐变函数让鼠标2秒后移动到(500,500)位置
# use tweening/easing function to move mouse over 2 seconds.
pyautogui.moveTo(1800, 500, duration=2, tween=pyautogui.easeInOutQuad)
# 在每次输入之间暂停0.25秒
pyautogui.typewrite('Hello world!', interval=0.25) #输入文本
pyautogui.press('esc') #按下按键
pyautogui.keyDown('shift')
pyautogui.press(['left', 'left', 'left', 'left', 'left', 'left'])
pyautogui.keyUp('shift')
pyautogui.hotkey('ctrl', 'c')
以上这篇python 调用pyautogui 实时获取鼠标的位置、移动鼠标的方法就是小编分享给大家的全部内容了,希望能给大家一个参考,也希望大家多多支持亿速云。
亿速云「云服务器」,即开即用、新一代英特尔至强铂金CPU、三副本存储NVMe SSD云盘,价格低至29元/月。点击查看>>
免责声明:本站发布的内容(图片、视频和文字)以原创、转载和分享为主,文章观点不代表本网站立场,如果涉及侵权请联系站长邮箱:is@yisu.com进行举报,并提供相关证据,一经查实,将立刻删除涉嫌侵权内容。