这篇文章将为大家详细讲解有关小程序如何实现悬浮搜索框,小编觉得挺实用的,因此分享给大家做个参考,希望大家阅读完这篇文章后可以有所收获。
小程序实现悬浮搜索框的具体代码,具体内容如下
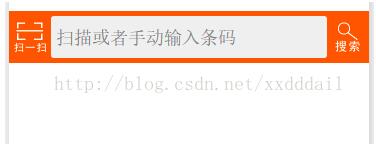
悬浮搜索框是当数据界面不断滚动时,搜索框始终悬浮在最上方。来看一下效果图
UI代码
 <view class="search-wrapper">
  <view class="search-panel">
   <view class="search-section">
    <view class="search-button-wrapper">
     <image class="search-button" src="/images/scan.png" bindtap="scan"></image>
    </view>
    <view class="search-input-wrapper ">
     <input bindinput="bindBarcodeInput" bindconfirm="query" bindfocus="bindBarcodeFocus" bindblur="bindBarcodeBlur" class="search-input" placeholder="扫描或者手动输入条码" value="{{barcode}}" confirm-type="search" />
    </view>
    <view class="search-button-wrapper">
     <image class="search-button" src="/images/search.png" bindtap="query"></image>
    </view>
   </view>
  </view>
  <view class="search-demo" hidden="{{hiddenDropdown}}">
   <button size="mini" bindtap="setDemoData">示例</button>
   <button size="mini" bindtap="clear" >清空</button>
  </view>
</view>样式
.search-wrapper {
 position: fixed;/*悬停搜索框的关键样式*/
 top: 0px;
 left: 0;
 width: 100%;
 z-index: 999;
}

.search-panel {
 background-color: #f50;
}

.search-section {
 padding: 5px 0px;
 display: flex;
 flex-direction: row;
}

.search-demo {
 padding: 5px;
 flex-direction: row;
 background-color: #eee;
 padding-left:42px;
 align-items: flex-start;
}

.search-input-wrapper {
 flex: 8;
 padding: 5px;
 background-color: #eee;
 border-radius: 3px;
}

.search-input {
 padding-top: 5px;
}

.search-clear {
 float: right;
 width: 32px;
 height: 32px;
 z-index: 998;
}

.search-button-wrapper {
 padding-left: 5px;
 padding-right: 5px;
 padding-top:5px;
}

.search-button {
 flex: 1;
 border: none !important;
 color: white !important;
 width: 32px;
 height: 32px;
}JS代码
//获取应用实例
var app = getApp()
Page({
  data: {
    barcode: "",
    hiddenLoading: true,
    hiddenData: true,
    hiddenDropdown: true,
    hiddenClear:true,
    demoData: 'XXXX',
    Product: {},
  },
  bindBarcodeInput: function (e) {
    this.setData({
      barcode: e.detail.value
    })
  },
  bindBarcodeFocus: function (e) {
    this.setData({
      hiddenDropdown: false,
      hiddenClear:false
    })
  },
  bindBarcodeBlur: function (e) {
    this.setData({
      hiddenDropdown: true,
      hiddenClear:true
    })
  },
  scan: function (e) {
    var that = this;
    wx.scanCode({
      success: function (res) {
        that.setData({
          barcode: res.result
        });
        that.query(e);
      },
      fail: function () {
        that.setData({
          barcode: "",
          hiddenData: true
        });
      },
      complete: function () {
        // complete
      }
    })
  },
  setDemoData: function (e) {
    this.setData({
      barcode: this.data.demoData
    });
  },
  clear: function (e) {
    this.setData({
      barcode: "",
      hiddenData: true
    });
  },
  query: function (e) {
    var url = "https://www.xxx.com/query";//查询数据的URL
    var that = this;
    if (that.data.barcode == undefined
      || that.data.barcode == null
      || that.data.barcode.length <= 0) {
      that.setData({ hiddenData: true });
      wx.showToast({
        title: '请输入条码',
        image: '/images/fail.png',
        duration: 2000
      });
      return;
    }
    wx.request({
      url: url,
      data: { barcode: that.data.barcode },
      method: 'GET',
      success: function (res) {
        var result = res.data;
        if (result.Status != 0) {
          that.setData({ hiddenData: true });
          wx.showToast({
            title: result.Message,
            image: '/images/fail.png',
            duration: 2000
          })
          return;
        }
        that.setData({ Product: result.Data, hiddenData: false });
        wx.showToast({
          title: "获取数据成功",
          image: '/images/ok.png',
          duration: 2000
        })
      },
      fail: function (e) {
        var toastText = '获取数据失败' + JSON.stringify(e);
        that.setData({
          hiddenLoading: !that.data.hiddenLoading,
          hiddenData: true
        });
        wx.showToast({
          title: toastText,
          icon: '',
          duration: 2000
        })
      },
      complete: function () {
        // complete
      }
    })
  }
})用到的几个图片


关于“小程序如何实现悬浮搜索框”这篇文章就分享到这里了,希望以上内容可以对大家有一定的帮助,使各位可以学到更多知识,如果觉得文章不错,请把它分享出去让更多的人看到。
免责声明:本站发布的内容(图片、视频和文字)以原创、转载和分享为主,文章观点不代表本网站立场,如果涉及侵权请联系站长邮箱:is@yisu.com进行举报,并提供相关证据,一经查实,将立刻删除涉嫌侵权内容。


 计算
计算 安全
安全 数据库
数据库 网络和加速
网络和加速 企业服务
企业服务


