这篇文章主要介绍如何使用Vue实现类似Spring官网图片滑动效果,文中介绍的非常详细,具有一定的参考价值,感兴趣的小伙伴们一定要看完!

可以看到, 随着鼠标的滑动,绿色图片和灰色图片可以无缝的在鼠标俩两边切换显示。
显示这样的效果其实很简单,利用固定定位保证两张图片在同一位置下, 我们可以将灰色图片当做背景层图片,然后根据获取到的实时X轴坐标, 动态改变绿色图片的宽度, 隐藏超出X轴坐标的部分, 就可以达到这样的效果, 简单来说, 这效果就是动态改变上层图片的宽度。
实现效果:
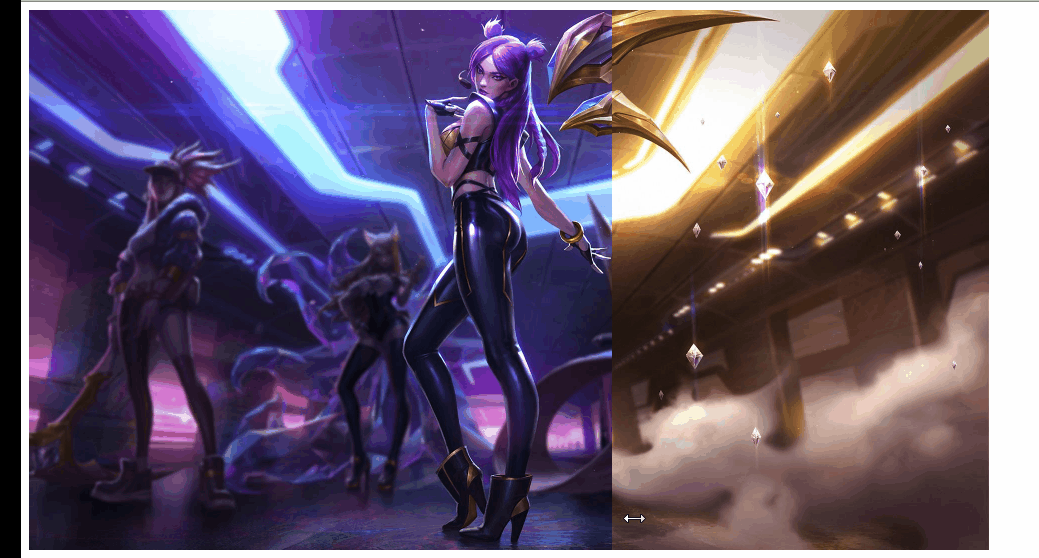
我这边选择了两张同样大小的KDA卡莎的图片, 将金色图作为背景图,暗黑图作为左侧图, 用了Vue的mousemove来获取X轴坐标值, 并通过监听坐标轴变化来实时改变左侧图片的宽度。
鼠标部分, 简化了Spring官网上鼠标位置出轴承的显示, 采用了cursor: ew-resize样式, 使得鼠标看起来可以左右滑动。
代码粘贴
<template>
  <div class="scroll">
    <div class="container" @mousemove="mousemove">
      <div class="base"></div>
      <div class="left" ref="left">
        <img src="../../static/image/kda-karsa.jpg" alt="">
      </div>
    </div>
  </div>
</template>
<script>
export default {
  data() {
    return {
      posX: 0
    }
  },
  methods: {
    mousemove(e) {
      // 获取x 坐标
      this.posX = e.offsetX
    }
  },
  watch: {
    posX(curX) {
      this.$refs.left.style.width = `${curX}px`
    }
  }
}
</script>
<style lang="scss" scoped>
.scroll{
  .container{
    width: 960px;
    height: 540px;
    background-color: #cccccc;
    position: relative;
    cursor: ew-resize;
    .base{
      position: absolute;
      width: 960px;
      height: 540px;
      top: 0;
      left: 0;
      background: url('../../static/image/kda-karsa-golden.jpg') no-repeat;
      background-size: 100%;
    }
    .left{
      position: absolute;
      width: 480px;
      height: 540px;
      overflow: hidden;
      top: 0;
      left: 0;
      img{
       width: 960px;
       height: 540px;
      }
    }
  }
}
</style>以上是“如何使用Vue实现类似Spring官网图片滑动效果”这篇文章的所有内容,感谢各位的阅读!希望分享的内容对大家有帮助,更多相关知识,欢迎关注亿速云行业资讯频道!
免责声明:本站发布的内容(图片、视频和文字)以原创、转载和分享为主,文章观点不代表本网站立场,如果涉及侵权请联系站长邮箱:is@yisu.com进行举报,并提供相关证据,一经查实,将立刻删除涉嫌侵权内容。


 计算
计算 安全
安全 数据库
数据库 网络和加速
网络和加速 企业服务
企业服务


